2024 CHEVROLET CORVETTE oil capacities
[x] Cancel search: oil capacitiesPage 161 of 362
Chevrolet Corvette Owner Manual (GMNA-Localizing-U.S./Canada/Mexico-
17272984) - 2024 - CRC - 2/20/23
160 Driving and Operating
Track Events and Competitive
Driving
All Z06 models, E-Ray models equipped with
the ZER performance package, and Stingray
models equipped with Z51 performance
package can be used for track events and
competitive driving. For additional details
on vehicle track preparation, see
Chevrolet.com > Corvette Experience >
Guides > Track Prep Guide.
{Danger
High-performance features are intended
for use only on closed tracks by
experienced and qualified drivers and
should not be used on public roads.
High-speed driving, aggressive cornering,
hard braking, and other high-performance
driving can be dangerous. Improper driver
inputs for the conditions may result in
loss of control of the vehicle, which could
injure or kill you or others. Always drive
safely.
Participating in track events or other
competitive driving without following the
instructions provided may affect the vehicle
warranty. See the warranty manual before using the vehicle for racing or other
competitive driving. See
Performance Driving
0 206.
{Warning
Some of the adjustments and procedures
specified in this section may require
specialized skill, training, and equipment.
Failure to perform these procedures
properly could cause malfunction,
potentially resulting in death, personal
injury, or damage to the vehicle or
property. Do not attempt to perform
these adjustments or procedures unless
properly qualified.
Be sure to follow all service procedures
before driving the vehicle at track events or
competitively. See New Vehicle Break-In
0 177.
{Warning
Prior to each track event and again
before returning to public roads, tighten
the wheel nuts with a torque wrench to
the proper torque specification. Wheel
nuts that are improperly or incorrectly
(Continued)
Warning (Continued)
tightened can cause the wheels to
become loose or come off, resulting in a
crash. SeeCapacities and Specifications
0 325 for wheel nut torque specifications.
Engine Sound Management Setting
Caution
Do not place the vehicle in Engine Sound
Management–Stealth mode. Damage
could result to exhaust valve actuators.
Engine Oil
Caution
If the vehicle is used for track events and
competitive driving, the engine may use
more oil than it would with normal use.
Low oil levels can damage the engine.
Check the oil level often and maintain
the proper level. See Engine Oil (5.5L LT6
Engine) 0246 or
Engine Oil (6.2L LT2 Engine) 0249.
Page 248 of 362
Chevrolet Corvette Owner Manual (GMNA-Localizing-U.S./Canada/Mexico-
17272984) - 2024 - CRC - 2/20/23
Vehicle Care 247
4. Remove the dipstick again and read thelevel on the cross-hatched area. Re-insert
the dipstick and push it all the way in
until it stops.
5. Turn the engine off.
When to Add Engine Oil
If the oil is below the cross-hatched area at
the tip of the dipstick, add 1 L (1 qt) of the
recommended oil through the oil fill cap
opening in the oil tank fill tube and then
recheck the level. See “Selecting the Right
Engine Oil” later in this section for the type
of oil to use. For engine oil crankcase
capacity, see Capacities and Specifications
0 325.
Caution
Do not add too much oil. Oil levels above
or below the acceptable operating range
shown on the dipstick are harmful to the
engine. If the oil level is above the
operating range (i.e., the engine has so
much oil that the oil level gets above the
cross-hatched area that shows the proper
operating range), the engine could be
damaged. Drain the excess oil or limit
driving of the vehicle, and seek a service
professional to remove the excess oil.
See Engine Compartment Overview 0238 for
the location of the external engine oil tank
dipstick and fill cap.
Add enough oil to put the level somewhere
in the proper operating range. Push the
dipstick all the way back into the oil tank
tube when finished.
Changing the Engine Oil and Filter
The vehicle requires a special procedure
when changing the engine oil and filter.
Follow this procedure closely.
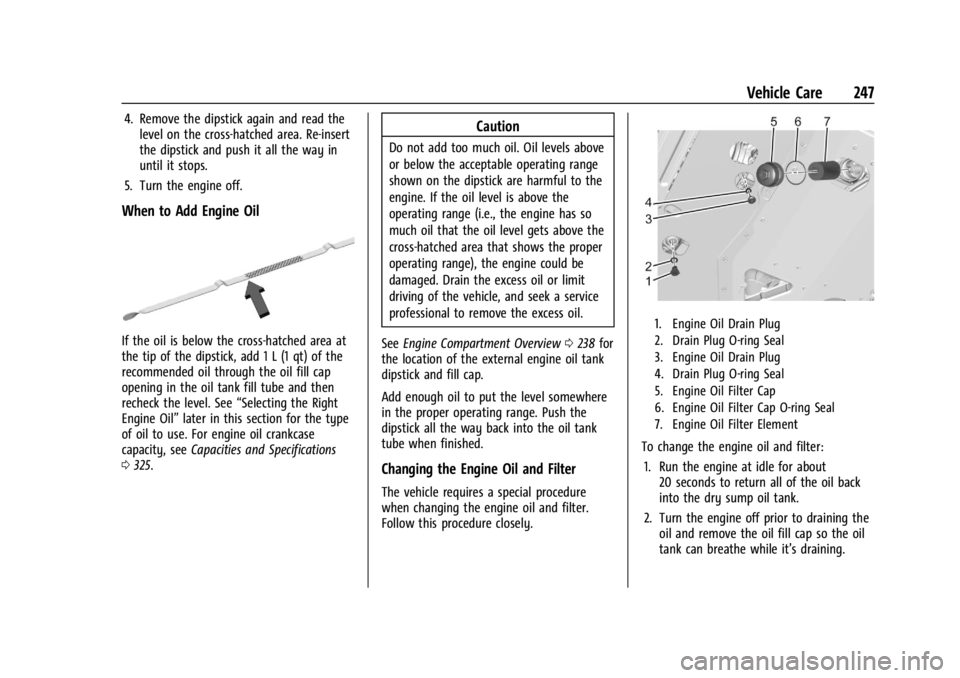
1. Engine Oil Drain Plug
2. Drain Plug O-ring Seal
3. Engine Oil Drain Plug
4. Drain Plug O-ring Seal
5. Engine Oil Filter Cap
6. Engine Oil Filter Cap O-ring Seal
7. Engine Oil Filter Element
To change the engine oil and filter:
1. Run the engine at idle for about 20 seconds to return all of the oil back
into the dry sump oil tank.
2. Turn the engine off prior to draining the oil and remove the oil fill cap so the oil
tank can breathe while it’s draining.
Page 249 of 362
Chevrolet Corvette Owner Manual (GMNA-Localizing-U.S./Canada/Mexico-
17272984) - 2024 - CRC - 2/20/23
248 Vehicle Care
3. Remove the engine oil drain plug (1)from the bottom of the engine oil tank.
Drain plug removal will let the oil drain
from the external oil tank. Allow the oil
to drain.
4. Inspect the drain plug O-ring seal (2) and replace if it is damaged. Reinstall the
drain plug into the oil tank by rotating it
to a stop.
5. Remove the engine oil drain plug (3) from the bottom of the engine
crankcase. Drain plug removal will let the
residual oil drain from crankcase sump.
Allow the oil to drain.
6. Inspect the drain plug O-ring seal (4) and replace if it is damaged. Reinstall the
drain plug into the crankcase sump and
tighten them to 25 Y(18 lb ft).
7. Remove the engine oil filter cap (5) and filter (7) and allow the oil to drain.
8. Install the engine oil filter cap (5) with a new engine oil filter cap seal ring (6) and
the new oil filter element (7) and hand
tighten. See Maintenance Replacement
Parts 0321 for the correct filter.
Tighten the engine oil filter cap (5) to
25 Y (18 lb ft). 9. Add oil to the oil tank through the
opening in the oil tank. See Capacities
and Specifications 0325.
10. Install the oil fill cap and insert the dipstick until fully seated to a stop,
if removed.
{Warning
To help avoid personal injury and/or
engine damage, always install the engine
oil dipstick and oil fill cap until fully
seated to a stop. If not fully seated, oil
could escape on to hot exhaust parts and
cause a fire.
11. Start the engine and check the oil level as described under "Checking the Engine
Oil." previously in this section.
Selecting the Right Engine Oil
Selecting the right engine oil depends on
both the proper oil specification and the
viscosity grade. See Recommended Fluids
and Lubricants 0320.
Specification
Use engine oils that meet the dexosR
Performance Engine Oil specification.
Engine oils that have been approved by GM
as meeting the dexosR specification are
marked with the dexosR approved logo. See
www.gmdexos.com.
GM recommends Mobil 1 engine oils that
show the dexosR approved logo.
Caution
Failure to use the recommended engine
oil or equivalent can result in engine
damage not covered by the vehicle
warranty.
Viscosity Grade
Use SAE 5W-50 viscosity grade engine oil.
When selecting an oil of the appropriate
viscosity grade, it is recommended to select
an oil of the correct specification. See
“Specification” previously in this section.
Page 251 of 362
Chevrolet Corvette Owner Manual (GMNA-Localizing-U.S./Canada/Mexico-
17272984) - 2024 - CRC - 2/20/23
250 Vehicle Care
and there could be no engine oil on the
dipstick. This is normal since the dipstick is
designed to read the engine oil level only
after the engine has run long enough to
reach normal operating temperature. Do not
add engine oil based on cold engine dipstick
readings. The engine oil level on the dipstick
must be checked while the engine is running
at idle.
To check the engine oil:1. Turn the engine on and let it warm up to at least 80 °C (175 °F).
2. Once the engine is warm, check the oil while the engine is running at idle.
{Warning
The engine oil dipstick handle may be
hot; it could burn you. Use a towel or
glove to touch the dipstick handle.
3. Remove the dipstick and wipe it with a clean lint-free paper towel or a cloth.
Re-insert the dipstick and push it all the
way in until it stops.
4. Remove the dipstick again and read the level on the cross-hatched area. Re-insert
the dipstick and push it all the way in
until it stops. 5. Turn the engine off.
When to Add Engine Oil
If the oil is below the cross-hatched area at
the tip of the dipstick, add 1 L (1 qt) of the
recommended oil through the oil fill cap
opening in the oil tank fill tube and then
recheck the level. See
“Selecting the Right
Engine Oil” later in this section for the type
of oil to use. For engine oil crankcase
capacity, see Capacities and Specifications
0 325.
Caution
Do not add too much oil. Oil levels above
or below the acceptable operating range
shown on the dipstick are harmful to the
engine. If the oil level is above the
operating range (i.e., the engine has so
much oil that the oil level gets above the
cross-hatched area that shows the proper
operating range), the engine could be
(Continued)
Caution (Continued)
damaged. Drain the excess oil or limit
driving of the vehicle, and seek a service
professional to remove the excess oil.
See Engine Compartment Overview 0238 for
the location of the external engine oil tank
dipstick and fill cap.
Add enough oil to put the level somewhere
in the proper operating range. Push the
dipstick all the way back into the oil tank
tube when finished.
Changing the Engine Oil and Filter
The vehicle requires a special procedure
when changing the engine oil and filter.
Follow this procedure closely.
Page 252 of 362
Chevrolet Corvette Owner Manual (GMNA-Localizing-U.S./Canada/Mexico-
17272984) - 2024 - CRC - 2/20/23
Vehicle Care 251
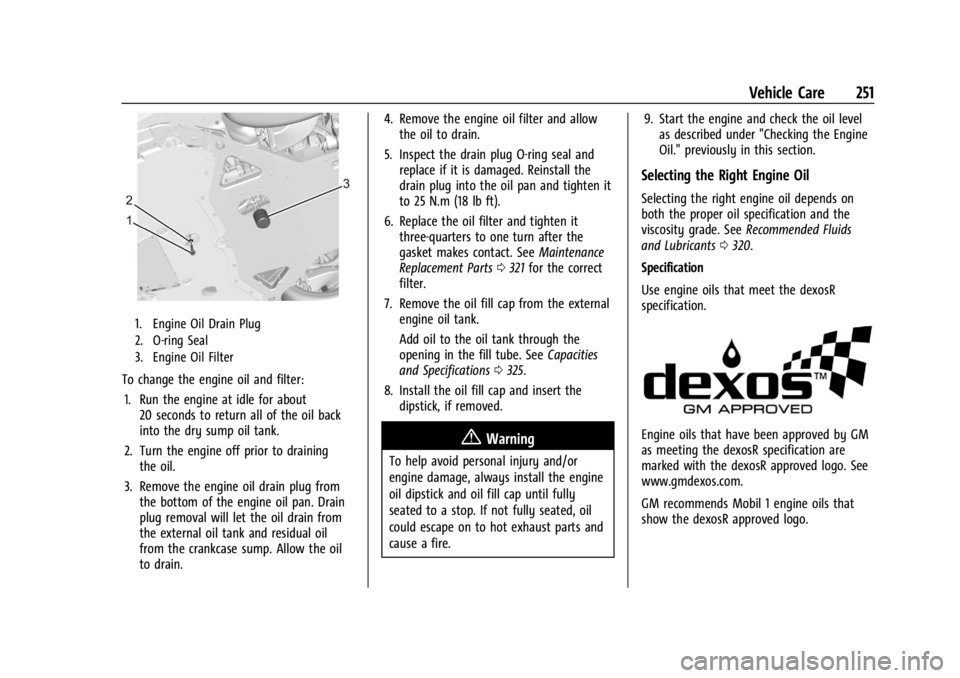
1. Engine Oil Drain Plug
2. O-ring Seal
3. Engine Oil Filter
To change the engine oil and filter:1. Run the engine at idle for about 20 seconds to return all of the oil back
into the dry sump oil tank.
2. Turn the engine off prior to draining the oil.
3. Remove the engine oil drain plug from the bottom of the engine oil pan. Drain
plug removal will let the oil drain from
the external oil tank and residual oil
from the crankcase sump. Allow the oil
to drain. 4. Remove the engine oil filter and allow
the oil to drain.
5. Inspect the drain plug O-ring seal and replace if it is damaged. Reinstall the
drain plug into the oil pan and tighten it
to 25 N.m (18 lb ft).
6. Replace the oil filter and tighten it three-quarters to one turn after the
gasket makes contact. See Maintenance
Replacement Parts 0321 for the correct
filter.
7. Remove the oil fill cap from the external engine oil tank.
Add oil to the oil tank through the
opening in the fill tube. See Capacities
and Specifications 0325.
8. Install the oil fill cap and insert the dipstick, if removed.
{Warning
To help avoid personal injury and/or
engine damage, always install the engine
oil dipstick and oil fill cap until fully
seated to a stop. If not fully seated, oil
could escape on to hot exhaust parts and
cause a fire. 9. Start the engine and check the oil level
as described under "Checking the Engine
Oil." previously in this section.
Selecting the Right Engine Oil
Selecting the right engine oil depends on
both the proper oil specification and the
viscosity grade. See Recommended Fluids
and Lubricants 0320.
Specification
Use engine oils that meet the dexosR
specification.
Engine oils that have been approved by GM
as meeting the dexosR specification are
marked with the dexosR approved logo. See
www.gmdexos.com.
GM recommends Mobil 1 engine oils that
show the dexosR approved logo.
Page 327 of 362

Chevrolet Corvette Owner Manual (GMNA-Localizing-U.S./Canada/Mexico-
17272984) - 2024 - CRC - 2/20/23
326 Technical Data
ApplicationCapacities
Metric English
Engine Oil with Filter
I5.5L V8 Engine (LT6) –Z06 7.6 L
8.0 qt
I6.2L V8 Engine (LT2) –Stingray and E-Ray 7.1 L
7.5 qt
Front Hybrid Drive Unit (E-Ray)** 3.0 L3.2 qt
Fuel Tank 70.0 L18.5 gal
Wheel Nut Torque 190Y 140 lb ft
All capacities are approximate. When adding, be sure to fill to the approximate level, as recommended in this manual. Recheck fluid level
after filling
*Engine cooling system capacity values are based on the entire cooling system and its components.
** After draining.