2023 TOYOTA VENZA HYBRID ESP
[x] Cancel search: ESPPage 333 of 560
3335-1. Using the air conditioning system and defogger
5
Interior features
■Changing the air conditioning
control panel touch switch
response
The amount of time takes for a
switch to respond can be changed
through the following operations:
The air conditioning system cannot
be operated while these operations
are performed.
1 Press and hold both the fan
speed decrease switch and auto-
matic mode switch at the same
time for approximately 3 sec-
onds.
A number from “01” to “05” will
be displayed on the driver’s side
temperature section in the
screen.
2 Each time rear window and out-
side rear view mirror defoggers
switch is pressed, the response
time changes as follows:
01 0203 04 05
The smaller the number the quicker
the response time becomes, and
the larger the number the slower the
response time becomes. If touch
operations are not performed for
approximately 5 seconds with the
desired setting displayed, the
screen returns to the normal driver’s
side temperature display and the
setting change completes. After the
setting change completes, all dis-
plays in the monitor section will illu-
minate for a short time. Do not turn
off the power switch during this time.
Setting contents will be erased.
■Turning the air conditioning
control panel touch switch
operation sounds on or off
Operation sounds produced when a
switch is touched can be turned on
or off through the following opera-
tions:
The air conditioning system cannot
be operated while these operations
are performed. 1
Press and hold both the fan
speed increase switch and
“OFF” switch at the same time
for approximately 3 seconds.
“On” or “OFF” will be displayed
on the driver’s side temperature
section in the screen.
2 Each time rear window and out-
side rear view mirror defoggers
switch is pressed, the function
switches between on and off.
If touch operations are not per-
formed for approximately 5 sec-
onds with “On” or “OFF” displayed,
the screen returns to the normal
driver’s side temperature display
and the setting change completes.
After the setting change completes,
all displays in the monitor section
will illuminate for a short time. Do
not turn off the power switch during
this time. Setti ng contents will be
erased.
■Customization
Some functions can be customized.
(Customizable features: P.513)
WARNING
■To prevent the windshield
from fogging up
Do not use the windshield defog-
ger switch during cool air opera-
tion in extremely humid weather.
The difference between the tem-
perature of the outside air and
that of the windshield can cause
the outer surface of the wind-
shield to fog up, blocking your
vision.
■When the outside rear view
mirror defoggers are operat-
ing
Do not touch the rear view mirror
surfaces when the outside rear
view mirror def oggers are on.
Page 362 of 560
3625-4. Using the other interior features
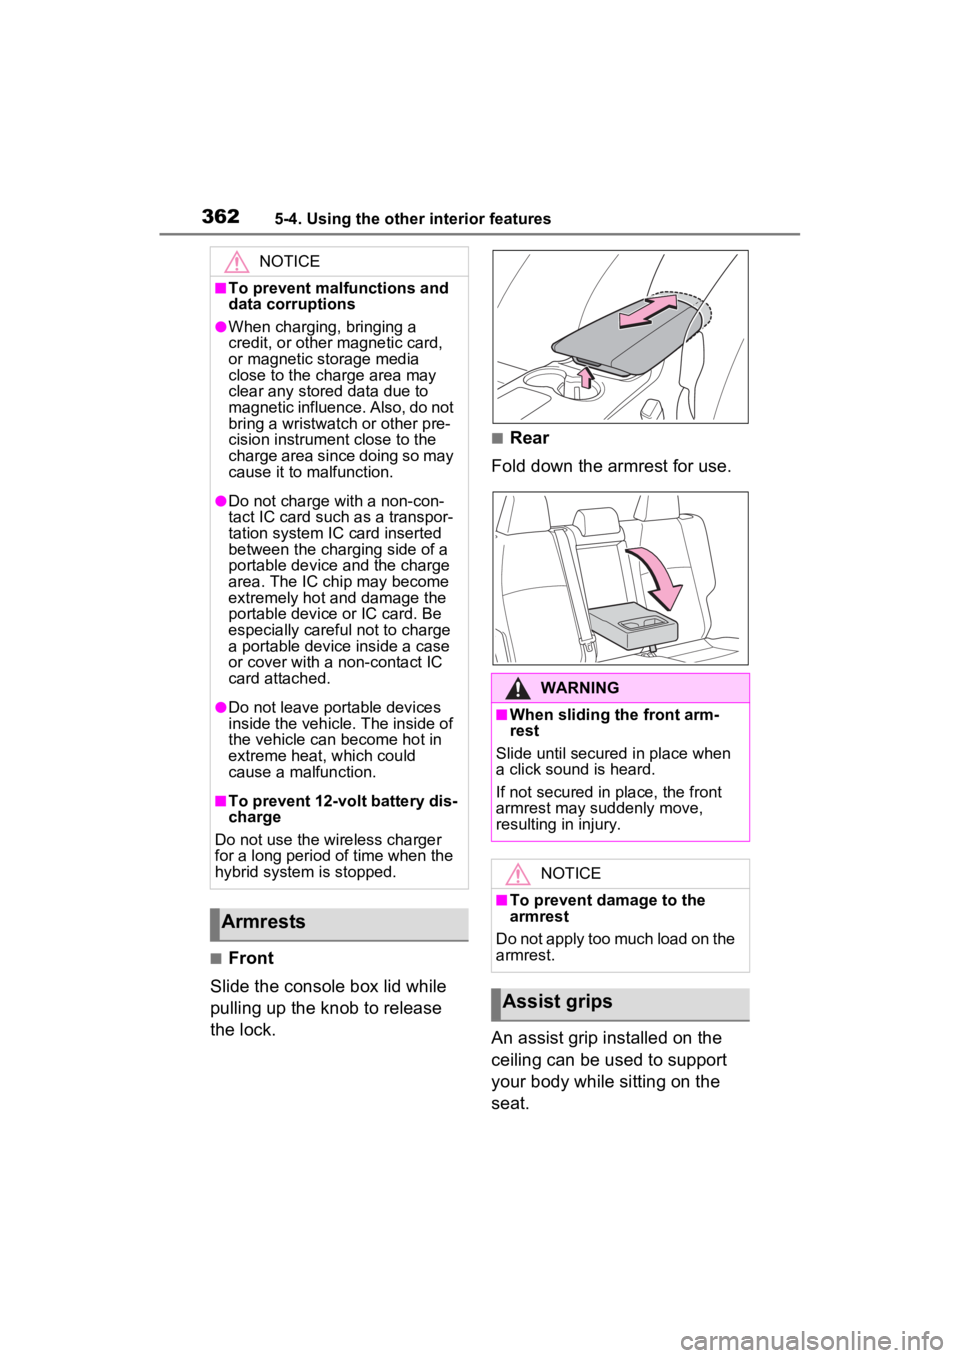
■Front
Slide the console box lid while
pulling up the knob to release
the lock.
■Rear
Fold down the armrest for use.
An assist grip installed on the
ceiling can be used to support
your body while sitting on the
seat.
NOTICE
■To prevent malfunctions and
data corruptions
●When charging, bringing a
credit, or other magnetic card,
or magnetic storage media
close to the charge area may
clear any stored data due to
magnetic influence. Also, do not
bring a wristwatch or other pre-
cision instrument close to the
charge area since doing so may
cause it to malfunction.
●Do not charge with a non-con-
tact IC card such as a transpor-
tation system IC card inserted
between the charging side of a
portable device and the charge
area. The IC chip may become
extremely hot and damage the
portable device or IC card. Be
especially careful not to charge
a portable device inside a case
or cover with a non-contact IC
card attached.
●Do not leave portable devices
inside the vehicle. The inside of
the vehicle can become hot in
extreme heat, which could
cause a malfunction.
■To prevent 12-volt battery dis-
charge
Do not use the wireless charger
for a long period of time when the
hybrid system is stopped.
Armrests
WARNING
■When sliding the front arm-
rest
Slide until secured in place when
a click sound is heard.
If not secured in place, the front
armrest may suddenly move,
resulting in injury.
NOTICE
■To prevent damage to the
armrest
Do not apply too much load on the
armrest.
Assist grips
Page 376 of 560
3766-1. Maintenance and care
Remove dirt and dust using a
vacuum cleaner. Wipe dirty
surfaces with a cloth damp-
ened with lukewarm water.
If dirt cannot be removed,
wipe it off with a soft cloth
dampened with neutral deter-
gent diluted to approximately
1%.
Wring out any excess water
from the cloth and thoroughly
wipe off remaining traces of
detergent and water.
■Shampooing the carpets
There are several commercial foam-
ing-type cleaners available. Use a
sponge or brush to apply the foam.
Rub in overlapping circles. Do not
use water. Wipe dirty surfaces and
let them dry. Excellent results are
obtained by keeping the carpet as
dry as possible.
■Handling the seat belts
Clean with mild soap and lukewarm
water using a clot h or sponge. Also
check the belts periodically for
excessive wear, fraying or cuts.
Cleaning a nd protect-
ing the vehicle interior
Perform cleaning in a man-
ner appropriate to each
component and its material.
Protecting the vehicle
interior
WARNING
■Water in the vehicle
●Do not splash or spill liquid in
the vehicle, such as on the floor,
on the rear seats, in the hybrid
battery (traction battery) air
intake vent or in the luggage
compartment. ( P.78)
Doing so may cause the hybrid
battery, electrical components,
etc. to malfunction or catch fire.
●Do not get any of the SRS com-
ponents or wiring in the vehicle
interior wet.
( P.34)
An electrical ma lfunction may
cause the airbags to deploy or
not function properly, resulting
in death or serious injury.
●Do not let the wireless charger
( P.355) get wet. Failure to do
so may cause t he charger to
become hot and cause burns or
could cause electric shock
resulting in death or serious
injury.
■Cleaning the interior (espe-
cially instrument panel)
Do not use polish wax or polish
cleaner. The instrument panel
may reflect off the windshield,
obstructing the driver’s view and
leading to an accident, resulting in
death or serious injury.
Page 377 of 560
3776-1. Maintenance and care
6
Maintenance and careRemove dirt using a water-
dampened soft cloth or syn-
thetic chamois.
Wipe the surface with a dry,
soft cloth to remove any
remaining moisture.
■Cleaning the areas with satin-
finish metal accents
The metal areas use a layer of real
metal for the surface. It is necessary
to clean them regularly. If dirty areas
are left uncleaned for long periods
of time, they may be difficult to
clean.
Remove dirt and dust using a
NOTICE
■Cleaning detergents
●Do not use the following types
of detergent, as they may dis-
color the vehicle interior or
cause streaks or damage to
painted surfaces:
• Non-seat portions: Organic sub- stances such as benzene or
gasoline, alkaline or acidic solu-
tions, dye, and bleach
• Seats: Alkaline or acidic solu- tions, such as thinner, benzene,
and alcohol
●Do not use polish wax or polish
cleaner. The instrument panel’s
or other interior part’s painted
surface may be damaged.
■Preventing damage to leather
surfaces
Observe the following precautions
to avoid damage to and deteriora-
tion of leather surfaces:
●Remove any dust or dirt from
leather surfaces immediately.
●Do not expose the vehicle to
direct sunlight for extended peri-
ods of time. Park the vehicle in
the shade, especially during
summer.
●Do not place items made of
vinyl, plastic, or containing wax
on the upholstery, as they may
stick to the leather surface if the
vehicle interior heats up signifi-
cantly.
■Water on the floor
Do not wash the vehicle floor with
water.
Vehicle systems such as the
audio system may be damaged if
water comes into contact with
electrical components such as the
audio system above or under the
floor of the vehicle. Water may
also cause the body to rust.
■When cleaning the inside of
the windshield
Do not allow glass cleaner to con-
tact the lens. Also, do not touch
the lens. ( P.234)
■Cleaning the inside of the rear
window
●Do not use a gla ss cleaner to
clean the rear window, as this
may cause damage to the rear
window defogger heater wires
or antenna. Use a cloth damp-
ened with lukewarm water to
gently wipe the window clean.
Wipe the window in strokes run-
ning parallel to the heater wires
or antenna.
●Be careful not to scratch or
damage the heater wires or
antenna.
Cleaning the areas with
satin-finish metal accents
(if equipped)
Cleaning the leather areas
Page 379 of 560
3796-2. Maintenance
6
Maintenance and care
6-2.Maintenance
■Repair and replacement
It is recommended that genuine
Toyota parts be used for repairs to
ensure performanc e of each sys-
tem. If non-Toyota p arts are used in
replacement or if a repair shop other
than a Toyota dealer performs
repairs, confirm the warranty cover-
age.
■Allow inspection and repairs to
be performed by a Toyota
dealer
●Toyota technicians are well-
trained specialists and are kept up
to date with the latest service
information. They are well
informed about the operations of
all systems on your vehicle.
●Keep a copy of the repair order. It
proves that the maintenance that
has been performed is under war-
ranty coverage. If any problem
should arise while your vehicle is
under warranty, your Toyota
dealer will promptly take care of it.
General maintenance should be
performed on a daily basis. This
can be done by yourself or by a
Toyota dealer.
Scheduled maintenance should
be performed at specified inter-
vals according to the mainte-
nance schedule.
For details about maintenance
items and schedules, refer to the
“Scheduled Maintenance Guide” or
“Owner’s Manual Supplement”.
Maintenance require-
ments
To ensure safe and econom-
ical driving, day-to-day care
and regular maintenance
are essential. It is the
owner’s responsibility to
perform regular checks.
Toyota recommends the fol-
lowing maintenance:
WARNING
■If your vehicle is not properly
maintained
Improper maintenance could
result in serious damage to the
vehicle and possible death or seri-
ous injury.
■Handling of the 12-volt bat-
tery
●Engine exhaust, some of its
constituents, and a wide variety
of automobile components con-
tain or emit chemicals known to
the State of California to cause
cancer and birth defects and
other reproductive harm. Work
in a well ventilated area.
●Oils, fuels and fluids contained
in vehicles as well as waste pro-
duced by component wear con-
tain or emit chemicals known to
the State of California to cause
cancer and birth defects or
other reproductive harm. Avoid
exposure and wash any
affected area immediately.
●12-volt battery posts, terminals
and related accessories con-
tain lead and lead compounds
which are known to cause brain
damage. Wash your hands after
handling. ( P.397)
General maintenance
Scheduled maintenance
Page 450 of 560
4507-2. Steps to take in an emergency
As an added safety feature, your
vehicle has been equipped with a
tire pressure m onitoring system
(TPMS-tire pressure warning sys-
tem) that illuminates a low tire
pressure telltale (tire pressure
warning light) when one or more
of your tires is significantly under-
inflated. Accordingly, when the
low tire pressure telltale (tire pres-
sure warning light) illuminates,
you should stop and check your
tires as soon as possible, and
inflate them to the proper pres-
sure. Driving on a significantly
under-inflated tire causes the tire
to overheat and can lead to tire
failure. Under-inflation also
reduces fuel efficiency and tire
tread life, and may affect the vehi-
cle’s handling and stopping abil-
ity.
Please note that the TPMS (tire
pressure warning system) is not a
substitute for pro per tire mainte-
nance, and it is the driver’s
responsibility to maintain correct
tire pressure, even if under-infla-
tion has not reach ed the level to
trigger illumination of the TPMS
low tire pressure telltale (tire pres-
sure warning light).Your vehicle has also been
equipped with a TPMS (tire pres-
sure warning system) malfunc-
tion indicator to indicate when the
system is not operating properly.
The TPMS (tire pressure warning
system) malfunction indicator is
combined with the low tire pres-
sure telltale (tire pressure warning
light). When the system detects a
malfunction, the te lltale will flash
for approximately one minute and
then remain continuously illumi-
nated. This sequence will con-
tinue upon subsequent vehicle
start-ups as long as the malfunc-
tion exists. When the malfunction
indicator is illuminated, the sys-
tem may not be ab le to detect or
signal low tire pressure as
intended.
TPMS (tire pressure warning sys-
tem) malfunctions may occur for a
variety of reasons, including the
installation of replacement or
alternate tires or wheels on the
vehicle that prevent the TPMS
(tire pressure warning system)
from functioning properly. Always
check the TPMS (tire pressure
warning system) malfunction tell-
tale after replacing one or more
tires or wheels on your vehicle to
ensure that the replacement or
alternate tires and wheels allow
the TPMS (tire pressure warning
system) to continue to function
properly.
NOTICE
■To ensure the tire pressure
warning system operates
properly
Do not install tires with different
specifications or manufacturers
as the tire pressure warning sys-
tem may not operate properly.
Page 453 of 560

4537-2. Steps to take in an emergency
7
When trouble arises
■If “Traction Battery Needs to be
Protected Shift into P to
Restart” is shown
This message is displayed when the
hybrid battery (traction battery)
charge has become extremely low
because the shift lever has been left
in N for a certain amount of time.
When operating the vehicle, shift to
P and restart the hybrid system.
■If “Shift is in N Release Acceler-
ator Before Shif ting” is shown
Message is displayed when the
accelerator pedal has been
depressed and the shift lever is in N.
Release the accelerator pedal and
shift the shift lever to D or R.
■If “Press Brake when Vehicle is
Stopped Hybrid System may
Overheat” is shown
Message is displayed when the
accelerator pedal is depressed to
maintain the vehicle position when
stopped on a upward slope, etc.
If this continues, the hybrid system
may overheat.
Release the accelerator pedal and
depress the brake pedal.
■If “Auto Power OFF to Conserve
Battery” is shown
Power was turned off due to the
automatic power off function.
Next time when starting the hybrid
system, operate th e hybrid system
for approximatel y 5 minutes to
recharge the 12-volt battery.
■If “Engine Oil Level Low Add or
Replace” is displayed
The engine oil level may be low.
Check the level of the engine oil,
and add engine oil if necessary.
This message may be displayed if
the vehicle is sto pped on a slope.
Move the vehicle to a level surface
and check if the message disap-
pears.
■If “Maintenance Required
Soon” is shown
Indicates that all maintenance
according to the driven distance on
the maintenance schedule
* should
be performed soon.
Comes on approximately 4500
miles (7200 km) after the message
has been reset.
If necessary, perform maintenance.
Please reset the m essage after the
maintenance is performed.
( P.380)
*: Refer to the separate “Scheduled
Maintenance Guide” or “Owner’
Manual Supplement” for the main-
tenance interval applicable to your
vehicle.
■If “Maintenance Required Visit
Your Dealer” is shown
Indicates that all maintenance is
required to correspond to the driven
distance on the maintenance sched-
ule
*.
Comes on approximately 5000
miles (8000 km) after the message
has been reset. (The indicator will
not work properly unless the mes-
sage has been reset.)
Perform the necessary mainte-
nance. Please reset the message
after the maintenance is performed.
( P.380)
*: Refer to the separate “Scheduled
Maintenance Guide” or “Owner’
Manual Supplement” for the main-
tenance interval applicable to your
vehicle.
■If “Engine Maintenance
Required Visit Your Dealer” is
shown
The engine or an engine component
is malfunctioning. Have the vehicle
inspected by your Toyota dealer
immediately.
Page 471 of 560
4717-2. Steps to take in an emergency
7
When trouble arises
was in before the 12-volt battery
was discharged. Before discon-
necting the 12-volt battery, turn
the power switch off.
If you are unsure what mode the
power switch was in before the
12-volt battery discharged, be
especially careful when recon-
necting the 12-volt battery.
●Some systems may require initial-
ization. (P.515)
■When replacing the 12-volt bat-
tery
●Use a 12-volt battery that con-
forms to European regulations.
●Use a battery that the case size is
same as the previous one (LN2),
20 hour rate capacity (20HR) is
equivalent (55Ah) or greater, and
performance rating (CCA) is
equivalent (345A) or greater.
• If the sizes differ, the 12-volt bat-
tery cannot be properly secured.
• If the 20 hour rate capacity is low,
even if the time period where the
vehicle is not used is a short time,
the 12-volt battery may discharge
and hybrid system may not be
able to start.
●Use a ventilation t ype calcium bat-
tery
●Use a 12-volt battery with a han-
dle. If a 12-volt b attery without a
handle is used, removal is more
difficult.
●When removing the 12-volt bat-
tery: P.398
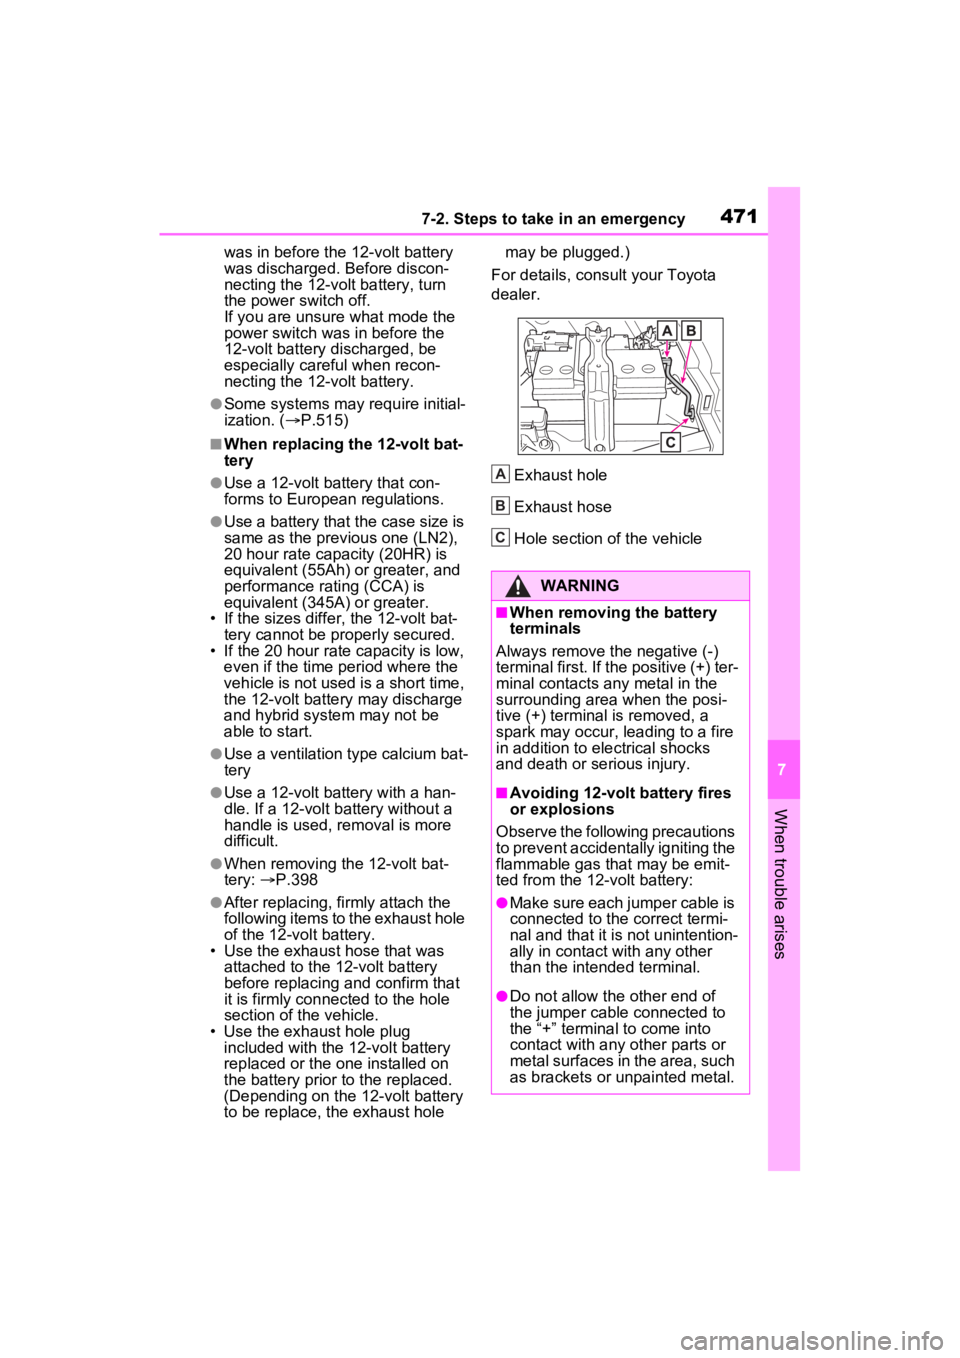
●After replacing, firmly attach the
following items to the exhaust hole
of the 12-volt battery.
• Use the exhaust hose that was attached to the 12-volt battery
before replacing an d confirm that
it is firmly connected to the hole
section of t he vehicle.
• Use the exhaust hole plug
included with the 12-volt battery
replaced or the one installed on
the battery prior to the replaced.
(Depending on the 12-volt battery
to be replace, the exhaust hole may be plugged.)
For details, consu lt your Toyota
dealer.
Exhaust hole
Exhaust hose
Hole section of the vehicle
WARNING
■When removing the battery
terminals
Always remove the negative (-)
terminal first. If the positive (+) ter-
minal contacts any metal in the
surrounding area when the posi-
tive (+) terminal is removed, a
spark may occur, leading to a fire
in addition to ele ctrical shocks
and death or serious injury.
■Avoiding 12-volt battery fires
or explosions
Observe the following precautions
to prevent accidentally igniting the
flammable gas that may be emit-
ted from the 12-volt battery:
●Make sure each jumper cable is
connected to the correct termi-
nal and that it is not unintention-
ally in contact with any other
than the intended terminal.
●Do not allow the other end of
the jumper cable connected to
the “+” terminal to come into
contact with any other parts or
metal surfaces in the area, such
as brackets or unpainted metal.
A
B
C