2023 TOYOTA TUNDRA HYBRID change time
[x] Cancel search: change timePage 318 of 618
3184-5. Using the driving support systems
Owners Manual_USA_M0C052_en
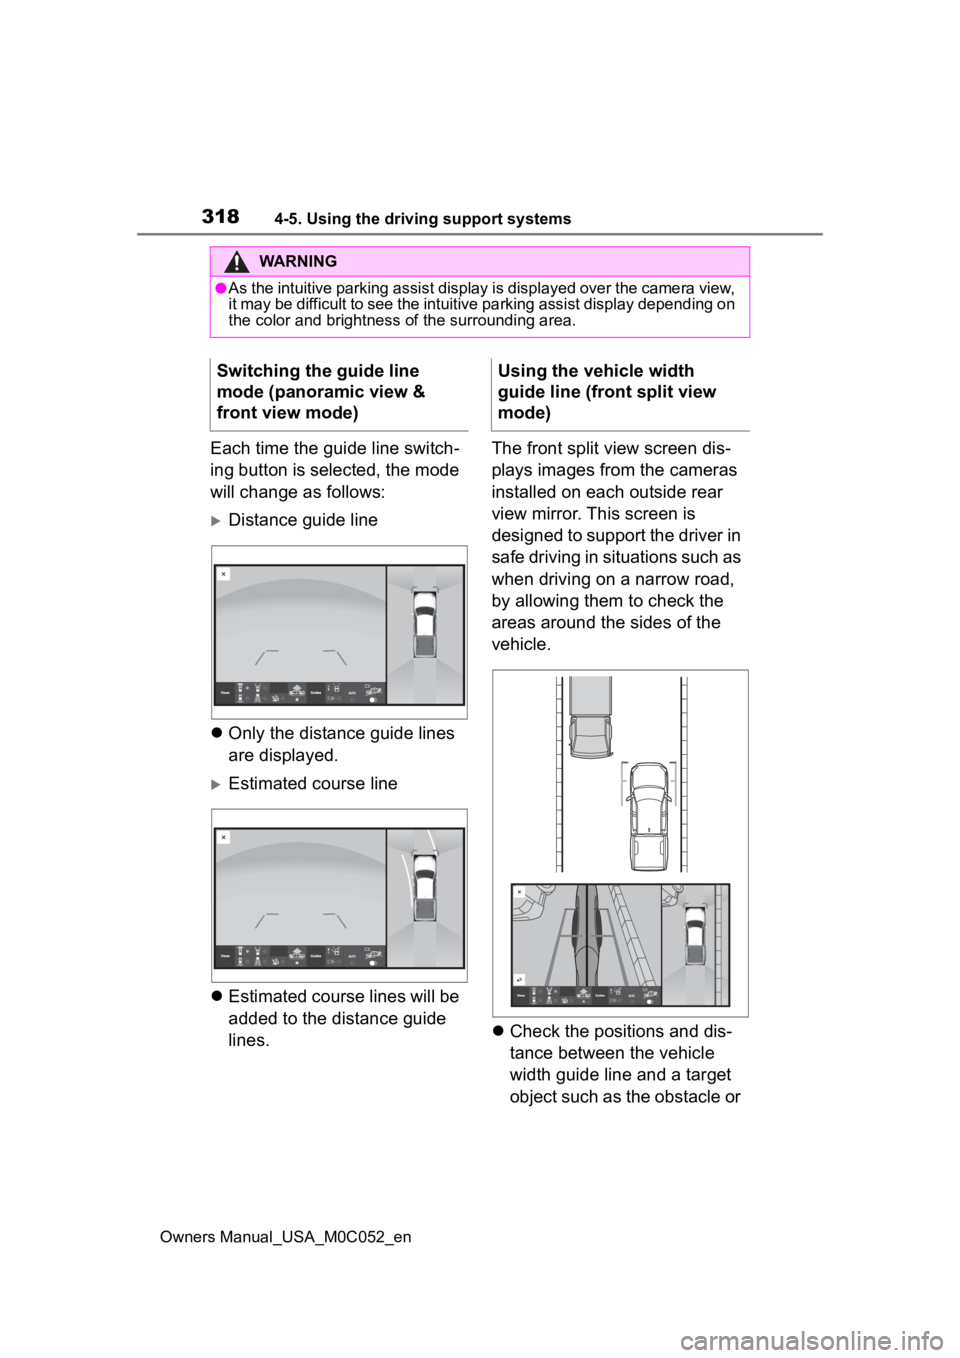
Each time the guide line switch-
ing button is selected, the mode
will change as follows:
Distance guide line
Only the distance guide lines
are displayed.
Estimated course line
Estimated course lines will be
added to the distance guide
lines. The front split view screen dis-
plays images from the cameras
installed on each outside rear
view mirror. This screen is
designed to support the driver in
safe driving in situations such as
when driving on a narrow road,
by allowing them to check the
areas around the sides of the
vehicle.
Check the positions and dis-
tance between the vehicle
width guide line and a target
object such as the obstacle or
WARNING
●As the intuitive parking assist display is displayed over the c amera view,
it may be difficult to see the intuitive parking assist display depending on
the color and brightness of the surrounding area.
Switching the guide line
mode (panoramic view &
front view mode)Using the vehicle width
guide line (front split view
mode)
Page 319 of 618
3194-5. Using the driving support systems
Owners Manual_USA_M0C052_en
4
Driving
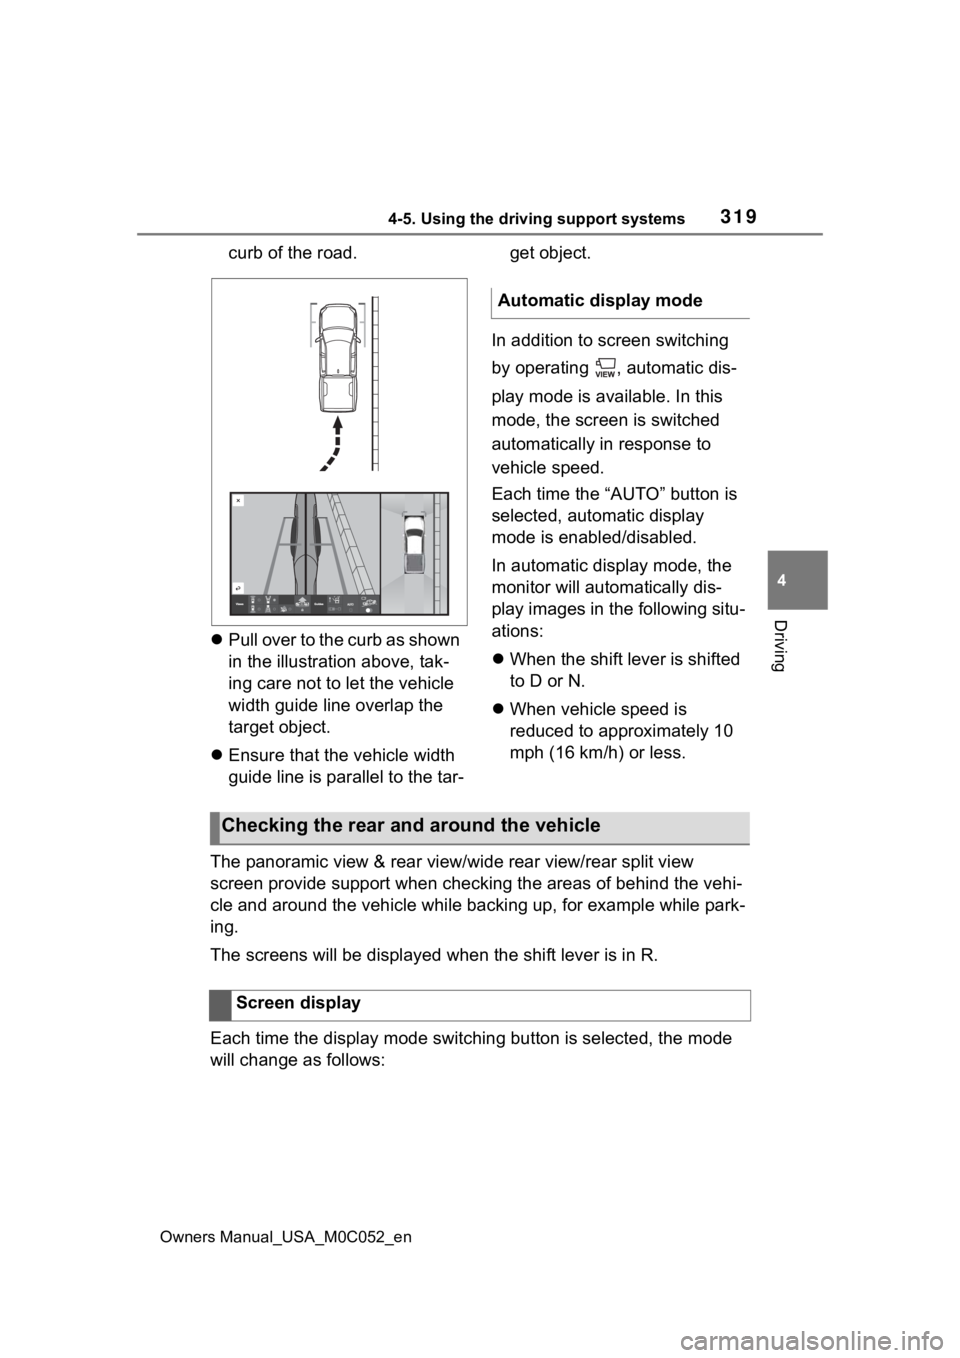
curb of the road.
Pull over to the curb as shown
in the illustration above, tak-
ing care not to let the vehicle
width guide line overlap the
target object.
Ensure that the vehicle width
guide line is parallel to the tar- get object.
In addition to screen switching
by operating , automatic dis-
play mode is available. In this
mode, the screen is switched
automatically in response to
vehicle speed.
Each time the “AUTO” button is
selected, automatic display
mode is enabled/disabled.
In automatic display mode, the
monitor will automatically dis-
play images in the following situ-
ations:
When the shift lever is shifted
to D or N.
When vehicle speed is
reduced to approximately 10
mph (16 km/h) or less.
The panoramic view & rear view/wide rear view/rear split view
screen provide support when checking the areas of behind the ve hi-
cle and around the vehicle while backing up, for example while park-
ing.
The screens will be displayed when the shift lever is in R.
Each time the display mode switching button is selected, the mo de
will change as follows:
Automatic display mode
Checking the rear and around the vehicle
Screen display
Page 321 of 618
3214-5. Using the driving support systems
Owners Manual_USA_M0C052_en
4
Driving
and the buzzer sounds.
Guide line switching button
Select to switch the guide line mode. ( P.323)
Display mode switching buttons
The display can be changed to var ious screens from button combinations.
Center guide line on/off button
Select to on/off the center guide line. (P.323)
Zoom button
Each time press the button, the mode will change between the wi de rear
view mode, narrow rear view mode and hitch view mode. (P.326)
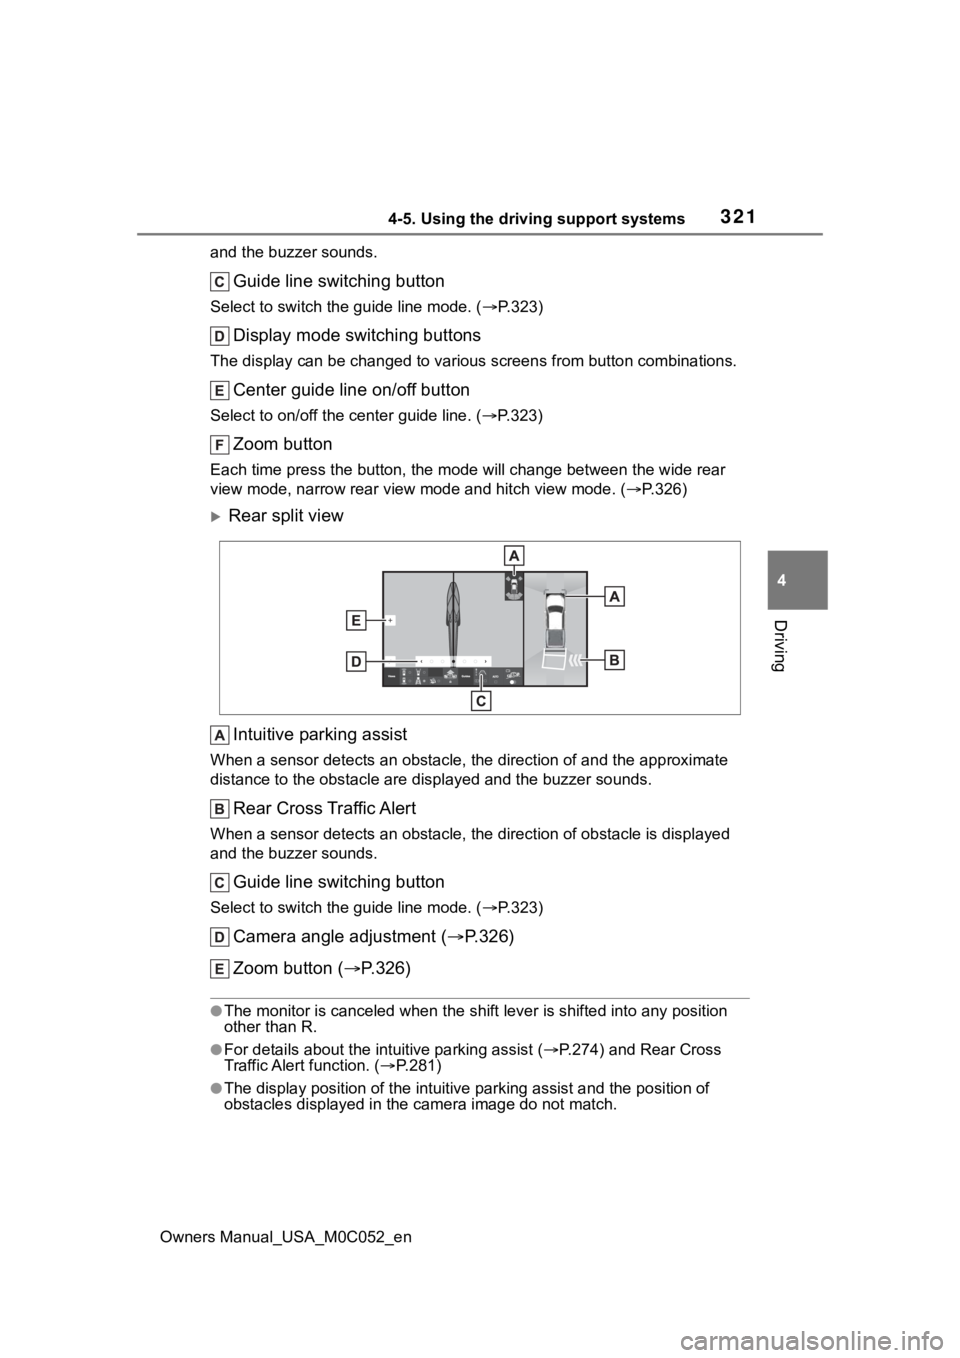
Rear split view
Intuitive parking assist
When a sensor detects an obstacle, the direction of and the app roximate
distance to the obsta cle are displayed and the buzzer sounds.
Rear Cross Traffic Alert
When a sensor detects an obstacle, the direction of obstacle is displayed
and the buzzer sounds.
Guide line switching button
Select to switch the guide line mode. ( P.323)
Camera angle adjustment ( P.326)
Zoom button ( P.326)
●The monitor is canceled when the shift lever is shifted into any position
other than R.
●For details about the int uitive parking assist (P.274) and Rear Cross
Traffic Alert function. ( P.281)
●The display position of the intuitive parking assist and the po sition of
obstacles displayed in the camera image do not match.
Page 322 of 618
3224-5. Using the driving support systems
Owners Manual_USA_M0C052_en
Each time the guide line switching button is selected, the mode will
change as follows:
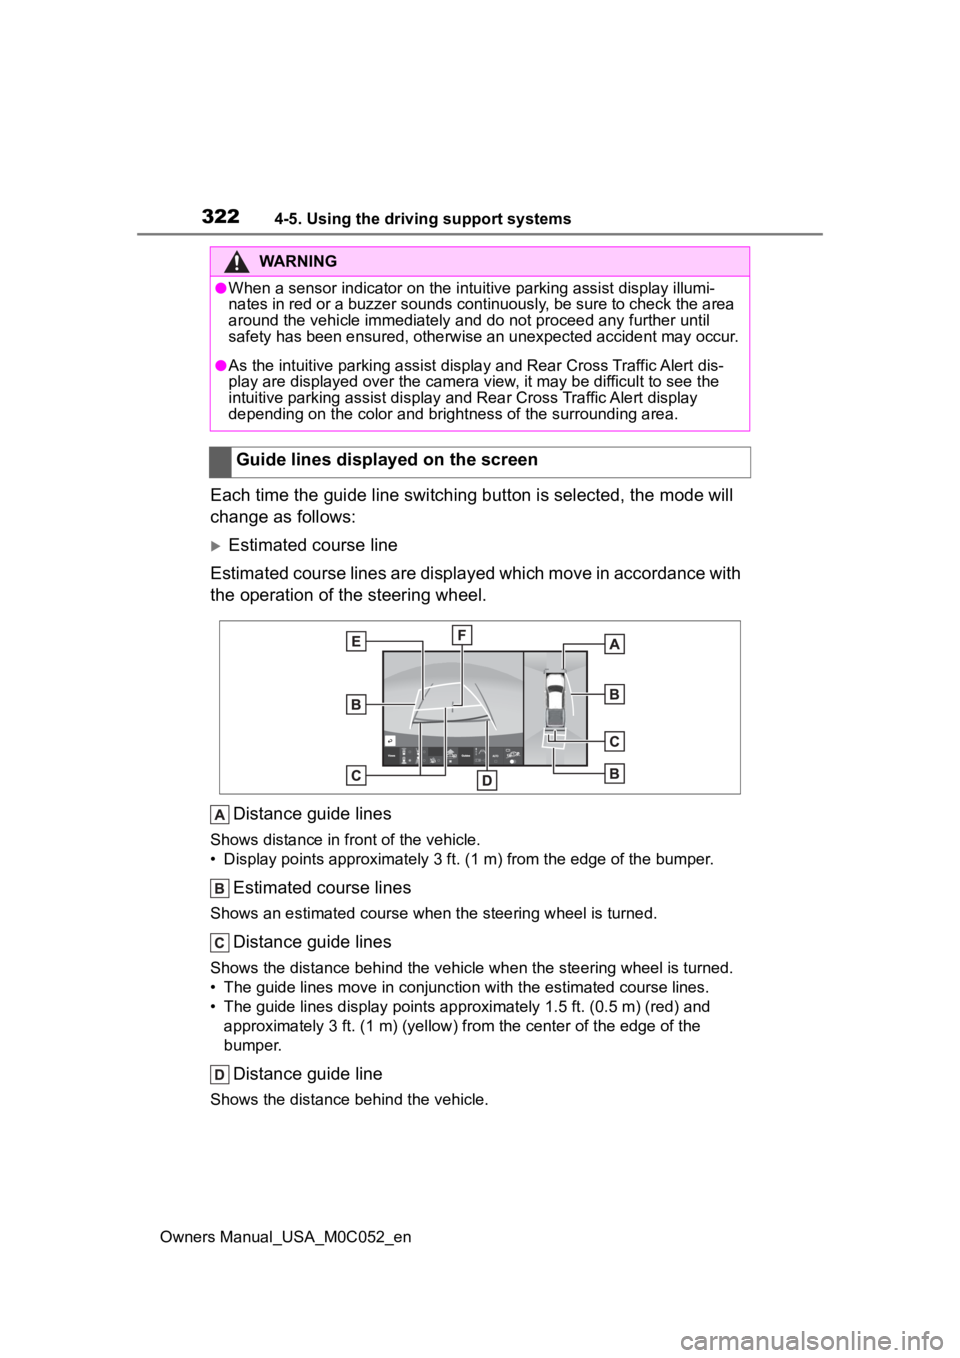
Estimated course line
Estimated course lines are displ ayed which move in accordance w ith
the operation of the steering wheel.
Distance guide lines
Shows distance in fr ont of the vehicle.
• Display points approximately 3 ft. (1 m) from the edge of the bumper.
Estimated course lines
Shows an estimated course when the steering wheel is turned.
Distance guide lines
Shows the distance behind the vehicle when the steering wheel is turned.
• The guide lines move in conjunc tion with the estimated course lines.
• The guide lines display points approximately 1. 5 ft. (0.5 m) (red) and
approximately 3 ft. (1 m) (yello w) from the center of the edge of the
bumper.
Distance guide line
Shows the distance behind the vehicle.
WARNING
●When a sensor indicator on the in tuitive parking assist display illumi-
nates in red or a buzzer sounds continuously, be sure to check the area
around the vehicle immediately a nd do not proceed any further until
safety has been ensured, otherwise an unexpected accident may o ccur.
●As the intuitive parking assist display and Rear Cross Traffic Alert dis-
play are displayed over the camera view, it may be difficult to see the
intuitive parking assist display and Rear Cross Traffic Alert display
depending on the color and brigh tness of the surrounding area.
Guide lines displayed on the screen
Page 325 of 618

3254-5. Using the driving support systems
Owners Manual_USA_M0C052_en
4
Driving
Each time press the zoom button, the mode will change as follow s:
Wide rear view
Narrow rear view
Hitch zoom view
●The hitch zoom view can be displayed for a certain time when i s
pressed while the driving at speeds of 10 mp h (16 km/h) or more.
●The hitch zoom view and bed zoom view (P.329) can be switched when
the switch is pressed while the displaying the screen.
If towing a trailer, magnify the difficult to see section of th e vehicle
rear or change the screen display and use when checking.
WARNING
●Depending on the circumstances of the vehicle (number of passen gers,
amount of luggage, etc.), the position of the guide lines displ ayed on the
screen may change. Be sure to check visually around the vehicle before
proceeding.
●If the steering wheel is straight and the vehicle width guide l ines and the
estimated course lines are not in alignment, have the vehicle i nspected
by your Toyota dealer.
●Do not use the system if the display is incorrect due to an une ven (hilly)
road or a non-straight (curvy) road.
Changing the rear view mode
Using the rear split view
Page 357 of 618
3574-5. Using the driving support systems
Owners Manual_USA_M0C052_en
4
Driving
*: If equipped
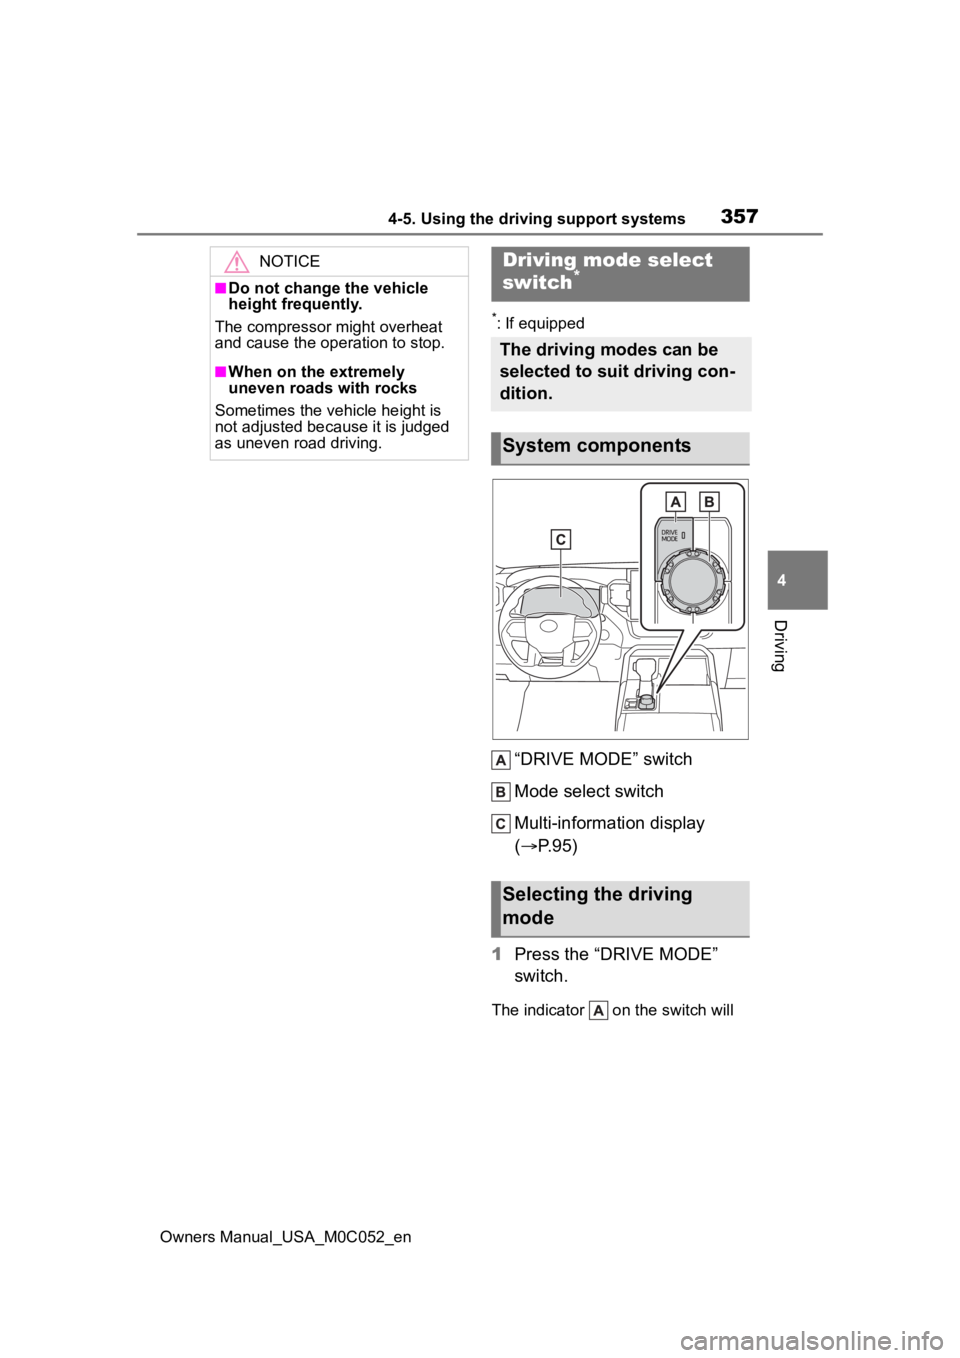
“DRIVE MODE” switch
Mode select switch
Multi-information display
( P.95)
1 Press the “DRIVE MODE”
switch.
The indicator on the switch will
NOTICE
■Do not change the vehicle
height frequently.
The compressor might overheat
and cause the operation to stop.
■When on the extremely
uneven roads with rocks
Sometimes the vehicle height is
not adjusted because it is judged
as uneven road driving.
Driving mode select
switch*
The driving modes can be
selected to suit driving con-
dition.
System components
Selecting the driving
mode
Page 359 of 618

3594-5. Using the driving support systems
Owners Manual_USA_M0C052_en
4
Driving
fuel economy through moderate
throttle characteri stics and by con-
trolling the operation of the air con-
ditioning system (heating/cooling).
The “ECO” indicator comes on.
• “SPORT S” mode
Assists accelerati on response by
controlling the transmission, engine
and steering. Suitable for when pre-
cise handling is desirable, for
example when driving on mountain
roads. The “SPORT S” indicator
comes on.
• “SPORT S+” mode
Helps to ensure th e controllability
and stability of the vehicle by inte-
grally controlling the steering wheel
and suspensions as well as the
transmission and engine, making it
suitable for sporty driving. The
“SPORT S+” indicator comes on.
• “CUSTOM” mode
Allows you to drive with the power
train, chassis and air conditioning
system functions set to your pre-
ferred settings. Custom mode set-
tings can only be changed on the
drive mode customization display of
multimedia system. The “CUSTOM”
indicator comes on.
■The driving mode select switch
can be operated when
The front-wheel dri ve control switch
is in “2H” and “4H”.
■Operation of the air condition-
ing system in Eco mode
Eco mode controls the heating/cool-
ing operations and fan speed of the
air conditioning system to enhance
fuel efficiency. To improve air condi-
tioning performance, perform the
following operations:
●Adjust the fan speed ( P.400)
●Turn off Eco drive mode ( P.358)
■Automatic deactivation of driv-
ing modes:
Driving mode is deactivated or the
driving mode will be changed to nor-
mal mode in the following condi-
tions:
●After turning the power switch off
and then turning it to on
●When the front-wheel drive control
switch is in “4L” (4WD models
only)
●When the Multi-terrain Select is
turned on (if equipped)
●When the Downhill assist control
system is turned on (if equipped)
●When the “TOW HAUL” mode or
“TOW+” mode is turned on (if
equipped)
■Customization
The Custom mode can be changed.
(Customizable features: P.570)
Page 361 of 618
3614-5. Using the driving support systems
Owners Manual_USA_M0C052_en
4
Driving
■Shifting from “4L” to “4H”
1 Stop the vehicle completely
and continue to depress the
brake pedal.
2 Shift the shift lever to N.
3 Push and shift the front-
wheel drive control switch to
“4H”.
The “4L” indicator will go off.
■When the front-wheel drive con-
trol switch is shifted to “4L”
VSC is automatically turned off.
■If the “4H” indicator flashes
The transfer mode may not suc-
cessfully change. Drive straight
ahead while accelerating or deceler-
ating, or drive in reverse.
■If the “4H” indicator is ON and
the “4L” indicator continues to
flash
A message will be displayed in the
multi-information display. Follow a
message, shift the shift lever to D or
R and drive the vehicle slowly, then
stop.
■If the “4H” indicator continues
to flash and the “4L” indicator
is ON
A message will be displayed in the
multi-information display. Follow a
message, shift the shift lever to D or
R and drive the vehicle slowly, then
stop.
■If the “4H” indicator is ON and
the “4L” indicator continues to
flash and a buzzer sounds
The shift lever is not in N and/or the
vehicle is moving . Stop the vehicle
completely, shift th e shift lever to N
and make sure that the indicator
stops flashing.
■If the “4H” indicator continues
to flash and the “4L” indicator
is ON and a buzzer sounds
The shift lever is not in N and/or the
vehicle is moving. Stop the vehicle
completely, shift the shift lever to N
and make sure that the indicator
stops flashing
■If the “4H” and “4L” indicator
flashes rapidly
There may be a malfunction in the
four-wheel drive system. Have the
vehicle inspected by your Toyota
dealer immediately.
■Four-wheel drive usage fre-
quency
You should drive in four-wheel drive
for at least 10 miles (16 km) each
month. This will assure that the front
drive components are lubricated.
WARNING
■Shifting the front-wheel drive
control switch from “2H” to
“4H” while driving
Never operate the front-wheel
drive control switch if the wheels
are slipping. Stop the slipping or
spinning before shifting.
■When the vehicle is parked
If the shift lever is moved before
the “4L” indicator turns on/off, the
transfer mode may not be shifted
completely. The transfer mode
disengages both the front and
rear driveshafts from the power-
train and allows the vehicle to
move regardless of the shift posi-
tion. (At this time, the indicator
blinks and the buzzer sounds.)
Therefore, the vehicle is free to
roll even if the automatic trans-
mission is in P. You or someone
else could be seriously injured.
You must complete the shifting of
the transfer mode before placing
transmission in P.