2023 TOYOTA TUNDRA HYBRID change time
[x] Cancel search: change timePage 148 of 618
1483-4. Adjusting the steering wheel and mirrors
Owners Manual_USA_M0C052_en
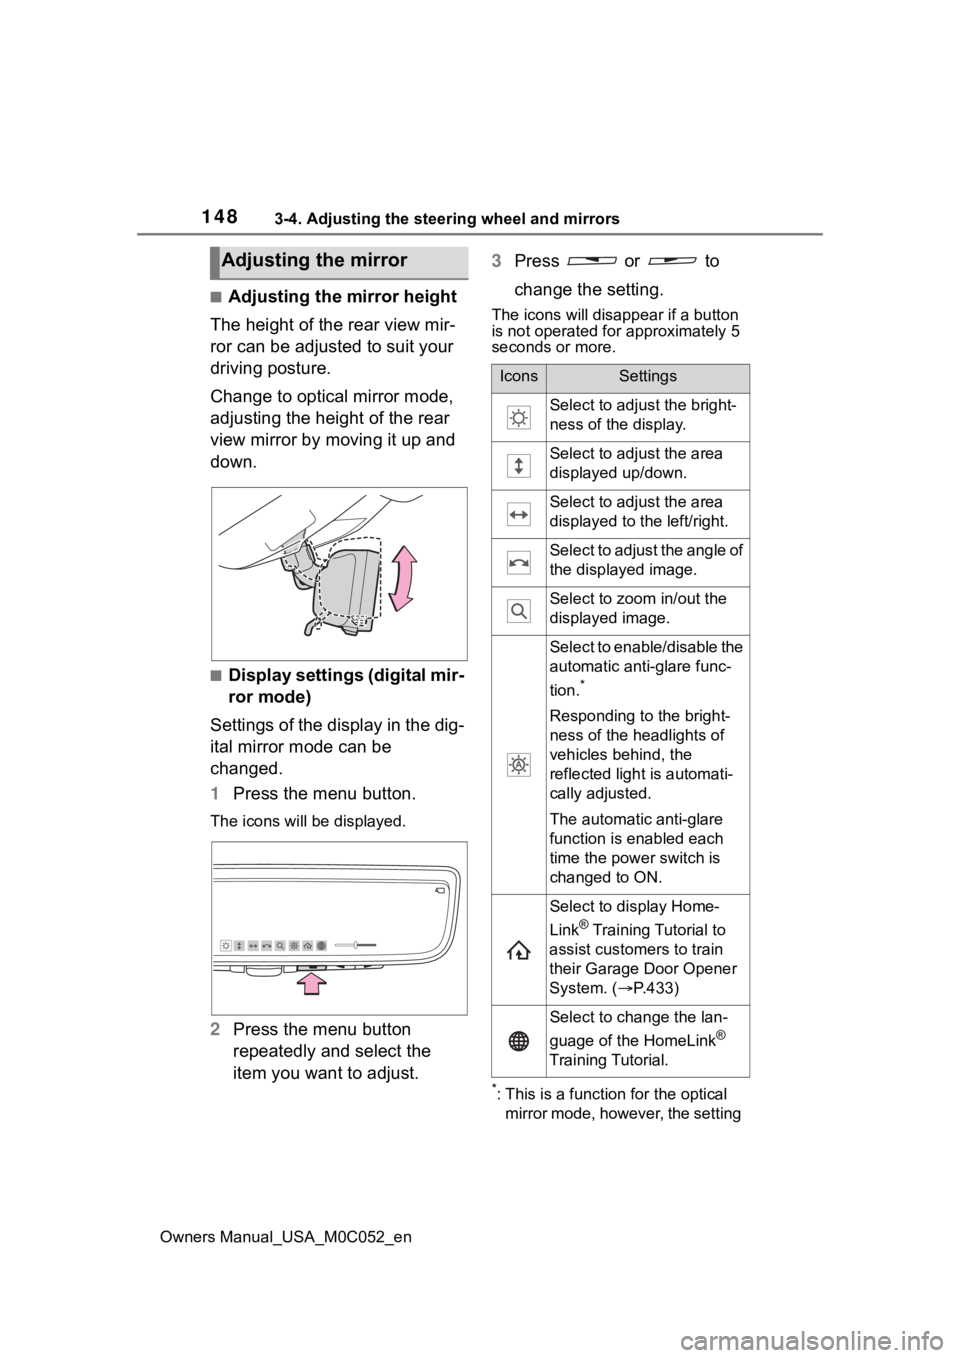
■Adjusting the mirror height
The height of the rear view mir-
ror can be adjusted to suit your
driving posture.
Change to optical mirror mode,
adjusting the height of the rear
view mirror by moving it up and
down.
■Display settings (digital mir-
ror mode)
Settings of the display in the dig-
ital mirror mode can be
changed.
1 Press the menu button.
The icons will be displayed.
2Press the menu button
repeatedly and select the
item you want to adjust. 3
Press or to
change the setting.
The icons will disappear if a button
is not operated fo r approximately 5
seconds or more.
*: This is a functi on for the optical
mirror mode, however, the setting
Adjusting the mirror
IconsSettings
Select to adjust the bright-
ness of the display.
Select to adjust the area
displayed up/down.
Select to adjust the area
displayed to the left/right.
Select to adjust the angle of
the displayed image.
Select to zoom in/out the
displayed image.
Select to enable/disable the
automatic anti-glare func-
tion.
*
Responding to the bright-
ness of the headlights of
vehicles behind, the
reflected light is automati-
cally adjusted.
The automatic anti-glare
function is enabled each
time the power switch is
changed to ON.
Select to display Home-
Link
® Training Tutorial to
assist customers to train
their Garage Door Opener
System. ( P.433)
Select to change the lan-
guage of the HomeLink
®
Training Tutorial.
Page 158 of 618
1583-4. Adjusting the steering wheel and mirrors
Owners Manual_USA_M0C052_en
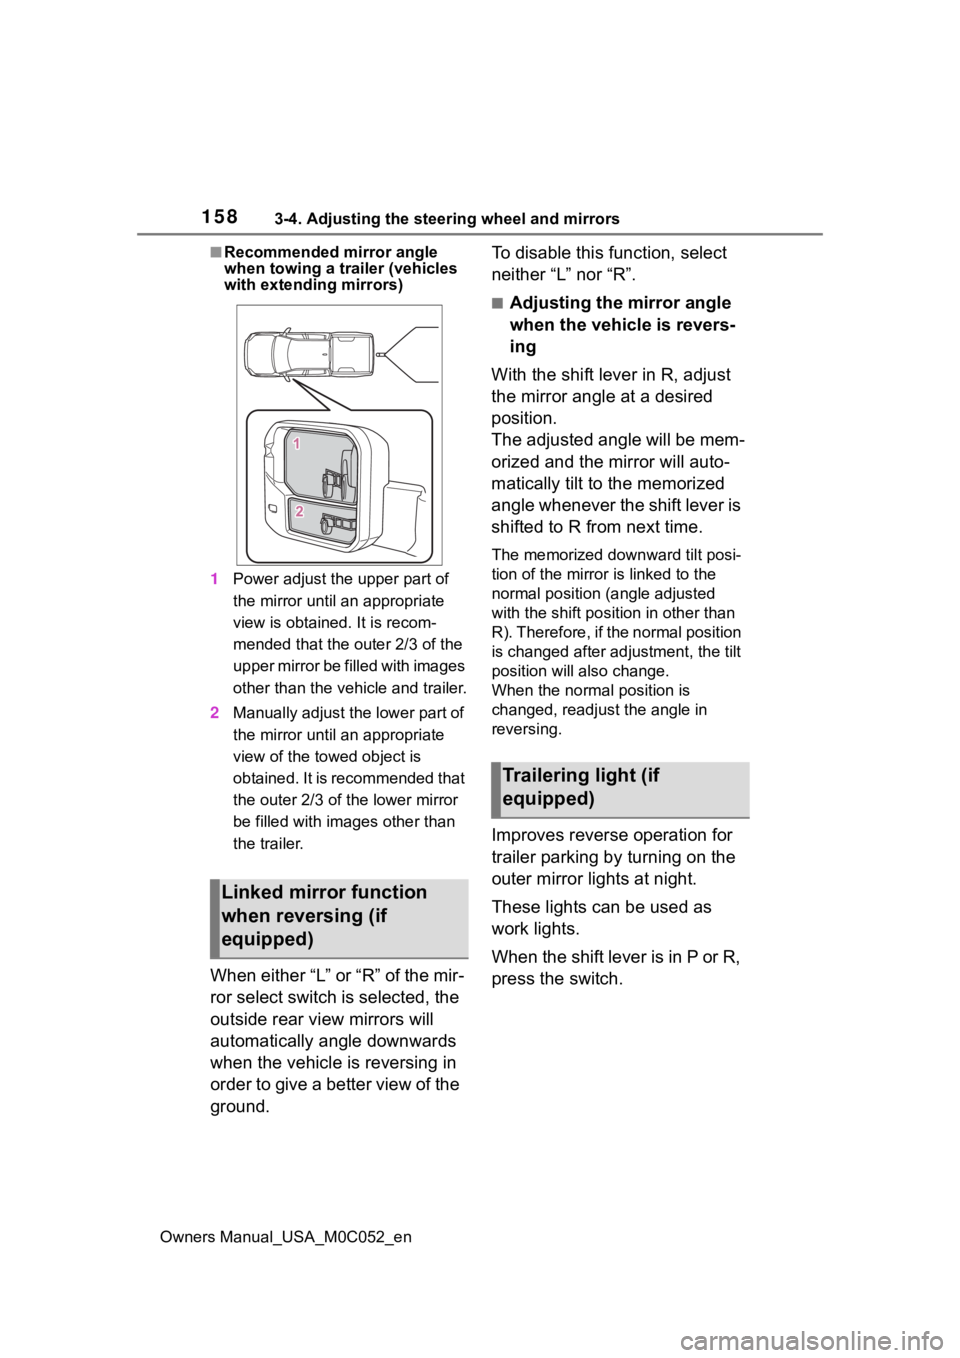
■Recommended mirror angle
when towing a trailer (vehicles
with extending mirrors)
1 Power adjust the upper part of
the mirror until an appropriate
view is obtained. It is recom-
mended that the outer 2/3 of the
upper mirror be f illed with images
other than the vehicle and trailer.
2 Manually adjust the lower part of
the mirror until an appropriate
view of the towed object is
obtained. It is recommended that
the outer 2/3 of the lower mirror
be filled with images other than
the trailer.
When either “L” or “R” of the mir-
ror select switch is selected, the
outside rear view mirrors will
automatically angle downwards
when the vehicle is reversing in
order to give a better view of the
ground. To disable this function, select
neither “L” nor “R”.
■Adjusting the mirror angle
when the vehicle is revers-
ing
With the shift lever in R, adjust
the mirror angle at a desired
position.
The adjusted angle will be mem-
orized and the mirror will auto-
matically tilt to the memorized
angle whenever the shift lever is
shifted to R from next time.
The memorized downward tilt posi-
tion of the mirror is linked to the
normal position (angle adjusted
with the shift posit ion in other than
R). Therefore, if the normal position
is changed after adjustment, the tilt
position will also change.
When the normal position is
changed, readjust the angle in
reversing.
Improves reverse operation for
trailer parking by turning on the
outer mirror lights at night.
These lights can be used as
work lights.
When the shift lever is in P or R,
press the switch.
Linked mirror function
when reversing (if
equipped)
Trailering light (if
equipped)
Page 195 of 618
1954-2. Driving procedures
Owners Manual_USA_M0C052_en
4
Driving
4-2.Driving procedures
1 Pull the parking brake switch
to check that the parking
brake is set. ( P.205)
The parking brake indicator will
come on.
2Check that the shift lever is in
P.
3 Firmly depress the brake
pedal.
and a message will be dis-
played on the multi-information dis-
play.
If it is not displayed, the hybrid sys-
tem cannot be started.
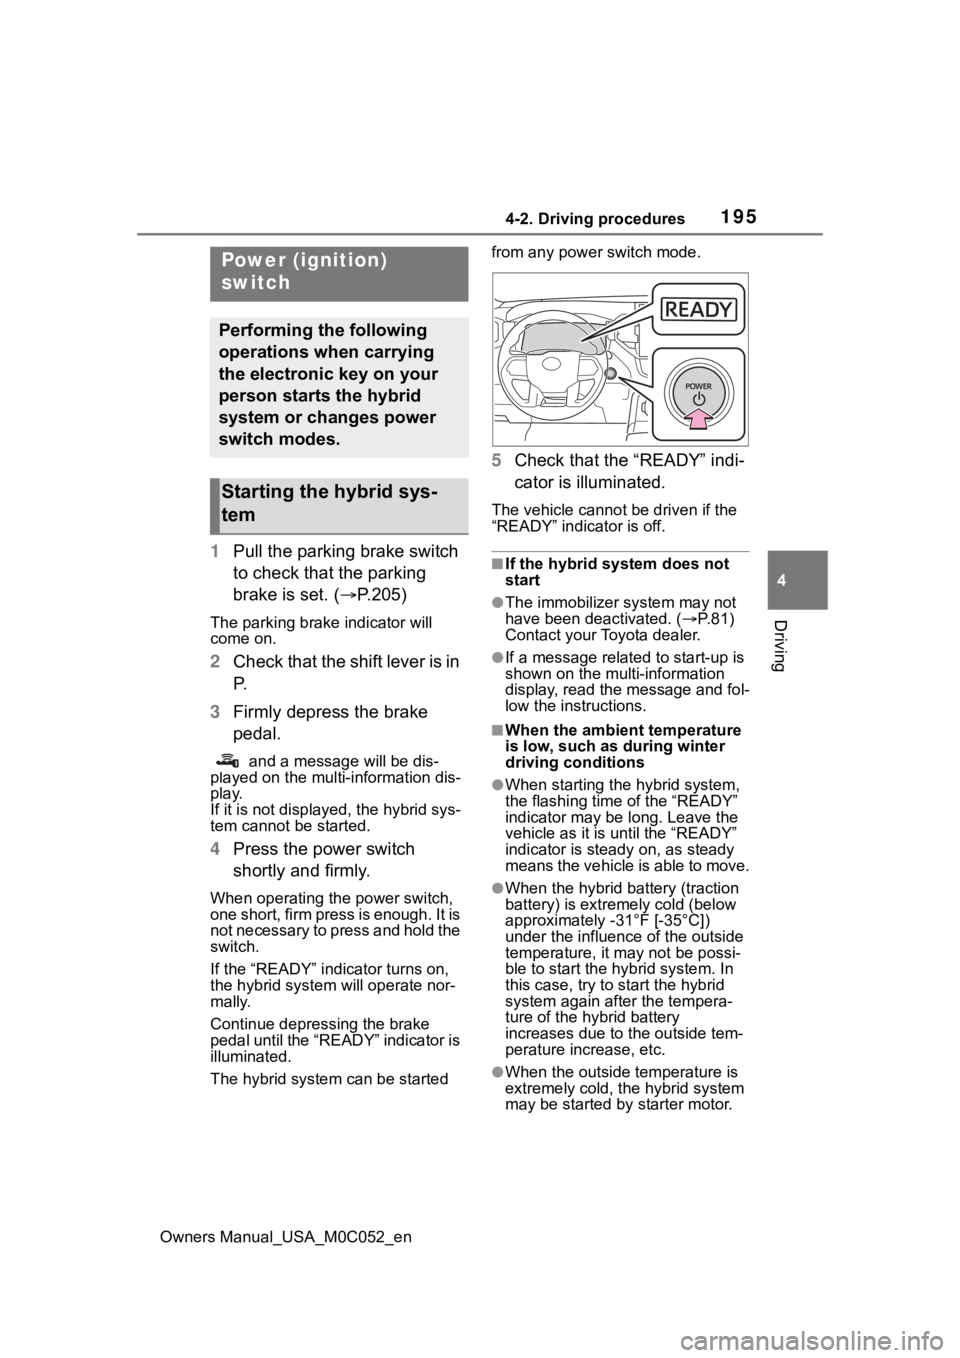
4 Press the power switch
shortly and firmly.
When operating the power switch,
one short, firm press is enough. It is
not necessary to press and hold the
switch.
If the “READY” indicator turns on,
the hybrid system will operate nor-
mally.
Continue depressing the brake
pedal until the “READY” indicator is
illuminated.
The hybrid system can be started from any power switch mode.
5
Check that the “READY” indi-
cator is illuminated.
The vehicle cannot be driven if the
“READY” indicator is off.
■If the hybrid system does not
start
●The immobilizer system may not
have been deactivated. ( P. 8 1 )
Contact your Toyota dealer.
●If a message related to start-up is
shown on the multi-information
display, read the message and fol-
low the instructions.
■When the ambient temperature
is low, such as during winter
driving conditions
●When starting th e hybrid system,
the flashing time of the “READY”
indicator may be long. Leave the
vehicle as it is until the “READY”
indicator is steady on, as steady
means the vehicle is able to move.
●When the hybrid battery (traction
battery) is extremely cold (below
approximately -31°F [-35°C])
under the influenc e of the outside
temperature, it ma y not be possi-
ble to start the hybrid system. In
this case, try to start the hybrid
system again after the tempera-
ture of the hybrid battery
increases due to the outside tem-
perature increase, etc.
●When the outside temperature is
extremely cold, the hybrid system
may be started by starter motor.
Power (ignition)
switch
Performing the following
operations when carrying
the electronic key on your
person starts the hybrid
system or changes power
switch modes.
Starting the hybrid sys-
tem
Page 198 of 618
1984-2. Driving procedures
Owners Manual_USA_M0C052_en
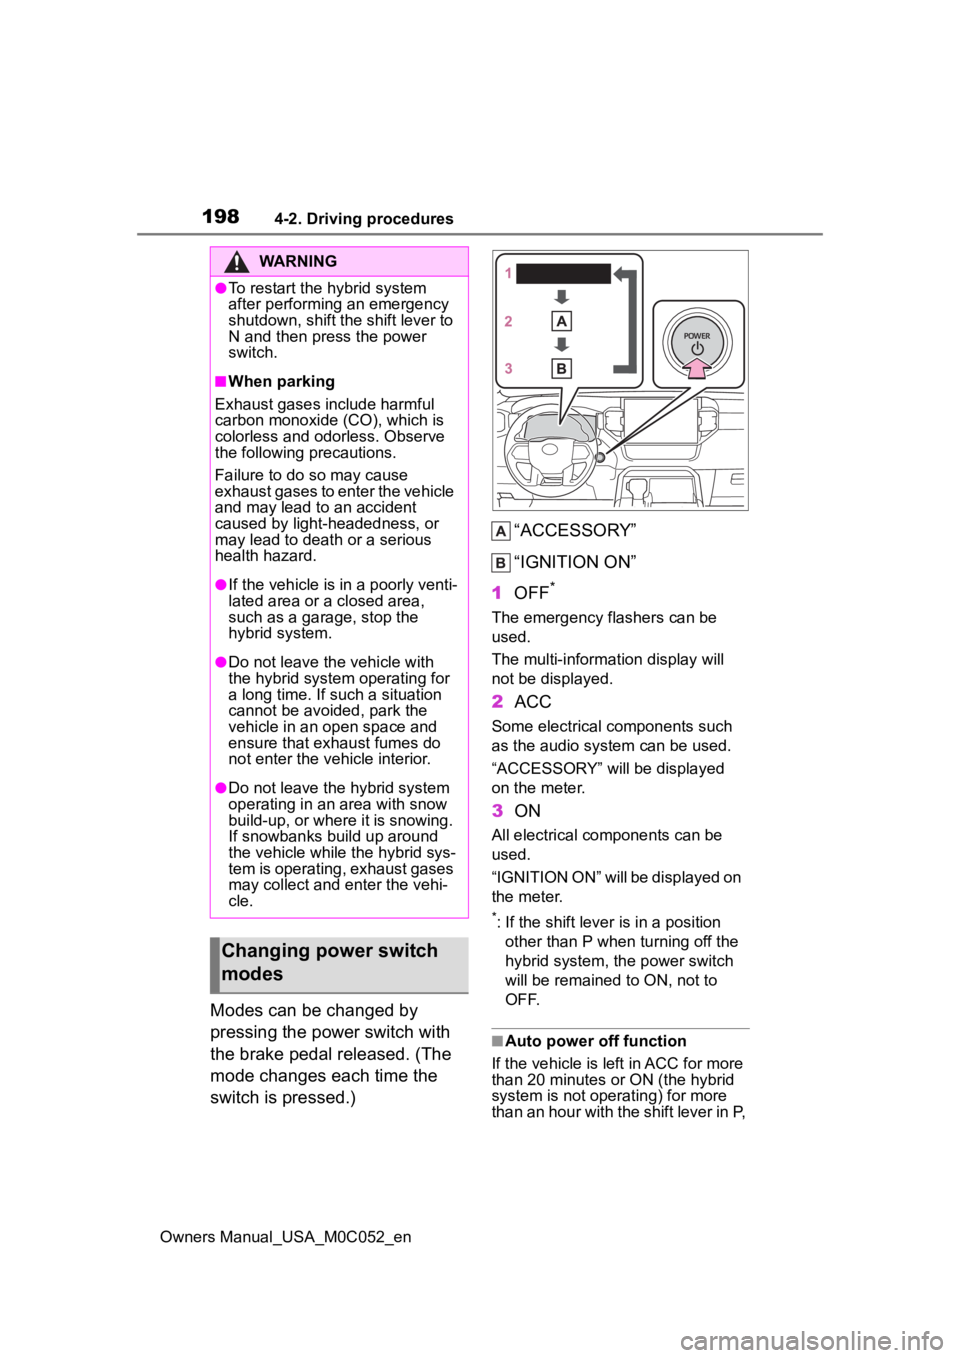
Modes can be changed by
pressing the power switch with
the brake pedal released. (The
mode changes each time the
switch is pressed.)“ACCESSORY”
“IGNITION ON”
1 OFF
*
The emergency flashers can be
used.
The multi-information display will
not be displayed.
2ACC
Some electrical components such
as the audio sys tem can be used.
“ACCESSORY” will be displayed
on the meter.
3 ON
All electrical components can be
used.
“IGNITION ON” will be displayed on
the meter.
*: If the shift lever is in a position
other than P when turning off the
hybrid system, the power switch
will be remained to ON, not to
OFF.
■Auto power off function
If the vehicle is left in ACC for more
than 20 minutes or ON (the hybrid
system is not operating) for more
than an hour with the shift lever in P,
WARNING
●To restart the hybrid system
after performing an emergency
shutdown, shift the shift lever to
N and then press the power
switch.
■When parking
Exhaust gases include harmful
carbon monoxide (CO), which is
colorless and odorless. Observe
the following precautions.
Failure to do so may cause
exhaust gases to enter the vehicle
and may lead to an accident
caused by light-headedness, or
may lead to death or a serious
health hazard.
●If the vehicle is in a poorly venti-
lated area or a closed area,
such as a garage, stop the
hybrid system.
●Do not leave the vehicle with
the hybrid system operating for
a long time. If such a situation
cannot be avoided, park the
vehicle in an open space and
ensure that exhaust fumes do
not enter the vehicle interior.
●Do not leave the hybrid system
operating in an area with snow
build-up, or where it is snowing.
If snowbanks build up around
the vehicle while the hybrid sys-
tem is operating, exhaust gases
may collect and enter the vehi-
cle.
Changing power switch
modes
Page 203 of 618
2034-2. Driving procedures
Owners Manual_USA_M0C052_en
4
Driving
range when the fluid temperature
is high.
●When the shift range is 9 or lower,
holding the shift lever toward “+”
sets the shift range to 10.
■Downshifting restriction warn-
ing buzzer
To help ensure safety and driving
performance, downshifting opera-
tion may sometimes b e restricted. In
some circumstances, downshifting
may not be possible even when the
shift lever is opera ted. (A buzzer will
sound twice.)
■If the S indicator does not come
on even after shifting the shift
lever to S
This may indicate a malfunction in
the automatic tra nsmission system.
Have the vehicle inspected by your
Toyota dealer immediately.
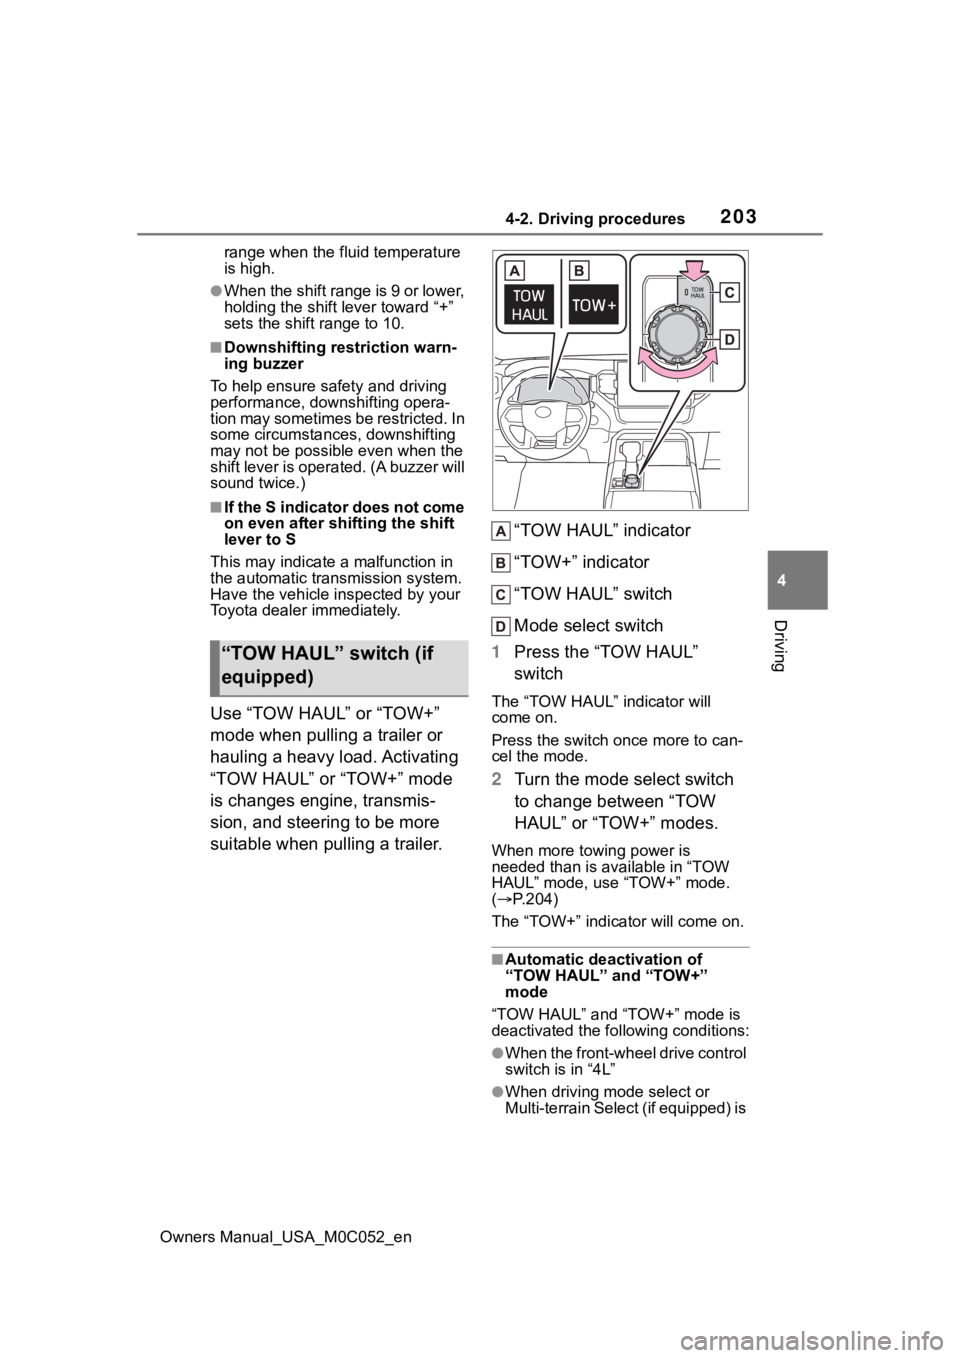
Use “TOW HAUL” or “TOW+”
mode when pulling a trailer or
hauling a heavy load. Activating
“TOW HAUL” or “TOW+” mode
is changes engine, transmis-
sion, and steering to be more
suitable when pulling a trailer. “TOW HAUL” indicator
“TOW+” indicator
“TOW HAUL” switch
Mode select switch
1 Press the “TOW HAUL”
switchThe “TOW HAUL” indicator will
come on.
Press the switch once more to can-
cel the mode.
2Turn the mode select switch
to change between “TOW
HAUL” or “TOW+” modes.
When more towing power is
needed than is available in “TOW
HAUL” mode, use “TOW+” mode.
( P.204)
The “TOW+” indicator will come on.
■Automatic deactivation of
“TOW HAUL” and “TOW+”
mode
“TOW HAUL” and “TOW+” mode is
deactivated the following conditions:
●When the front-wheel drive control
switch is in “4L”
●When driving m ode select or
Multi-terrain Select (if equipped) is
“TOW HAUL” switch (if
equipped)
Page 204 of 618
2044-2. Driving procedures
Owners Manual_USA_M0C052_enselected
■Differences with “TOW HAUL”
mode and “TOW+” mode
It is recommend ed to use each
mode according to the weight of the
trailer to be towed.
●“TOW HAUL” mode is used when
towing trailers that weigh less than
5000 lb. (2268 kg).
●“TOW+” mode is used when tow-
ing trailers that weigh more than
5000 lb. (2268 kg).
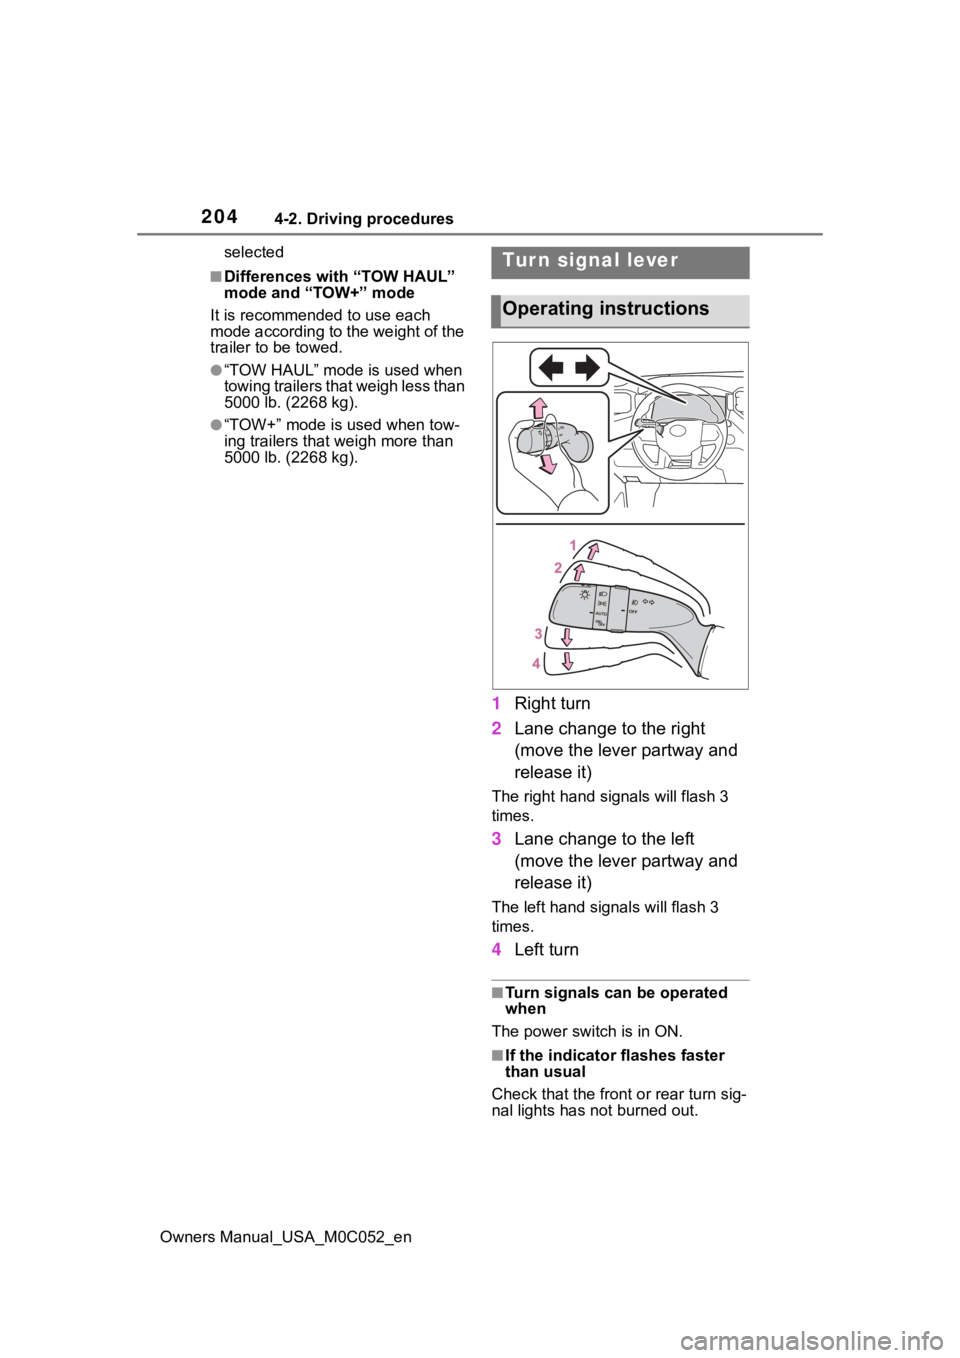
1 Right turn
2 Lane change to the right
(move the lever partway and
release it)
The right hand s ignals will flash 3
times.
3 Lane change to the left
(move the lever partway and
release it)
The left hand signals will flash 3
times.
4Left turn
■Turn signals can be operated
when
The power switch is in ON.
■If the indicator flashes faster
than usual
Check that the front or rear turn sig-
nal lights has not burned out.
Tur n signal lever
Operating instructions
Page 216 of 618

2164-3. Operating the lights and wipers
Owners Manual_USA_M0C052_ensandstorms, etc.)
• The windshield is obscured by fog, mist, ice, dirt, etc.
• The windshield is cracked or dam- aged
• The front camera is deformed or
dirty
• When the temperature of the front camera is extremely high
• Surrounding brightness levels are equal to those of h eadlights, tail
lights or fog lights
• When headlights or tail lights of vehicles ahead are turned off,
dirty, changing color, or not aimed
properly
• When the vehicle is hit by water, snow, dust, etc. from a preceding
vehicle
• When driving thr ough an area of
intermittently changing brightness
and darkness
• When frequently and repeatedly driving ascending/descending
roads, or roads with rough, bumpy
or uneven surfaces (such as
stone-paved roads, gravel roads,
etc.)
• When frequently and repeatedly taking curves or driving on a wind-
ing road
• There is a highly reflective object
ahead of the vehicle, such as a
sign or mirror
• The back of a vehicle ahead is highly reflective, such as a con-
tainer on a truck
• The vehicle’s headlights are dam- aged or dirty, or are not aimed
properly
• The vehicle is listing or titling due to a flat tire, a trailer being towed,
etc.
• The high beam and low beam are repeatedly being switched
between in an abnormal manner
• The driver believes that the high beam may be causing problems
or distress to other drivers or
pedestrians nearby
■Temporarily lowering sensor
sensitivity
The sensitivity of the sensor can be temporarily lowered.
1
Turn the power s witch off while
the following conditions are met.
●The headlight switch is in or
.
●The headlight switch lever is in
low beam position.
●Automatic High Beam switch is
on.
2 Turn the power switch to ON.
3 Within 60 seconds after step 2,
repeat pushing the headlight
switch lever to the high beam
position then pulling it to the orig-
inal position quickly 10 times,
then leave the lever in the origi-
nal position.
4 If the sensitivity is changed, the
AHB indicator is turn on and off 3
times.
Automatic High Beam (headlights)
may turn on even when the vehicle
is stopped.
■Switching to the high
beams
Push the lever away from you.
The AHB indicator will turn off and
the high beam indi cator will turn on.
Pull the lever to its original position
to activate the Automatic High
Beam system.
Turning the high beams
on/off manually
Page 228 of 618

2284-5. Using the driving support systems
Owners Manual_USA_M0C052_en
■If a warning message is displayed on the multi-information display
A system may be tempor arily unavailable or there may be a malfu nction in
the system.
●In the following situations, perform the actions specified in t he table. When
the normal operating conditions are detected, the message will disappear
and the system will be come operational.
If the message does not disapp ear, contact your Toyota dealer.
●In the following situations, if the situation has changed (or the vehicle has
been driven for some time) and the normal operating conditions are
detected, the message will disappear and the system will become opera-
tional.
If the message does not disappea r, contact your Toyota dealer.
SituationActions
When the area around a camera is
covered with dirt, moisture (fogged
up, covered with condensation, ice,
etc.), or other foreign matterUsing the wiper and A/C function,
remove the dirt and other attached
matter. ( P.401)
When the temperature around the
front camera is outside of the opera-
tional range, such as when the vehi-
cle is in the sun or in an extremely
cold environment
If the front camera is hot, such as
after the vehicle had been parked in
the sun, use the air conditioning sys-
tem to decrease the temperature
around the front camera.
If a sunshade was used when the
vehicle was parked, depending on its
type, the sunlight reflected from the
surface of the sunshade may cause
the temperature of the front camera
to become excessively high.
If the front camera is cold, such after
the vehicle is parked in an extremely
cold environment, use the air condi-
tioning system to increase the tem-
perature around the front camera.
The area in front o f the front camera
is obstructed, such as when the
hood is open or a sticker is attached
to the part of the win dshield in front
of the front camera.
Close the hood, rem ove the sticker,
etc., to clear the obstruction.
When “Pre-Collisio n System Radar
In Self Calibration Unavailable See
Owner’s Manual” is displayed.Check whether there is attached
materials on the radar sensor and
radar sensor cover, and if there is,
remove it.