2023 TOYOTA RAV4 PRIME display
[x] Cancel search: displayPage 454 of 662
4566-4. Using the other interior features
tion function may activate and
stop the power supply function.
●Certain types of electrical devices
may disturb TV or radio by noises.
●Noise may be heard from the cool-
ing fan under the rear seats when
using the power outlet, but this is
not a malfunction.
■120 VAC Devices which may
not operate properly
The following electrical devices may
not operate properly even if their
total power consumption is less than
1500 W.
●Devices with high initial peak watt-
age
●Devices that require larger power
consumption than described in the
instruction manual of the electrical
device.
●Measuring devices that process
precise data
●Devices that require an extremely
stable power supply
●Devices that require a constant
power supply from the power out-
let, such as a device with a timer.
■When using the power outlet
while the vehicle is parked or
stopped
●The doors cannot be locked or
unlocked using the smart key sys-
tem.
●The doors cannot be locked or
unlocked using the electronic key.
The doors can only be locked or
unlocked using the mechanical
key ( P.567).
●A buzzer may sound or “Key Not
Detected Check Key Location”
may be displayed on the multi-
information display when the door
is opened or closed. Make sure to
carry the electronic key on your
person.
WARNING
■For safe use
Observe the following precau-
tions.
Failure to do so may lead to an
accident, resulting in death or
serious injury.
●Do not allow pers ons unfamiliar
with the system, such as a child,
to use the power outlet by them-
selves.
●Do not disconnect the plug of a
device while your hands are wet
or insert a pin or other object
into the power ou tlet. Also, if a
liquid or snow is on the power
outlet, dry the outlet before
using it.
●Do not attempt to modify, disas-
semble or repair a power outlet.
For information on repairs, con-
tact your Toyota dealer.
●Keep the power o utlet free of
dust and foreign matter. Also,
make sure to clean the power
outlet periodically.
●Hold the plug by its body when
inserting or removing the plug
into or from the power outlet. Do
not touch the plug blades. Pull-
ing the cord to remove the
power source plug may damage
the plug or cord.
●If any abnormal heat is felt in
the cord or outlet, stop using it
immediately. Also, observe the
following precautions to pre-
vent abnormal heat from being
generated from the cord or
power outlet.
Page 463 of 662
4656-4. Using the other interior features
6
Interior features
other sturdy, safe device to
reach the “Learn” or “Smart”
button on the garage door
opener motor.
■Programming HomeLink®
Steps 2 through 4 must be per-
formed within 60 seconds, oth-
erwise the HomeLink
® indicator
light will stop flashing and pro-
gramming will not be success-
fully completed.
1 Vehicles with Digital Rear-
view Mirror: Press the
HomeLink
® button or menu
button
When the HomeLink® button is
pressed:
Homelink
® Training Tutorial will be
displayed to assist you program-
ming the HomeLink
®.
When Homelink
® Training Tutorial
is displayed, follow the instructions
displayed.
When the menu button is pressed:
Press the menu button and
select the “Set Up >”. Homelink
®
Training Tutorial will be displayed
to assist you programming the
HomeLink
®.
When Homelink
® Training Tutorial
is displayed, follow the instructions
displayed.
2 Press and release the
HomeLink
® button you want
to program and check that
the HomeLink
® indicator light
flashes (orange).
3 Point the remote control
transmitter for the device at
the rear view mirror, 1 to 3 in. (25 to 75 mm) from the
HomeLink
® buttons.
Keep the HomeLink® indicator light
in view while programming.
4 Program a device.
Programming a device other
than an entry gate (for U.S.A.
owners)
Press and hold the remote con-
trol transmitter button until the
HomeLink
® indicator light
changes from slowly flashing
orange to rapidly flashing green
(rolling code) or continuously lit
green (fixed code), then release
the button.
Programming an entry gate
(for U.S.A. owners)/Program-
ming a device in the Cana-
dian market
Press and release the remote
Page 477 of 662
4797-2. Maintenance
7
Maintenance and care
■Resetting the message indicat-
ing maintenance is required
(with 7-inch display)
After the required maintenance is
performed according to the mainte-
nance schedule, please reset the
reminder light or message.
To reset the reminder light or mes-
sage, follow the procedure
described below:
1 Press or of the meter
control switches and select
on the multi-information display.
2 Press or of the meter
control switches and select
“Vehicle Settings”. Then press
and hold .
3 Press or of the meter
control switches and select
“Scheduled Maintenance”. Then
press .
4 Select “Yes” and press .
A message will be displayed when
the reset proced ure has been com-
pleted.
■Resetting the message indicat-
ing maintenance is required
(with 12.3-inch display)
After the required maintenance is
performed according to the mainte-
nance schedule, please reset the
reminder light or message.
To reset the reminder light or mes-
sage, follow the procedure
described below:
1 Press and hold to display the
cursor on the content display
area (center) of the multi-infor-
mation display. 2
Press or of the meter
control switches to select
and then press .
3 Press or of the meter
control switch es and select
“ Vehicle Settings”. Then
press and hold .
4 Press or of the meter
control switch es and select
“Scheduled Maintenance”. Then
press .
5 Select “Yes” and press .
A message will be d isplayed when
the reset procedure has been com-
pleted.
You can perform some mainte-
nance procedures by yourself.
Please be aware that do-it-your-
self maintenance may affect
warranty coverage.
The use of Toyota Repair Manuals
is recommended.
For details about warranty cover-
age, refer to the separate “Owner’s
Warranty Informat ion Booklet” or
“Owner’s Manual Supplement”.
Do-it-yourself mainte-
nance
Page 483 of 662
4857-3. Do-it-yourself maintenance
7
Maintenance and care
DC/DC Con-
verter air
intake vent
( P.515)• Vacuum cleaner,
etc,
• Phillips screw- driver
Light bulbs
( P.528)
• Bulb with same
number and watt-
age rating as origi-
nal
• Phillips-head screwdriver
• Flathead screw- driver
• Wrench
Headlight aim
( P.527)Phillips-head
screwdriver
Radiator and
condenser
( P.492)
Tire inflation
pressure
( P.509)• Tire pressure
gauge
• Compressed air source
Washer fluid
( P.494)
• Water or washer
fluid containing
antifreeze (for win-
ter use)
• Funnel (used only for adding water or
washer fluid)
WARNING
The engine compartment contains
many mechanisms and fluids that
may move suddenly, become hot,
or become electrically energized.
To avoid death or serious injury,
observe the following precautions.
ItemsParts and tools■When working on the engine
compartment
●Make sure that “IGNITION ON”
on the multi-information display
and the “READY” indicator are
both off.
●Keep hands, clothing and tools
away from the moving fan.
●Do not leave anything that may
burn easily, such as paper and
rags, in the engine compart-
ment.
●Do not smoke, cause sparks or
expose an open flame to fuel.
Fuel fumes are flammable.
■When working near the elec-
tric cooling fan or radiator
grille
Be sure the power switch is OFF.
With the power switch in ON, the
electric cooling fa n may automati-
cally start to run if the air condi-
tioning is on and/or the coolant
temperature is high. ( P.492)
■Safety glasses
Wear safety gla sses to prevent
flying or falling material, fluid
spray, etc., from getting in your
eyes.
NOTICE
■If you remove the air cleaner
filter
Driving with the air cleaner filter
removed may cause excessive
engine wear due to dirt in the air.
Page 492 of 662
4947-3. Do-it-yourself maintenance
■Brake fluid can absorb moisture
from the air
Excess moisture in the brake fluid
can cause a dangerous loss of brak-
ing efficiency. Use only newly
opened brake fluid.
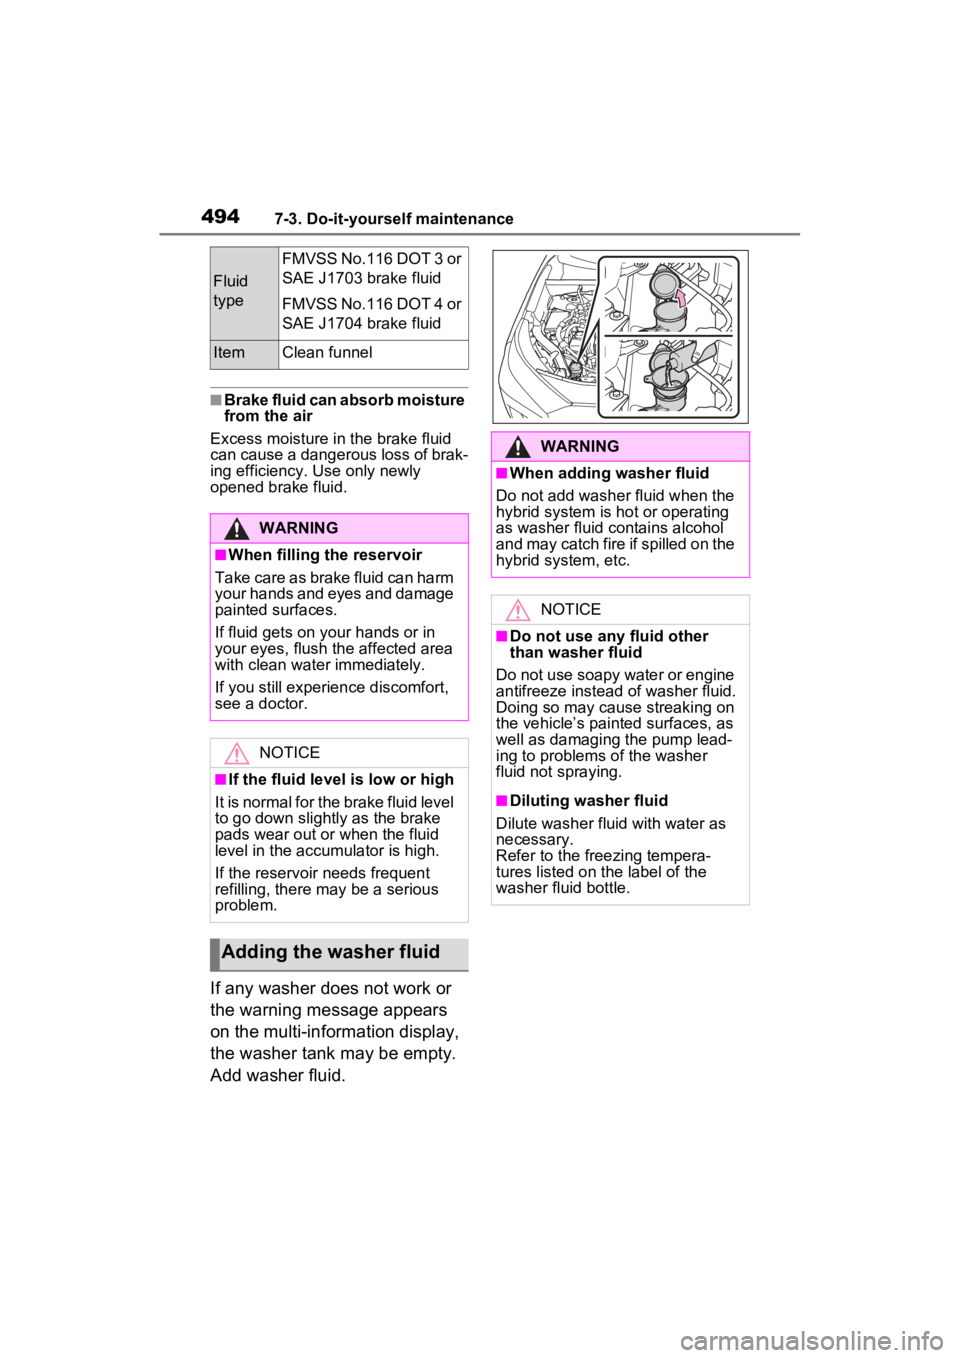
If any washer does not work or
the warning message appears
on the multi-information display,
the washer tank may be empty.
Add washer fluid.
Fluid
type
FMVSS No.116 DOT 3 or
SAE J1703 brake fluid
FMVSS No.116 DOT 4 or
SAE J1704 brake fluid
ItemClean funnel
WARNING
■When filling the reservoir
Take care as brake fluid can harm
your hands and eyes and damage
painted surfaces.
If fluid gets on your hands or in
your eyes, flush th e affected area
with clean water immediately.
If you still experien ce discomfort,
see a doctor.
NOTICE
■If the fluid level is low or high
It is normal for the brake fluid level
to go down slightly as the brake
pads wear out or when the fluid
level in the accumulator is high.
If the reservoir needs frequent
refilling, there may be a serious
problem.
Adding the washer fluid
WARNING
■When adding washer fluid
Do not add washer fluid when the
hybrid system is hot or operating
as washer fluid contains alcohol
and may catch fire if spilled on the
hybrid system, etc.
NOTICE
■Do not use any fluid other
than washer fluid
Do not use soapy water or engine
antifreeze instead of washer fluid.
Doing so may cause streaking on
the vehicle’s painted surfaces, as
well as damaging the pump lead-
ing to problems of the washer
fluid not spraying.
■Diluting washer fluid
Dilute washer fluid with water as
necessary.
Refer to the freezing tempera-
tures listed on the label of the
washer fluid bottle.
Page 498 of 662
5007-3. Do-it-yourself maintenance
■When rotating the tires (vehi-
cles with tire pressure warning
system)
Make sure that the power switch is
OFF. If the tires are rotated while
the power switch is in ON, the tire
position informa tion will not be
updated. If this accidentally occurs,
either turn the power switch to OFF
and then to ON, or initialize the sys-
tem after checking that the tire pres-
sure is properly adjusted.
Your vehicle is equipped with a
tire pressure warning system
that uses tire pressure warning
valves and transmitters to detect
low tire inflation pressure before
serious problems arise.
The tire pressure warning sys-
tem of this vehicle adopts a 2-
type warning system
When “Adjust Pressure” is
displayed (Normal Warning)
The tire pressure warning light
comes on and a buzzer sounds
when the tire inflation pressure
becomes low due to natural air
leakage or outside temperature.
(Ways of coping: P.547, 585)
When “Immediately Check
tire when Safe” is displayed
(Emergency Warning)
The tire pressure warning light
comes on and a buzzer sounds
when the tire inflation pressure
becomes low suddenly due to a
blowout. (Ways of coping: P.547,
557) However, the system may not be able to detect sudden tire rup-
tures (bursting, etc.).
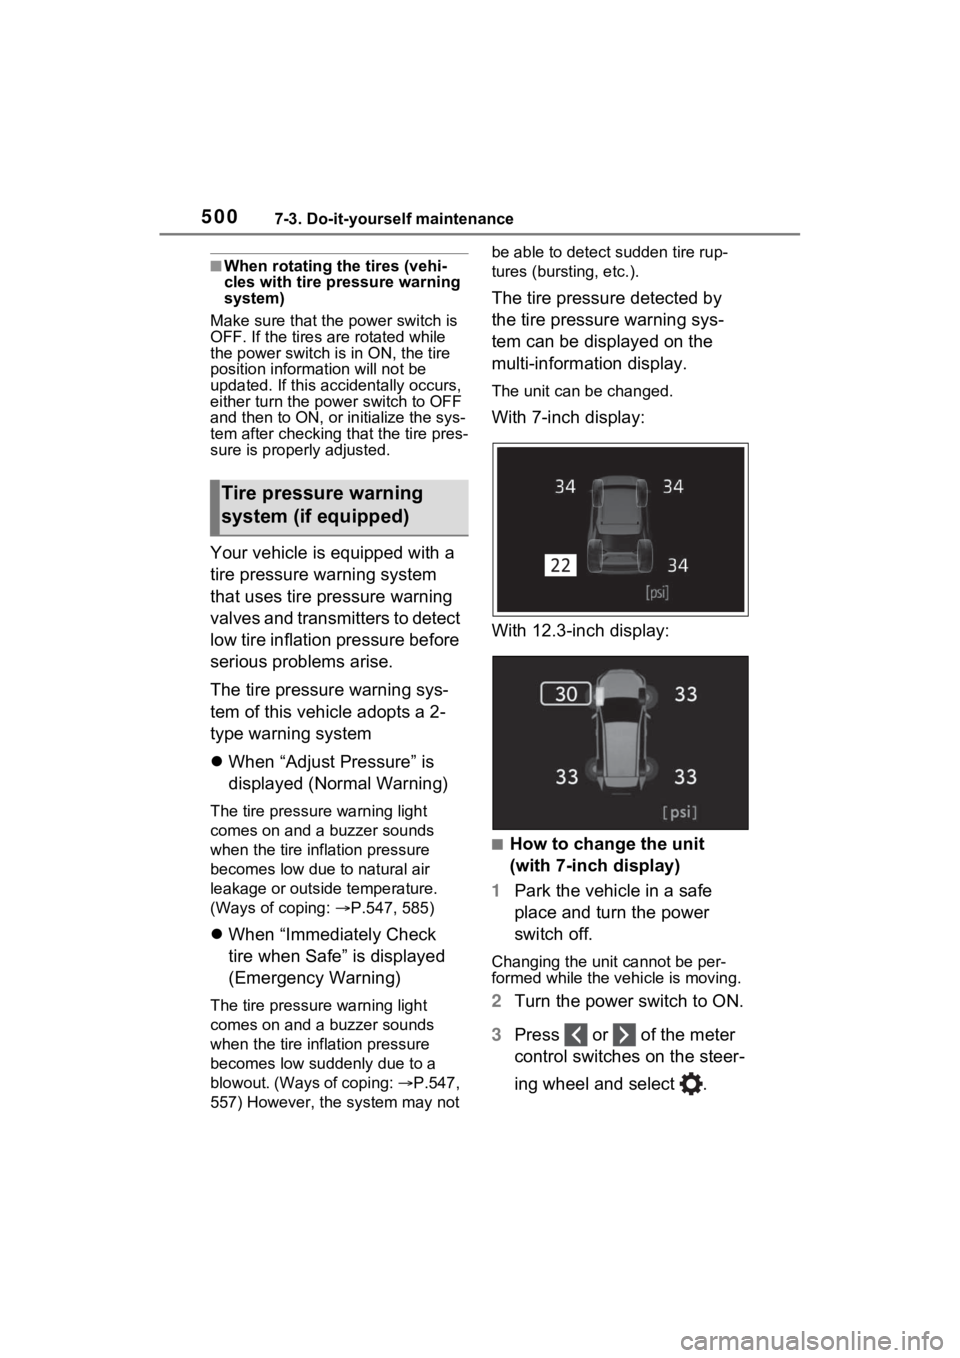
The tire pressure detected by
the tire pressure warning sys-
tem can be displayed on the
multi-information display.
The unit can be changed.
With 7-inch display:
With 12.3-inch display:
■How to change the unit
(with 7-inch display)
1 Park the vehicle in a safe
place and turn the power
switch off.
Changing the unit cannot be per-
formed while the vehicle is moving.
2Turn the power switch to ON.
3 Press or of the meter
control switches on the steer-
ing wheel and select .
Tire pressure warning
system (if equipped)
Page 499 of 662
5017-3. Do-it-yourself maintenance
7
Maintenance and care
4Press or of the meter
control switches and select
“Vehicle Settings”, and then
press and hold .
5 Press or of the meter
control switches and select
“TPWS”, and then press .
6 Press or to select
“Setting Unit”.
7 Press or to select the
desired unit and then press
.
■How to change the unit
(with 12.3-inch display)
1 Park the vehicle in a safe
place and turn the power
switch off.
Changing the unit cannot be per-
formed while the vehicle is moving.
2Turn the power switch to ON.
3 Press and hold to display
the cursor on the content dis-
play area (center) of the
multi-information display.
4 Press or of the meter
control switches to select
and then press .
5 Press or of the meter
control switches and select
“ Vehicle Settings”, and
then press and hold . 6
Press or of the meter
control switches and select
“TPWS”, and then press .
7 Press or to select
“Pressure unit setting”.
8 Press or to select the
desired unit and then press
.
■Routine tire inflation pressure
checks
The tire pressure warning system
does not replace routine tire inflation
pressure checks . Make sure to
check tire inflation pressure as part
of your routine o f daily vehicle
checks.
■Tire inflation pressure
●It may take a few minutes to dis-
play the tire inflation pressure
after the power switch is turned to
ON. It may also take a few min-
utes to display the tire inflation
pressure after infl ation pressure
has been adjusted.
●Tire inflation pressure changes
with temperature.
The displayed values may also be
different from the values mea-
sured using a tire pressure gauge.
■Situations in which the tire
pressure warning system may
not operate properly
●In the following cases, the tire
pressure warning system may not
operate properly.
• If non-genuine Toyota wheels are
used.
• A tire has been replaced with a tire that is not an OE (Original
Equipment) tire.
• A tire has been replaced with a tire that is not of the specified size.
• Tire chains, etc. are equipped.
• An auxiliary-support ed run-flat tire
is equipped.
Page 500 of 662
5027-3. Do-it-yourself maintenance
• If a window tint that affects the
radio wave signals is installed.
• If there is a lot of snow or ice on
the vehicle, particularly around the
wheels or wheel housings.
• If the tire inflation pressure is
extremely higher than the speci-
fied level.
• If wheel without tire pressure
warning valves a nd transmitters
are used.
• If the ID code on the tire pressure
warning valves and transmitters is
not registered in the tire pressure
warning computer.
●Performance may be affected in
the following situations.
• Near a TV tower, electric power plant, gas station, radio station,
large display, airpo rt or other facil-
ity that generates strong radio
waves or electrical noise
• When carrying a portable radio,
cellular phone, cordless phone or
other wireless communication
device
If tire position information is not
correctly displayed due to the
radio wave conditions, the display
may be corrected by driving and
changing the radio wave condi-
tions.
●When the vehicle is parked, the
time taken for the warning to start
or go off could be extended.
●When tire inflation pressure
declines rapidly for example when
a tire has burst, the warning may
not function.
■Warning performance of the tire
pressure warning system
The warning of the tire pressure
warning system will change in
accordance with th e conditions
under which it was initialized. For
this reason, the system may give a
warning even if the tire pressure
does not reach a low enough level,
or if the pressure is higher than the
pressure that was adjusted to when
the system was initialized.
When replacing tires or wheels,
tire pressure warning valves and
transmitters must also be
installed.
When new tire pressure warning
valves and transmitters are
installed, new ID codes must be
registered in the tire pressure
warning computer and the tire
pressure warning system must
be initialized. ( P.506)
■When replacing the tires and
wheels
If the ID code of the tire pressure
warning valve and tr ansmitter is not
registered, the tire pressure warning
system will not work properly. After
driving for about 20 minutes, the tire
pressure warning light blinks for 1
minute and stays on to indicate a
system malfunction.
Installing tire pressure
warning valves and trans-
mitters (if equipped)
NOTICE
■Repairing or replacing tires,
wheels, tire pressure warn-
ing valves, transmitters and
tire valve caps
●When removing or fitting the
wheels, tires or the tire pressure
warning valves and transmit-
ters, contact your Toyota dealer
as the tire pressure warning
valves and transmitters may be
damaged if not handled cor-
rectly.