2023 TOYOTA RAV4 PRIME steering wheel
[x] Cancel search: steering wheelPage 95 of 662

952-1. Plug-in hybrid system
2
Plug-in hybrid system
When eco air conditioning mode
is used, the air conditioning con-
trol is switched automatically to
a lower setting. (P.423)
The heated steering wheel (if
equipped) and seat heaters are
efficient heating device that
directly warm the body using
less electric power.
When used togethe r with the air
conditioning system, a low tem-
perature setting can be used to
improve electrical and fuel effi-
ciency.
■Check the tire pressure
If the tire pressure is lower than
the specified value, it will
worsen the electrical and fuel
efficiency.
A pressure level 7 psi (50 kPa, 0.5
kgf/cm
2 or bar) lower than the spec-
ified value will cause a worsening of
several percentage points.
■When driving on highways,
use the EV/HV mode selec-
tion switch to drive in HV
mode
The power consumption will
increase significantly if the vehi-
cle is driven in EV mode on
highways.
■Do not load unnecessary
objects in the vehicle
Driving with objects weighing
220 lb. (100 kg) in the vehicle
will worsen the electrical and
fuel efficiency by approximately
3%. Air resistance also greatly
affects electrical and fuel effi-
ciency. Remove any exterior
accessories such as a roof lug-
gage carrier when they are not
being used.
The running resistance of snow
tires is high and they will worsen
electrical and fuel efficiency.
Replace them with standard
tires as soon as they are no lon-
ger needed.
■Know your vehicle’s electri-
cal and fuel efficiency
If you know your vehicle’s daily
electrical and fuel efficiency, you
will understand the benefits of
Eco drive.
Use the Power Consump-
tion/Fuel Economy, ECO Accel-
erator Guidance/“Eco Score”
and other data displayed on the
multi-information display.
The following indicate that
charging has been carried out
properly.
The charging indicator of the
charging port turns off
“Charging Complete” is dis-
played on the multi-informa-
tion display when a door is
opened with the power switch
off ( P.117)
Regardless of the type of power
Display when c harging is
completed
Page 187 of 662

1873-1. Instrument cluster
3
Vehicle status information and indicators
Press: Enter/Set
Press and hold: Reset/Dis-
play customizable items
Return to the previous screen
Call sending/receiving and
history display (if equipped)
Linked with the hands-free
system, sending or receiving
call is displayed. For details
regarding the hands-free sys-
tem, refer to “MULTIMEDIA
OWNER’S MANUAL”.
*: On screens where the screen can be scrolled and the display can
be switched, a scroll bar or a
round icon that shows the num-
ber of registered screens is dis-
played.
Information related to each icon
can be displayed by selecting
the icon with the meter control
switches.
Some of the information may be
displayed automatically depending
on the situation.
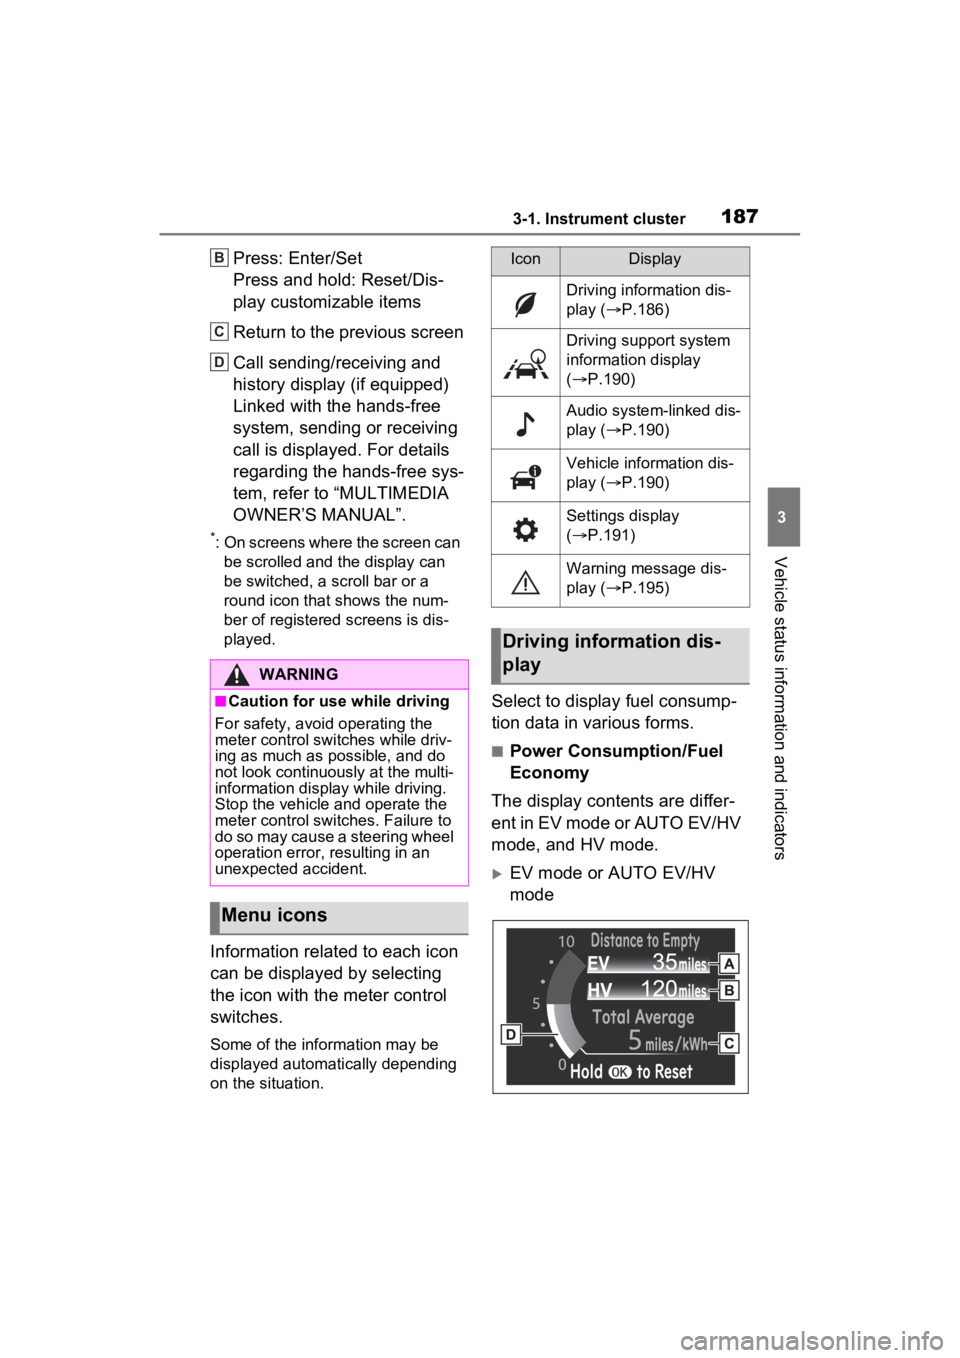
Select to display fuel consump-
tion data in various forms.
■Power Consumption/Fuel
Economy
The display contents are differ-
ent in EV mode or AUTO EV/HV
mode, and HV mode.
EV mode or AUTO EV/HV
mode
WARNING
■Caution for use while driving
For safety, avoid operating the
meter control swit ches while driv-
ing as much as possible, and do
not look continuously at the multi-
information display while driving.
Stop the vehicle and operate the
meter control swit ches. Failure to
do so may cause a steering wheel
operation error, resulting in an
unexpected accident.
Menu icons
B
C
D
IconDisplay
Driving information dis-
play ( P.186)
Driving support system
information display
( P.190)
Audio system-linked dis-
play ( P.190)
Vehicle information dis-
play ( P.190)
Settings display
( P.191)
Warning message dis-
play ( P.195)
Driving information dis-
play
Page 200 of 662

2003-1. Instrument cluster
3Contents display area (left):
Press to display contents
list.
Contents display area (right):
Press to display contents
list.
4 Press or to select the
items.
5 Press to select/deselect
items.
The display contents are differ-
ent in EV mode or AUTO EV/HV
mode, and HV mode.
EV mode or AUTO EV/HV
mode Current power consumption
Displays the instantaneous current
power consumption.
Average power consumption
Displays the average power con-
sumption since the function was
reset or the average power con-
sumption after starting.
*1, 2, 3
The average power consumption
selected by “Power Consumption”
on the screen is displayed.
(
P.191)
*1: Use the displayed power con-
sumption as a reference only.
*2: Average power consumption since the function was reset can
be reset by pressing and holding
.
*3: Average power consumption after starting is reset each time
the hybrid system stops.
HV mode
Current fuel economy
Displays the instantaneous current
fuel economy.
Average fuel economy
Displays the average fuel economy
since the function was reset or the
average fuel economy after starting
or refueling.
*1, 2, 3
WARNING
■Caution for use while driving
For safety, avoid operating the
meter control swit ches while driv-
ing as much as possible, and do
not look continuously at the multi-
information display while driving.
Stop the vehicle and operate the
meter control swit ches. Failure to
do so may cause a steering wheel
operation error, resulting in an
unexpected accident.
Power Consumption/Fuel
Economy
A
B
A
B
Page 212 of 662

2123-1. Instrument cluster
systems will be displayed when
necessary:
■Driving support systems
Displays a warning/sugges-
tion/advice message or the
operating state of a relevant
system.
PCS (Pre-Collision System)
( P.340)
Brake Override System
( P.283)
Drive-Start Control ( P.283)
Parking Support Brake func-
tion (static objects) (if
equipped) ( P.400)
Displayed content is the same as
that displayed on the meter. For
details, refer to the explanations of
each system.
■ / icons
Displays the following multi-
information display linked icons:
: Master warning icon
Displayed when a warning mes-
sage is displayed on the multi-infor-
mation display.
: Information icon
Displayed when a sugges-
tion/advice pop-up display is dis-
played on the multi-information
display.
■Warning message
Some warning messages are
displayed when necessary,
according to certain conditions.
Displayed content is the same as that displayed on
the multi-informa-
tion display. For details, refer to the
explanations of each system.
■Audio system operation
status (if equipped)
Displayed when an audio
remote control switch on the
steering wheel is operated.
■Hands-free system status
(if equipped)
Displayed when the hands-free
system is operated.
■Outside temperature dis-
play
Displayed when the power
switch is turned to ON or when
the low outside temperature
indicator is flashing.
■When a pop-up display is dis-
played
When a pop-up display is displayed,
a current display may no longer be
displayed. In this case, the display
will return afte r the pop-up display
disappears.
■Outside temperature display
●When the ambient temperature is
approximately 37°F (3°C) or
lower, will flash for approxi-
mately 10 second s and the out-
side temperat ure display will turn
off.
●In the following sit uations, the cor-
rect outside temperature may not
be displayed, or the display may
take longer than normal to
change:
• When stopped (including when using “My Room Mode”), or driv-
ing at low speeds (less than 12
mph [20 km/h])
Page 217 of 662

217
4
4
Before driving
Before driving
4-1. Key informationKeys ............................ 218
4-2. Opening, closing and locking the doors
Side doors ................... 222
Back door .................... 227
Smart key system ....... 241
4-3. Adjusting the seats Front seats .................. 247
Rear seats................... 248
Driving position memory .................................. 250
Head restraints............ 253
4-4. Adjusting the steering wheel and mirrors
Steering wheel ............ 256
Inside rear view mirror 257
Digital Rear-view Mirror .................................. 258
Outside rear view mirrors .................................. 268
4-5. Opening, closing the win- dows and moon roof
Power windows ........... 270
Moon roof .................... 273
Panoramic moon roof.. 276
Page 250 of 662

2504-3. Adjusting the seats
ten.
■Recall procedure
1 Check that the shift lever is in
P.
2 Turn the power switch to ON.
3 Press one of the buttons for
the driving position you want
to recall until the buzzer
sounds.
■To stop the position recall oper-
ation part-way through
Perform any of the following:
●Press the “SET” button.
●Press button “1” or “2”.
●Operate any of the seat adjust-
ment switches.
■Seat positions that can be
memorized ( P.247)
The adjusted positions other than
the position adjusted by lumbar sup-
port switch can be recorded.
■Operating the driving position
memory after turning the power
switch to OFF
Recorded seat positions can be
activated up to 180 seconds after
the driver’s door is opened and
another 60 seconds after it is closed
again.
■In order to correctly use the
driving position memory func-
tion
If a seat position is already in the
furthest possible position and the
seat is operated in the same direc-
tion, the recorded position may be
slightly different w hen it is recalled.
■When recalling the driving posi-
tion
Take care when recalling the driving
position so that the head restraint
does not touch the ceiling.
■If the 12-volt b attery is discon-
nected
The memorized positions are
erased.
■When the recorded seat posi-
tion cannot be recalled
The seat position may not be
recalled in some situations when the
seat position is recorded in a certain
range. For details, contact your
Toyota dealer.
WARNING
■Seat adjustment caution
Take care during seat adjustment
so that the seat does not strike
the rear passenger or squeeze
your body against the steering
wheel.
Page 255 of 662

2554-4. Adjusting the steering wheel and mirrors
4
Before driving
4-4.Adjusting the steering wheel and mirrors
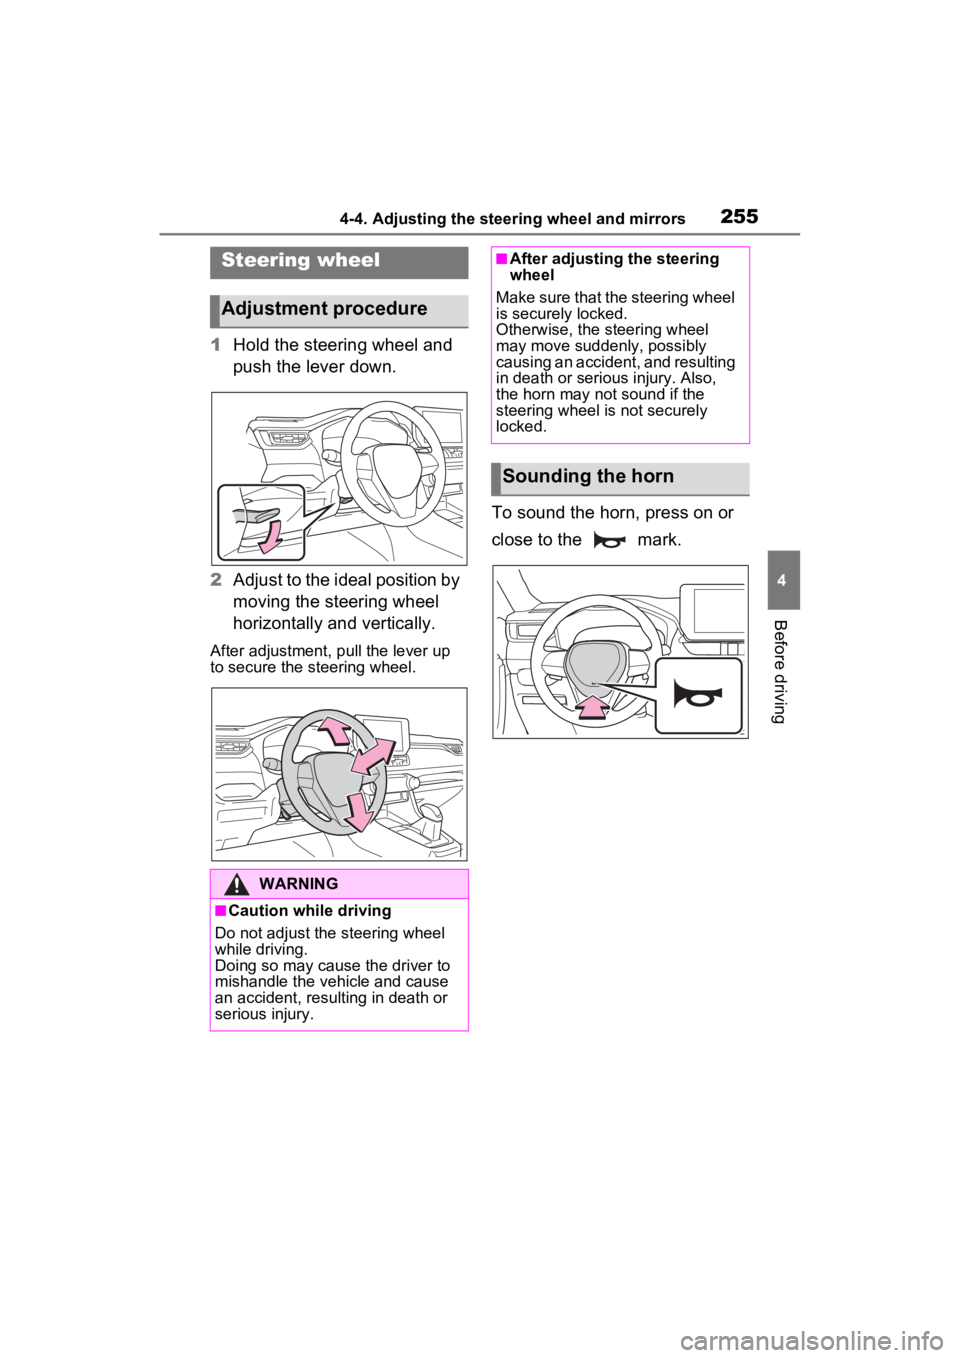
1Hold the steering wheel and
push the lever down.
2 Adjust to the ideal position by
moving the steering wheel
horizontally and vertically.
After adjustment, pull the lever up
to secure the steering wheel.
To sound the horn, press on or
close to the mark.
Steering wheel
Adjustment procedure
WARNING
■Caution while driving
Do not adjust the steering wheel
while driving.
Doing so may cause the driver to
mishandle the vehicle and cause
an accident, resul ting in death or
serious injury.
■After adjusting the steering
wheel
Make sure that the steering wheel
is securely locked.
Otherwise, the steering wheel
may move suddenly, possibly
causing an accident, and resulting
in death or serious injury. Also,
the horn may not sound if the
steering wheel is not securely
locked.
Sounding the horn
Page 256 of 662

2564-4. Adjusting the steering wheel and mirrors
*: If equipped
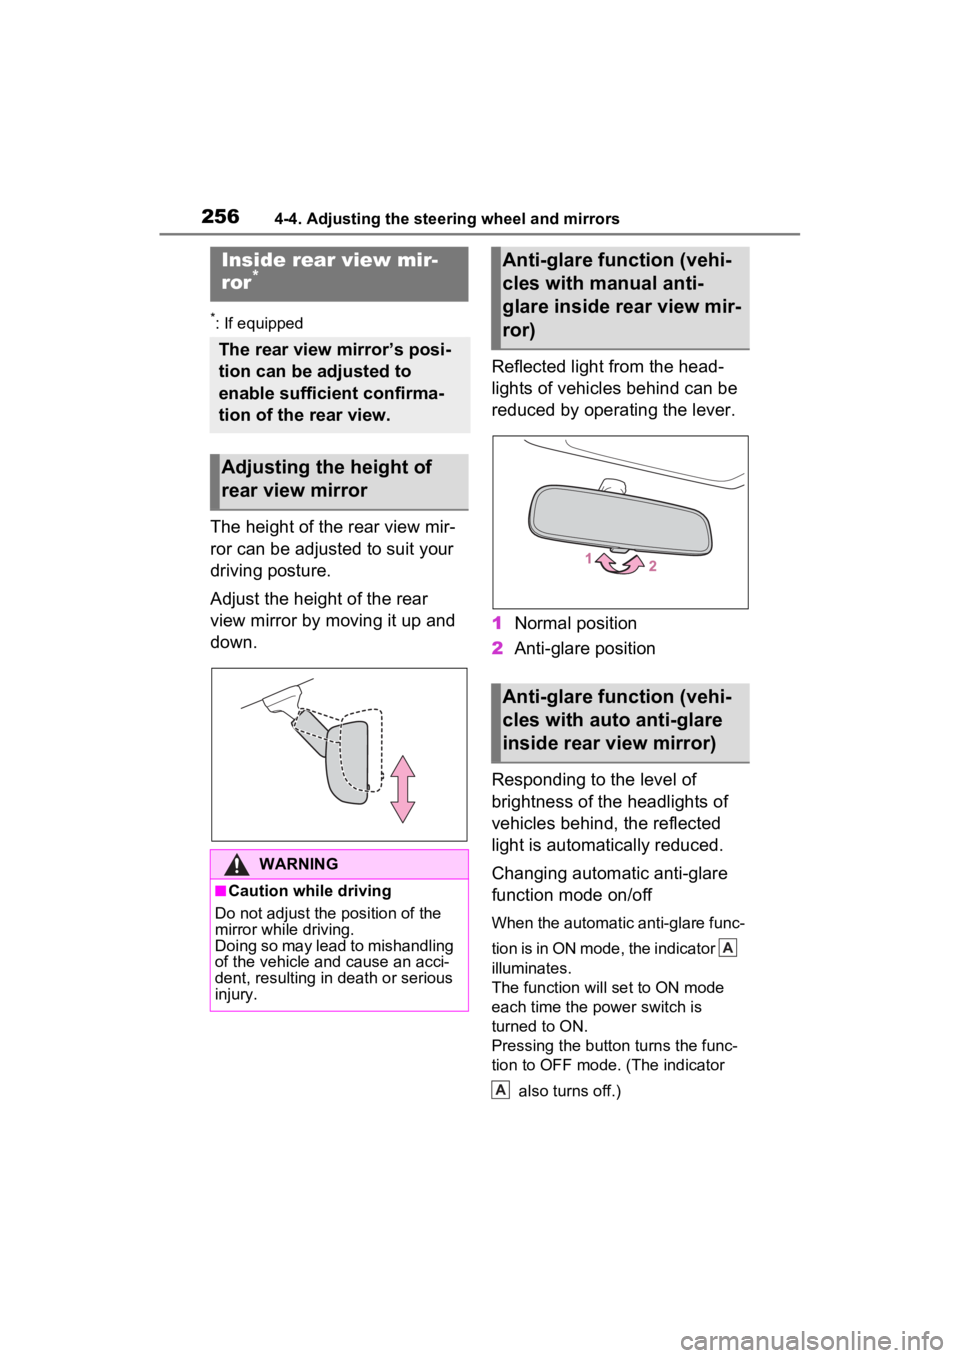
The height of the rear view mir-
ror can be adjusted to suit your
driving posture.
Adjust the height of the rear
view mirror by moving it up and
down.Reflected light from the head-
lights of vehicles behind can be
reduced by operating the lever.
1
Normal position
2 Anti-glare position
Responding to the level of
brightness of the headlights of
vehicles behind, the reflected
light is automatically reduced.
Changing automatic anti-glare
function mode on/off
When the automatic anti-glare func-
tion is in ON mode, the indicator
illuminates.
The function will set to ON mode
each time the power switch is
turned to ON.
Pressing the button turns the func-
tion to OFF mode. (The indicator also turns off.)
Inside rear view mir-
ror*
The rear view mirror’s posi-
tion can be adjusted to
enable sufficient confirma-
tion of the rear view.
Adjusting the height of
rear view mirror
WARNING
■Caution while driving
Do not adjust the position of the
mirror while driving.
Doing so may lead to mishandling
of the vehicle and cause an acci-
dent, resulting in death or serious
injury.
Anti-glare function (vehi-
cles with manual anti-
glare inside rear view mir-
ror)
Anti-glare function (vehi-
cles with auto anti-glare
inside rear view mirror)
A
A