2023 TOYOTA RAV4 HYBRID belt
[x] Cancel search: beltPage 234 of 586
2324-2. Driving procedures
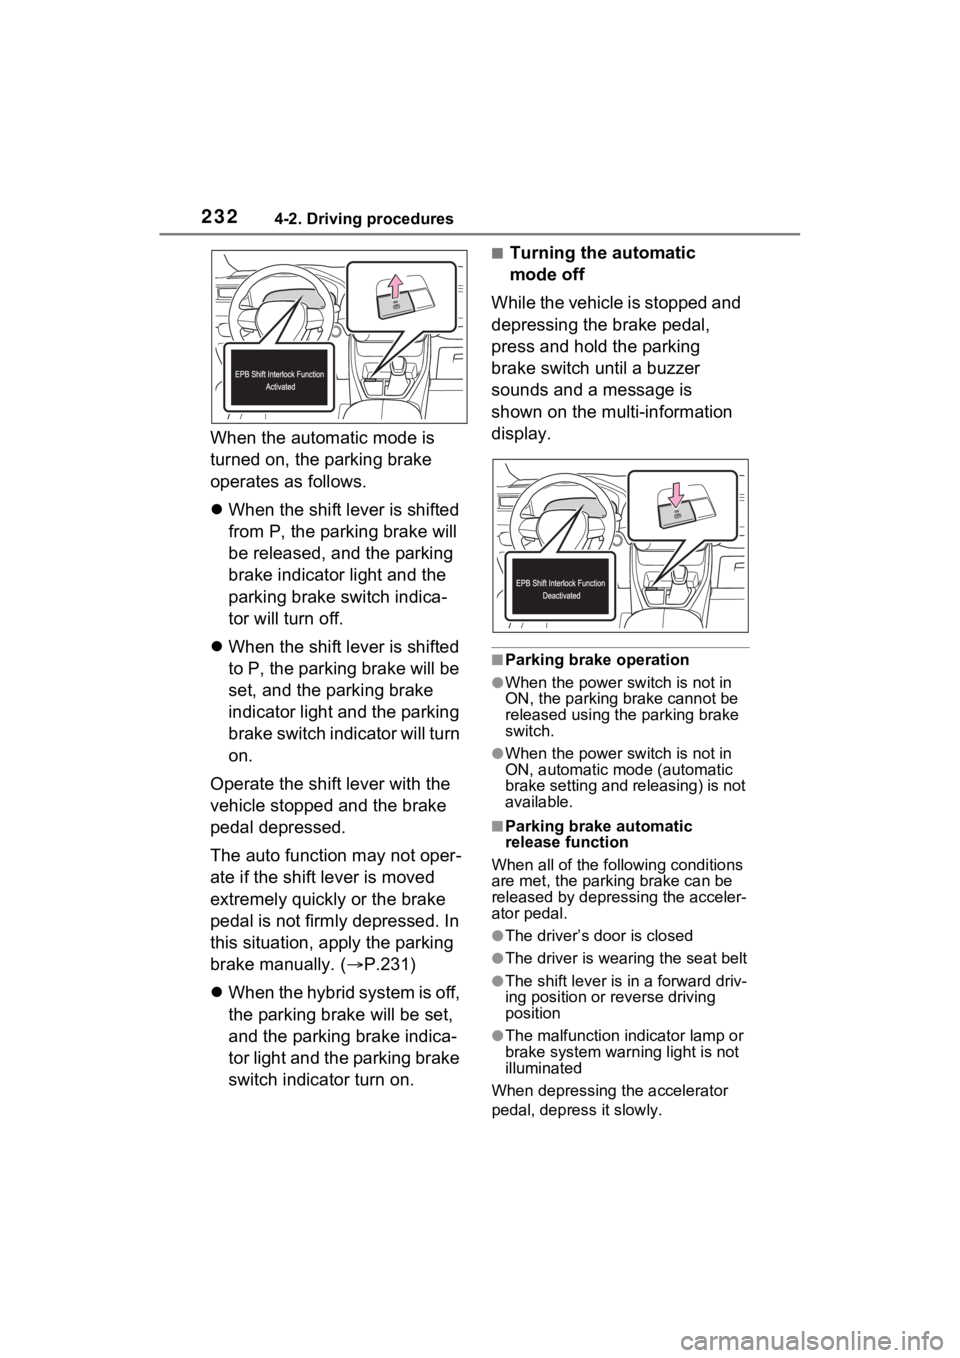
When the automatic mode is
turned on, the parking brake
operates as follows.
When the shift lever is shifted
from P, the parking brake will
be released, and the parking
brake indicator light and the
parking brake switch indica-
tor will turn off.
When the shift lever is shifted
to P, the parking brake will be
set, and the parking brake
indicator light and the parking
brake switch indicator will turn
on.
Operate the shift lever with the
vehicle stopped and the brake
pedal depressed.
The auto function may not oper-
ate if the shift lever is moved
extremely quickly or the brake
pedal is not firmly depressed. In
this situation, apply the parking
brake manually. ( P.231)
When the hybrid system is off,
the parking brake will be set,
and the parking brake indica-
tor light and the parking brake
switch indicator turn on.
■Turning the automatic
mode off
While the vehicle is stopped and
depressing the brake pedal,
press and hold the parking
brake switch until a buzzer
sounds and a message is
shown on the multi-information
display.
■Parking brake operation
●When the power switch is not in
ON, the parking brake cannot be
released using the parking brake
switch.
●When the power switch is not in
ON, automatic mode (automatic
brake setting and releasing) is not
available.
■Parking brake automatic
release function
When all of the fo llowing conditions
are met, the parking brake can be
released by depressing the acceler-
ator pedal.
●The driver’s door is closed
●The driver is wearing the seat belt
●The shift lever is in a forward driv-
ing position or reverse driving
position
●The malfunction in dicator lamp or
brake system warning light is not
illuminated
When depressing the accelerator
pedal, depress it slowly.
Page 235 of 586

2334-2. Driving procedures
4
Driving
If the parking brake is not released
when the accelerator pedal is
depressed, release the parking
brake manually.
When the shift lever is shifted from
P, the parking brake will be released
automatically.
■Parking brake automatic lock
function
The parking brake will be set auto-
matically under the following condi-
tions:
●The brake pedal is not depressed
●The driver’s door is open
●The driver’s seat belt is not fas-
tened
●The shift lever is in a position
other than P or N
●The malfunction indicator lamp
and brake system warning light
are not illuminated
■If “Parking Brake Temporarily
Unavailable” i s displayed on
the multi-information display
If the parking brake is operated
repeatedly over a short period of
time, the system may restrict opera-
tion to prevent overheating. If this
happens, refrain from operating the
parking brake. Nor mal operation will
return after about 1 minute.
■If “Parking Brake Unavailable”
is displayed on the multi-infor-
mation display
Operate the parking brake switch. If
the message does not disappear
after operating the switch several
times, the system may be malfunc-
tioning. Have the vehicle inspected
by your Toyota dealer.
■Parking brake operation sound
When the parking brake operates, a
motor sound (whirring sound) may
be heard. This does not indicate a
malfunction.
■Parking brake indicator light
and Parking brake switch indi-
cator
●Depending on the power switch
position/mode, the parking brake
indicator light and the parking
brake switch indicator will turn on
and stay on as described below:
ON: Comes on until the parking
brake is released.
Not in ON: Stays on for approxi-
mately 15 seconds.
●When the power switch is turned
off with the parking brake set, the
parking brake indicator light and
the parking brake switch indicator
will stay on for abo ut 15 seconds.
This does not indicate a malfunc-
tion.
■When the parking brake switch
malfunctions
Automatic mode (automatic brake
setting and releas ing) will be turned
on automatically.
■Parking the vehicle
P.195
■Parking brake engaged warning
buzzer
A buzzer will sound if the vehicle is
driven with the parking brake
engaged. “Parking Brake ON” is dis-
played on the multi-information dis-
play (with the vehicle reaching a
speed of 3 mph [5 km/h]).
■If the brake system warning
light comes on
P.456
■Usage in winter time
P.335
Page 237 of 586

2354-2. Driving procedures
4
Driving
Turn the brake hold system on
The brake hold standby indicator
(green) comes on. While the
system is holding the brake, the
brake hold operated indicator (yel-
low) comes on.
■Brake hold system operating
conditions
The brake hold system cannot be
turned on in the following condi-
tions:
●The driver’s doo r is not closed.
●The driver is not wearing the seat
belt.
●The parking brake is engaged.
If any of the cond itions above are
detected when the brake hold sys-
tem is enabled, the system will turn
off and the brake hold standby indi-
cator light will go off. In addition, if
any of the conditions are detected
while the system is holding the
brake, a warning buzzer will sound
and a message will be shown on the
multi-information display. The park-
ing brake will then be set automati-
cally.
■Brake hold function
●If the brake pedal is left released
for a period of about 3 minutes
after the system has started hold-
ing the brake, the parking brake
will be set automatically. In this
case, a warning buzzer sounds
and a message is shown on the
multi-information display.
●To turn the syste m off while the
system is holding the brake, firmly
depress the brake pedal and
press the button again.
●The brake hold function may not
hold the vehicle when the vehicle
is on a steep incline. In this situa-
tion, it may be ne cessary for the
driver to apply the brakes. A warn-
ing buzzer will sound and the
multi-information display will
inform the driver of this situation. If
a warning message is shown on
the multi-information display, read
the message and follow the
instructions.
■When the parking brake is set
automatically while the system
is holding the brakes
Perform any of the following opera-
tions to release the parking brake.
●Depress the accelerator pedal.
(The parking brake will not be
released automatically if the seat
belt is not fastened.)
●Operate the parkin g brake switch
with the brake pedal depressed.
Make sure that the parking brake
Brake Hold
The brake hold system
keeps the brake applied
when the shift lever is in D,
S or N with the system on
and the brake pedal has
been depressed to stop the
vehicle. The system
releases the brake when the
accelerator pedal is
depressed with the shift
lever in D or S to allow
smooth start off.
Enabling the system
A
B
Page 293 of 586

2914-5. Using the driving support systems
4
Driving
when the vehicle speed is approx-
imately 20 mph (30 km/h) or more.
(However, when the vehicle speed
is set while driving at below
approximately 20 mph [30 km/h],
the set speed will be set to
approximately 20 mph [30 km/h].)
■Accelerating after setting the
vehicle speed
The vehicle can accelerate by oper-
ating the accelerator pedal. After
accelerating, the set speed
resumes. However, during vehicle-
to-vehicle distance control mode,
the vehicle spee d may decrease
below the set speed in order to
maintain the distance to the preced-
ing vehicle.
■When the vehicle stops while
follow-up cruising
●Pressing the “+RES” switch while
the vehicle ahead stops will
resume follow-up cruising if the
vehicle ahead starts off within
approximately 3 seconds after the
switch is pressed.
●If the vehicle ahead starts off
within 3 seconds after your vehicle
stops, follow-up cruising will be
resumed.
■Automatic cancelation of vehi-
cle-to-vehicle d istance control
mode
Vehicle-to-vehicle distance control
mode is automatically canceled in
the following situations.
●VSC is activated.
●TRAC is activated for a period of
time.
●When the VSC or TRAC system is
turned off.
●The sensor cannot detect cor-
rectly because i t is covered in
some way.
●When the brake control or output
restriction control of a driving sup-
port system operates.
(For example: Pre-Collision Sys-
tem, Drive-Start Control)
●The parking brake is operated.
●The vehicle is stopped by system
control on a steep incline.
●The following are detected when
the vehicle has been stopped by
system control:
• The driver is not wearing a seat
belt.
• The driver’s door is opened.
• The vehicle has been stopped for about 3 minutes
If vehicle-to-vehicle distance control
mode is automatically canceled for
any reasons other than the above,
there may be a malfunction in the
system. Contact your Toyota dealer.
■Automatic cancelation of con-
stant speed control mode
Constant speed control mode is
automatically cance led in the follow-
ing situations:
●Actual vehicle speed is more than
approximately 10 mph (16 km/h)
below the set vehicle speed.
●Actual vehicle speed falls below
approximately 20 mph (30 km/h).
●VSC is activated.
●TRAC is activated for a period of
time.
●W h en t he V S C o r T RA C sys te m is
turned off.
●When the brake control or output
restriction control of a driving sup-
port system operates.
(For example: Pre-Collision Sys-
tem, Drive-Start Control)
●The parking brake is operated.
If constant speed control mode is
automatically canceled for any rea-
sons other than the above, there
may be a malfunction in the system.
Contact your Toyota dealer.
■Brake operation
A brake operation sound may be
heard and the brake pedal response
may change, but these are not mal-
Page 339 of 586
3374-6. Driving tips
4
Driving
Specific design characteris-
tics give it a higher center of
gravity than ordinary passen-
ger cars. This vehicle design
feature causes this type of
vehicle to be more likely to
rollover. And, utility vehicles
have a significantly higher
rollover rate than other types
of vehicles.
An advantage of the higher
ground clearance is a better
view of the road allowing you
to anticipate problems.
It is not designed for corner-
ing at the same speeds as
ordinary passenger cars any
more than low-slung sports
cars are designed to perform
satisfactorily under off-road
conditions. Therefore, sharp
turns at excessive speeds
may cause the vehicle to roll-
over.
When driving your vehicle off-
Utility vehicle precau-
tions
This vehicle belongs to the
utility vehicle class, which
has higher ground clear-
ance and narrower tread in
relation to the height of its
center of gravity to make it
capable of performing in a
wide variety of off-road
applications.
Utility vehicle feature
WARNING
■Utility vehicle precautions
Always observe t he following pre-
cautions to minim ize the risk of
death, serious injury or damage to
your vehicle:
●In a rollover crash, an unbelted
person is significantly more
likely to die than a person wear-
ing a seat belt. Therefore, the
driver and all passengers
should always fasten their seat
belts.
●Avoid sharp turns or abrupt
maneuvers, if at all possible.
Failure to operat e this vehicle
correctly may result in loss of
control or vehicle rollover caus-
ing death or serious injury.
●Loading cargo on the roof lug-
gage carrier (if equipped) will
make the center of the vehicle
gravity higher. Avoid high
speeds, sudden starts, sharp
turns, sudden braking or abrupt
maneuvers, otherwise it may
result in loss of control or vehi-
cle rollover du e to failure to
operate this vehicle correctly.
●Always slow down in gusty
crosswinds. Because of its pro-
file and higher ce nter of gravity,
your vehicle is more sensitive to
side winds than an ordinary
passenger car. Slowing down
will allow you to have better
control.
●Do not drive horizontally across
steep slopes. Driving straight up
or straight down is preferred.
Your vehicle (or any similar off-
road vehicle) can tip over side-
ways much more easily than
forward or backward.
Off-road driving
Page 389 of 586
3876-1. Maintenance and care
6
Maintenance and care
Remove dirt and dust using a
vacuum cleaner. Wipe dirty
surfaces with a cloth damp-
ened with lukewarm water.
If dirt cannot be removed,
wipe it off with a soft cloth
dampened with neutral deter-
gent diluted to approximately
1%.
Wring out any excess water
from the cloth and thoroughly
wipe off remaining traces of
detergent and water.
■Shampooing the carpets
There are several commercial foam-
ing-type cleaners available. Use a
sponge or brush to apply the foam.
Rub in overlapping circles. Do not
use water. Wipe dirty surfaces and
let them dry. Exce llent results are
obtained by keeping the carpet as
dry as possible.
■Handling the seat belts
Clean with mild soap and lukewarm
water using a clot h or sponge. Also
check the belts periodically for
excessive wear, fraying or cuts.
NOTICE
●Do not bring the nozzle tip close
to boots (rubber or resin manu-
factured cover), or connectors
or the following parts.
The parts may be damaged if
they come into contact with
high-pressure water.
• Traction related parts
• Steering parts
• Suspension parts
• Brake parts
●Keep the cleaning nozzle at
least 11.9 in. (30 cm) away from
the vehicle body. Otherwise
resin section, such as moldings
and bumpers, may be deformed
and damaged. Also, do not con-
tinuously hold the nozzle in the
same place.
●Do not spray the lower part of
the windshield continuously. If
water enters the air conditioning
system intake located near the
lower part of the windshield, the
air conditioning system may not
operate correctly.
●Do not wash the underside of
the vehicle usin g a high pres-
sure car washer.
Cleaning and protect-
ing the vehicle interior
Perform cleaning in a man-
ner appropriate to each
component and its material.
Protecting the vehicle
interior
Page 395 of 586
3936-2. Maintenance
6
Maintenance and care
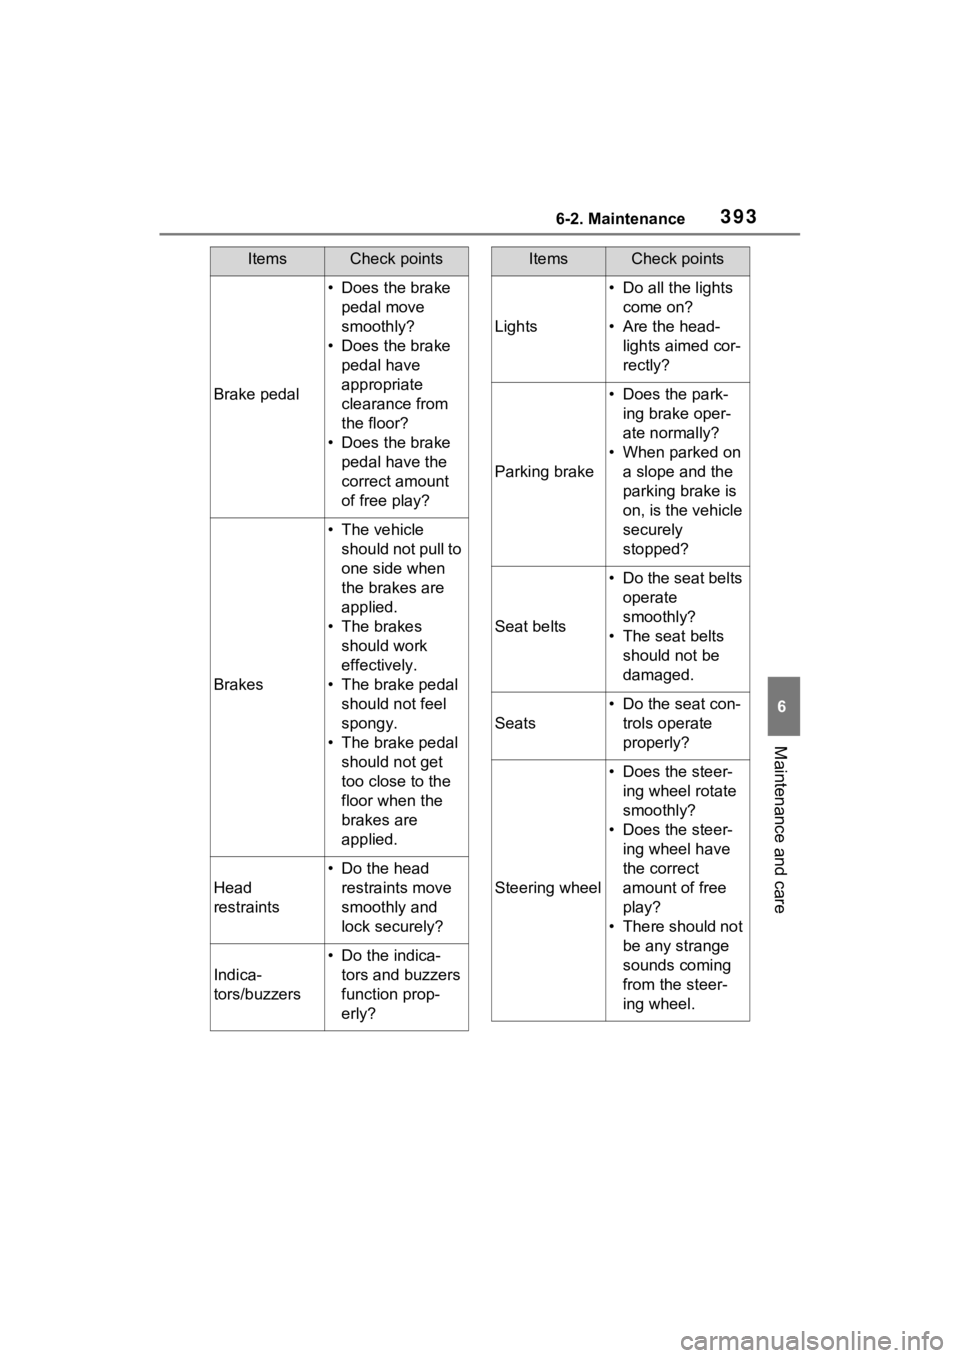
Brake pedal
• Does the brake pedal move
smoothly?
• Does the brake pedal have
appropriate
clearance from
the floor?
• Does the brake pedal have the
correct amount
of free play?
Brakes
• The vehicle should not pull to
one side when
the brakes are
applied.
• The brakes should work
effectively.
• The brake pedal should not feel
spongy.
• The brake pedal should not get
too close to the
floor when the
brakes are
applied.
Head
restraints
• Do the head restraints move
smoothly and
lock securely?
Indica-
tors/buzzers
• Do the indica-tors and buzzers
function prop-
erly?
ItemsCheck points
Lights
• Do all the lights come on?
• Are the head- lights aimed cor-
rectly?
Parking brake
• Does the park-ing brake oper-
ate normally?
• When parked on a slope and the
parking brake is
on, is the vehicle
securely
stopped?
Seat belts
• Do the seat belts operate
smoothly?
• The seat belts should not be
damaged.
Seats
• Do the seat con-trols operate
properly?
Steering wheel
• Does the steer-ing wheel rotate
smoothly?
• Does the steer- ing wheel have
the correct
amount of free
play?
• There should not be any strange
sounds coming
from the steer-
ing wheel.
ItemsCheck points
Page 413 of 586
4116-3. Do-it-yourself maintenance
6
Maintenance and care
■If the tread on snow tires wears
down below 0.16 in. (4 mm)
The effectiveness of the tires as
snow tires is lost.
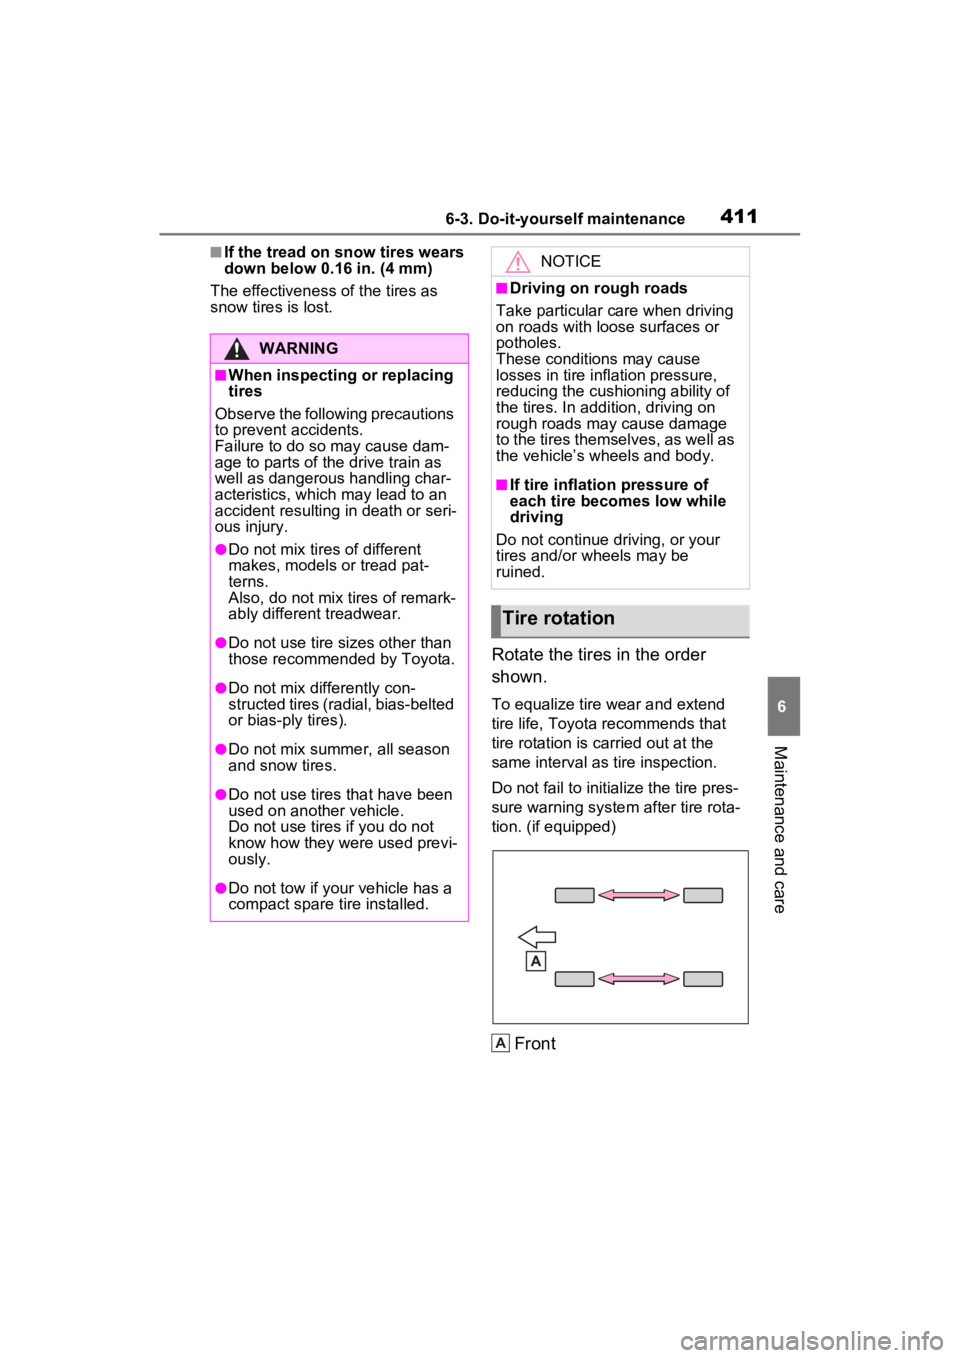
Rotate the tires in the order
shown.
To equalize tire wear and extend
tire life, Toyota recommends that
tire rotation is carried out at the
same interval as tire inspection.
Do not fail to initialize the tire pres-
sure warning system after tire rota-
tion. (if equipped)
Front
WARNING
■When inspecting or replacing
tires
Observe the following precautions
to prevent accidents.
Failure to do so may cause dam-
age to parts of t he drive train as
well as dangerous handling char-
acteristics, which may lead to an
accident resulting in death or seri-
ous injury.
●Do not mix tires of different
makes, models or tread pat-
terns.
Also, do not mix tires of remark-
ably different treadwear.
●Do not use tire sizes other than
those recommende d by Toyota.
●Do not mix differently con-
structed tires (radial, bias-belted
or bias-ply tires).
●Do not mix summer, all season
and snow tires.
●Do not use tires that have been
used on another vehicle.
Do not use tires if you do not
know how they were used previ-
ously.
●Do not tow if your vehicle has a
compact spare tire installed.
NOTICE
■Driving on rough roads
Take particular care when driving
on roads with loose surfaces or
potholes.
These conditions may cause
losses in tire inflation pressure,
reducing the cushioning ability of
the tires. In addition, driving on
rough roads may cause damage
to the tires themselves, as well as
the vehicle’s wheels and body.
■If tire inflation pressure of
each tire becomes low while
driving
Do not continue driving, or your
tires and/or wheels may be
ruined.
Tire rotation
A