2023 TOYOTA RAV4 HYBRID light
[x] Cancel search: lightPage 382 of 586
3805-4. Using the other interior features
1Press and hold the desired
HomeLink
® button.
2 When the HomeLink
® indica-
tor starts flashing orange,
release the HomeLink
® but-
ton and perform “Program-
ming HomeLink
®” 1 (it takes
20 seconds for the
HomeLink
® indicator to start
flashing).
■Before programming
●Install a new battery in the trans-
mitter.
●The battery side of the transmitter
must be pointed away from the
HomeLink
® buttons.
Press the appropriate
HomeLink® button. The
HomeLink® indicator light
should turn on.
The status of the opening and
closing of a garage door is
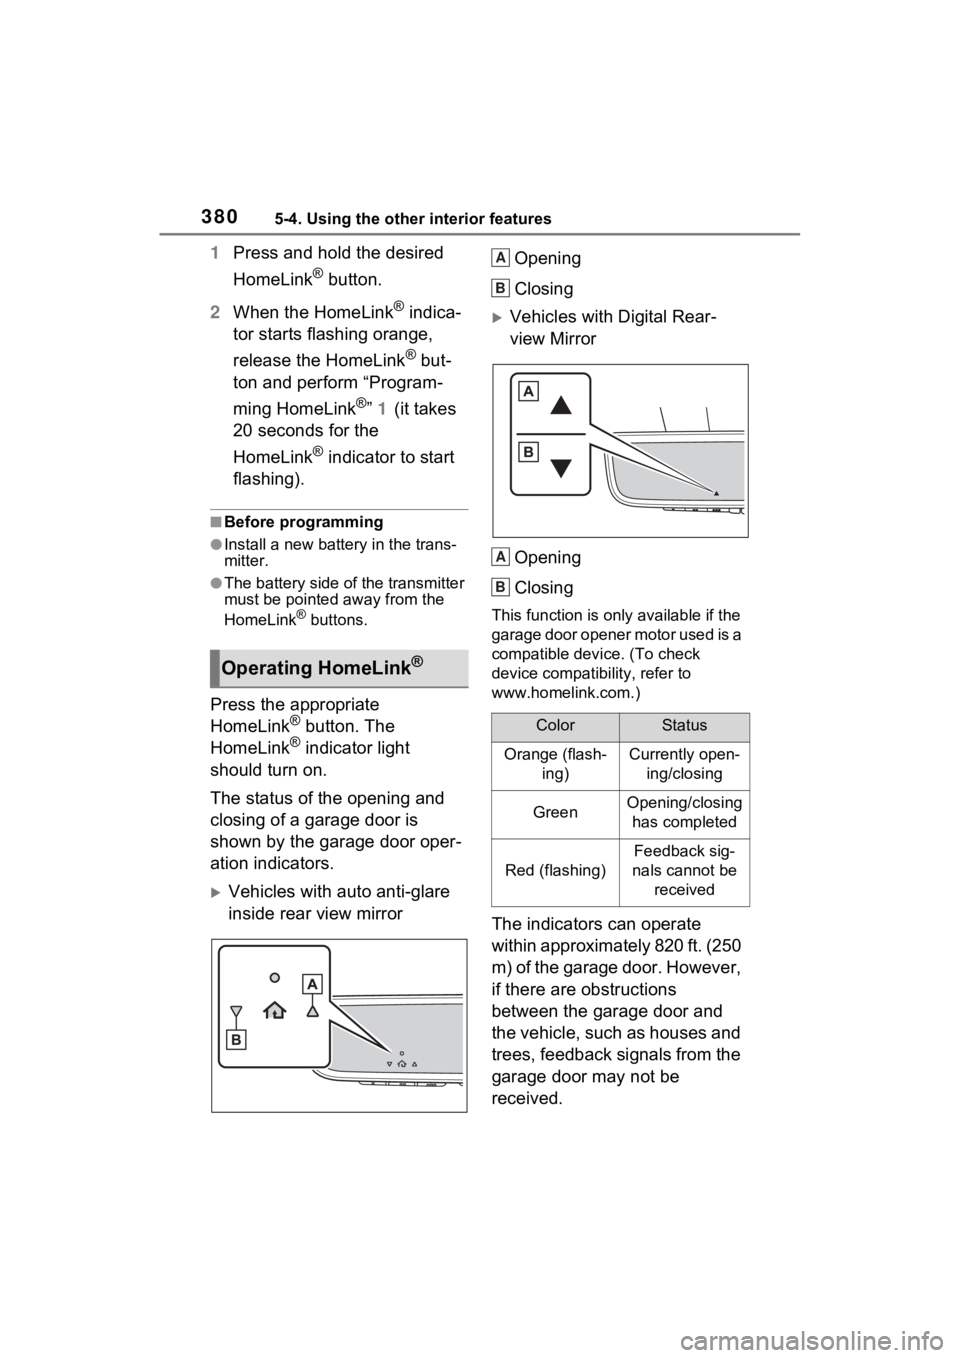
shown by the garage door oper-
ation indicators.
Vehicles with auto anti-glare
inside rear view mirror Opening
Closing
Vehicles with Digital Rear-
view Mirror
Opening
Closing
This function is only available if the
garage door opener motor used is a
compatible device. (To check
device compatibility, refer to
www.homelink.com.)
The indicators can operate
within approximately 820 ft. (250
m) of the garage door. However,
if there are obstructions
between the garage door and
the vehicle, such as houses and
trees, feedback signals from the
garage door may not be
received.
Operating HomeLink®
ColorStatus
Orange (flash- ing)Currently open-ing/closing
GreenOpening/closing has completed
Red (flashing)
Feedback sig-
nals cannot be received
A
B
A
B
Page 383 of 586
3815-4. Using the other interior features
5
Interior features
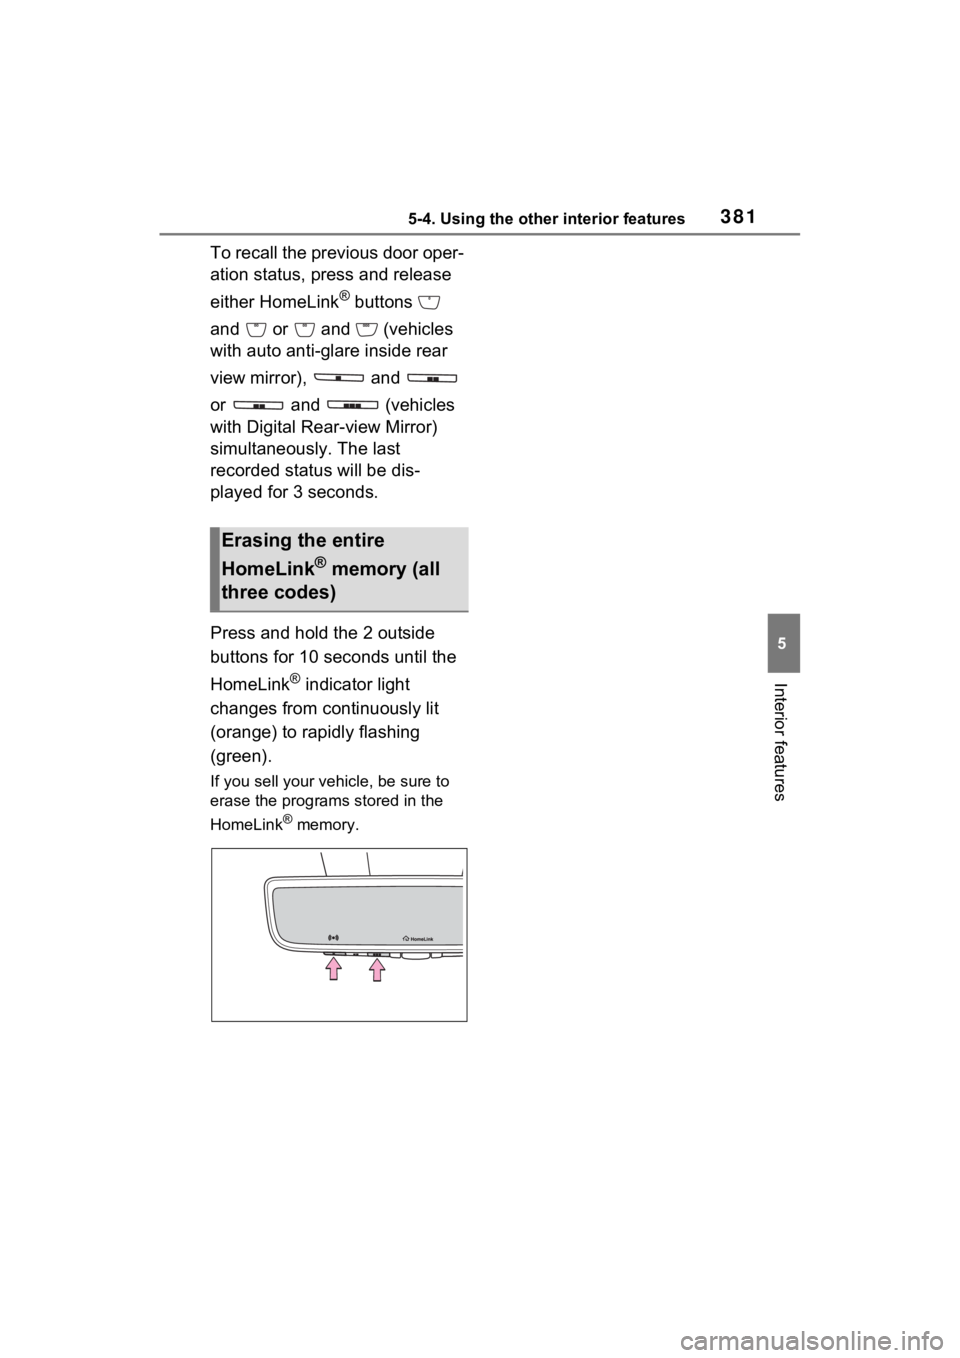
To recall the previous door oper-
ation status, press and release
either HomeLink
® buttons
and or and (vehicles
with auto anti-glare inside rear
view mirror), and
or and (vehicles
with Digital R ear-view Mirror)
simultaneously. The last
recorded status will be dis-
played for 3 seconds.
Press and hold the 2 outside
buttons for 10 seconds until the
HomeLink
® indicator light
changes from continuously lit
(orange) to rapidly flashing
(green).
If you sell your vehicle, be sure to
erase the programs stored in the
HomeLink
® memory.
Erasing the entire
HomeLink
® memory (all
three codes)
Page 385 of 586

383
6
6
Maintenance and care
Maintenance and care
6-1. Maintenance and careCleaning and protecting the vehicle exterior .......... 384
Cleaning and protecting the vehicle interior ........... 387
6-2. Maintenance Maintenance requirements.................................. 390
General maintenance.. 392
Emission inspection and maintenance (I/M) pro-
grams ........................ 394
6-3. Do-it-yourself mainte- nance
Do-it-yourself service pre- cautions ..................... 396
Hood ........................... 398
Positioning a floor jack 399
Engine compartment ... 401
12-volt battery ............. 407
Tires ............................ 409
Tire inflation pressure . 420
Wheels ......... ...............422
Air conditioning filter .... 424
Cleaning the hybrid battery (traction battery) air intake
vent ........................... 426
Wiper insert replacement .................................. 429
Wireless remote con- trol/electronic key battery
.................................. 433Checking and replacing
fuses .......................... 436
Headlight aim .............. 438
Light bulbs ................... 439
Page 388 of 586

3866-1. Maintenance and care
WARNING
■Precaution regarding the rear
bumper
If the paint of the rear bumper is
chipped or scratched, the follow-
ing systems may not function cor-
rectly. If this occurs, consult your
Toyota dealer.
●BSM (if equipped)
●RCTA (if equipped)
●PKSB (if equipped)
●Intuitive parking assist (if
equipped)
NOTICE
■To prevent paint deterioration
and corrosion on the body
and components (aluminum
wheels, etc.)
●Wash the vehicle immediately in
the following cases:
• After driving near the sea coast
• After driving on salted roads
• If coal tar or tre e sap is present
on the paint surface
• If dead insects, insect droppings or bird droppings are present on
the paint surface
• After driving in an area contami- nated with soot, oily smoke,
mine dust, iron powder or chem-
ical substances
• If the vehicle becomes heavily soiled with dust or mud
• If liquids such as benzene and gasoline are spilled on the paint
surface
●If the paint is chipped or
scratched, have it repaired
immediately.
●To prevent the wheels from cor-
roding, remove any dirt and
store in a place with low humid-
ity when storing the wheels.
■Cleaning the exterior lights
●Wash carefully. Do not use
organic substances or scrub
with a hard brush.
This may damage the surfaces
of the lights.
●Do not apply wax to the sur-
faces of the lights.
Wax may cause damage to the
lenses.
■When using an automatic car
wash (vehicles with rain-
sensing windshield wipers)
Set the wiper switch to off posi-
tion.
If the wiper switch is in “AUTO”,
the wipers may operate and the
wiper blades may be damaged.
■When using a high pressure
car wash
●When washing the vehicle, do
not let water from the high-pres-
sure washer directly hit the
camera or the area around the
camera. Due to the shock from
the high pressure water, it is
possible that the device may not
operate normally.
●Do not spray water directly on
the radar which is equipped
behind the radar sensor cover.
Otherwise it may cause the
device to be damaged.
Page 390 of 586
3886-1. Maintenance and care
WARNING
■Water in the vehicle
●Do not splash or spill liquid in
the vehicle, such as on the floor,
on the rear seats, in the hybrid
battery (traction battery) air
intake vent or in the luggage
compartment. (P.78)
Doing so may cause the hybrid
battery, electrical components,
etc. to malfunction or catch fire.
●Do not get any of the SRS com-
ponents or wiring in the vehicle
interior wet.
( P.34)
An electrical malfunction may
cause the airbags to deploy or
not function properly, resulting
in death or serious injury.
●Vehicles with wireless charger:
Do not let the wireless charger
( P.366) get wet. Failure to do
so may cause the charger to
become hot and cause burns or
could cause electric shock
resulting in death or serious
injury.
■Cleaning the interior (espe-
cially instrument panel)
Do not use a polis h wax or polish
cleaner. The instrument panel
may reflect off the windshield,
obstructing the dr iver’s view and
leading to an accident, resulting in
death or serious injury.
NOTICE
■Cleaning detergents
●Do not use the following types
of detergent, as they may dis-
color the vehicle interior or
cause streaks or damage to
painted surfaces:
• Non-seat portions: Organic sub- stances such as benzene or
gasoline, alkaline or acidic solu-
tions, dye, and bleach
• Seats: Alkaline or acidic solu- tions, such as thinner, benzene,
and alcohol
●Do not use a polish wax or pol-
ish cleaner. The instrument
panel’s or other interior part’s
painted surface may be dam-
aged.
■Preventing damage to leather
surfaces
Observe the following precautions
to avoid damage to and deteriora-
tion of leather surfaces:
●Remove any dust or dirt from
leather surfaces immediately.
●Do not expose the vehicle to
direct sunlight for extended peri-
ods of time. Park the vehicle in
the shade, especially during
summer.
●Do not place items made of
vinyl, plastic, or containing wax
on the upholstery, as they may
stick to the leather surface if the
vehicle interior heats up signifi-
cantly.
Page 393 of 586
3916-2. Maintenance
6
Maintenance and care
■Resetting the message indicat-
ing maintenance is required
(with 7-inch display)
After the required maintenance is
performed according to the mainte-
nance schedule, please reset the
reminder light or message.
To reset the reminder light or mes-
sage, follow the procedure
described below:
1 Press or of the meter
control switches and select
on the multi-information display.
2 Press or of the meter
control switches and select
“Vehicle Settings”. Then press
and hold .
3 Press or of the meter
control switches and select
“Scheduled Maintenance”. Then
press .
4 Select “Yes” and press .
A message will be displayed when
the reset proced ure has been com-
pleted.
■Resetting the message indicat-
ing maintenance is required
(with 12.3-inch display)
After the required maintenance is
performed according to the mainte-
nance schedule, please reset the
reminder light or message.
To reset the reminder light or mes-
sage, follow the procedure
described below:
1 Press and hold to display the
cursor on the content display
area (center) of the multi-infor-
mation display. 2
Press or of the meter
control switches to select
and then press .
3 Press or of the meter
control switch es and select
“ Vehicle Settings”. Then
press and hold .
4 Press or of the meter
control switch es and select
“Scheduled Maintenance”. Then
press .
5 Select “Yes” and press .
A message will be d isplayed when
the reset procedure has been com-
pleted.
You can perform some mainte-
nance procedures by yourself.
Please be aware that do-it-your-
self maintenance may affect
warranty coverage.
The use of Toyota Repair Manuals
is recommended.
For details about warranty cover-
age, refer to the separate “Owner’s
Warranty Informat ion Booklet” or
“Owner’s Manual Supplement”.
Do-it-yourself mainte-
nance
Page 395 of 586
3936-2. Maintenance
6
Maintenance and care
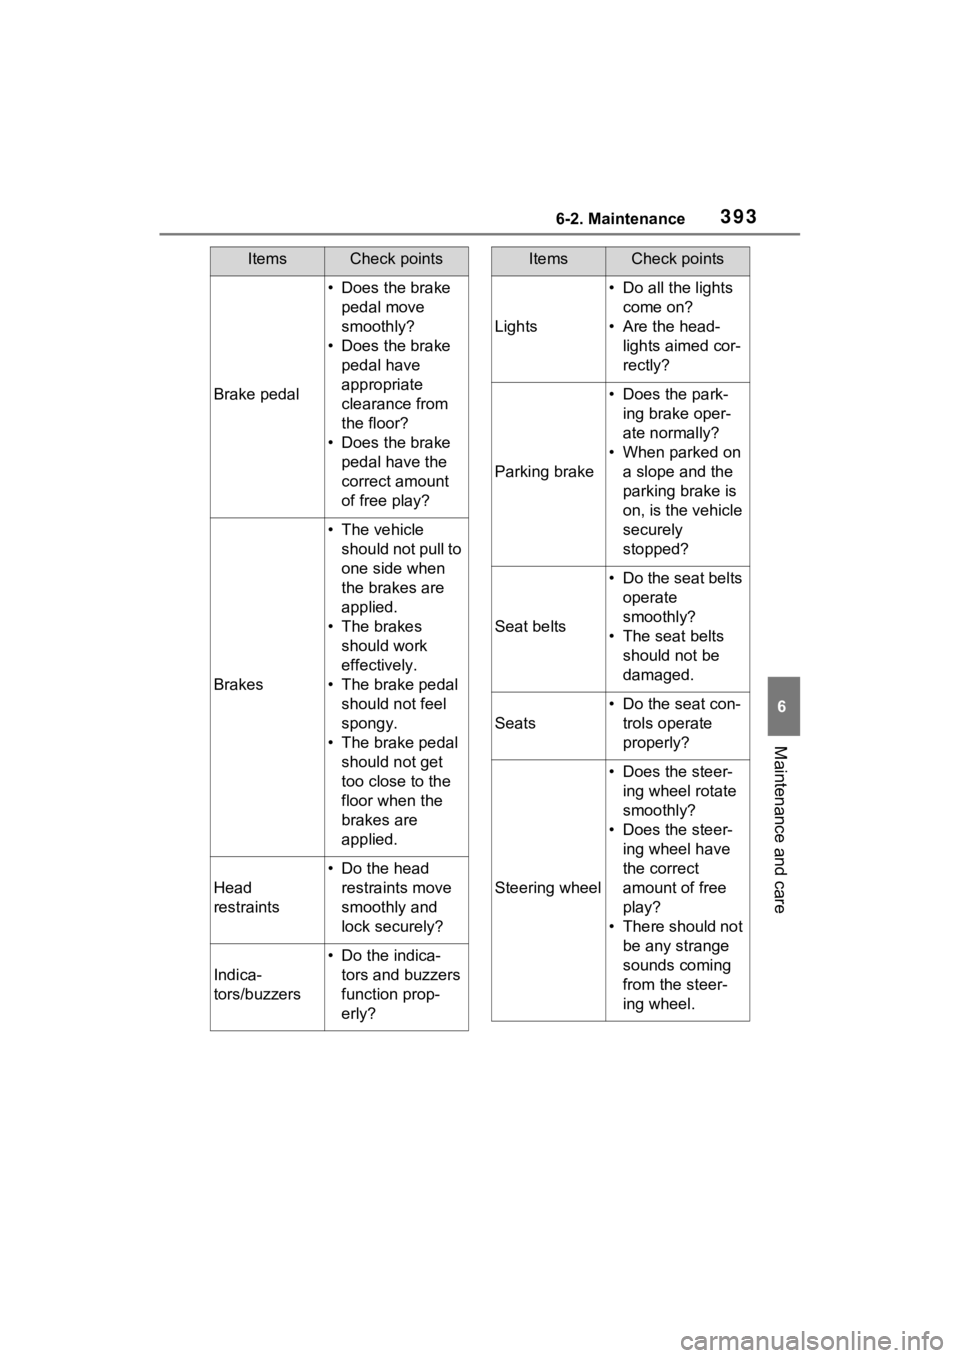
Brake pedal
• Does the brake pedal move
smoothly?
• Does the brake pedal have
appropriate
clearance from
the floor?
• Does the brake pedal have the
correct amount
of free play?
Brakes
• The vehicle should not pull to
one side when
the brakes are
applied.
• The brakes should work
effectively.
• The brake pedal should not feel
spongy.
• The brake pedal should not get
too close to the
floor when the
brakes are
applied.
Head
restraints
• Do the head restraints move
smoothly and
lock securely?
Indica-
tors/buzzers
• Do the indica-tors and buzzers
function prop-
erly?
ItemsCheck points
Lights
• Do all the lights come on?
• Are the head- lights aimed cor-
rectly?
Parking brake
• Does the park-ing brake oper-
ate normally?
• When parked on a slope and the
parking brake is
on, is the vehicle
securely
stopped?
Seat belts
• Do the seat belts operate
smoothly?
• The seat belts should not be
damaged.
Seats
• Do the seat con-trols operate
properly?
Steering wheel
• Does the steer-ing wheel rotate
smoothly?
• Does the steer- ing wheel have
the correct
amount of free
play?
• There should not be any strange
sounds coming
from the steer-
ing wheel.
ItemsCheck points
Page 399 of 586
3976-3. Do-it-yourself maintenance
6
Maintenance and care
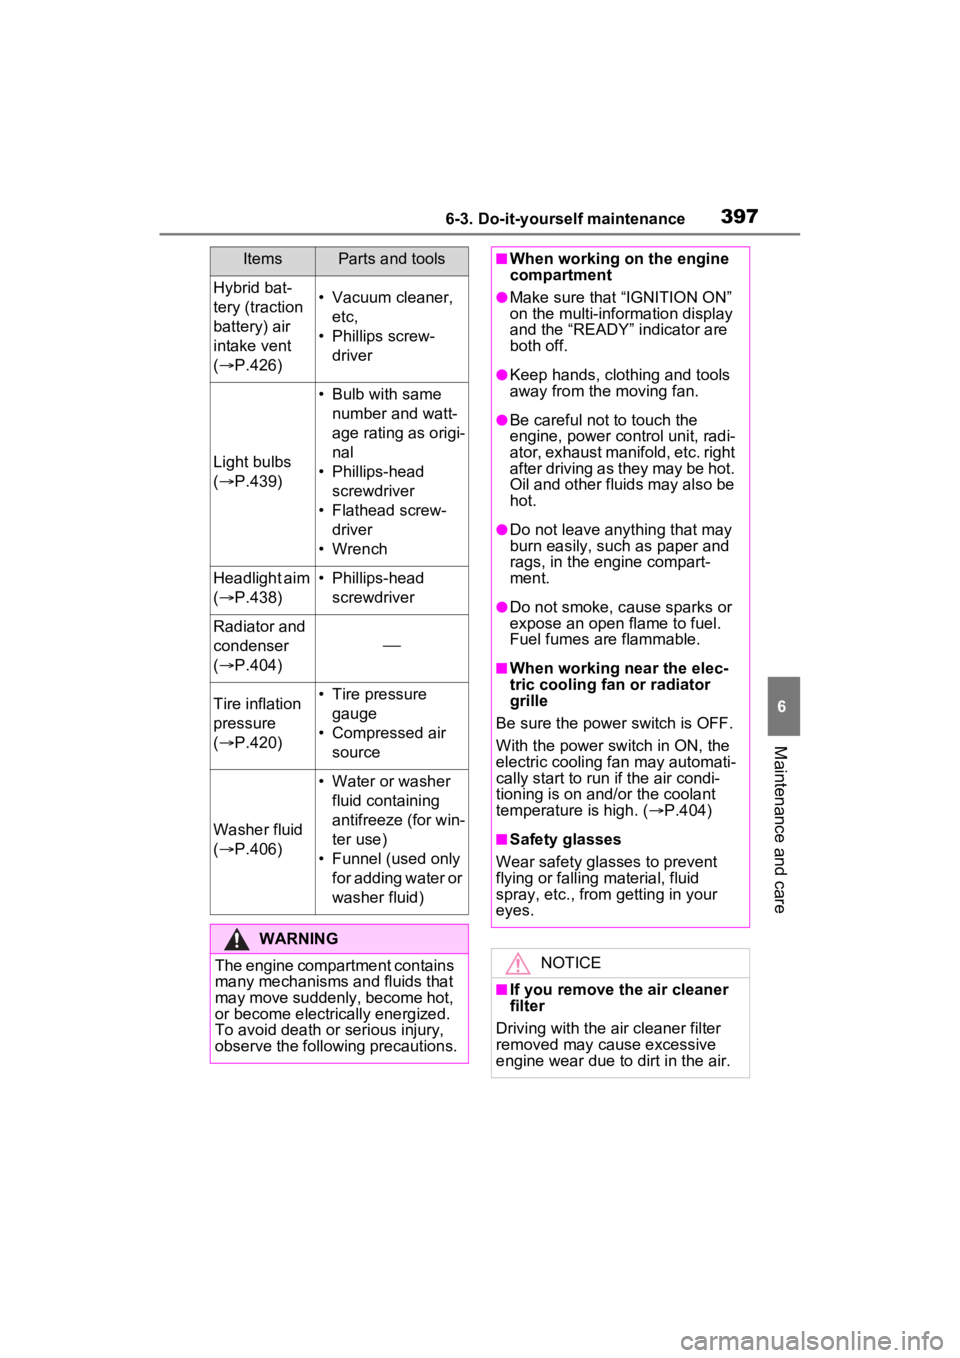
Hybrid bat-
tery (traction
battery) air
intake vent
( P.426)• Vacuum cleaner,
etc,
• Phillips screw- driver
Light bulbs
( P.439)
• Bulb with same
number and watt-
age rating as origi-
nal
• Phillips-head screwdriver
• Flathead screw- driver
• Wrench
Headlight aim
( P.438)• Phillips-head
screwdriver
Radiator and
condenser
( P.404)
Tire inflation
pressure
( P.420)• Tire pressure
gauge
• Compressed air source
Washer fluid
( P.406)
• Water or washer
fluid containing
antifreeze (for win-
ter use)
• Funnel (used only for adding water or
washer fluid)
WARNING
The engine compartment contains
many mechanisms and fluids that
may move suddenly, become hot,
or become electrically energized.
To avoid death or serious injury,
observe the following precautions.
ItemsParts and tools■When working on the engine
compartment
●Make sure that “IGNITION ON”
on the multi-information display
and the “READY” indicator are
both off.
●Keep hands, clothing and tools
away from the moving fan.
●Be careful not to touch the
engine, power control unit, radi-
ator, exhaust manifold, etc. right
after driving as they may be hot.
Oil and other fluids may also be
hot.
●Do not leave anything that may
burn easily, such as paper and
rags, in the engine compart-
ment.
●Do not smoke, cause sparks or
expose an open flame to fuel.
Fuel fumes are flammable.
■When working near the elec-
tric cooling fan or radiator
grille
Be sure the power switch is OFF.
With the power switch in ON, the
electric cooling fa n may automati-
cally start to run if the air condi-
tioning is on and/or the coolant
temperature is high. ( P.404)
■Safety glasses
Wear safety gla sses to prevent
flying or falling material, fluid
spray, etc., from getting in your
eyes.
NOTICE
■If you remove the air cleaner
filter
Driving with the air cleaner filter
removed may cause excessive
engine wear due to dirt in the air.