Page 341 of 468
3416-3. Do-it-yourself maintenance
6
Maintenance and care
■LED light bulbs
The lights other th an the front turn
signal lights/parking lights (vehicles
without side turn sig nal lights), front
side marker lights (bulb type), rear
turn signal lights, rear side marker
lights (bulb type) and back-up lights
consist of a number of LEDs. If any
of the LEDs burn out, take your
vehicle to your Toyota dealer to
have the light replaced.
■Condensation build-up on the
inside of the lens
In certain situatio ns, such as when
driving in the rain or when washing
the vehicle, condensation may form
on the inner side of the headlight
lens and other li ghts. As each light
has a ventilation hole, moist air may
enter. If the ambient temperature is
low, condensation may form tempo-
rarily, but it will di ssipate as the
inside of the light i s warmed up. As
the condensation is due to a phe-
nomenon similar to windows fogging
in the rain, it doe s not indicate a
malfunction.
Contact your Toyota dealer for more
information in the following situa-
tions:
●Large drops of water have built up
on the inside of the lens.
●Water has built up inside the
headlight.
■When replacing light bulbs
P. 3 3 8
■Front turn signal/parking
lights (vehicles without side
turn signal lights)
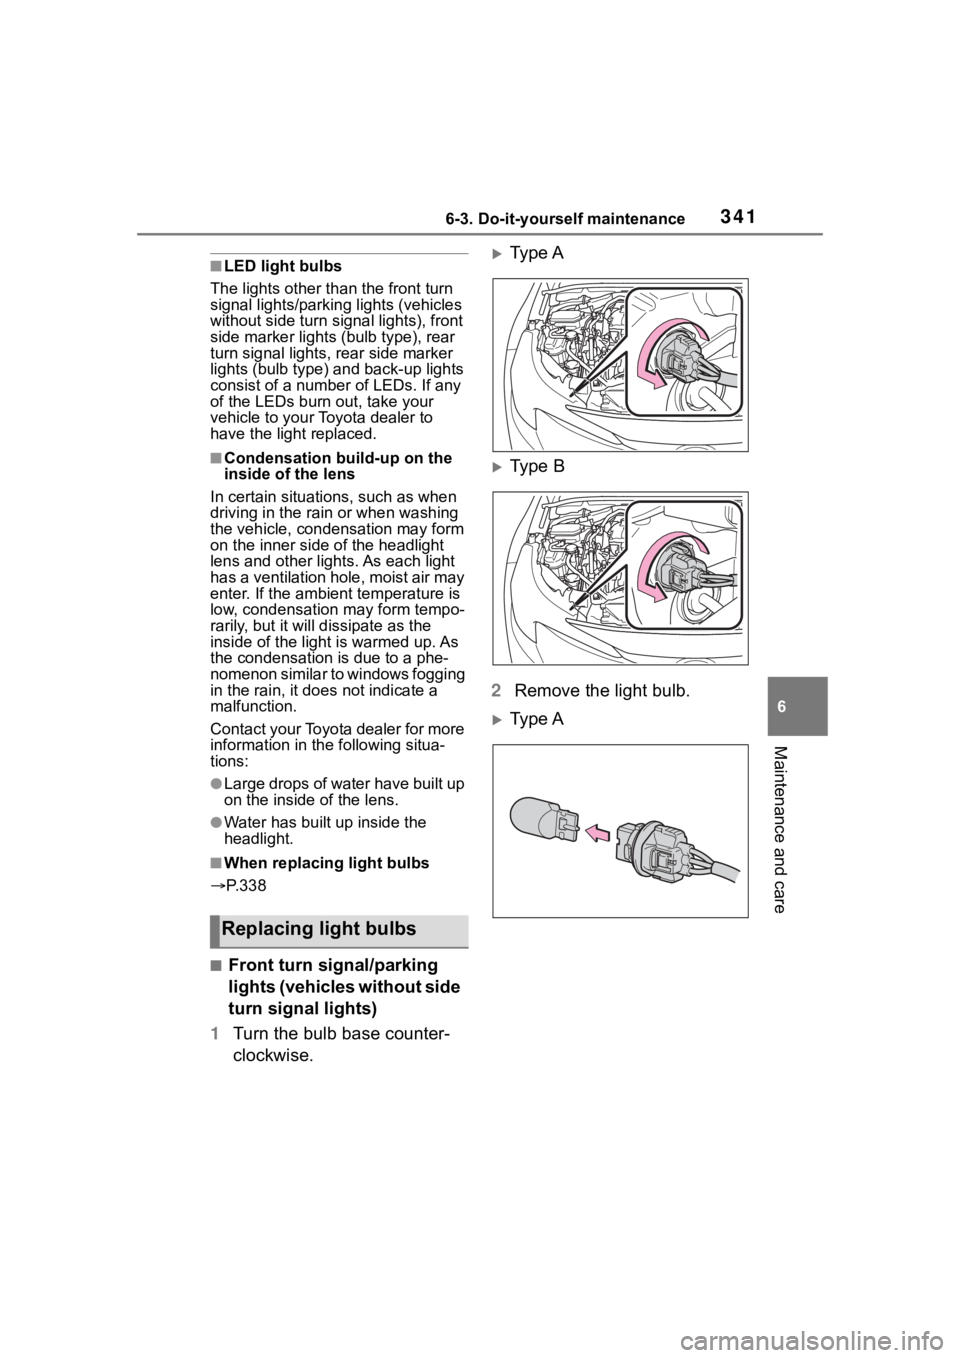
1 Turn the bulb base counter-
clockwise.
Type A
Type B
2 Remove the light bulb.
Type A
Replacing light bulbs
Page 342 of 468
3426-3. Do-it-yourself maintenance
Ty p e B
3 When installing, reverse the
steps listed.
■Front side marker lights
(bulb type)
1 Turn the bulb base counter-
clockwise.
2 Remove the light bulb.
3 When installing, reverse the
steps listed.
■Rear turn signal lights and
rear side marker lights
(vehicles with blub type
rear side marker lights)
1 Open the trunk lid.
2 Insert a flathead screwdriver
between the cover and the
light assembly and pry up the
cover to disengage the claws
(indicated by a dotted line).
To prevent scratching the vehicle,
wrap the tip of th e flathead screw-
driver with a cloth, etc.
3Pull the cover toward the rear
of the vehicle and remove the
cover.
Page 343 of 468
3436-3. Do-it-yourself maintenance
6
Maintenance and care
4Remove the 2 screws and
then remove the light assem-
bly by pulling it straight back.
5 Turn the bulb base counter-
clockwise.
Rear side marker lights
Rear turn signal lights
6 Remove the light bulb.
Rear side marker lights
Rear turn signal lights
7 When installing the light bulb,
install it by conducting steps 6 and 5 with the directions
reversed.
8 Install the light assembly and
then install the 2 screws.
Align the guide and pin on
the light assembl y with the mount-
ing when installing it.
9 Install the cover.
■Rear turn signal lights
(vehicles with LED type rear
side marker lights)
1 Open the trunk lid.
2 Insert a flathead screwdriver
between the cover and the
light assembly and pry up the
cover to disengage the claws
(indicated by a dotted line).
To prevent scratching the vehicle,
wrap the tip of th e flathead screw-
driver with a cloth, etc.
Page 345 of 468
3456-3. Do-it-yourself maintenance
6
Maintenance and care
■Back-up lights
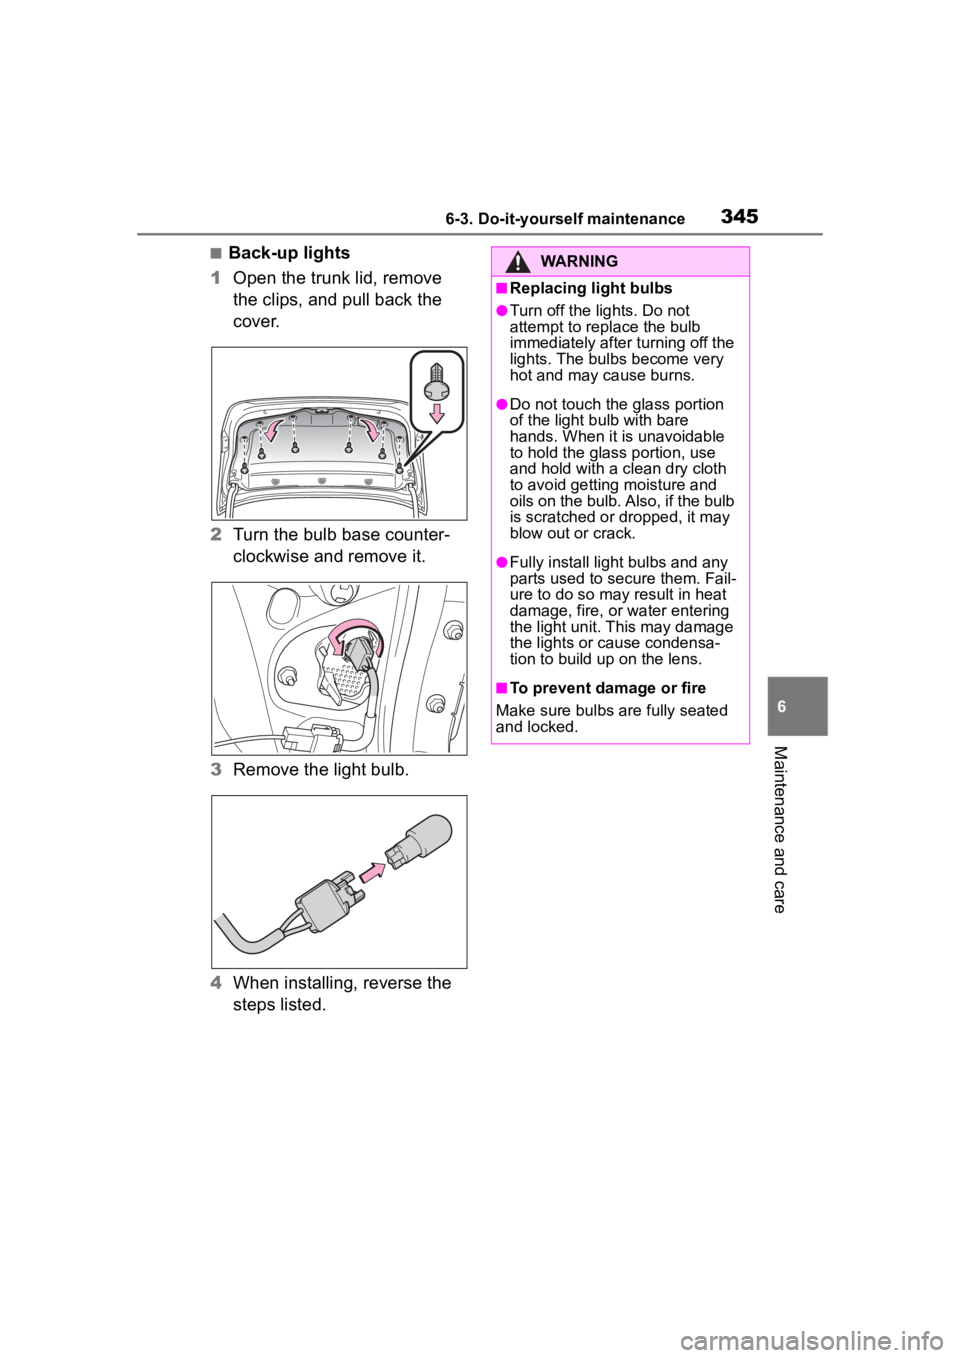
1 Open the trunk lid, remove
the clips, and pull back the
cover.
2 Turn the bulb base counter-
clockwise and remove it.
3 Remove the light bulb.
4 When installing, reverse the
steps listed.WARNING
■Replacing light bulbs
●Turn off the lights. Do not
attempt to replace the bulb
immediately after turning off the
lights. The bulbs become very
hot and may cause burns.
●Do not touch the glass portion
of the light bulb with bare
hands. When it is unavoidable
to hold the glass portion, use
and hold with a clean dry cloth
to avoid getting moisture and
oils on the bulb. Also, if the bulb
is scratched or dropped, it may
blow out or crack.
●Fully install light bulbs and any
parts used to secure them. Fail-
ure to do so may result in heat
damage, fire, or water entering
the light unit. This may damage
the lights or cause condensa-
tion to build up on the lens.
■To prevent damage or fire
Make sure bulbs are fully seated
and locked.
Page 348 of 468
3487-1. Essential information
7-1.Essential information
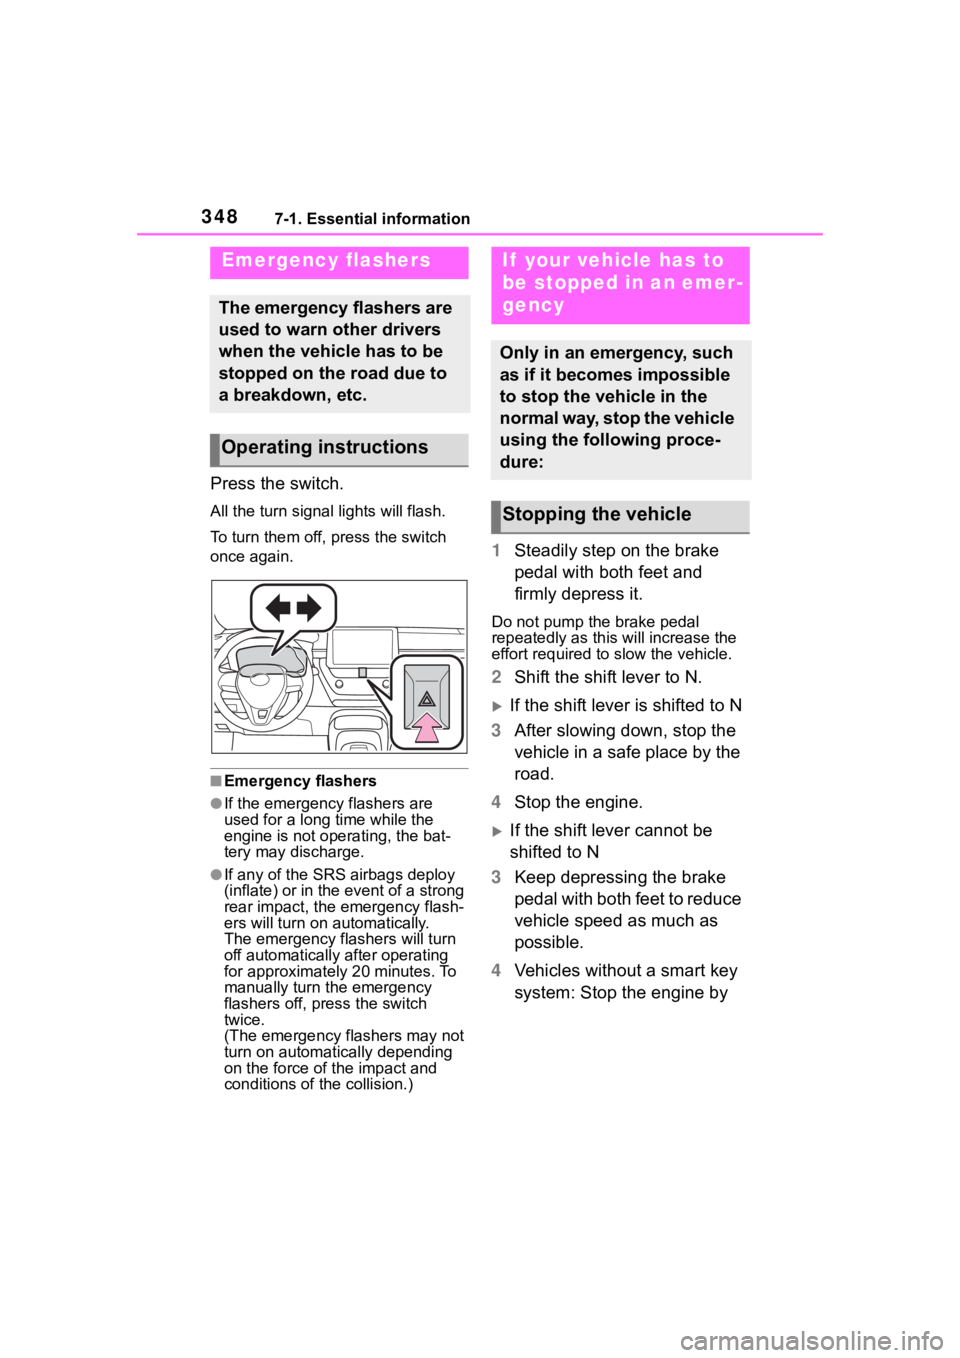
Press the switch.
All the turn signal lights will flash.
To turn them off, press the switch
once again.
■Emergency flashers
●If the emergency flashers are
used for a long time while the
engine is not operating, the bat-
tery may discharge.
●If any of the SRS airbags deploy
(inflate) or in the event of a strong
rear impact, the emergency flash-
ers will turn on automatically.
The emergency flashers will turn
off automatically after operating
for approximately 20 minutes. To
manually turn t he emergency
flashers off, press the switch
twice.
(The emergency flashers may not
turn on automatically depending
on the force of the impact and
conditions of the collision.)
1 Steadily step on the brake
pedal with both feet and
firmly depress it.
Do not pump the brake pedal
repeatedly as this will increase the
effort required to slow the vehicle.
2Shift the shift lever to N.
If the shift lever is shifted to N
3 After slowing down, stop the
vehicle in a safe place by the
road.
4 Stop the engine.
If the shift lever cannot be
shifted to N
3 Keep depressing the brake
pedal with both feet to reduce
vehicle speed as much as
possible.
4 Vehicles without a smart key
system: Stop the engine by
Emergency flashers
The emergency flashers are
used to warn other drivers
when the vehicle has to be
stopped on the road due to
a breakdown, etc.
Operating instructions
If your vehicle has to
be stopped in an emer-
gency
Only in an emergency, such
as if it becomes impossible
to stop the vehicle in the
normal way, stop the vehicle
using the following proce-
dure:
Stopping the vehicle
Page 356 of 468
3567-2. Steps to take in an emergency
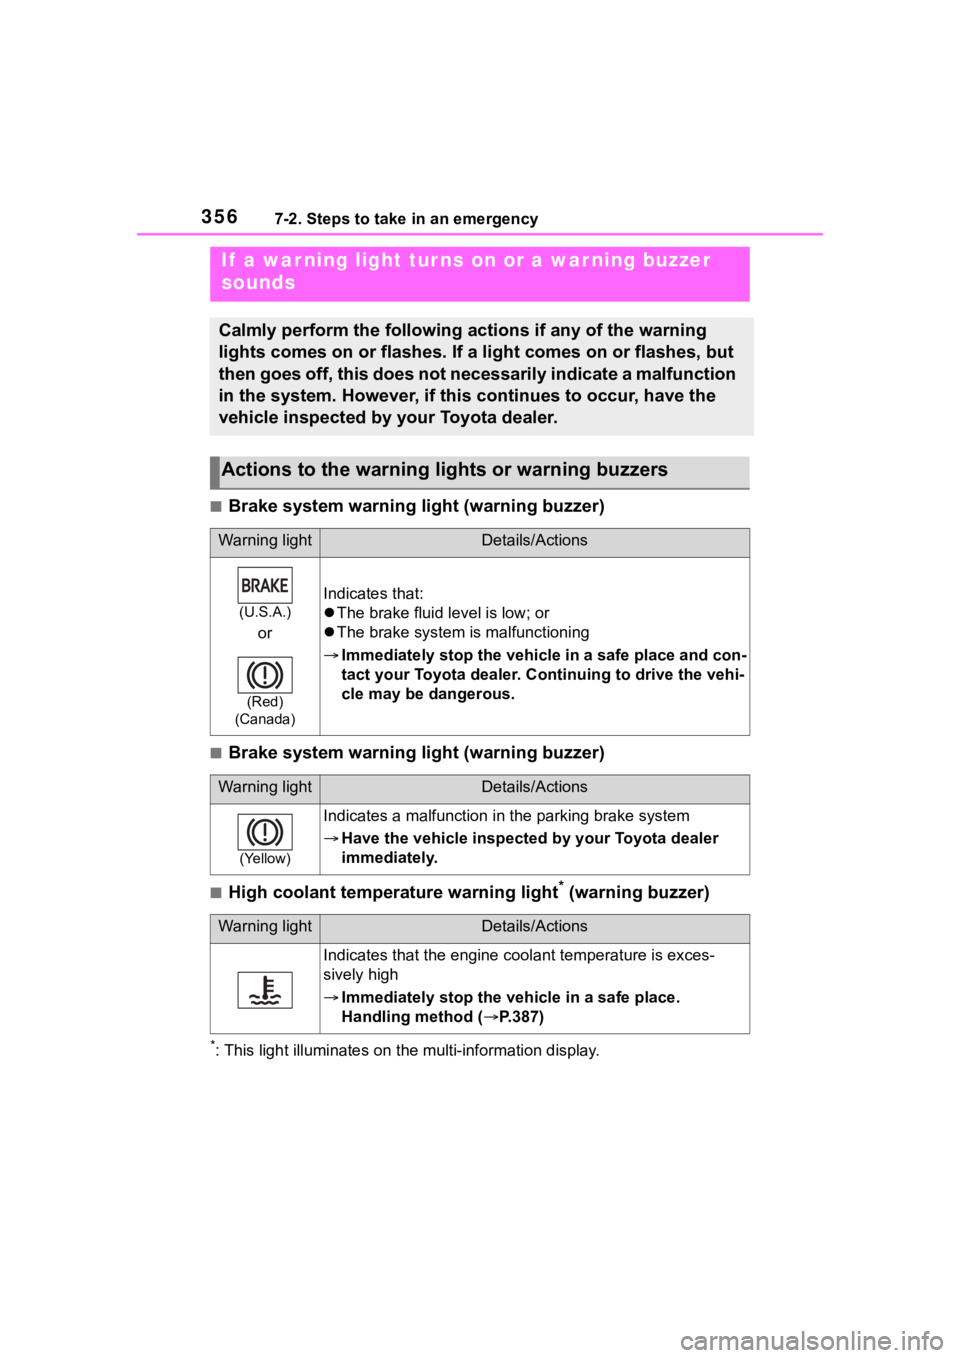
■Brake system warning light (warning buzzer)
■Brake system warning light (warning buzzer)
■High coolant temperature warning light* (warning buzzer)
*: This light illuminat es on the multi-information display.
If a war ning light tur ns on or a war ning buzzer
sounds
Calmly perform the following actions if any of the warning
lights comes on or flashes. If a light comes on or flashes, but
then goes off, this does not necessarily indicate a malfunction
in the system. However, if this continues to occur, have the
vehicle inspected by your Toyota dealer.
Actions to the warning lights or warning buzzers
Warning lightDetails/Actions
(U.S.A.)
or
(Red)
(Canada)
Indicates that:
The brake fluid level is low; or
The brake system is malfunctioning
Immediately stop the vehicle in a safe place and con-
tact your Toyota dealer. Continuing to drive the vehi-
cle may be dangerous.
Warning lightDetails/Actions
(Yellow)
Indicates a malfunction i n the parking brake system
Have the vehicle inspected by your Toyota dealer
immediately.
Warning lightDetails/Actions
Indicates that the engine c oolant temperature is exces-
sively high
Immediately stop the vehicle in a safe place.
Handling method ( P.387)
Page 360 of 468
3607-2. Steps to take in an emergency
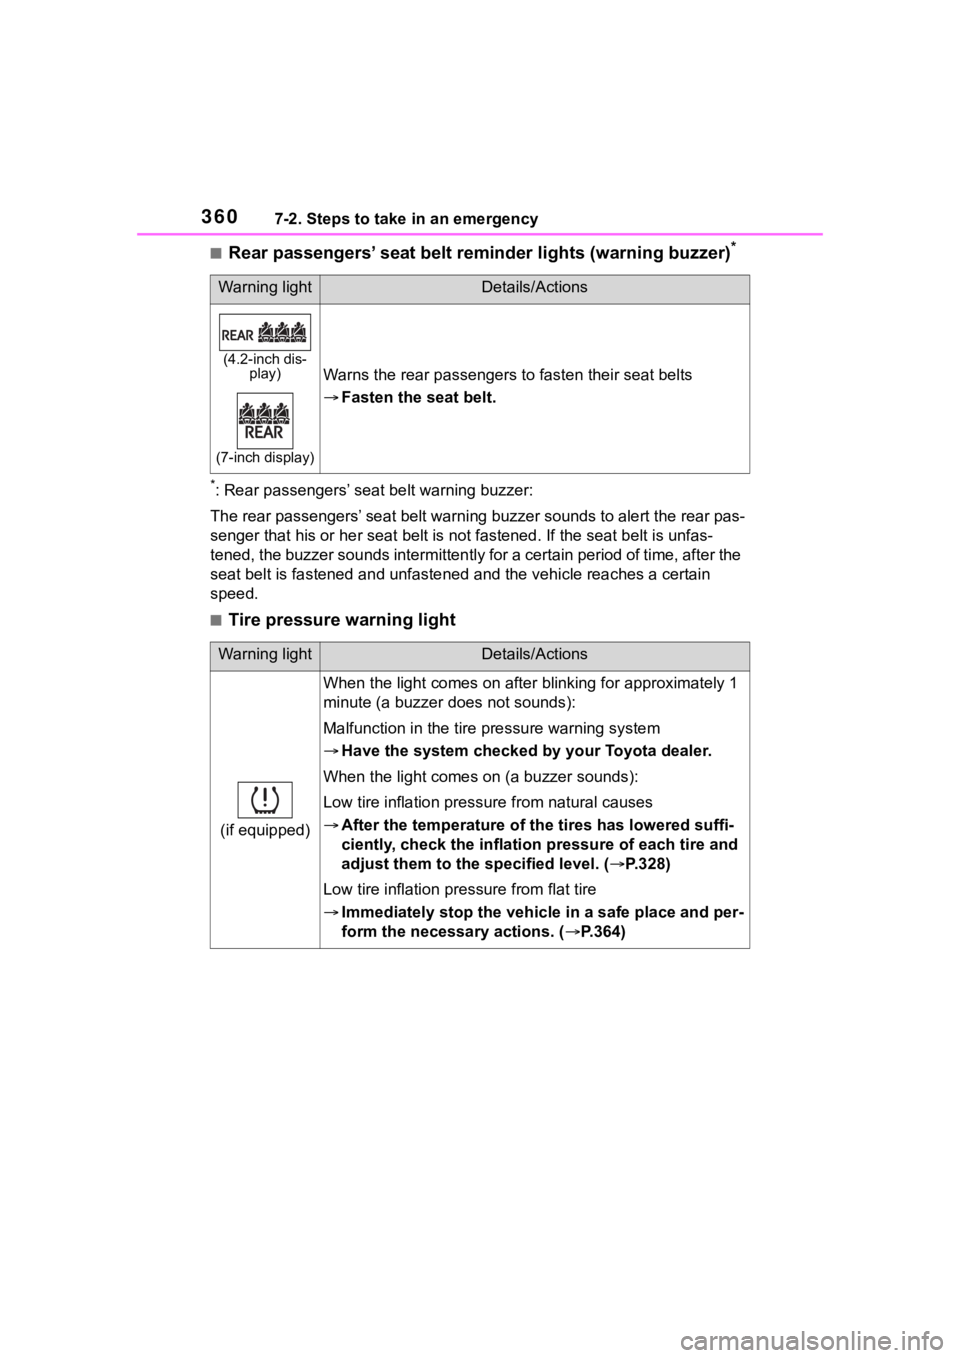
■Rear passengers’ seat belt reminder lights (warning buzzer)*
*: Rear passengers’ seat belt warning buzzer:
The rear passengers’ seat belt warning buzzer sounds to alert t he rear pas-
senger that his or he r seat belt is not fastened. If the seat b elt is unfas-
tened, the buzzer sounds intermittently for a certain period of time, after the
seat belt is fastened and unfast ened and the vehicle reaches a certain
speed.
■Tire pressure warning light
Warning lightDetails/Actions
(4.2-inch dis- play)
(7-inch display)
Warns the rear passengers to fasten their seat belts
Fasten the seat belt.
Warning lightDetails/Actions
(if equipped)
When the light comes on after blinking for approximately 1
minute (a buzzer does not sounds):
Malfunction in the tire pressure warning system
Have the system checked by your Toyota dealer.
When the light comes o n (a buzzer sounds):
Low tire inflation press ure from natural causes
After the temperature of the tires has lowered suffi-
ciently, check the inflation pressure of each tire and
adjust them to the specified level. ( P.328)
Low tire inflation pre ssure from flat tire
Immediately stop the vehic le in a safe place and per-
form the necessary actions. ( P.364)
Page 363 of 468

3637-2. Steps to take in an emergency
7
When trouble arises
■Parking brake indicator
■Brake hold operated indicator
■Warning buzzer
In some cases, the buzzer may not
be heard due to being in a noisy
location or audio sound.
■Front passenger detection sen-
sor, seat belt reminder and
warning buzzer
●If luggage is placed on the front
passenger seat, the front passen-
ger detection sensor may cause
the warning light to flash and the
warning buzzer to sound even if a
passenger is not sitting in the
seat.
●If a cushion is placed on the seat,
the sensor may n ot detect a pas-
senger, and the warning light may
not operate properly.
■Operation of rear passengers’
seat belt re minder lights
●The rear passengers’ seat belt
reminder lights will illuminate for
approximately 60 seconds after
either rear door has been opened
and closed.
●If any rear seat belt is fastened
and then unfastened, the corre-
sponding light for that seat will illu-
minate continuously . If either rear
door is opened and closed while a
rear passengers’ seat belt light is
illuminated, it will tu rn off approxi-
mately 60 seconds after the door
is closed.
■SRS warning light
This warning light system monitors
the airbag sensor assembly, front
impact sensors, side impact sensors
(front door), side impact sensors
(front), driver’s seat position sensor,
driver’s seat belt buckle switch, front
passenger seat belt buckle switch,
“AIR BAG ON” indicator light, “AIR
BAG OFF” indicator light, seat belt
pretensioners, airbags, intercon-
necting wiring and power sources.
( P. 3 2 )
■Electric power steering system
warning light (warning buzzer)
When the battery charge becomes
insufficient or the voltage temporar-
ily drops, the electric power steering
Warning lightDetails/Actions
(Flashes)
(U.S.A.)
or
(Flashes)
(Canada)
It is possible that the parking brake is not fully engaged or
released
Operate the parking brake switch once again.
This light comes on the parking brake is not released. If the
light turns off after the parking brakes is fully released, the
system is operating normally.
Warning lightDetails/Actions
(Flashes)
Indicates a malfunction in the brake hold system
Have the vehicle inspected by your Toyota dealer
immediately.