2023 TOYOTA COROLLA lights
[x] Cancel search: lightsPage 91 of 468

912-1. Instrument cluster
2
Vehicle status information and indicators
can be used to record and display
different distances independently.
To reset, display the desired trip
meter and press and hold the dis-
play change button.
The brightness of the instrument
panel lights can be adjusted.
1Brighter
2 Darker
■Instrument panel light bright-
ness adjustment
The brightness of the instrument
panel lights can be adjusted sepa-
rately for when the tail lights are on
and off.
■The clocks can be adjusted
on the audio system
screen.
Refer to “MULTIMEDIA
OWNER’S MANUAL”.
■Display
Driving support system status
display area
Displays an image when the follow-
ing systems are operating and a
menu icon other than is
selected:
• LTA (Lane Tracing Assist)
• LDA (Lane Departure Alert)
• Dynamic radar cruise control
• RSA (Road Sign Assist) (if equipped) ( P.217)
Content display area
By selecting menu icons on the
multi-information di splay, a variety
of driving-related information can
be displayed. The multi-information
display can also be used to change
display settings and other vehicle
settings.
Warning or advice pop-up displays
are also displayed in certain situa-
tions.
■Menu icons
The menu icons will be dis-
played by pressing the or
Changing the instrument
panel light brightness
Adjusting the clock
Multi-infor mation dis-
play (4.2-inch display)
Display and menu icons
Page 109 of 468
1093-1. Key information
3
Before driving
Locks the doors (P. 1 1 1 )
Unlocks the doors ( P. 1 1 1 )
Opens the windows
*1 and
moon roof
*1, 2 ( P. 1 1 1 )
Opens the trunk ( P. 1 1 8 )
Sounds the alarm ( P.109)
*1:This setting must be customized
at your Toyota dealer.
*2: If equipped
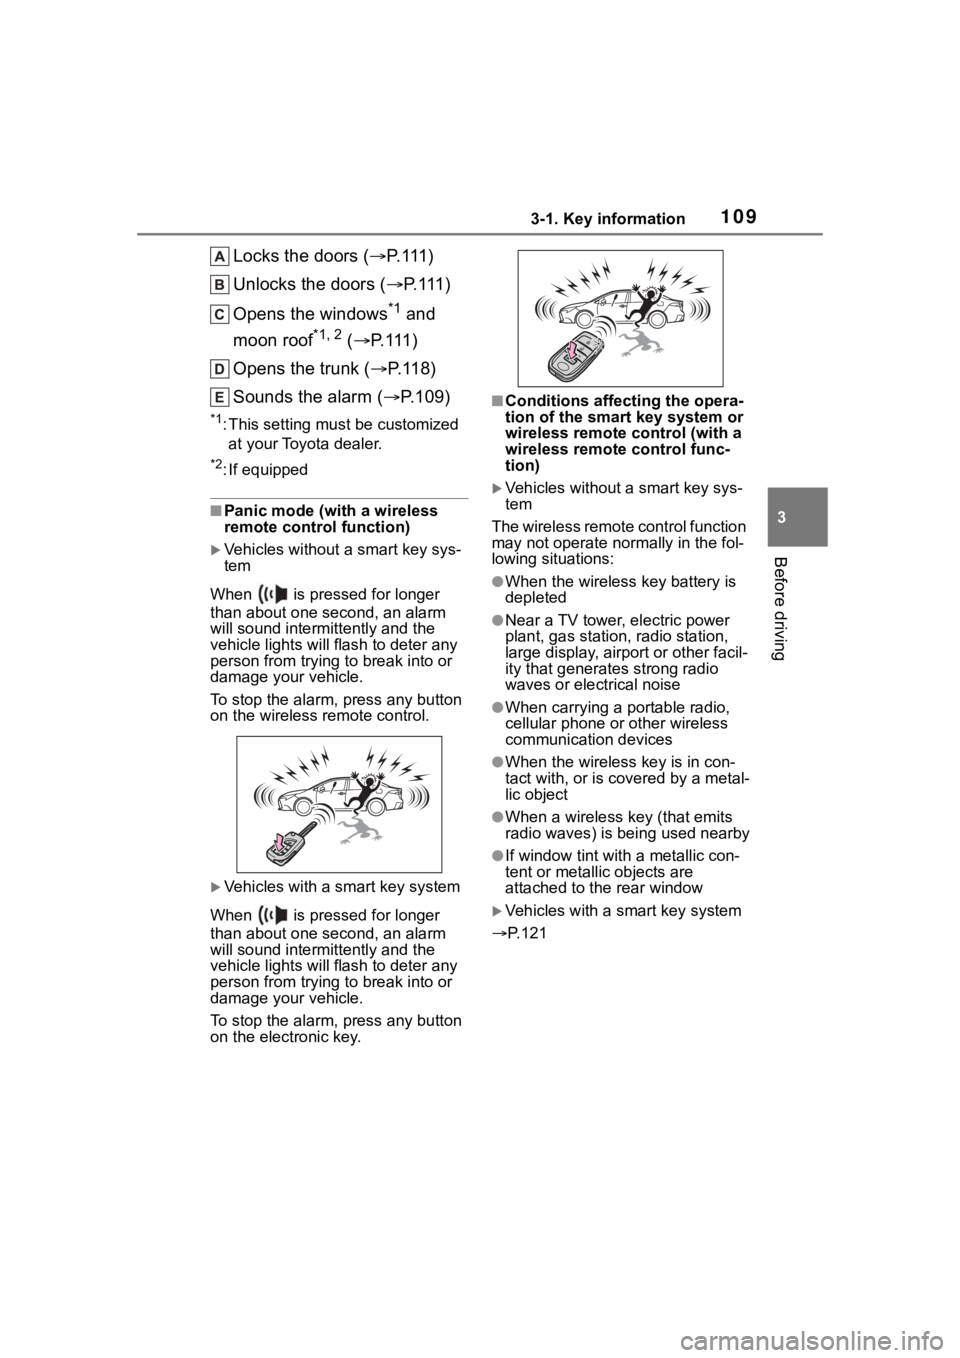
■Panic mode (with a wireless
remote control function)
Vehicles without a smart key sys-
tem
When is pressed for longer
than about one second, an alarm
will sound intermittently and the
vehicle lights will f lash to deter any
person from trying to break into or
damage your vehicle.
To stop the alarm, press any button
on the wireless re mote control.
Vehicles with a smart key system
When is pressed for longer
than about one second, an alarm
will sound intermittently and the
vehicle lights will f lash to deter any
person from trying to break into or
damage your vehicle.
To stop the alarm, press any button
on the electronic key.
■Conditions affecting the opera-
tion of the smart key system or
wireless remote control (with a
wireless remote control func-
tion)
Vehicles without a smart key sys-
tem
The wireless remote control function
may not operate normally in the fol-
lowing situations:
●When the wireles s key battery is
depleted
●Near a TV tower, electric power
plant, gas station, radio station,
large display, airpo rt or other facil-
ity that generates strong radio
waves or electrical noise
●When carrying a portable radio,
cellular phone or other wireless
communication devices
●When the wireless key is in con-
tact with, or is c overed by a metal-
lic object
●When a wireless key (that emits
radio waves) is being used nearby
●If window tint wit h a metallic con-
tent or metallic objects are
attached to the rear window
Vehicles with a smart key system
P.121
Page 131 of 468
1313-4. Adjusting the steering wheel and mirrors
3
Before driving
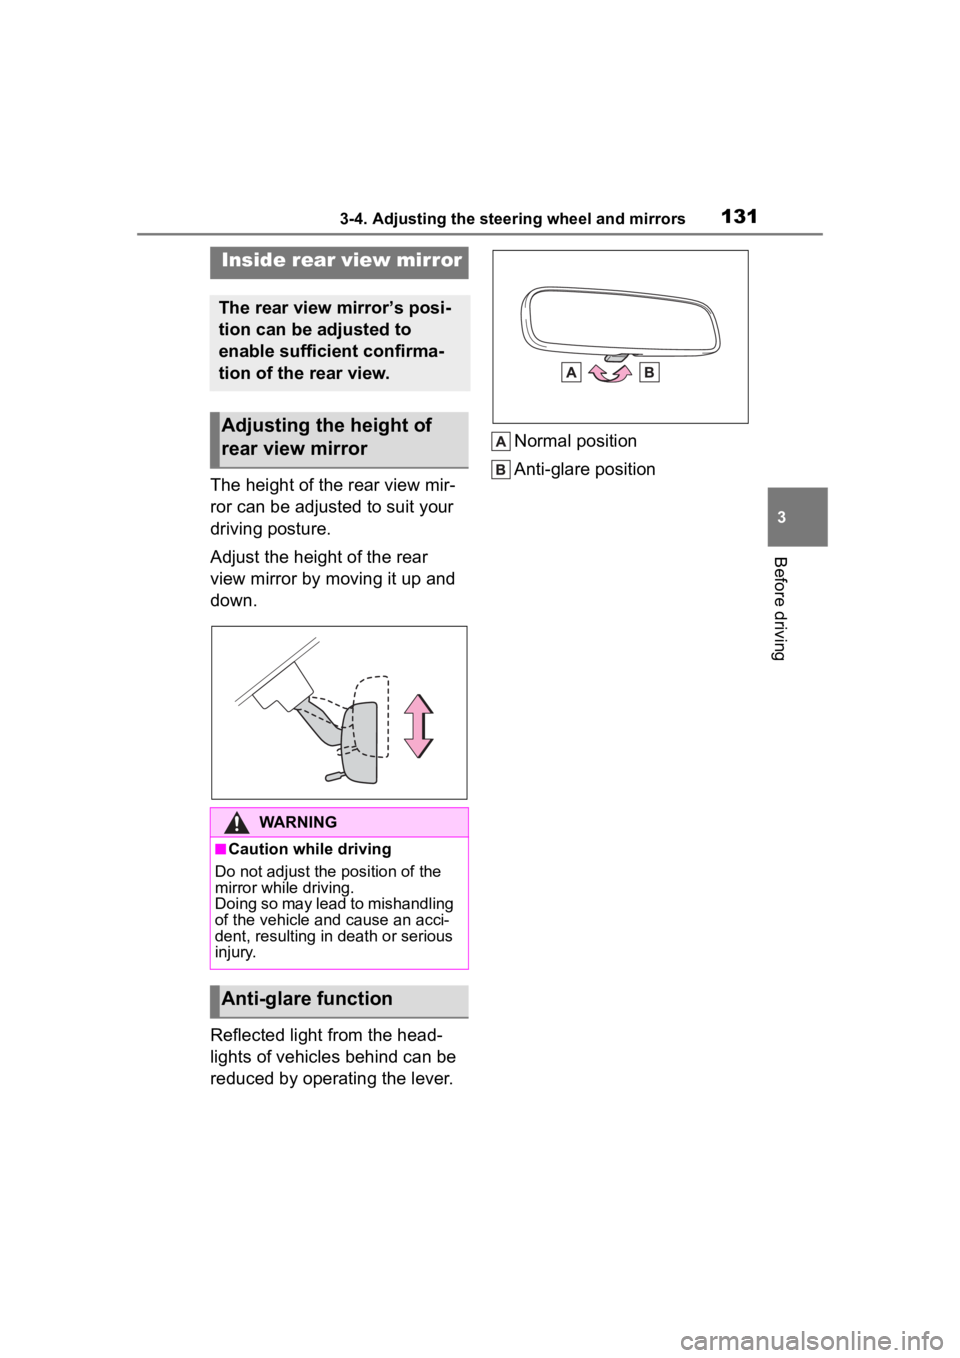
The height of the rear view mir-
ror can be adjusted to suit your
driving posture.
Adjust the height of the rear
view mirror by moving it up and
down.
Reflected light from the head-
lights of vehicles behind can be
reduced by operating the lever.Normal position
Anti-glare position
Inside rear view mirror
The rear view mirror’s posi-
tion can be adjusted to
enable sufficient confirma-
tion of the rear view.
Adjusting the height of
rear view mirror
WARNING
■Caution while driving
Do not adjust the position of the
mirror while driving.
Doing so may lead to mishandling
of the vehicle and cause an acci-
dent, resulting in death or serious
injury.
Anti-glare function
Page 141 of 468
141
4
4
Driving
Driving
.4-1. Before drivingDriving the vehicle....... 143
Cargo and luggage ..... 149
Vehicle load limits ....... 152
Trailer towing............... 152
Dinghy towing ............. 153
4-2. Driving procedures Engine (ignition) switch (vehicles without a smart
key system) ............... 154
Engine (ignition) switch (vehicles with a smart key
system)...................... 155
Continuously variable trans- mission (vehicles without
paddle shift switches).................................. 160
Continuously variable trans- mission (vehicles with pad-
dle shift switches) ...... 162
Turn signal lever.......... 167
Parking brake .............. 168
Brake Hold .................. 171
4-3. Operating the lights and wipers
Headlight switch .......... 173
AHB (Automatic High Beam)........................ 175
Windshield wipers and washer....................... 1784-4. Refueling
Opening the fuel tank cap.................................. 180
4-5. Using the dr iving support
systems
Toyota Safety Sense 3.0 software update ......... 182
Toyota Safety Sense 3.0 .................................. 184
PCS (Pre-Collision System) .................................. 190
LTA (Lane Tracing Assist) .................................. 201
LDA (Lane Departure Alert) .................................. 206
PDA (Proactive driving assist) ........................ 211
RSA (Road Sign Assist) .................................. 217
Dynamic radar cruise con- trol ............................. 219
Cruise control .............. 227
Emergency Driving Stop System ...................... 230
BSM (Blind Spot Monitor) .................................. 232
RCTA (Rear Cross Traffic Alert) function ............ 237
Safe Exit Assist ........... 243
Driving mode select switch .................................. 247
Driving assist systems .................................. 248
Page 167 of 468

1674-2. Driving procedures
4
Driving
1Right turn
2 Lane change to the right
(move the lever partway and
release it)
The right hand signals will flash 3
times.
3Lane change to the left
(move the lever partway and
release it)
The left hand signals will flash 3
times.
4Left turn
■Turn signals can be operated
when
The engine switch is in ON.
■If the indicator flashes faster
than usual
Check that a light bulb in the front or
rear turn signal lights has not burned out.
Tur n signal lever
Operating instructions
Page 173 of 468
1734-3. Operating the lights and wipers
4
Driving
4-3.Operating the lights and wipers
Operating the switch
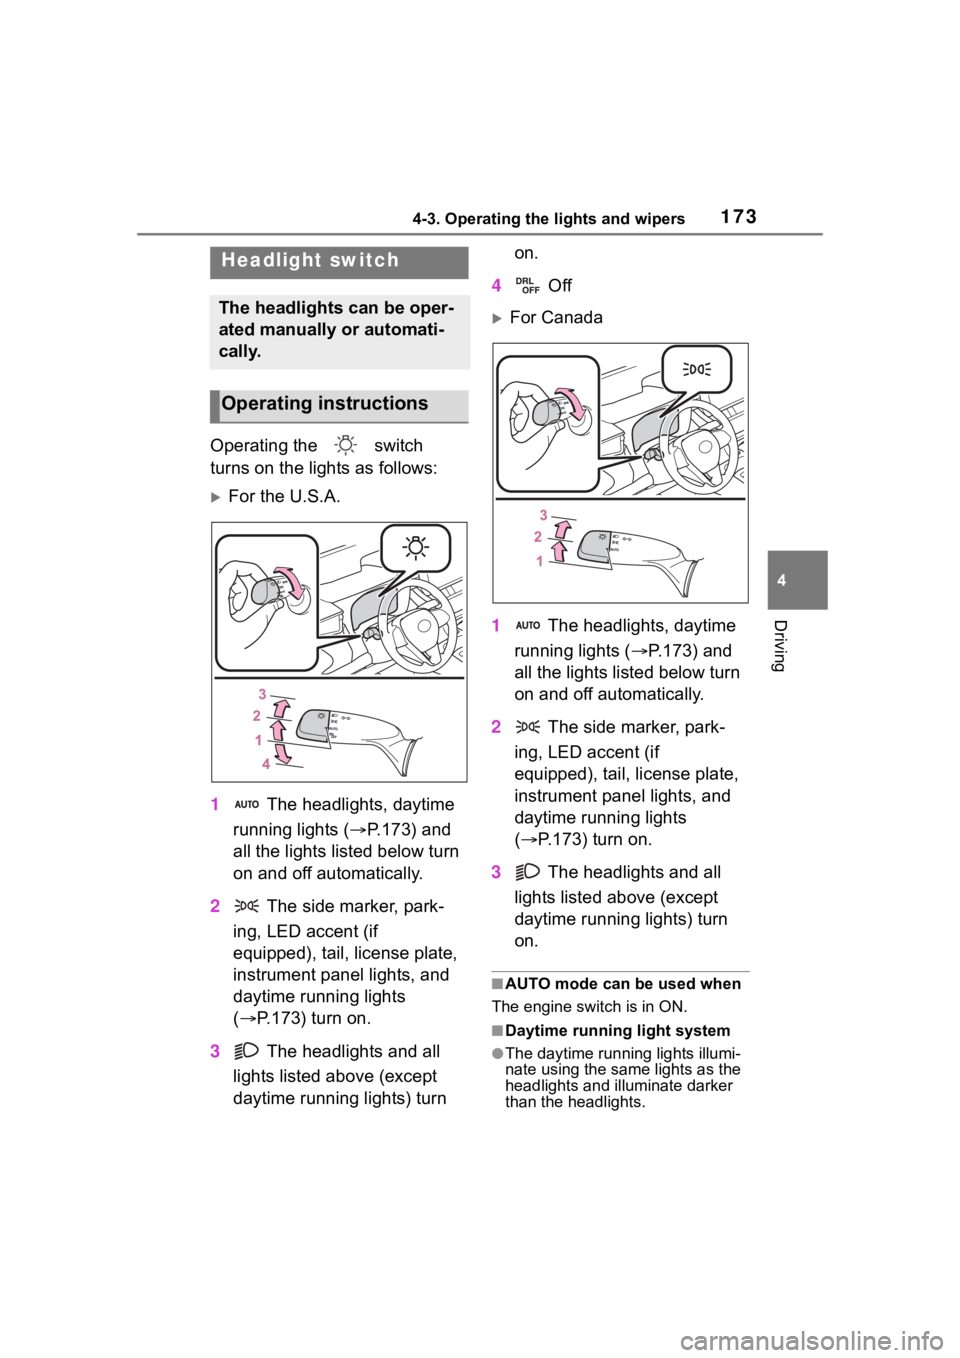
turns on the lights as follows:
For the U.S.A.
1 The headlights, daytime
running lights ( P.173) and
all the lights listed below turn
on and off automatically.
2 The side marker, park-
ing, LED accent (if
equipped), tail, license plate,
instrument panel lights, and
daytime running lights
( P.173) turn on.
3 The headlights and all
lights listed above (except
daytime running lights) turn on.
4 Off
For Canada
1 The headlights, daytime
running lights ( P.173) and
all the lights listed below turn
on and off automatically.
2 The side marker, park-
ing, LED accent (if
equipped), tail, license plate,
instrument panel lights, and
daytime running lights
( P.173) turn on.
3 The headlights and all
lights listed above (except
daytime running lights) turn
on.
■AUTO mode can be used when
The engine switch is in ON.
■Daytime running light system
●The daytime runn ing lights illumi-
nate using the same lights as the
headlights and illu minate darker
than the headlights.
Headlight switch
The headlights can be oper-
ated manually or automati-
cally.
Operating instructions
Page 174 of 468

1744-3. Operating the lights and wipers
●To make your vehicle more visible
to other drivers during daytime
driving, the daytime running lights
turn on automatically when all of
the following conditions are met.
(The daytime running lights are
not designed for use at night.)
• The engine is running
• The parking brake is released
• The headlight switch is in the
or
* position
*: When the surroundings are bright
The daytime running lights remain
on after they illumi nate, even if the
parking brake is set again.
●For the U.S.A.: Daytime running
lights can be turned off by operat-
ing the switch.
●Compared to turning on the head-
lights, the daytime running light
system offers gr eater durability
and consumes less electricity, so
it can help improve fuel economy.
■Headlight control sensor
The sensor may not function prop-
erly if an object is placed on the sen-
sor, or anything that blocks the
sensor is affixed to the windshield.
Doing so interfere s with the sensor
detecting the level of ambient light
and may cause the automatic head-
light system to malfunction.
■Automatic light off system
●When the headlights are on: The
headlights and tail lights turn off
30 seconds after the driver’s door
is opened and closed if the engine
switch is turned to ACC or OFF.
(Vehicles with a wireless remote
control: The lights turn off immedi- ately if on the key is pressed
after all the doors are closed.)
●When only the tail lights are on:
The tail lights turn off automati-
cally if the engine switch is turned
to ACC or OFF and the driver’s
door is opened.
To turn the lights on again, turn the
engine switch to ON, or turn the light
switch off once and then back to
or (except for the Canada).
■Light reminder buzzer
A buzzer sounds when the engine
switch is turned t o OFF or ACC and
the driver’s door is opened while the
lights are turned on.
■Windshield wiper linked head-
light illumination
When driving during daytime with
the headlight switch turned to , if
the windshield wipers are used, the
headlights will turn o n automatically
after several se conds to help
enhance the visibility of your vehi-
cle.
■Battery-saving function
In order to prevent the battery of the
vehicle from discharging, if the
headlights and/or tail lights are on
when the engine switch is turned off
the battery saving function will oper-
ate and automatically turn off all the
lights after approximately 20 min-
utes. When the engine switch is
turned to ON, the battery-saving
function will be disabled.
When any of the following are per-
formed, the battery-saving function
is canceled once and then reacti-
vated. All the lights will turn off auto-
matically 20 minutes after the
Battery- saving function has been
reactivated:
●When the headlight switch is oper-
ated
●When a door is opened or closed
Page 175 of 468
1754-3. Operating the lights and wipers
4
Driving
■Customization
Some functions can be customized.
( P.412)
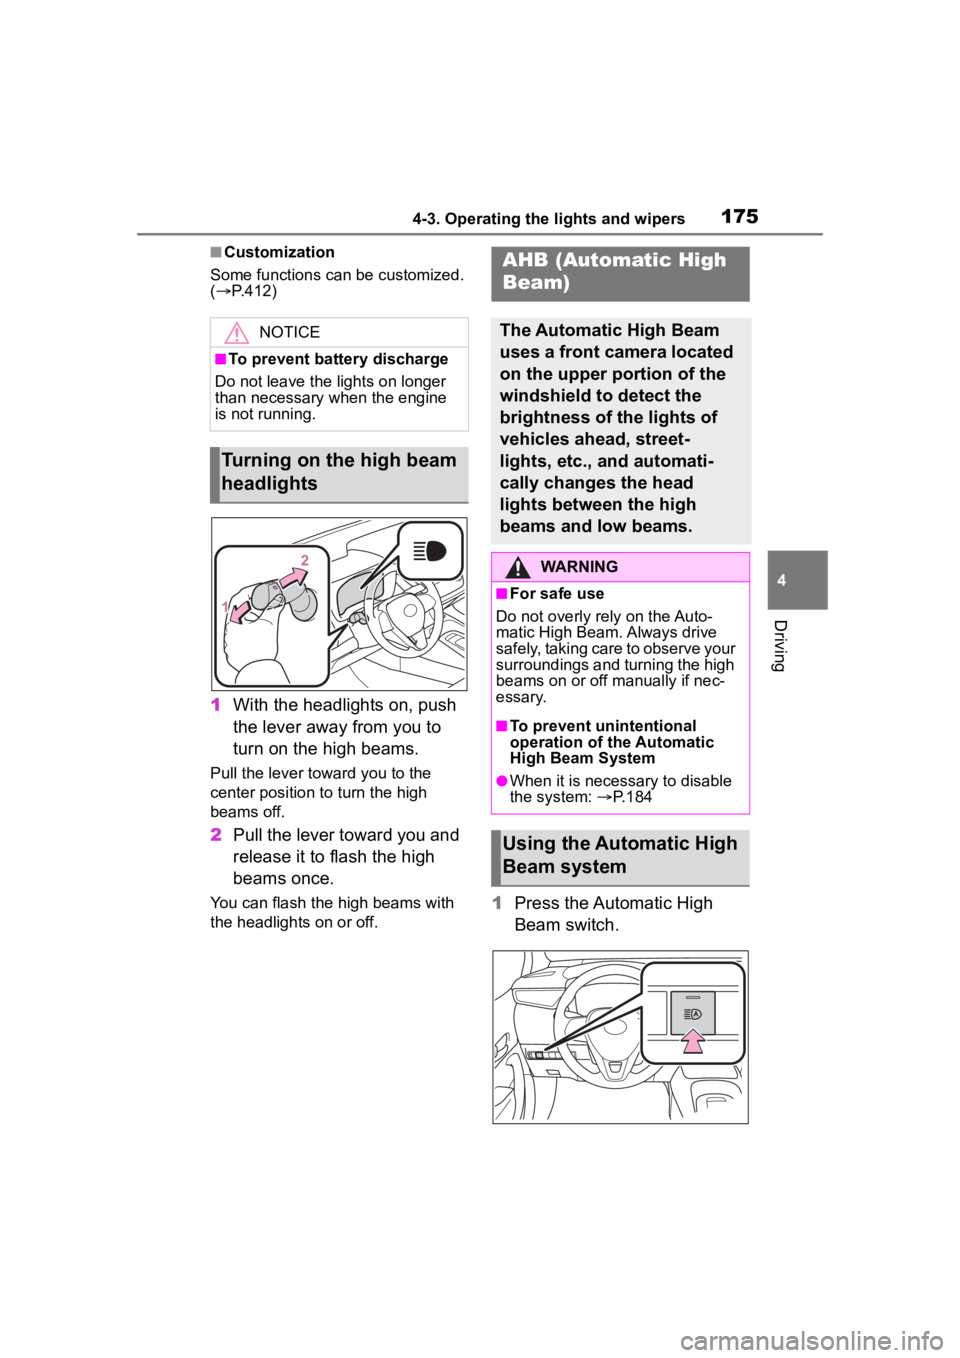
1 With the headlights on, push
the lever away from you to
turn on the high beams.
Pull the lever toward you to the
center position to turn the high
beams off.
2Pull the lever toward you and
release it to flash the high
beams once.
You can flash the high beams with
the headlights on or off.1Press the Automatic High
Beam switch.
NOTICE
■To prevent battery discharge
Do not leave the lights on longer
than necessary when the engine
is not running.
Turning on the high beam
headlights
AHB (Automatic High
Beam)
The Automatic High Beam
uses a front camera located
on the upper portion of the
windshield to detect the
brightness of the lights of
vehicles ahead, street-
lights, etc., and automati-
cally changes the head
lights between the high
beams and low beams.
WARNING
■For safe use
Do not overly rely on the Auto-
matic High Beam. Always drive
safely, taking care to observe your
surroundings and turning the high
beams on or off manually if nec-
essary.
■To prevent unintentional
operation of the Automatic
High Beam System
●When it is necessary to disable
the system: P.184
Using the Automatic High
Beam system