2023 TOYOTA COROLLA ECO mode
[x] Cancel search: ECO modePage 24 of 468
241-1. For safe use
1-1.For safe use
Use only floor mats designed
specifically for vehicles of the
same model and model year as
your vehicle. Fix them securely
in place onto the carpet.
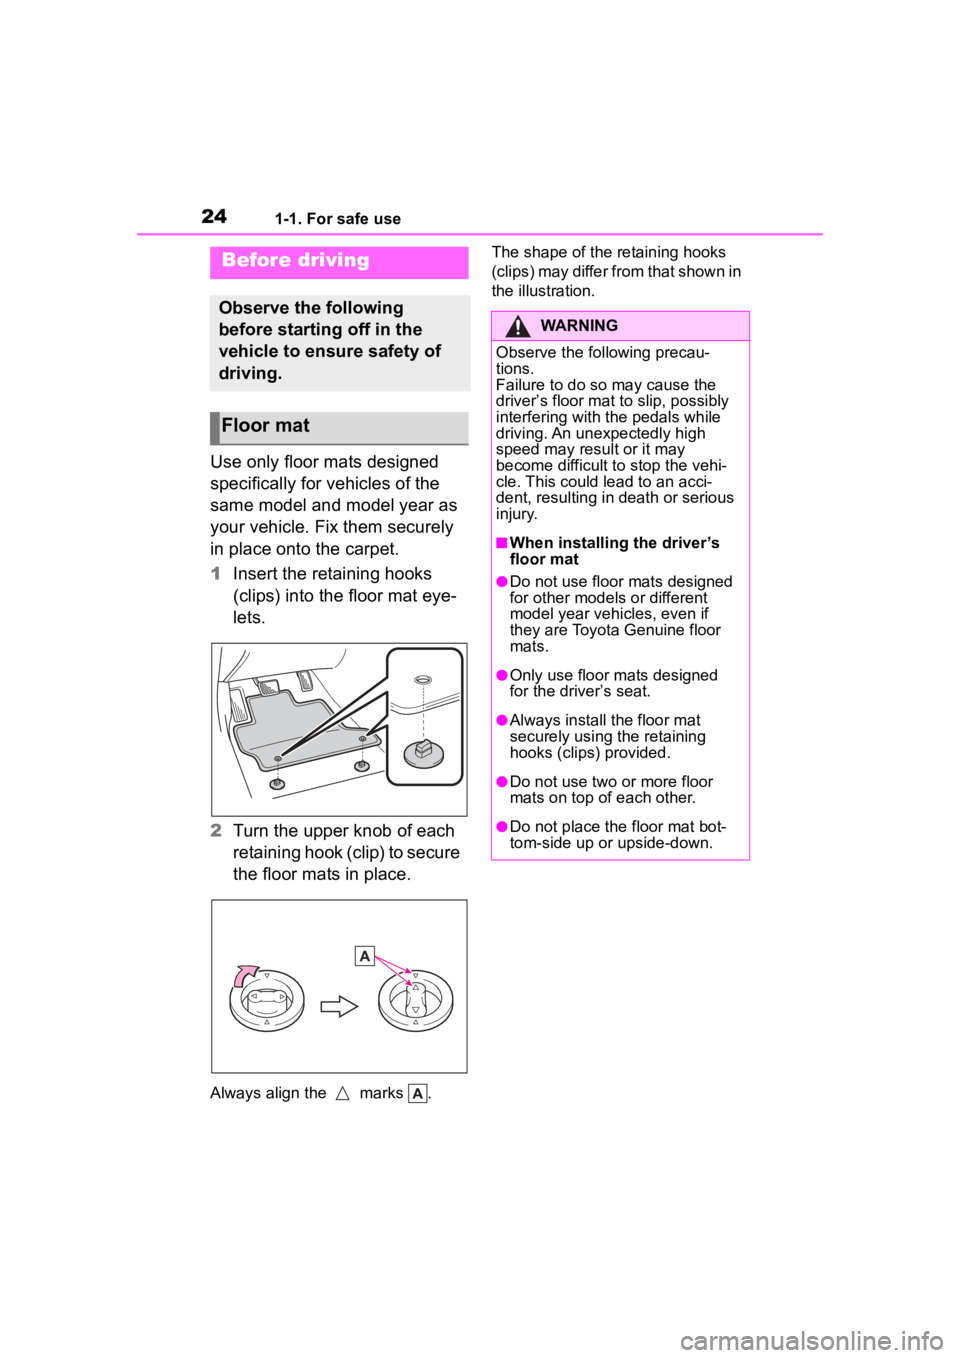
1Insert the retaining hooks
(clips) into the floor mat eye-
lets.
2 Turn the upper knob of each
retaining hook (clip) to secure
the floor mats in place.
Always align the marks . The shape of the retaining hooks
(clips) may differ from that shown in
the illustration.
Before driving
Observe the following
before starting off in the
vehicle to ensure safety of
driving.
Floor mat
WARNING
Observe the following precau-
tions.
Failure to do so may cause the
driver’s floor mat to slip, possibly
interfering with t
he pedals while
driving. An unexpectedly high
speed may result or it may
become difficult to stop the vehi-
cle. This could lead to an acci-
dent, resulting in death or serious
injury.
■When installing the driver’s
floor mat
●Do not use floor mats designed
for other models or different
model year vehicles, even if
they are Toyota Genuine floor
mats.
●Only use floor mats designed
for the driver’s seat.
●Always install the floor mat
securely using the retaining
hooks (clips) provided.
●Do not use two or more floor
mats on top of each other.
●Do not place the floor mat bot-
tom-side up or upside-down.
Page 64 of 468
641-2. Child safety
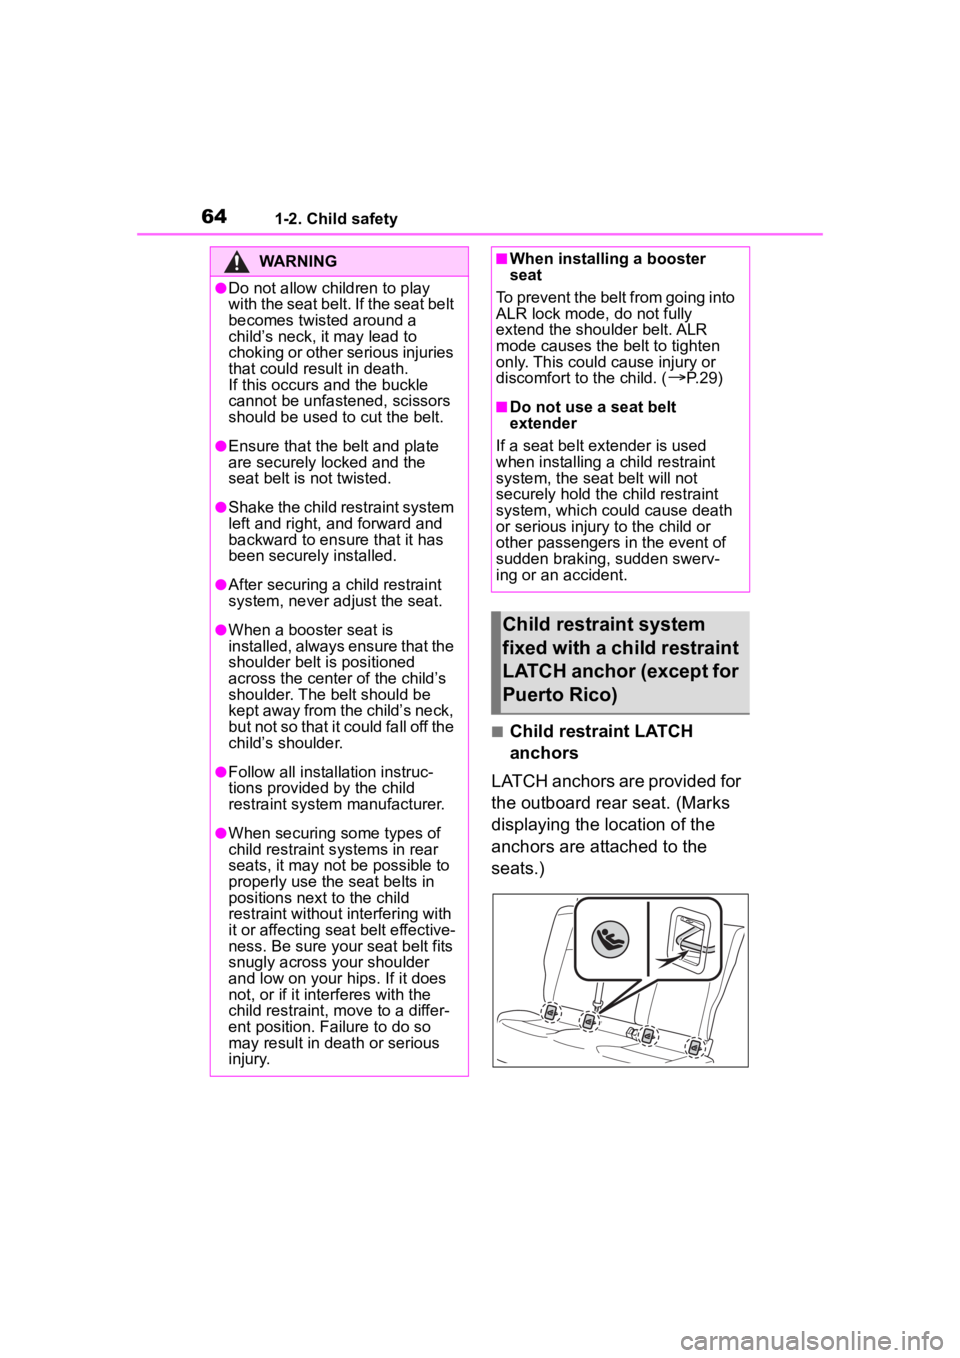
■Child restraint LATCH
anchors
LATCH anchors are provided for
the outboard rear seat. (Marks
displaying the location of the
anchors are attached to the
seats.)
WARNING
●Do not allow children to play
with the seat belt. If the seat belt
becomes twisted around a
child’s neck, it may lead to
choking or other serious injuries
that could result in death.
If this occurs and the buckle
cannot be unfastened, scissors
should be used to cut the belt.
●Ensure that the belt and plate
are securely locked and the
seat belt is not twisted.
●Shake the child restraint system
left and right, and forward and
backward to ensure that it has
been securely installed.
●After securing a child restraint
system, never adjust the seat.
●When a booster seat is
installed, always ensure that the
shoulder belt is positioned
across the center of the child’s
shoulder. The belt should be
kept away from the child’s neck,
but not so that it could fall off the
child’s shoulder.
●Follow all installation instruc-
tions provided by the child
restraint system manufacturer.
●When securing some types of
child restraint s ystems in rear
seats, it may not be possible to
properly use the seat belts in
positions next to the child
restraint without interfering with
it or affecting seat belt effective-
ness. Be sure your seat belt fits
snugly across your shoulder
and low on your hips. If it does
not, or if it interferes with the
child restraint, move to a differ-
ent position. Failure to do so
may result in death or serious
injury.
■When installing a booster
seat
To prevent the belt from going into
ALR lock mode, do not fully
extend the shoulder belt. ALR
mode causes the belt to tighten
only. This could cause injury or
discomfort to the child. (
P. 2 9 )
■Do not use a seat belt
extender
If a seat belt extender is used
when installing a child restraint
system, the seat belt will not
securely hold the child restraint
system, which could cause death
or serious injury to the child or
other passengers in the event of
sudden braking, sudden swerv-
ing or an accident.
Child restraint system
fixed with a child restraint
LATCH anchor (except for
Puerto Rico)
Page 85 of 468

852-1. Instrument cluster
2
Vehicle status information and indicators
*1: These lights come on when the engine switch is turned to ON to
indicate that a system check is
being performed. They will turn
off after the engine is started, or
after a few seconds. There may
be a malfunction in a system if
the lights do not come on, or turn
off. Have the vehicle inspected
by your Toyota dealer.
*2: This light comes on when the system is turned off.
*3: This light illumi nates on the out-
side rear view mirrors.
*4: This light illuminates on the multi-information display.
*5: When the outside temperature is approximately 37°F (3°C) or
lower, this indicator will flash for
approximately 10 seconds, then
stay on.
*6: This light illuminates on the cen-ter panel.
*7: This light illuminates on the over-head console.
VSC OFF indicator
*1, 2
( P.250)
Smart key system indica-
tor
*4 (if equipped)
( P.155)
(U.S.A.)
Parking brake indicator
( P.168)
(Canada)
Parking brake indicator
( P.168)
Brake hold standby indi-
cator
*1 ( P.171)
Brake hold operated indi-
cator
*1 ( P.171)
Eco Driving Indicator
Light
*1 ( P. 9 3 )
Low outside temperature
indicator
*5 ( P.86, 89)
Security indicator
*6
( P.77, 78)
“AIR BAG ON/OFF”
indicator
*1, 7 ( P. 4 1 )
Sport mode indicator (if
equipped) ( P.247)
Page 94 of 468
942-1. Instrument cluster
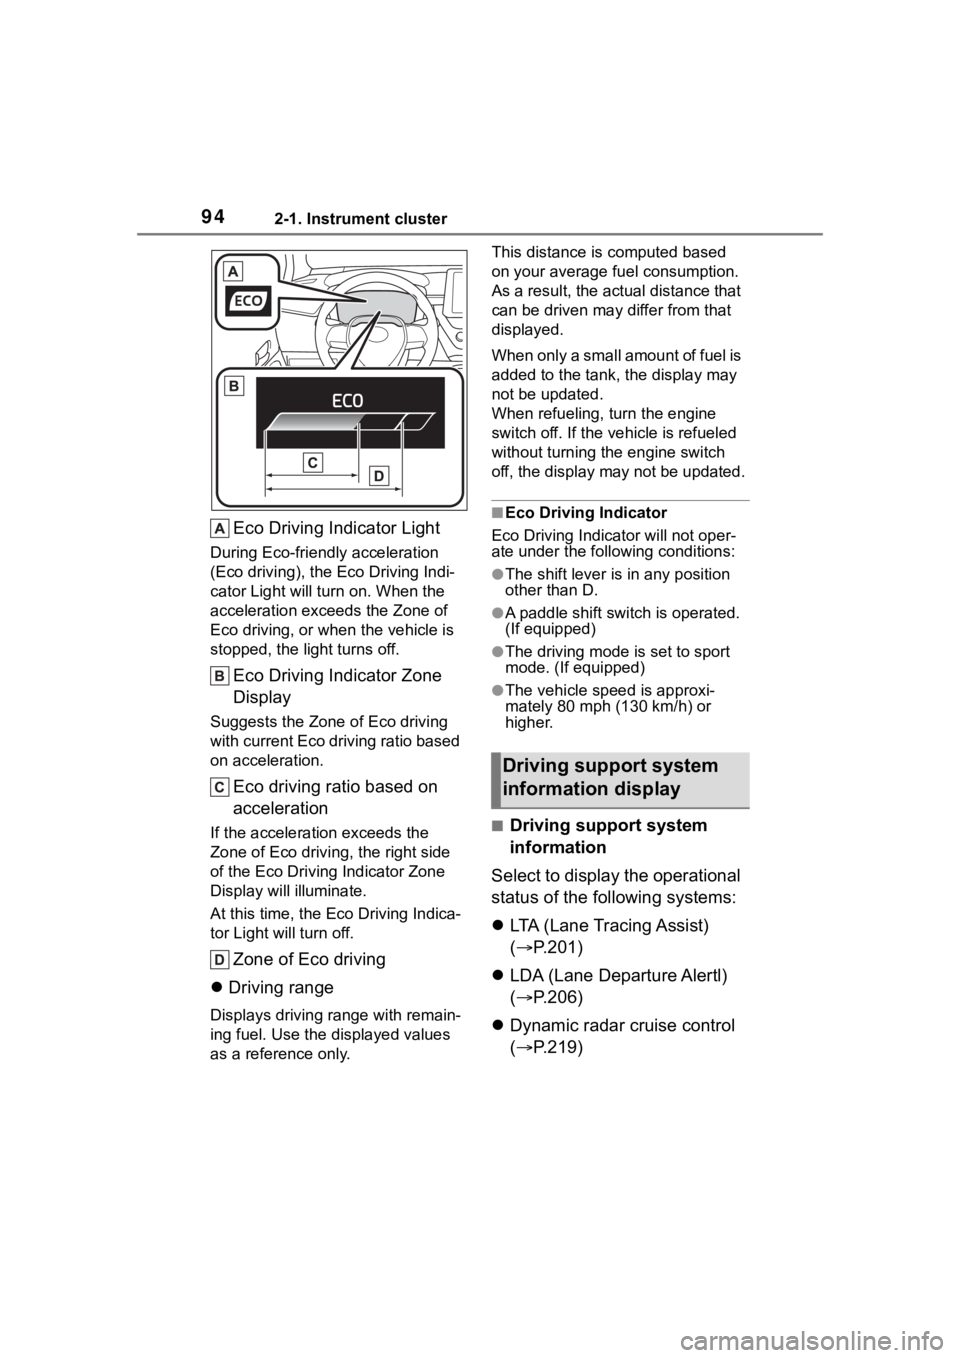
Eco Driving Indicator Light
During Eco-friendly acceleration
(Eco driving), the Eco Driving Indi-
cator Light will turn on. When the
acceleration exceeds the Zone of
Eco driving, or when the vehicle is
stopped, the light turns off.
Eco Driving Indicator Zone
Display
Suggests the Zone of Eco driving
with current Eco driving ratio based
on acceleration.
Eco driving ratio based on
acceleration
If the acceleration exceeds the
Zone of Eco driving, the right side
of the Eco Driving Indicator Zone
Display will illuminate.
At this time, the Eco Driving Indica-
tor Light will turn off.
Zone of Eco driving
Driving range
Displays driving range with remain-
ing fuel. Use the d isplayed values
as a reference only. This distance is computed based
on your average f
uel consumption.
As a result, the actual distance that
can be driven may differ from that
displayed.
When only a small amount of fuel is
added to the tank, the display may
not be updated.
When refueling, turn the engine
switch off. If the ve hicle is refueled
without turning the engine switch
off, the display may not be updated.
■Eco Driving Indicator
Eco Driving Indicator will not oper-
ate under the following conditions:
●The shift lever is in any position
other than D.
●A paddle shift switch is operated.
(If equipped)
●The driving mode is set to sport
mode. (If equipped)
●The vehicle spe ed is approxi-
mately 80 mph (130 km/h) or
higher.
■Driving support system
information
Select to display the operational
status of the following systems:
LTA (Lane Tracing Assist)
( P.201)
LDA (Lane Departure Alertl)
( P.206)
Dynamic radar cruise control
( P.219)
Driving support system
information display
Page 99 of 468
992-1. Instrument cluster
2
Vehicle status information and indicators
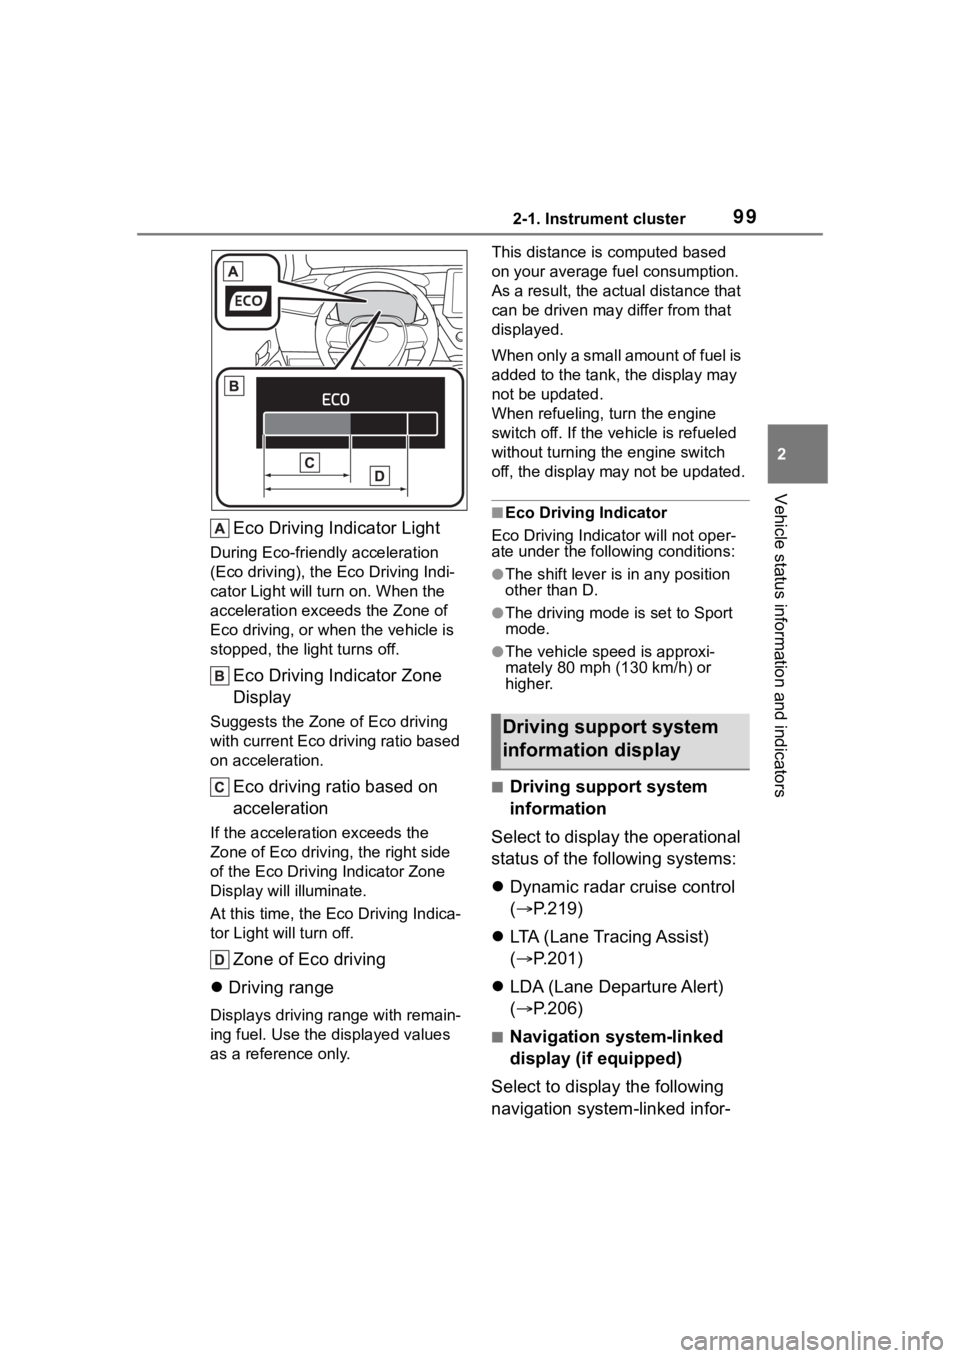
Eco Driving Indicator Light
During Eco-friendly acceleration
(Eco driving), the Eco Driving Indi-
cator Light will turn on. When the
acceleration exceeds the Zone of
Eco driving, or when the vehicle is
stopped, the light turns off.
Eco Driving Indicator Zone
Display
Suggests the Zone of Eco driving
with current Eco driving ratio based
on acceleration.
Eco driving ratio based on
acceleration
If the acceleration exceeds the
Zone of Eco driving, the right side
of the Eco Driving Indicator Zone
Display will illuminate.
At this time, the Eco Driving Indica-
tor Light will turn off.
Zone of Eco driving
Driving range
Displays driving range with remain-
ing fuel. Use the d isplayed values
as a reference only. This distance is computed based
on your average f
uel consumption.
As a result, the actual distance that
can be driven may differ from that
displayed.
When only a small amount of fuel is
added to the tank, the display may
not be updated.
When refueling, turn the engine
switch off. If the ve hicle is refueled
without turning the engine switch
off, the display may not be updated.
■Eco Driving Indicator
Eco Driving Indicator will not oper-
ate under the following conditions:
●The shift lever is in any position
other than D.
●The driving mode is set to Sport
mode.
●The vehicle spe ed is approxi-
mately 80 mph (130 km/h) or
higher.
■Driving support system
information
Select to display the operational
status of the following systems:
Dynamic radar cruise control
( P.219)
LTA (Lane Tracing Assist)
( P.201)
LDA (Lane Departure Alert)
( P.206)
■Navigation system-linked
display (if equipped)
Select to display the following
navigation system-linked infor-
Driving support system
information display
Page 107 of 468
1073-1. Key information
3
Before driving
• The wireless remote control does not operate.
• The detection area becomes
smaller.
Vehicles with a smart key system
●The standard battery life is 1 to 2
years.
●If the battery becomes low, an
alarm will sound in the cabin and a
message will be shown on the
multi-information display when the
engine is stopped.
●To reduce key battery depletion
when the electronic key is to not
be used for long periods of time,
set the electronic key to the bat-
tery-saving mode. ( P.121)
●As the electronic key always
receives radio waves, the battery
will become depleted even if the
electronic key is not used. The fol-
lowing symptoms indicate that the
electronic key battery may be
depleted. Replace the battery
when necessary. ( P.333)
• The smart key system or the wire- less remote control does not oper-
ate.
• The detection area becomes smaller.
• The LED indicator on the key sur-
face does not turn on.
●To avoid serious deterioration, do
not leave the electronic key within
3 ft. (1 m) of the following electri-
cal appliances t hat produce a
magnetic field:
• TVs
• Personal computers
• Cellular phones, cordless phones and battery chargers
• Recharging cellular phones or
cordless phones
• Table lamps
• Induction cookers
●If the electronic key is near the
vehicle for longer than necessary,
even if the smart key system is not
operated, the key battery may
become depleted faster than nor-
mal.
■Replacing the battery (with a
wireless remote control func-
tion)
P.333
■The electronic key function is
suspended when (vehicles with
a smart key system)
The electronic key function may be
suspended when the electronic key
is kept unmoved in a same location
for a certain period, such as it is left
on a same place. This is to reduce
battery consumption. The function
will be restored automatically when
the electronic key is moved, such as
it is picked up.
■If “A New Key has been Regis-
tered Contact Your Dealer for
Details” is shown on the
multi-information display (vehi-
cles with a smart key system)
This message will be displayed
each time the driver’s door is
opened when the doors are
unlocked from the outside for
approximately 10 days after a new
electronic key has been registered.
If this message is displayed but you
have not had a new electronic key
registered, ask your Toyota dealer to
check if an unknown electronic key
(other than those in your posses-
sion) has been registered.
■If a wrong key is used (with a
wireless remote control func-
tion)
The key cylinder rotates freely, iso-
lated from the internal mechanism.
NOTICE
■To prevent key damage
●Do not drop the keys, subject
them to strong shocks or bend
them.
●Do not expose the keys to high
temperatures for long periods of
time.
Page 109 of 468
1093-1. Key information
3
Before driving
Locks the doors (P. 1 1 1 )
Unlocks the doors ( P. 1 1 1 )
Opens the windows
*1 and
moon roof
*1, 2 ( P. 1 1 1 )
Opens the trunk ( P. 1 1 8 )
Sounds the alarm ( P.109)
*1:This setting must be customized
at your Toyota dealer.
*2: If equipped
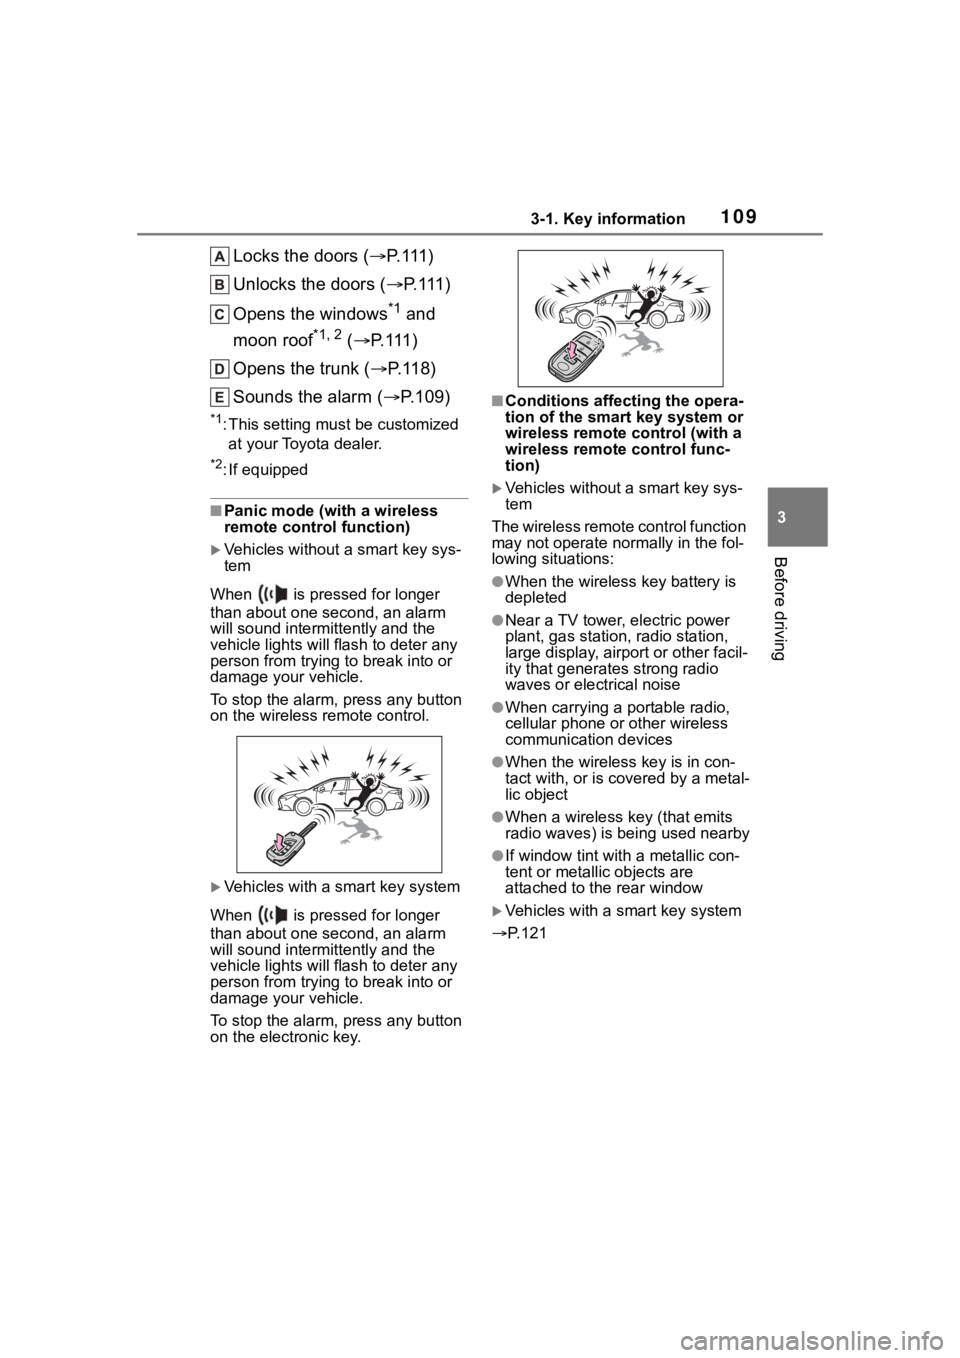
■Panic mode (with a wireless
remote control function)
Vehicles without a smart key sys-
tem
When is pressed for longer
than about one second, an alarm
will sound intermittently and the
vehicle lights will f lash to deter any
person from trying to break into or
damage your vehicle.
To stop the alarm, press any button
on the wireless re mote control.
Vehicles with a smart key system
When is pressed for longer
than about one second, an alarm
will sound intermittently and the
vehicle lights will f lash to deter any
person from trying to break into or
damage your vehicle.
To stop the alarm, press any button
on the electronic key.
■Conditions affecting the opera-
tion of the smart key system or
wireless remote control (with a
wireless remote control func-
tion)
Vehicles without a smart key sys-
tem
The wireless remote control function
may not operate normally in the fol-
lowing situations:
●When the wireles s key battery is
depleted
●Near a TV tower, electric power
plant, gas station, radio station,
large display, airpo rt or other facil-
ity that generates strong radio
waves or electrical noise
●When carrying a portable radio,
cellular phone or other wireless
communication devices
●When the wireless key is in con-
tact with, or is c overed by a metal-
lic object
●When a wireless key (that emits
radio waves) is being used nearby
●If window tint wit h a metallic con-
tent or metallic objects are
attached to the rear window
Vehicles with a smart key system
P.121
Page 120 of 468
1203-2. Opening, closing and locking the doors
*: If equipped
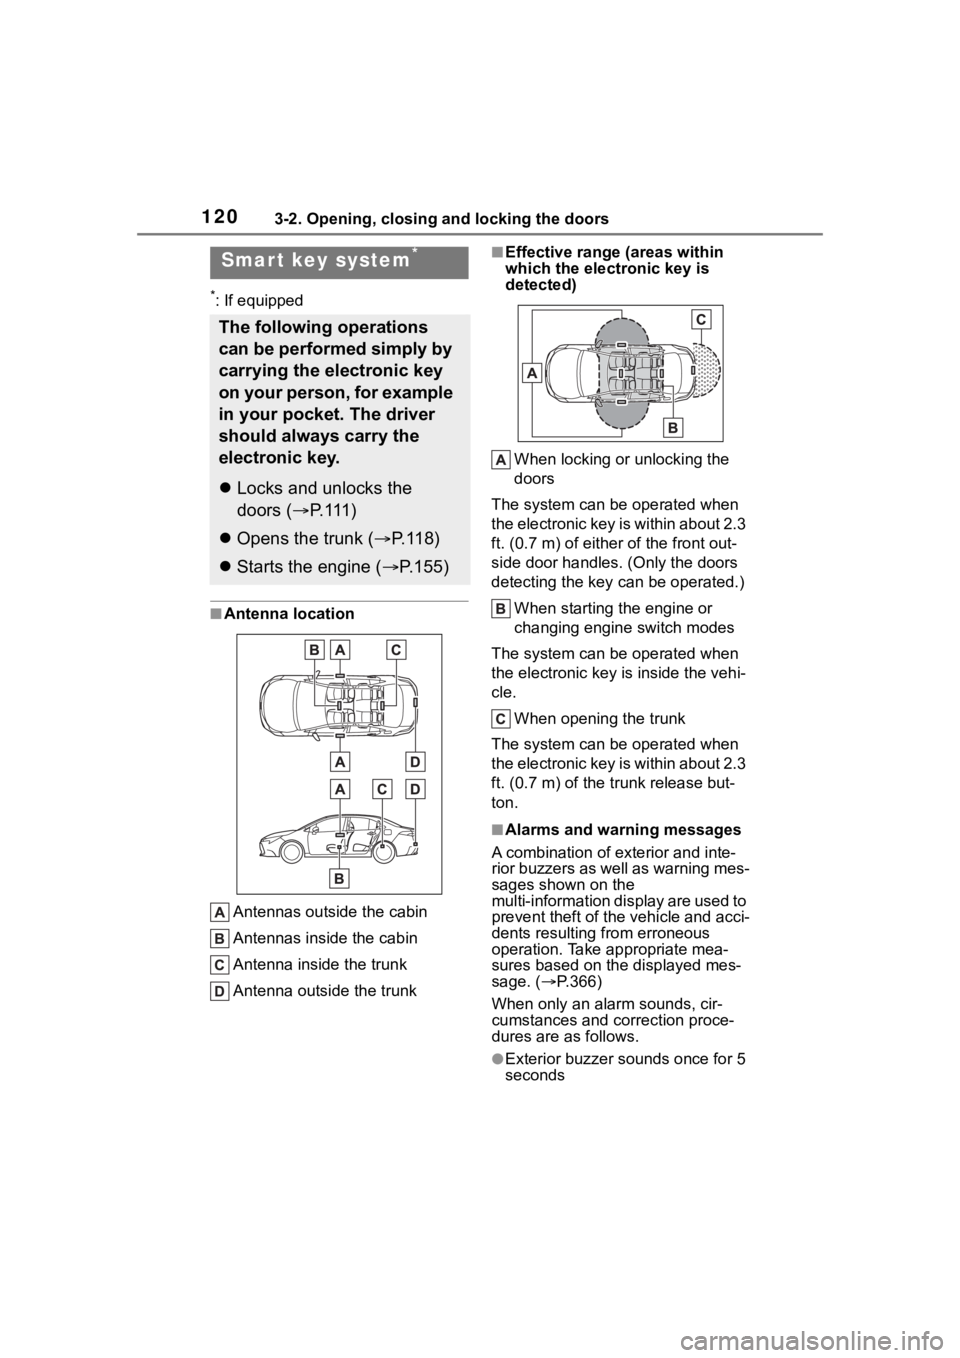
■Antenna locationAntennas outside the cabin
Antennas inside the cabin
Antenna inside the trunk
Antenna outside the trunk
■Effective range (areas within
which the electronic key is
detected)
When locking or unlocking the
doors
The system can be operated when
the electronic key is within about 2.3
ft. (0.7 m) of either of the front out-
side door handles. (Only the doors
detecting the key can be operated.)
When starting the engine or
changing engine switch modes
The system can be operated when
the electronic key i s inside the vehi-
cle.
When opening the trunk
The system can be operated when
the electronic key is within about 2.3
ft. (0.7 m) of the trunk release but-
ton.
■Alarms and warning messages
A combination of exterior and inte-
rior buzzers as well as warning mes-
sages shown on the
multi-information di splay are used to
prevent theft of the vehicle and acci-
dents resulting from erroneous
operation. Take appropriate mea-
sures based on the displayed mes-
sage. ( P.366)
When only an alarm sounds, cir-
cumstances and correction proce-
dures are as follows.
●Exterior buzzer sounds once for 5
seconds
Smar t key system*
The following operations
can be performed simply by
carrying the electronic key
on your person, for example
in your pocket. The driver
should always carry the
electronic key.
Locks and unlocks the
doors ( P. 1 1 1 )
Opens the trunk ( P. 1 1 8 )
Starts the engine ( P.155)