Page 357 of 496

3576-3. Do-it-yourself maintenance
6
Maintenance and care
■Bulbs that need to be
replaced by your Toyota
dealer
Headlights/daytime running
lights
Parking lights
Front turn signal lights
Front side marker lights
LED accent lights (if
equipped)
Side turn signal lights (if
equipped)
Tail lights
Stop lights
Rear side marker lights (LED
type)
High mounted stoplight
License plate lights
■LED light bulbs
The lights other than the rear turn
signal lights, rear side marker lights
(bulb type) and back-up lights con-
sist of a number of LEDs. If any of
the LEDs burn out, take your vehicle
to your Toyota dealer to have the
light replaced.
■Condensation build-up on the
inside of the lens
In certain situatio ns, such as when
driving in the rain or when washing
the vehicle, condensation may form
on the inner side of the headlight
lens and other li ghts. As each light
has a ventilation hole, moist air may
enter. If the ambient temperature is
low, condensation may form tempo-
rarily, but it will di ssipate as the
inside of the light i s warmed up. As
the condensation is due to a phe-
nomenon similar to windows fogging
in the rain, it doe s not indicate a malfunction.
Contact your Toyota dealer for more
information in t
he following situa-
tions:
●Large drops of water have built up
on the inside of the lens.
●Water has built up inside the
headlight.
■When replacing light bulbs
P.355
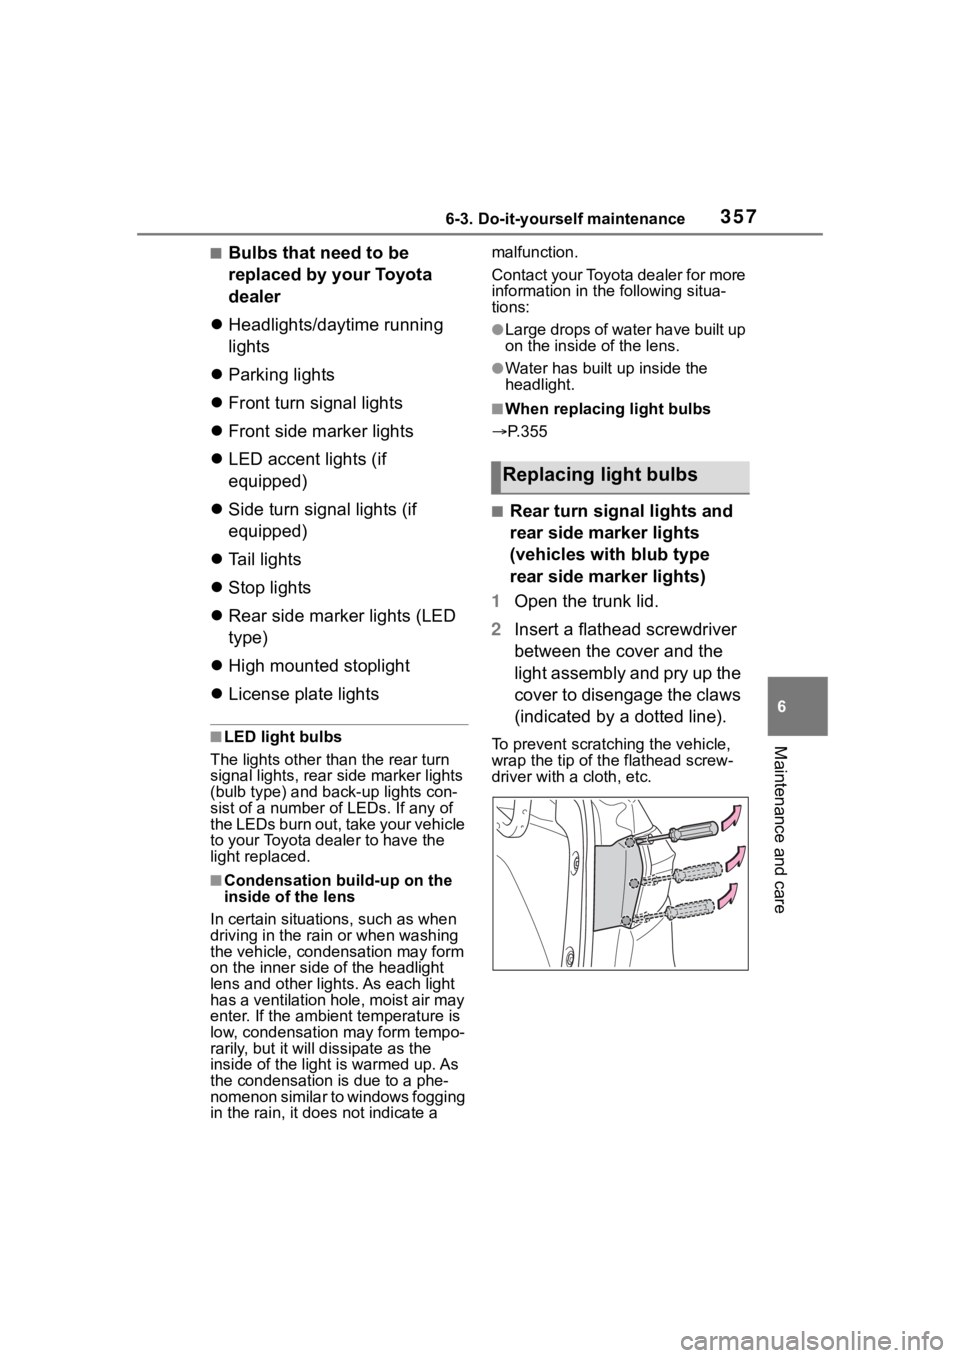
■Rear turn signal lights and
rear side marker lights
(vehicles with blub type
rear side marker lights)
1 Open the trunk lid.
2 Insert a flathead screwdriver
between the cover and the
light assembly and pry up the
cover to disengage the claws
(indicated by a dotted line).
To prevent scratching the vehicle,
wrap the tip of th e flathead screw-
driver with a cloth, etc.
Replacing light bulbs
Page 358 of 496
3586-3. Do-it-yourself maintenance
3Pull the cover toward the rear
of the vehicle and remove the
cover.
4 Remove the 2 screws and
then remove the light assem-
bly by pulling it straight back.
5 Turn the bulb base counter-
clockwise.
Rear side marker lights
Rear turn signal lights 6
Remove the light bulb.
Rear side marker lights
Rear turn signal lights
7 When installing the light bulb,
install it by conducting steps
6 and 5 with the directions
reversed.
8 Install the light assembly and
then install the 2 screws.
Align the guide and pin on
the light assembl y with the mount-
ing when installing it.
9 Install the cover.
■Rear turn signal lights
(vehicles with LED type rear
side marker lights)
1 Open the trunk lid.
2 Insert a flathead screwdriver
between the cover and the
light assembly and pry up the
Page 360 of 496
3606-3. Do-it-yourself maintenance
■Back-up lights
1 Open the trunk lid, remove
the clips, and pull back the
cover.
2 Turn the bulb base counter-
clockwise and remove it.
3 Remove the light bulb.
4 When installing, reverse the
steps listed.WARNING
■Replacing light bulbs
●Turn off the lights. Do not
attempt to replace the bulb
immediately after turning off the
lights. The bulbs become very
hot and may cause burns.
●Do not touch the glass portion
of the light bulb with bare
hands. When it is unavoidable
to hold the glass portion, use
and hold with a clean dry cloth
to avoid getting moisture and
oils on the bulb. Also, if the bulb
is scratched or dropped, it may
blow out or crack.
●Fully install light bulbs and any
parts used to secure them. Fail-
ure to do so may result in heat
damage, fire, or water entering
the light unit. This may damage
the lights or cause condensa-
tion to build up on the lens.
■To prevent damage or fire
Make sure bulbs are fully seated
and locked.
Page 370 of 496

3707-2. Steps to take in an emergency
4Tighten down the towing eye-
let securely using a wheel nut
wrench (if equipped) or hard
metal bar.
5 Securely attach cables or
chains to the towing eyelet.
Take care not to damage the vehi-
cle body.
6Enter the vehicle being towed
and start the hybrid system.
If the hybrid system does not start,
turn the power switch to ON.
7Shift the shift lever to N and
release the parking brake.
Turn automatic mode off.
( P.184)
When the shift lever cannot
be shifted: P. 1 8 1
■While towing
If the hybrid system is off, the power
assist for the brakes and steering
will not function, making steering
and braking more difficult.
■Wheel nut wrench
Vehicle without wheel nut wrench:
Wheel nut wrench can be pur-
chased at your Toyota dealer.
Vehicle with wheel nut wrench:
Wheel nut wrench is installed in
trunk. ( P.399)
Fluid leaks under the vehicle.
(Water dripping from the air
conditioning after use is nor-
mal.)
Flat-looking tires or uneven
tire wear
Engine coolant temperature
gauge needle continually
points higher than normal.
Changes in exhaust sound
Excessive tire squeal when
cornering
Strange noises related to the
suspension system
Pinging or other noises
related to the hybrid system
Engine missing, stumbling or
running roughly
Appreciable loss of power
Vehicle pulls heavily to one
If you think something
is wrong
If you notice any of the fol-
lowing symptoms, your
vehicle probably needs
adjustment or repair. Con-
tact your Toyota dealer as
soon as possible.
Visible symptoms
Audible symptoms
Operational symptoms
Page 428 of 496
4288-1. Specifications
A: Wedge base bulbs (clear)
B: Wedge base bulbs (amber)
Wheel size18 8J
Wheel nut torque76 ft•lbf (103 N•m, 10.5 kgf•m)
Light bulbs
Light bulbsBulb No.WTy p e
Exterior
Rear side marker lights (bulb
type)—5A
Rear turn signal lights—21B
Back-up lights—16A
InteriorTrunk light—5A
Page 444 of 496
4448-2. Customization
*1: For details about each function: P. 1 0 8
*2: The default setting varies according to country.
*3: 7-inch display
*4: If equipped
■Door lock ( P.127, 133, 408)
Drive information items
(Second item)Elapsed time
Average vehicle
speed
—O—
Distance
Pop-up displayOnOff—O—
FunctionDefault settingCustomized setting
Unlocking using a
mechanical key
Driver’s door unlocked in
one step, all doors
unlocked in two step
All doors unlocked in one step——O
Automatic door locking
function
Shift position linked door
locking opera- tionOff
O—OSpeed linked door locking operation
Automatic door unlock-
ing function
Shift position linked door unlocking operationOff
O—ODriver’s door linked door unlocking operation
Locking/unlocking of the
trunk when all doors are
locked/unlocked
OnOff——O
Function*1Default settingCustomized setting
Page 446 of 496
4468-2. Customization
■Wireless remote control (P.124, 127, 133)
■Power switch* ( P.172)
*: Vehicles with a smart key system
■Power windows and moon roof* ( P.150, 153)
FunctionDefault settingCustomized setting
Wireless remote controlOnOff——O
Unlocking operation
Driver’s door
unlocked in
one step, all doors
unlocked in two step
All doors unlocked in one stepO—O
Trunk unlocking opera-
tionPress and hold (short)
One short press
——O
Push twice
Press and hold (long)
Off
Theft deterrent panic
modeOnOff——O
Locking operation when
door openedOnOffO—O
FunctionDefault setting
ACC customization
Enabling/Disabling ACC
mode
On, OffO——
FunctionDefault settingCustomized setting
Mechanical key linked
operationOffOn——O
Wireless remote control
linked operationOffOn (open only)——O
Wireless remote control
linked operation signal
(buzzer)
OnOff——O
Page 468 of 496

468Alphabetical Index
Brake assist ............................ 266
Break-in tips ........................... 160
Brightness control Instrument panel light control98, 101
Meter light control ................. 101
BSM (Blind Spot Monitor) ...... 249
C
Care Exterior ................................. 302
Interior .................................. 305
Seat belts ............................. 305
Wheels and wheel ornaments........................................... 302
Cargo capacity ....................... 168
Chains ..................................... 274
Child restraint system Fixed with a LATCH system ... 64
Fixed with a seat belt ............. 60
Front passenger occupant clas-sification system ................... 41
Points to remember ................ 48
Riding with children ................ 47
Types of child restraint system installation met hod ............... 50
Using an anchor bracket ........ 68
Child safety 12-volt battery precautions . 323, 413
Airbag precautions ................. 36
Child restraint system............. 50
Heated steering wheel and seat
heater precautions ............. 284
How your child should wear the seat belt................................ 28
Moon roof precau tions ......... 154
Power window lock switch.... 152
Power window precautions .. 151
Rear door child-protectors.... 132
Seat belt extender precautions ............................................. 28 Seat belt precautions..............47
Trunk precautions .................133
Child-protectors......................132
Cleaning Exterior .................................302
Interior ..................................305
Seat belts .............................305
Wheels and wheel ornaments...........................................302
Clock ......................96, 98, 99, 102
Coat hooks ..............................299
Condenser ............. ..................321
Console box ............................290
Cooling system .......................320 Engine overheating ..............414
Hybrid system overheating ...415
Cruise control .........................244
Cup holders.............................289
Current fuel consumption....104, 11 0
Curtain shield airbags ..............31
Customizable featu res ...........442
D
Daytime running light system189
Defogger
Outside rear view mirrors .....280
Rear window.........................280
Windshield ............................279
Differential Rear differential oil................424
Dimensions .............................420
Dinghy towing .........................169
Display Cruise control .......................245
Dynamic radar cruise control 239
Energy monitor ..................... 116
Multi-information display.....102,
109
RCTA ....................................254
Warning message.................382
Display change button .....97, 101