Page 386 of 500

3867-2. Steps to take in an emergency
WARNING
Observe the following precau-
tions.
Failure to do so may result in
death or serious injury.
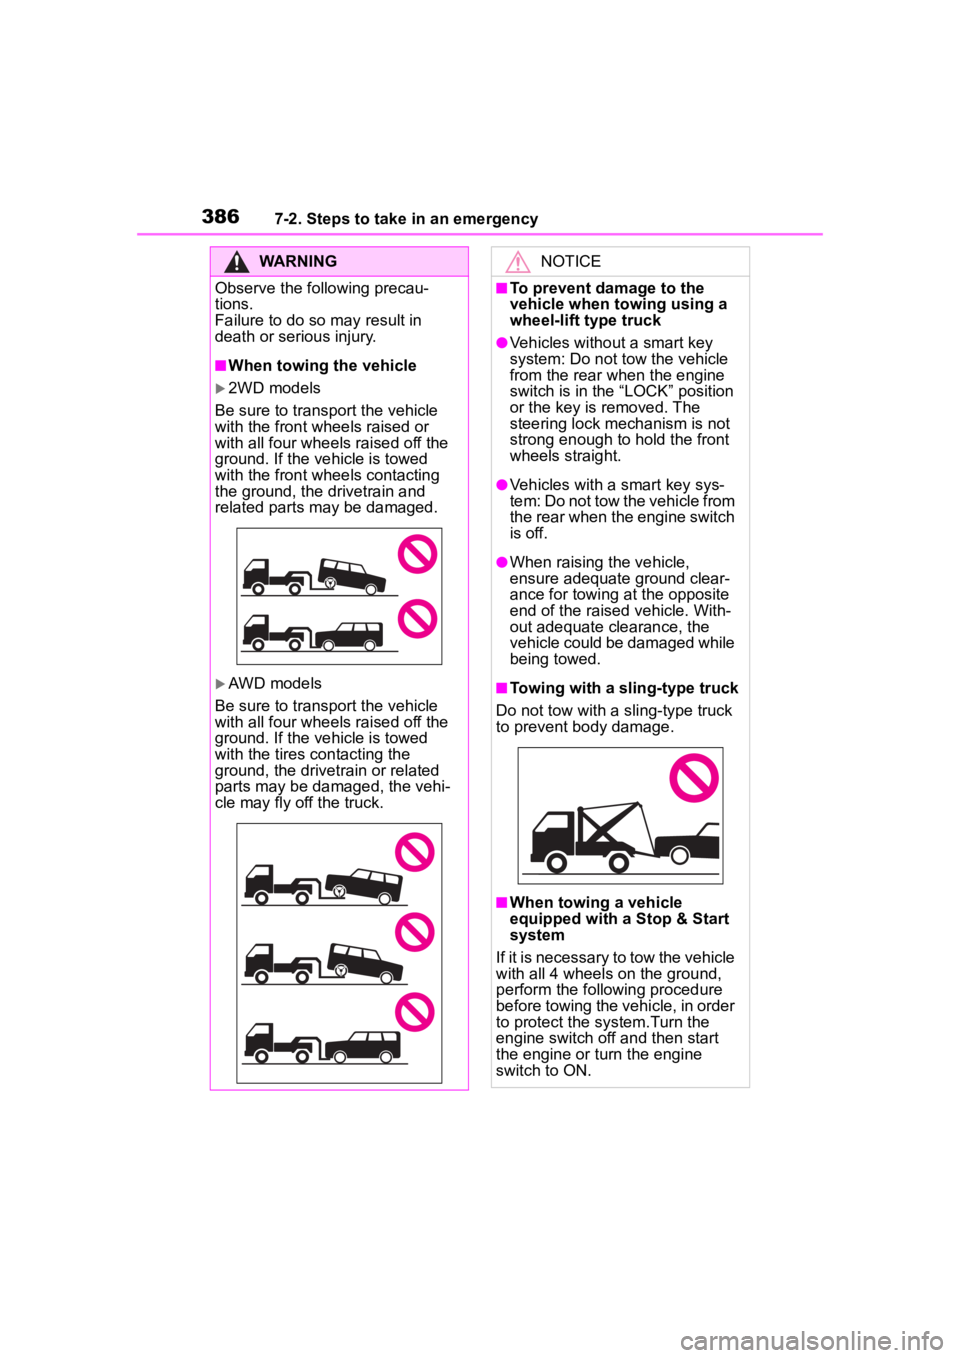
■When towing the vehicle
2WD models
Be sure to transport the vehicle
with the front wh eels raised or
with all four wheels raised off the
ground. If the vehicle is towed
with the front wh eels contacting
the ground, the drivetrain and
related parts may be damaged.
AWD models
Be sure to transport the vehicle
with all four wheels raised off the
ground. If the vehicle is towed
with the tires contacting the
ground, the drivetrain or related
parts may be damaged, the vehi-
cle may fly off the truck.
NOTICE
■To prevent damage to the
vehicle when t owing using a
wheel-lift type truck
●Vehicles without a smart key
system: Do not tow the vehicle
from the rear when the engine
switch is in the “LOCK” position
or the key is removed. The
steering lock mechanism is not
strong enough to hold the front
wheels straight.
●Vehicles with a smart key sys-
tem: Do not tow the vehicle from
the rear when the engine switch
is off.
●When raising the vehicle,
ensure adequate ground clear-
ance for towing at the opposite
end of the raised vehicle. With-
out adequate clearance, the
vehicle could be damaged while
being towed.
■Towing with a sling-type truck
Do not tow with a sling-type truck
to prevent body damage.
■When towing a vehicle
equipped with a Stop & Start
system
If it is necessary to tow the vehicle
with all 4 wheels on the ground,
perform the following procedure
before towing the vehicle, in order
to protect the system.Turn the
engine switch off and then start
the engine or turn the engine
switch to ON.
Page 405 of 500

4057-2. Steps to take in an emergency
7
When trouble arises
necessary maintenance. Please
reset the message after the mainte-
nance is performed. ( P.428)
*: Refer to the separate “Scheduled
Maintenance” or “Owner’s Man-
ual Supplement” for the mainte-
nance interval applicable to your
vehicle.
■If a message that indicates the
need for referring to Owner’s
Manual is displayed
●If “Engine Coolant Temp High” is
displayed, follow the instructions
accordingly. ( P.423)
●If the following m essage is dis-
played on the multi-information
display, it may indicate a malfunc-
tion. Have the vehicle inspected
by your Toyota dealer immedi-
ately.
• “Smart Key System malfunction”
●If any of the following messages
are displayed on the multi-infor-
mation display, it may indicate a
malfunction. Immediately stop the
vehicle and contact your Toyota
dealer.
• “Braking Power Low”
• “Oil Pressure Low”
Stop the vehicle in a safe
place on a hard, flat surface.
Set the parking brake.
Shift the shift lever to P.
Stop the engine.
Turn on the emergency flash-
ers.
If you have a flat tire
Your vehicle is equipped
with a spare tire. The flat tire
can be replaced with the
spare tire.
For details about tires:
P.351
WARNING
■If you have a flat tire
Do not continue driving with a flat
tire. Driving even a short distance
with a flat tire can damage the tire
and the wheel beyond repair,
which could resul t in an accident.
Before jacking up the
vehicle
Page 406 of 500
4067-2. Steps to take in an emergency
2WD models
Wheel nut wrench
Wheel lock key (if equipped)
Jack handle
Jack
Spare tire
Location of the spare t ire, jack and tools
Page 407 of 500
4077-2. Steps to take in an emergency
7
When trouble arises
AWD models
Jack
Wheel nut wrench
Wheel lock key (if equipped)
Jack handle
Spare tire
WARNING
■Using the tire jack
Observe the following precau-
tions. Improper use of the tire jack
may cause the vehicle to sud-
denly fall off the jack, leading to
death or serious injury.
●Do not use the tire jack for any
purpose other than replacing
tires or installing and removing
tire chains.
●Only use the tire jack that
comes with this vehicle for
replacing a flat tire. Do not use it
on other vehicles, and do not
use other tire jacks for replacing
tires on this vehicle.
●Put the jack properly in its jack
point.
●Do not put any part of your body
under the vehicle while it is sup-
ported by the jack.
●Do not start the engine or drive
the vehicle while the vehicle is
supported by the jack.
Page 408 of 500

4087-2. Steps to take in an emergency
When replacing tires on a vehi-
cle with wheel lock nuts, use the
following procedures to remove
and install the wheel lock nuts.
The wheel lock key is stored in
the tray inside the luggage com-
partment. Always return the
wheel lock key to its original
position after use, so that it does
not get lost. (P.406)
■Removal
For ease of removal, the wheel
lock nut should always be the
first one loosened.
1 Place the wheel lock key on
top of the wheel lock nut,
turning until the wheel lock
key and wheel lock nut pat-
terns engage.
2 Place the wheel nut wrench
on the wheel lock key, and
while applying pressure on
the wheel lock key, loosen
the wheel lock nut.
■Installation
For ease of installation, the
wheel lock nut should always be
the last one tightened.
1 By hand, install a wheel lock
nut on the wheel to be
installed.
2 Place the wheel lock key on
top of the wheel lock nut,
turning until the wheel lock
key and wheel lock nut pat-
terns engage.
3 Place the wheel nut wrench
on the wheel lock key, and
while applying pressure on
the wheel lock key, tighten
the wheel lock nut to the rec-
ommended torque.
WARNING
●Do not raise the vehicle while
someone is inside.
●When raising the vehicle, do not
put an object on or under the
jack.
●Do not raise the vehicle to a
height greater than that required
to replace the tire.
●Use a jack stand if it is neces-
sary to get under the vehicle.
●When lowering the vehicle,
make sure that there is no-one
near the vehicle. If there are
people nearby, warn them
vocally before lowering.
Wheel lock nut (if
equipped)
NOTICE
■When using a wheel lock key
(if equipped)
Do not use an impact wrench.
Using an impact wrench may
cause permanent damage to
wheel lock nut and wheel lock
key. If in doubt about wheel lock
application, contact your Toyota
dealer.
Page 410 of 500
4107-2. Steps to take in an emergency
1Chock the tires.
2 Vehicles with a steel wheel:
Remove the wheel ornament
using the wrench.
Insert the wrench into the notch
on the wheel cap.
To protect the wheel ornament,
place a rag between the wrench and the wheel ornament.
3
Slightly loosen the wheel
nuts (one turn).
Vehicles with wheel locks: Use the
wheel lock key to loosen the wheel
lock.
4 Turn the tire jack portion
by hand until the center of the
recessed portion of the jack
WARNING
■When storing the spare tire
Be careful not to catch fingers or
other body parts between the
spare tire and the body of the
vehicle.
Replacing a flat tire
Flat tireWheel chock positions
Front left-hand
sideBehind the rear
right-hand side
tire
Front right-hand
sideBehind the rear
left-hand side tire
Rear left-hand
sideIn front of the
front right-hand
side tire
Rear right-hand
sideIn front of the
front left-hand
side tire
Page 413 of 500

4137-2. Steps to take in an emergency
7
When trouble arises
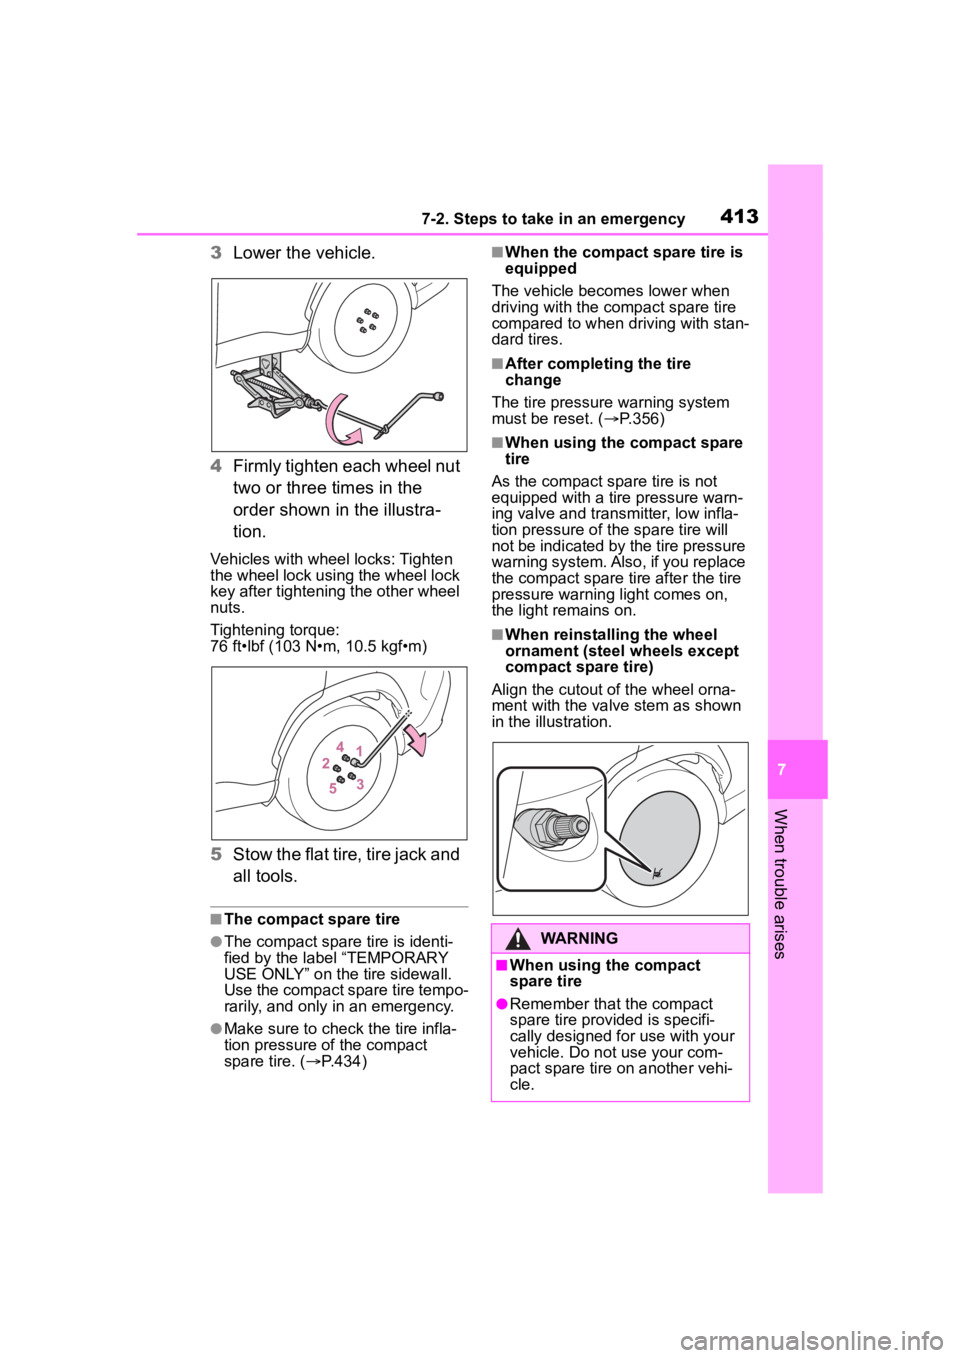
3Lower the vehicle.
4 Firmly tighten each wheel nut
two or three times in the
order shown in the illustra-
tion.
Vehicles with wheel locks: Tighten
the wheel lock using the wheel lock
key after tightening the other wheel
nuts.
Tightening torque:
76 ft•lbf (103 N•m, 10.5 kgf•m)
5Stow the flat tire, tire jack and
all tools.
■The compact spare tire
●The compact spare tire is identi-
fied by the label “TEMPORARY
USE ONLY” on the tire sidewall.
Use the compact spare tire tempo-
rarily, and only in an emergency.
●Make sure to check the tire infla-
tion pressure of the compact
spare tire. ( P.434)
■When the compact spare tire is
equipped
The vehicle becomes lower when
driving with the compact spare tire
compared to when driving with stan-
dard tires.
■After completing the tire
change
The tire pressure warning system
must be reset. ( P.356)
■When using the compact spare
tire
As the compact spare tire is not
equipped with a tire pressure warn-
ing valve and transm itter, low infla-
tion pressure of the spare tire will
not be indicated by the tire pressure
warning system. Also , if you replace
the compact spare ti re after the tire
pressure warning light comes on,
the light remains on.
■When reinstalling the wheel
ornament (steel wheels except
compact spare tire)
Align the cutout of the wheel orna-
ment with the valve stem as shown
in the illustration.
WARNING
■When using the compact
spare tire
●Remember that the compact
spare tire provided is specifi-
cally designed for use with your
vehicle. Do not use your com-
pact spare tire on another vehi-
cle.
Page 416 of 500

4167-2. Steps to take in an emergency
The battery terminal connec-
tions may be loose or cor-
roded. ( P.348)
The engine starting system may
be malfunctioning due to an
electrical problem such as elec-
tronic key battery depletion or a
blown fuse. However, an interim
measure is available to start the
engine. ( P.416)
One of the following may be the
cause of the problem:
The battery may be dis-
charged. ( P.419)
One or both of the battery ter-
minals may be disconnected.
( P.348)
Contact your Toyot a dealer if the
problem cannot be repaired, or if
repair procedures are unknown.
When the engine does not start,
the following steps can be used as an interim measure to start
the engine if the engine switch is
functioning normally.
Do not use this starting proce-
dure except in case of emer-
gency.
1
Set the parking brake.
( P.172)
2 Check that the shift lever is in
P.
3 Turn the engine switch to
ACC
*.
4 Press and hold the engine
switch for about 15 seconds
while depressing the brake
pedal firmly.
Even if the engi ne can be started
using the above steps, the system
may be malfunctioning. Have the
vehicle inspected by your Toyota
dealer.
*: ACC mode can be enabled/dis- abled on the customize menu.
( P.449)
The starter motor does
not turn over (vehicles
with a smart key system)
The starter motor does
not turn over, the interior
lights and headlights do
not turn on, or the horn
does not sound.
Emergency start function
(vehicles with a smart key
system)