2023 TOYOTA COROLLA CROSS key
[x] Cancel search: keyPage 164 of 500

1644-2. Driving procedures
engine switch mode.
■Engine switch illumination
According to the situation, the
engine switch illumi nation operates
as follows.
●When a door is opened, or the
engine switch mode is changed
from ACC or ON to off, the engine
switch illumination comes on.
●When depressing the brake pedal
with carrying the electronic key on
your person, the engine switch
illumination blinks.
●When the engine switch mode is
in ACC or ON, the engine switch
illumination is constantly illumi-
nated.
■If the engine does not start
●The engine immobilizer system
may not have been deactivated.
( P. 6 8 )
Contact your Toyota dealer.
●If a message related to start-up is
shown on the multi-information
display, read the message and fol-
low the instructions.
■If the battery is discharged
The engine cannot be started using
the smart key system. Refer to
P.419to restart the engine.
■Electronic key battery depletion
P. 9 8
■Conditions affecting operation
P. 1 1 9
■Notes for the entry function
P.120
■Electronic key battery
P.368
■Operation of the engine switch
●If the switch is not pressed shortly
and firmly, the engine switch
mode may not change or the
engine may not start.
●If attempting to restart the engine
immediately after turning the
engine switch off, the engine may
not start in some cases. After turn-
ing the engine switch off, please
wait a few seconds before restart-
ing the engine.
■Customization
If the smart key system has been
deactivated in a customized setting,
refer to P.417.
WARNING
■When starting the engine
Always start the engine while sit-
ting in the driver’s seat. Do not
depress the accelerator pedal
while starting the engine under
any circumstances.
Doing so may cause an accident
resulting in death o r serious injury.
NOTICE
■When starting the engine
●Do not race a cold engine.
●If the engine becomes difficult to
start or stalls frequently, have
your vehicle checked by your
Toyota dealer immediately.
Page 165 of 500

1654-2. Driving procedures
4
Driving
1Stop the vehicle completely.
2 Set the parking brake
( P.172), and shift the shift
lever to P.
Check the parking brake indicator
is illuminated.
Do not press the shift lever button
after shifting the shit position to P.
3 Press the engine switch.
The engine will stop, and the meter
display will be extinguished.
4Release the brake pedal and
check that “ACCESSORY” or
“IGNITION ON” is not shown
on the multi-information dis-
p l a y.
■Automatic engine shut off fea-
ture
●The vehicle is equipped with a
feature that automatically shuts off
the engine when the shift lever is
in P with the engine running for an
extended period.
●The engine will automatically shut
off after approximately 1 hour if it
has been left running while the
shift lever is in P.
●The timer for the automatic engine
shut off feature will reset if the
brake pedal is depre ssed or if the shift lever is in a position other
than P.
●After the vehicle
is parked, if the
door is locked with the door lock
switch ( P.107) from the inside or
the mechanical key (P.417) from
the outside, the automatic engine
shut off feature will be disabled.
The timer for the automatic engine
shut off feature will be re-enabled
if the driver’s door is opened.
NOTICE
■Symptoms indicating a mal-
function with the engine
switch
If the engine switch seems to be
operating somewh at differently
than usual, such as the switch
sticking slightly, there may be a
malfunction. Contact your Toyota
dealer immediately.
Stopping the engineWARNING
■Stopping the engine in an
emergency
●If you want to stop the engine in
an emergency while driving the
vehicle, press and hold the
engine switch for more than 2
seconds, or press it briefly 3
times or more in succession.
(
P.382)
However, do not touch the
engine switch while driving
except in an emergency. Turn-
ing the engine off while driving
will not cause loss of steering or
braking control, but the power
assist to these systems will be
lost. This will make it more diffi-
cult to steer and brake, so you
should pull over and stop the
vehicle as soon as it is safe to
do so.
●If the engine switch is operated
while the vehicle is running, a
warning message will be shown
on the multi-information display
and a buzzer sounds.
●To restart the engine after per-
forming an emergency shut-
down, shift the shift lever to N
and then press the engine
switch.
Page 179 of 500

1794-3. Operating the lights and wipers
4
Driving
■Daytime running light system
●Vehicles without a smart key sys-
tem :The daytime running lights
illuminate using the same lights as
the headlights and illuminate
darker than the headlights.
Vehicles with a smart key system
:The daytime runni ng lights illumi-
nate using the sa me lights as the
parking lights and illuminate darker
than the parking lights.
●To make your vehicle more visible
to other drivers during daytime
driving, the daytime running lights
turn on automatically when all of
the following condi tions are met.
(The daytime running lights are
not designed for use at night.)
• The engine is running
• The parking brake is released
• The headlight switch is in the
or
* position
*: When the surroundings are bright
The daytime running lights remain
on after they illumi nate, even if the
parking brake is set again.
●Daytime running lights can be
turned off by operating the switch.
●Compared to turning on the head-
lights, the daytime running light
system offers gr eater durability
and consumes less electricity, so
it can help improve fuel economy.
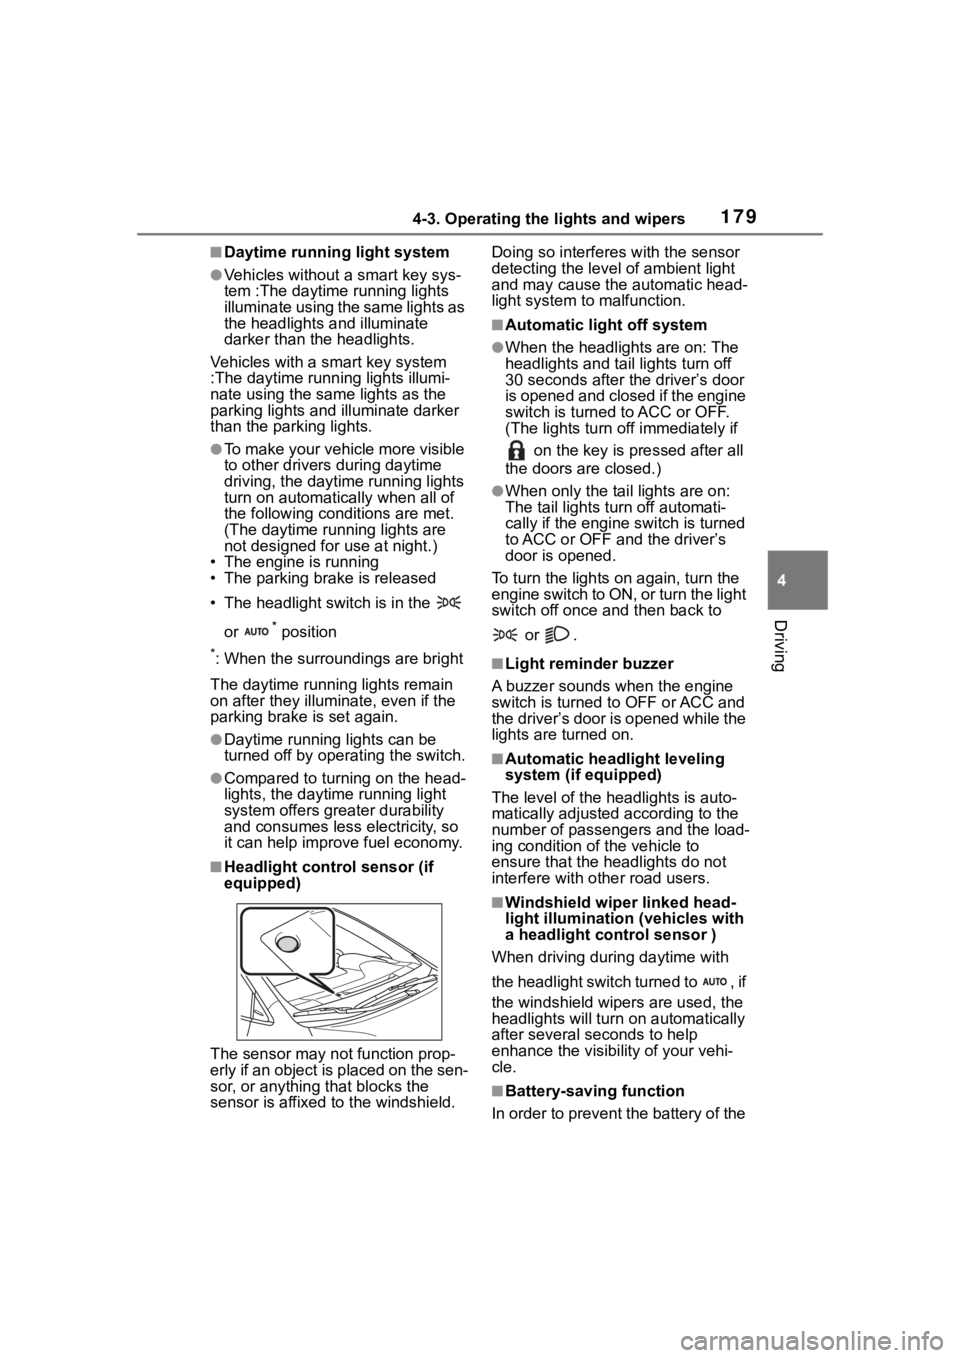
■Headlight control sensor (if
equipped)
The sensor may not function prop-
erly if an object is placed on the sen-
sor, or anything that blocks the
sensor is affixed to the windshield. Doing so interferes with the sensor
detecting the level
of ambient light
and may cause t he automatic head-
light system to malfunction.
■Automatic light off system
●When the headlights are on: The
headlights and tail lights turn off
30 seconds after the driver’s door
is opened and closed if the engine
switch is turned to ACC or OFF.
(The lights turn off immediately if
on the key is pressed after all
the doors are closed.)
●When only the tail lights are on:
The tail lights turn off automati-
cally if the engine switch is turned
to ACC or OFF and the driver’s
door is opened.
To turn the lights on again, turn the
engine switch to ON, or turn the light
switch off once and then back to
or .
■Light reminder buzzer
A buzzer sounds when the engine
switch is turned t o OFF or ACC and
the driver’s door is opened while the
lights are turned on.
■Automatic headlight leveling
system (if equipped)
The level of the headlights is auto-
matically adjusted according to the
number of passengers and the load-
ing condition of the vehicle to
ensure that the headlights do not
interfere with o ther road users.
■Windshield wiper linked head-
light illumination (vehicles with
a headlight control sensor )
When driving during daytime with
the headlight switch turned to , if
the windshield wipers are used, the
headlights will turn o n automatically
after several se conds to help
enhance the visibility of your vehi-
cle.
■Battery-saving function
In order to prevent the battery of the
Page 303 of 500

3035-2. Using the interior lights
5
Interior features
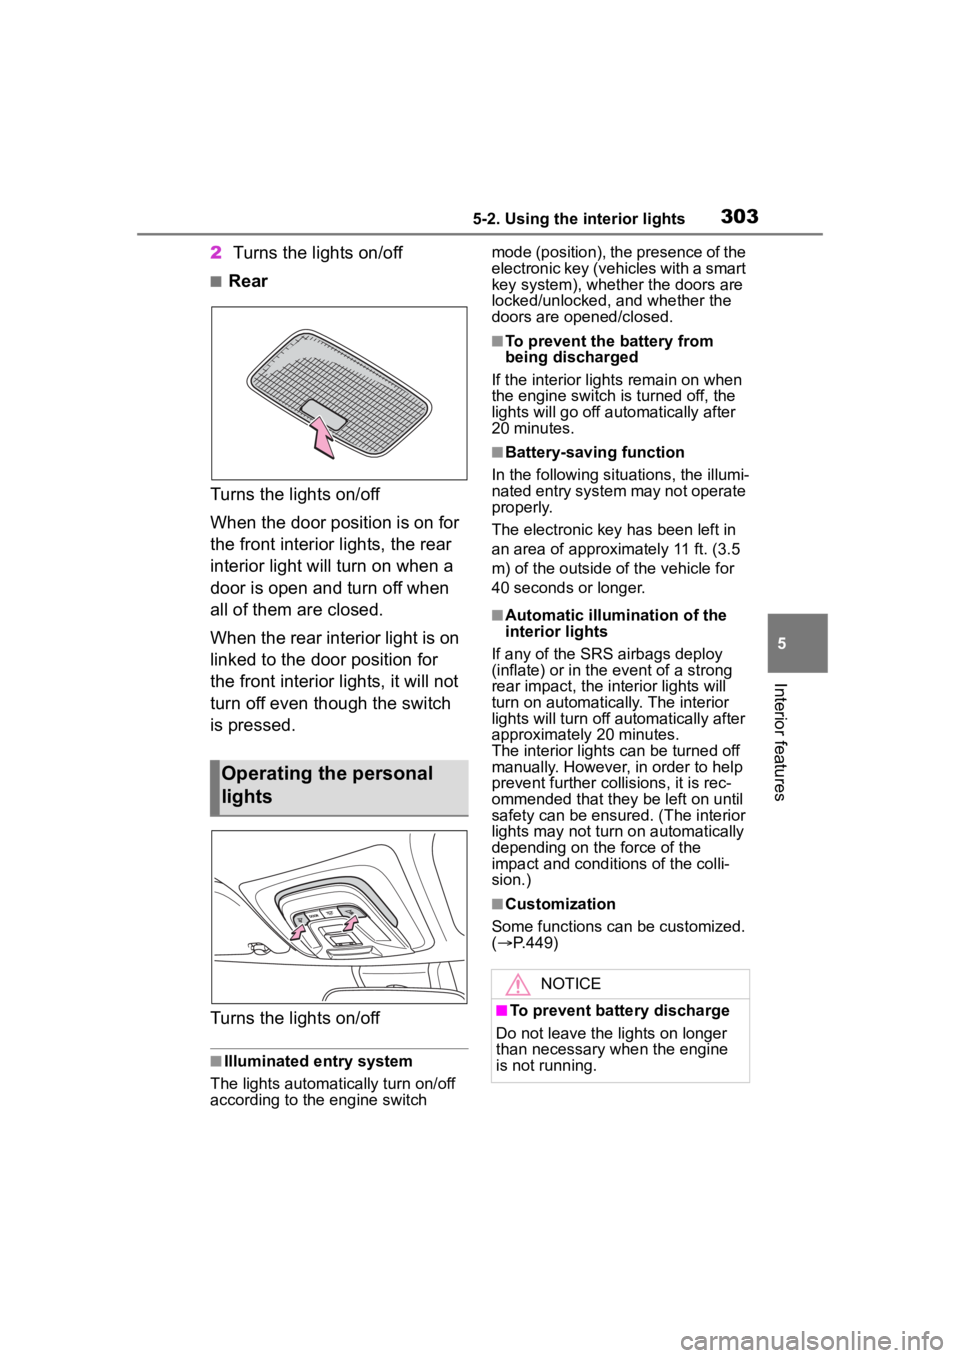
2Turns the lights on/off
■Rear
Turns the lights on/off
When the door position is on for
the front interior lights, the rear
interior light will turn on when a
door is open and turn off when
all of them are closed.
When the rear interior light is on
linked to the door position for
the front interior lights, it will not
turn off even though the switch
is pressed.
Turns the lights on/off
■Illuminated entry system
The lights automatically turn on/off
according to the engine switch mode (position), the presence of the
electronic key (vehicles with a smart
key system), whether the doors are
locked/unlocked, and whether the
doors are opened/closed.
■To prevent the battery from
being discharged
If the interior light s remain on when
the engine switch is turned off, the
lights will go off automatically after
20 minutes.
■Battery-saving function
In the following situations, the illumi-
nated entry system may not operate
properly.
The electronic key has been left in
an area of approximately 11 ft. (3.5
m) of the outside of the vehicle for
40 seconds or longer.
■Automatic illumination of the
interior lights
If any of the SRS airbags deploy
(inflate) or in the event of a strong
rear impact, the in terior lights will
turn on automatically. The interior
lights will turn off automatically after
approximately 20 minutes.
The interior lights can be turned off
manually. However, in order to help
prevent further co llisions, it is rec-
ommended that they be left on until
safety can be ensured. (The interior
lights may not turn on automatically
depending on the force of the
impact and conditions of the colli-
sion.)
■Customization
Some functions can be customized.
( P.449)
Operating the personal
lights
NOTICE
■To prevent battery discharge
Do not leave the lights on longer
than necessary w hen the engine
is not running.
Page 314 of 500

3145-4. Other interior features
■The wireless charger can be
operated when
The engine switch is in ACC or ON.
■Portable devices that can be
charged
●Portable devices compatible with the Qi wireless charging standard
can be charged by the wireless
charger. However, compatibility
with all devices which meet the Qi
wireless charging standard is not
guaranteed.●The wireless char
ger is designed
to supply low power electricity (5
Operation indicator lightSuspected causeMeasure
Continuously blinks 1
time per second
Communication mal-
function between the
wireless charger and
smart key system
If the engine is running,
stop the engine and
then restart it.
If the engine switch is in
ACC, start the engine.
( P.163)
Continuously flashes 3
times (orange)
Foreign matter detected
If a metallic foreign
object is detected in the
charge area, the over-
heat prevention func-
tion of the metallic
foreign obje ct will oper-
ate
Remove the foreign
object from the charge
area.
Portable device not
aligned correctly
If the charging coil of a
portable device is not
properly positioned on
the charging area, the
overheat prevention
function will operate
Remove the portable
device from the
charging tray, check that
the operation indicator
light changes back to
green, and then place
the portable device so
that it is near the center
of the charging tray.
Also, if a case or cover
is installed to the porta-
ble device, remove it.
Continuously flashes 4
times (orange)
Temperature inside
wireless charger
exceeded a certain
amount
Stop charging, remove
the portable device from
the charging tray, and
wait for the temperature
to decrease before
attempting to begin
charging again.
Page 315 of 500

3155-4. Other interior features
5
Interior features
W or less) to a cellular phone,
smartphone, or other portable
device.
●However, portable devices, such
as the following, can be charged
with more than 5 W.
• 7.5 W charging compatible iPhones can be ch arged at 7.5 W
or less.
• Portable devices compliant with EPP output as defined by WPC
standard Ver1.2.4. can be
charged at 10 W or less.
■Using the smart key system
During charging, when the smart
key system searches for an elec-
tronic key, charging may be tempo-
rarily suspended.
■If a cover or accessory is
attached to the portable device
Do not charge a portable device if a
cover or accessory which is not Qi
compatible is attached. Depending
on the type of cover (including the
certain genuine manufacture parts)
and/or accessory attached, it may
not be possible to charge the porta-
ble device. If the portable device is
placed on the charging area and
does not charge, remove the cover
and/or accessories.
■If interference is heard in AM
radio broadcasts while
charging
●Turn off the wireless charger and
check if the noise is reduced. If
noise is reduced, press and hold
the power supply switch of the
wireless charger for 2 seconds.
The frequency of the wireless
charger is changed and noise may
be reduced. When the frequency
is changed, the operation indica-
tor light will blink (orange) 2 times.
●Rapid charging for iPhones is per-
formed using a specific radio
wave frequency.
Depending on the version of iOS
installed, while th e frequency is
being changed, rapid charging may not be performed.
■Charging precautions
While charging, the wireless charger
and the portable device will become
warm. This is not a malfunction.
If a portable device becomes warm
while charging and charging stops
due to the protection function of the
portable device, wai t until the porta-
ble device cools down and charge it
again.
Also, to decrease the temperature
inside the wireless charger, a fan
may operate. This does not indicate
a malfunction.
■Sound generated during opera-
tion
Operation sounds may be heard
when the power supply switch is
pressed to turn the wireless charger
on, when the engine switch is
pressed to change to ACC or ON
while the wireless charger is on, or
when a portable device is being
detected. This does not indicate a
malfunction.
■Situations in which the wireless
charger may not operate cor-
rectly
In the following situ ations, the wire-
less charger may not operate cor-
rectly:
●When a portable device is fully
charged
●When a portable device is being
charged by a wired connection
●When there is a foreign object
between the charging area and
portable device
●When the temperature of a porta-
ble device becomes high while
charging
●When the temperature near the
charging tray is 95°F (35°C) or
more due to being in direct sun-
light, etc.
●When a portable device is placed
with its charging surface facing up
Page 316 of 500

3165-4. Other interior features
●When a portable device is not
centered on the charging area
●When a portable device is larger
than the charging tray
●When a foldable portable device is
placed outside of the charging
area
●When the vehicle is near a TV
tower, electric power plant, fuel
station, radio station, large dis-
play, airport, or other facility that
generates strong radio waves or
electrical noise
●When the any of the following
objects, with a thickness of 0.08
in. (2 mm) or more, are between
the charging surface of a portable
device and the charging are:
• Cases or covers a ttached with an
uneven or tilted surface, so that
the charging side is not flat
• Thick cases or covers
• Thick decorations
• Accessories, such as finger rings, straps, etc.
●When the portable device is in
contact with, or is covered by any
of the following metallic objects:
• Cases which have magnet in it on the charging side of the portable
device
• Cards covered with metal, such as aluminum foil
• Cigarette boxes that have alumi-
num foil inside
• Metallic wallets or bags
• Coins
• Heat packs
• Recorded media such as CDs and DVDs
• Metallic decorations
• Metallic cases or covers
●When wireless keys (that emit
radio waves) other than those of
your vehicle are being used
nearby
●When 2 or more portable devices
are placed on the charging tray at
the same time
In situations other than above, if the
wireless charger does not operate properly or the operation indicator
light blinks continuously, the wire-
less charger may be malfunctioning.
Contact your Toyota dealer.
■Cleaning the wireless charger
P.331
WARNING
■Caution while driving
When charging a portable device
while driving, for safety reasons,
the driver should not operate the
portable device.
■Precautions for when driving
Do not charge sma ll, lightweight
portable devices, such as wireless
earbuds, while driving. Light-
weight devices may fly off of the
charging tray, possibly leading to
an accident.
■Caution regarding interfer-
ence with electronic devices
People with implantable cardiac
pacemakers, cardiac resynchroni-
zation therapy pacemakers or
implantable cardioverter def ibrilla-
tors, as well as any other electri-
cal medical device, should consult
their physician about the usage of
the wireless charger.
Operations of th e wireless char-
ger may have an affect on medi-
cal devices.
■To prevent damage or burns
Observe the following precau-
tions.
Failure to do so may result in the
possibility of fire, equipment fail-
ure or damage, or burns due to
heat.
●Do not put any metallic objects
between the charging area and
the portable device while
charging.
Page 327 of 500

327
6
6
Maintenance and care
Maintenance and care
.6-1. Maintenance and careCleaning and protecting the vehicle exterior .......... 328
Cleaning and protecting the vehicle interior ........... 331
6-2. Maintenance Maintenance requirements.................................. 334
General maintenance.. 336
Emission inspection and maintenance (I/M) pro-
grams ........................ 338
6-3. Do-it-yourself mainte- nance
Do-it-yourself service pre- cautions ..................... 340
Hood ........................... 342
Positioning a floor jack .................................. 343
Engine compartment ... 344
Tires ............................ 351
Tire inflation pressure.. 363
Wheels ......... ...............365
Air conditioning filter .... 366
Wireless remote con- trol/electronic key battery.................................. 368
Checking and replacing fuses.......................... 371
Headlight aim .............. 373
Light bulbs................... 374