2023 TOYOTA BZ4X turned off automatically
[x] Cancel search: turned off automaticallyPage 66 of 628

661-3. Emergency assistance
Owners Manual_USA_M42C01_en
When the power switch is turned
to ON, the red indicator light
comes on for 2 seconds then
turns off. Afterward, the green
indicator light comes on, indicat-
ing that the service is active.
The following indicator light pat-
terns indicate specific system
usage conditions:
Green indicator light on =
Active service
Green indicator light flashing
= Safety Connect call in pro-
cess
Red indicator light (except at
vehicle start-up) = System
malfunction (contact your Toy-
ota dealer)
No indicator light (off) =
Safety Connect service not
active
■Automatic Collision Notifi-
cation
In case of either airbag deploy-
ment or severe rear-end colli- sion, the system is designed to
automatically call the response
center. The responding agent
receives the vehicle’s location
and attempts to speak with the
vehicle occupants to assess the
level of emergency. If the occu-
pants are unable to communi-
cate, the agent automatically
treats the call as an emergency,
contacts the nearest emer-
gency services provider to
describe the situation, and
requests that assistance be sent
to the location.
■Stolen Vehicle Location
If your vehicle is stolen, Safety
Connect can work with local
authorities to assist them in
locating and recovering the
vehicle. After filing a police
report, call the Customer Experi-
ence Center at 1-800-331-4331
in the United States, 1-888-869-
6828 in Canada, and follow the
prompts for Safety Connect to
initiate this service.
In addition to assisting law
enforcement with recovery of a
stolen vehicle, Safety-Connect-
equipped vehicle location data
may, under certain circum-
stances, be shared with third
parties to locate your vehicle.
Further information is available
at Toyota.com.
■Emergency Assistance But-
ton (“SOS”)
In the event of an emergency on
NOTICE
■When contacting the
response center
You may be unable to contact the
response center if the network is
busy.
Safety Connect LED light
Indicators
Safety Connect services
Page 107 of 628

1072-2. Charging
Owners Manual_USA_M42C01_en
2
Electric Vehicle system
5 Remove the charging con-
nector cap and secure it to
the cable.
6 Insert the charging connector
into the AC charging inlet.
Align the guide position on the bot-
tom of the charging connector, and
push the charging connector
straight into the AC charging inlet
as far as possible. Once a click
sound is heard, check that the
charging connector is securely
locked.
When the charging connector is
inserted straight as far as possible,
it will automatically lock. ( P. 9 3 )
7 Confirm that the charging
indicator of the charging port
is illuminated.
Charging will not start if the
charging indicator does not illumi- nate when the charging connector
is inserted. (
P.133)
If the charging indicator is flashing,
the charging schedule is registered.
( P.107)
If the error warning indicator on the
CCID (Charging Cir cuit Interrupting
Device) flashes during charging,
check P.90 and follow the correc-
tion procedure.
The charging indicator will turn off
when charging is completed.
The charging indicator will also turn
off when charging is interrupted. In
this case, refer to P.133
■When connecting the AC
charging connector
If the door is opene d or the power
switch is turned to ON with the AC
charging connector connected, the
charging cable indicator turns on to
notify that the AC charging connec-
tor is connected.
■If the charging i ndicator of the
charging port flashes after con-
necting the AC charging cable
The charging schedule ( P. 1 1 8 ) i s
registered and charging cannot be
performed. To cancel charging using
Page 129 of 628

1292-2. Charging
Owners Manual_USA_M42C01_en
2
Electric Vehicle system
Next event will be displayed
according to the charging
schedule settings.
When press “OK”, close Next
charging event screen.
When press “Charge Now”,
charge now is turned on.
■When all charging schedules
are turned off
The icon is not displayed on the
“Charging schedule” screen.
The icon will be displayed by turning
it ON on the “Events” screen.
■When charging schedule set-
ting operations are canceled
When the vehicle is in the following
conditions, charging schedule set-
ting operations are canceled.
●The power switch is turned off
before the setting s are confirmed
●The vehicle starts off
●A display with a higher priority
than that of the charging schedule
setting is shown
1Connect the charge cable to
the vehicle to start charging.
AC Charging: P. 1 0 5
DC Charging: P. 1 1 3
2 Turn the power switch to ON
while charging.
My Room Mode settings is auto-
matically display ed on the multi-
information display.
3 Operate the meter control
switches to select “Yes”, and
then press “OK”.
My Room Mode is started and it is
possible to use the air conditioning
system, audio system, etc.
Select “No” and press “OK” when
My Room Mode is not being used.
To disable My Room Mode, turn the
power switch off.
My Room Mode will automatically
be off when DC charging is com-
pleted.
When starting My Room Mode,
NOTICE
■While performing the setting
operation
When performing the setting
operation while t he EV system is
stopped, be careful that the
12-volt battery will not be dis-
charged.
Using My Room Mode
When the charging cable is
connected to the vehicle,
electrical components such
as the air conditioning sys-
tem and audio system can
be used by the power sup-
ply from an external power
source.
Starting My Room Mode
Display information for
electric power balance
during My Room Mode
Page 130 of 628
1302-2. Charging
Owners Manual_USA_M42C01_en
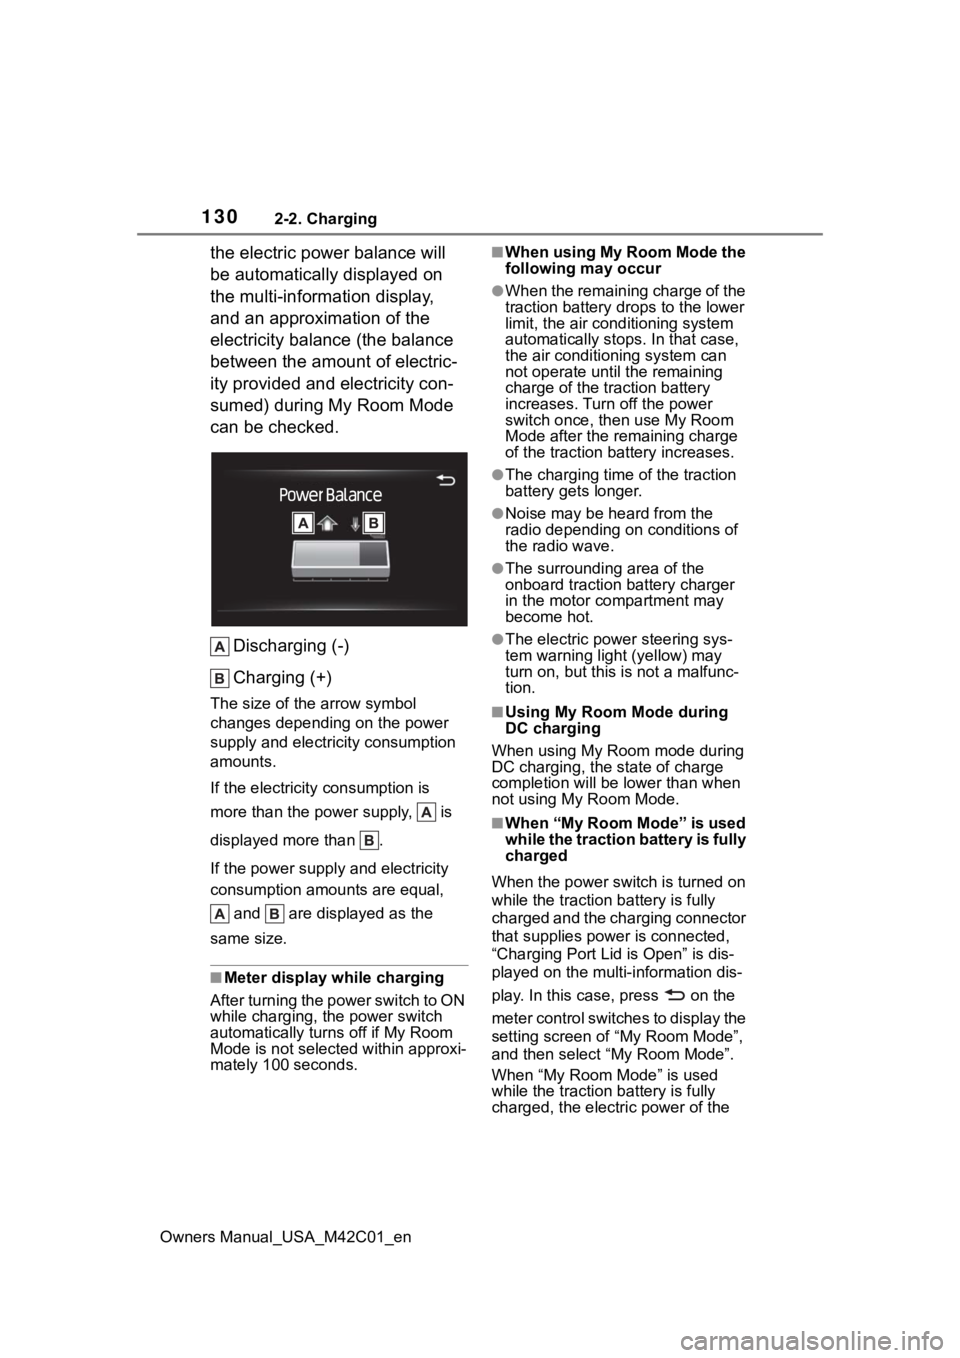
the electric power balance will
be automatically displayed on
the multi-information display,
and an approximation of the
electricity balance (the balance
between the amount of electric-
ity provided and electricity con-
sumed) during My Room Mode
can be checked.Discharging (-)
Charging (+)
The size of the arrow symbol
changes depending on the power
supply and electric ity consumption
amounts.
If the electricity consumption is
more than the power supply, is
displayed more than .
If the power supply and electricity
consumption amounts are equal,
and are displayed as the
same size.
■Meter display while charging
After turning the power switch to ON
while charging, the power switch
automatically turns off if My Room
Mode is not selected within approxi-
mately 100 seconds.
■When using My Room Mode the
following may occur
●When the remaining charge of the
traction battery d rops to the lower
limit, the air conditioning system
automatically stops. In that case,
the air conditioning system can
not operate until the remaining
charge of the traction battery
increases. Turn off the power
switch once, then use My Room
Mode after the remaining charge
of the traction battery increases.
●The charging time of the traction
battery gets longer.
●Noise may be heard from the
radio depending on conditions of
the radio wave.
●The surrounding area of the
onboard traction battery charger
in the motor compartment may
become hot.
●The electric power steering sys-
tem warning light (yellow) may
turn on, but this is not a malfunc-
tion.
■Using My Room Mode during
DC charging
When using My Room mode during
DC charging, the state of charge
completion will be lo wer than when
not using My Room Mode.
■When “My Room Mode” is used
while the traction battery is fully
charged
When the power switch is turned on
while the traction b attery is fully
charged and the charging connector
that supplies power is connected,
“Charging Port Lid is Open” is dis-
played on the multi-information dis-
play. In this cas e, press on the
meter control switches to display the
setting screen of “My Room Mode”,
and then select “My Room Mode”.
When “My Room Mode” is used
while the traction b attery is fully
charged, the electric power of the
Page 178 of 628

1784-2. Opening, closing and locking the doors
Owners Manual_USA_M42C01_en
(30 to 50 cm) from the rear
bumper.
Kick sensor
Hands Free Power Back
Door operation detection
area
Smart key system operation
detection area (P.187)
2 Perform a kick operation by
moving your foot to within
approximately 3.9 in. (10 cm)
of the rear bumper and then
pulling it back.
Perform the entire kick operation
within 1 second.
The back door will not start operat-
ing while a foot is detected under
the rear bumper.
Operate the Hands Free Power
Back Door without contacting the
rear bumper with your foot.
If another electronic key is in the
cabin or luggage compartment, it
may take slightly longer than nor- mal for the operation to occur.
Kick sensor
Hands Free Power Back
Door operation detection
area
3 When the kick sensor detects
a kicking motion with the foot,
the buzzer sounds, and when
the foot being pulled is
detected, the back door auto-
matically fully opens or fully
closes.
The buzzer can be turned off with
the customize function. ( P.570)
If a foot is moved under the rear
bumper while the back door is
opening/closing, the back door will
stop moving.
If a foot is moved under the rear
bumper again during the halted
operation, the ba ck door will per-
form the rever se operation.
■Luggage compartment light
●The luggage compartment light
turns on when the back door is
opened.
●When the power switch is turned
to OFF, the light will go off auto-
matically after 20 minutes.
■Back door closer
In the event that the back door is left
slightly open, the back door closer
will automatically clo se it to the fully
Page 183 of 628

1834-2. Opening, closing and locking the doors
Owners Manual_USA_M42C01_en
4
Before driving
WARNING
●If the power back door system is
turned off while the back door is
operating automatically, the
automatic operation is stopped.
The back door then has to be
operated manually. Take extra
care when on an incline, as the
back door may open or close
unexpectedly.
●If the operating conditions of the
power back door are no longer
met, a buzzer may sound and
the back door may stop opening
or closing. The back door then
has to be operated manually.
Take extra care when on an
incline, as the back door may
open or close abruptly.
●On an incline, t he back door
may suddenly shut after it
opens. Make sure the back door
is fully open and secure.
●In the following situations, the
power back door may detect an
abnormality and automatic
operation may be stopped. In
this case, the back door has to
be operated manually. Take
extra care when on an incline,
as the back door may open or
close abruptly.
• When the back door contacts an obstacle
• When the 12-volt battery volt- age suddenly drops, such as
when the power switch is turned
to ON or the EV system is
started during automatic opera-
tion
●If a bicycle carrier or similar
heavy object is attached to the
back door, the power back door
may not operate, causing itself
to malfunction, or the back door
may suddenly shut again after
being opened, causing some-
one’s hands, arms, head or
neck to be caught and injured.
When installing an accessory
part to the back door, using a
genuine Toyota part is recom-
mended.
■Jam protection function
Observe the following precau-
tions.
Failure to do so may cause death
or serious injury.
●Never use any part of your body
to intentionally activate the jam
protection function.
●The jam protection function may
not work if something gets
caught just before the back door
fully closes. Be careful not to
catch fingers or anything else.
●The jam protection function may
not work depending on the
shape of the object that is
caught. Be careful not to catch
fingers or anything else.
■Hands Free Power Back Door
(if equipped)
Observe the following precautions
when operating the Hands Free
Power Back Door.
Failure to do so may cause death
or serious injury.
●Check the safety of the sur-
rounding area to make sure
there are no obs tacles or any-
thing that could cause any of
your belongings to get caught.
Page 200 of 628

2004-4. Adjusting the steering wheel and mirrors
Owners Manual_USA_M42C01_en
*: If equipped
The height of the rear view mir-
ror can be adjusted to suit your
driving posture.
Adjust the height of the rear
view mirror by moving it up and
down.Reflected light from the head-
lights of vehicles behind can be
reduced by operating the lever.
1
Normal position
2 Anti-glare position
Responding to the level of
brightness of the headlights of
vehicles behind, the reflected
light is automatically reduced.
Changing automatic anti-glare
function mode on/off
When the automatic anti-glare func-
tion is in ON mode, the indicator
illuminates.
The function will set to ON mode
each time the power switch is
turned to ON.
Pressing the button turns the func-
tion to OFF mode. (The indicator also turns off.)
Inside rear view mir-
ror*
The rear view mirror’s posi-
tion can be adjusted to
enable sufficient confirma-
tion of the rear view.
Adjusting the height of
rear view mirror
WARNING
■Caution while driving
Do not adjust the position of the
mirror while driving.
Doing so may lead to mishandling
of the vehicle and cause an acci-
dent, resulting in death or serious
injury.
Anti-glare function (vehi-
cles with manual anti-
glare inside rear view mir-
ror)
Anti-glare function (vehi-
cles with auto anti-glare
inside rear view mirror)
Page 233 of 628

2335-2. Driving procedures
Owners Manual_USA_M42C01_en
5
Driving
1 Stop the vehicle completely.
2 Set the parking brake.
( P.243)
3 Press the P position switch.
( P.237)
Check that the shift position indica-
tor shows P and the parking brake
indicator is illuminated.
4Press the power switch.
The EV system will stop, and the
meter display will be extinguished
(the shift position indicator will be
extinguished a few seconds after
the meter display).
5Release the brake pedal and
check that “ACCESSORY” or
“POWER ON” is not shown
on the meter.
■Automatic EV system shut off
feature
●The vehicle is equipped with a
feature that automatically shuts off
the EV system when the shift posi-
tion is in P with the EV system operating for an extended period.
●The EV system will automatically
shut off after approximately 1 hour
if it has been left operating while
the shift position is in P.
●The timer for the automatic EV
system shut off feature will reset if
the brake pedal is depressed or if
the shift position is in a position
other than P.
●After the vehicle
is parked, if the
door is locked with the door lock
switch ( P.170) from the inside or
the mechanical key (P.539) from
the outside, the automatic EV sys-
tem shut off feature will be dis-
abled. The timer for the automatic
EV system shut off feature will be
re-enabled if the driver’s door is
opened.
■When the shift control system
malfunctions
When attempting to turn the power
switch off while t here is a malfunc-
tion in the shift control system, the
power switch mode may change to
ACC. In this case, ACC may be
turned off by applying the parking
brake and pressing the power
switch again.
If there is a malfunction in the sys-
tem, have the vehicle inspected by
your Toyota dealer immediately.
■Automatic P position selection
function
P.238
NOTICE
■When starting the EV system
If the EV system becomes difficult
to start, have your vehicle
checked by your Toyota dealer
immediately.
■Symptoms indicating a mal-
function with the power
switch
If the power switch seems to be
operating somewh at differently
than usual, such as the switch
sticking slightly, there may be a
malfunction. Contact your Toyota
dealer immediately.
Stopping the EV system