2023 TOYOTA 86 engine
[x] Cancel search: enginePage 348 of 449
3487-2. Steps to take in an emergency
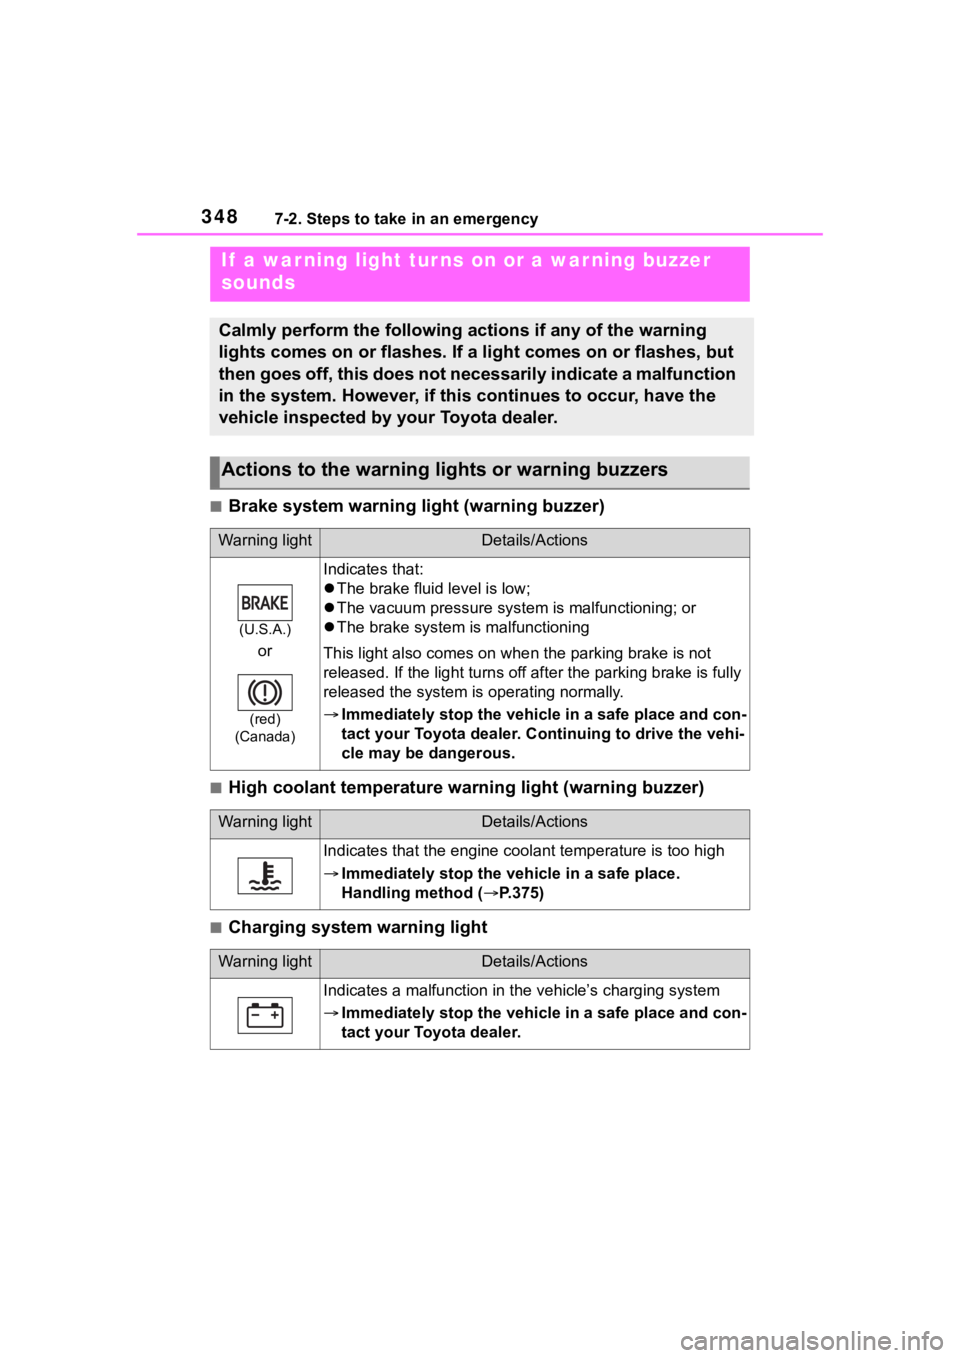
■Brake system warning light (warning buzzer)
■High coolant temperature warning light (warning buzzer)
■Charging system warning light
If a war ning light tur ns on or a war ning buzzer
sounds
Calmly perform the following actions if any of the warning
lights comes on or flashes. If a light comes on or flashes, but
then goes off, this does not necessarily indicate a malfunction
in the system. However, if this continues to occur, have the
vehicle inspected by your Toyota dealer.
Actions to the warning lights or warning buzzers
Warning lightDetails/Actions
(U.S.A.)
or
(red)
(Canada)
Indicates that:
The brake fluid level is low;
The vacuum press ure system is malfunctioning; or
The brake system is malfunctioning
This light also comes on whe n the parking brake is not
released. If the light turns off after the parking brake is ful ly
released the system is operating normally.
Immediately stop the vehicle in a safe place and con-
tact your Toyota dealer. Continuing to drive the vehi-
cle may be dangerous.
Warning lightDetails/Actions
Indicates that the engine coolant temperature is too high
Immediately stop the vehicle in a safe place.
Handling method ( P.375)
Warning lightDetails/Actions
Indicates a malfunction in the vehicle’s charging system
Immediately stop the vehicle in a safe place and con-
tact your Toyota dealer.
Page 349 of 449
3497-2. Steps to take in an emergency
7
When trouble arises
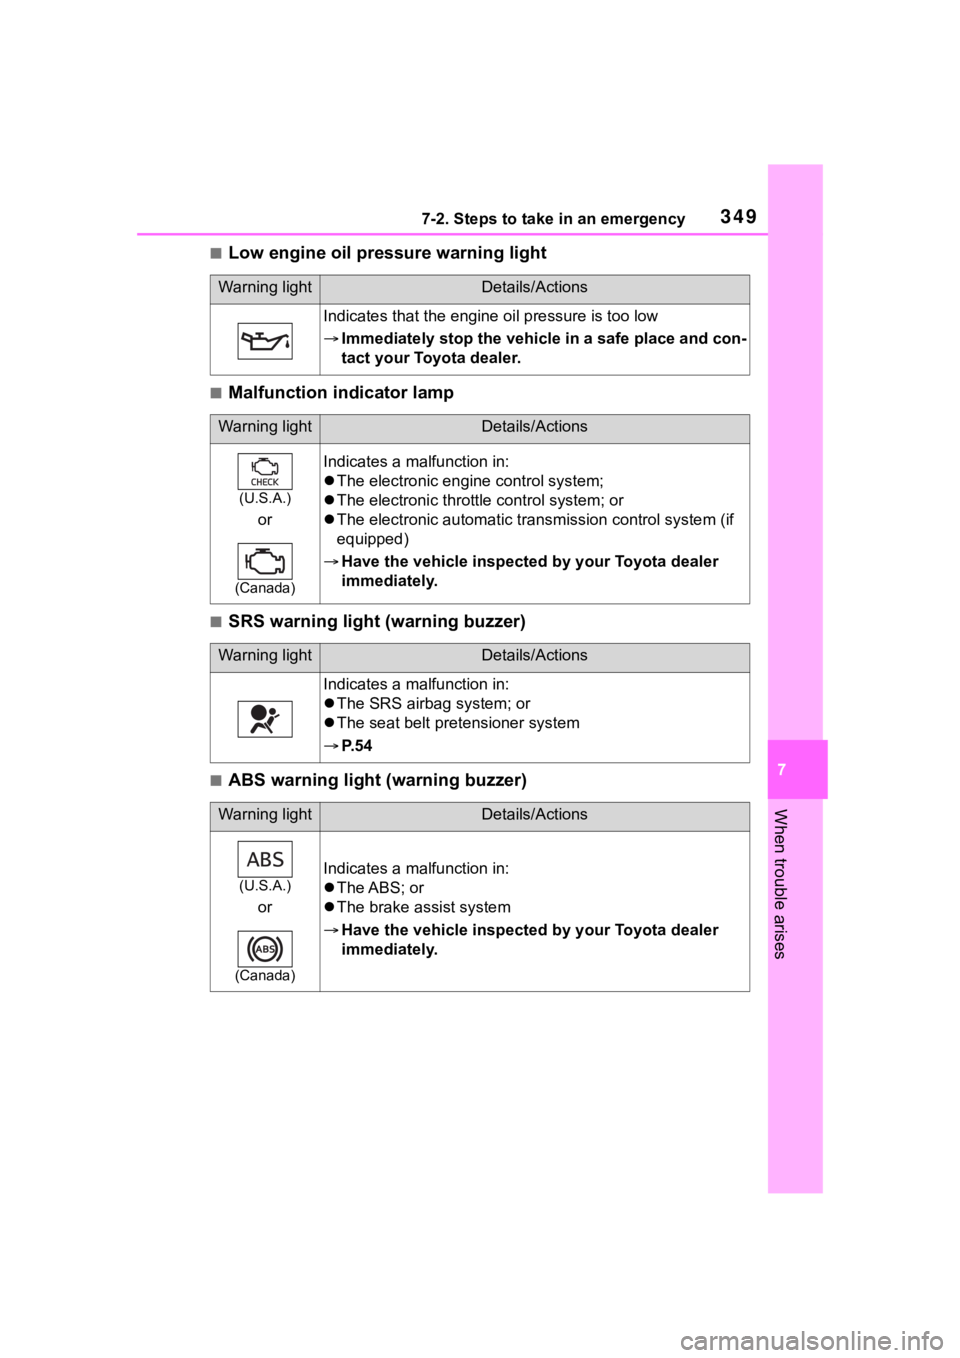
■Low engine oil pressure warning light
■Malfunction indicator lamp
■SRS warning light (warning buzzer)
■ABS warning light (warning buzzer)
Warning lightDetails/Actions
Indicates that the engine oil pressure is too low
Immediately stop the vehicle in a safe place and con-
tact your Toyota dealer.
Warning lightDetails/Actions
(U.S.A.)
or
(Canada)
Indicates a malfunction in:
The electronic engine control system;
The electronic throttle control system; or
The electronic automatic transmission control system (if
equipped)
Have the vehicle inspected by your Toyota dealer
immediately.
Warning lightDetails/Actions
Indicates a malfunction in:
The SRS airbag system; or
The seat belt pretensioner system
P. 5 4
Warning lightDetails/Actions
(U.S.A.)
or
(Canada)
Indicates a malfunction in:
The ABS; or
The brake assist system
Have the vehicle inspected by your Toyota dealer
immediately.
Page 351 of 449
3517-2. Steps to take in an emergency
7
When trouble arises
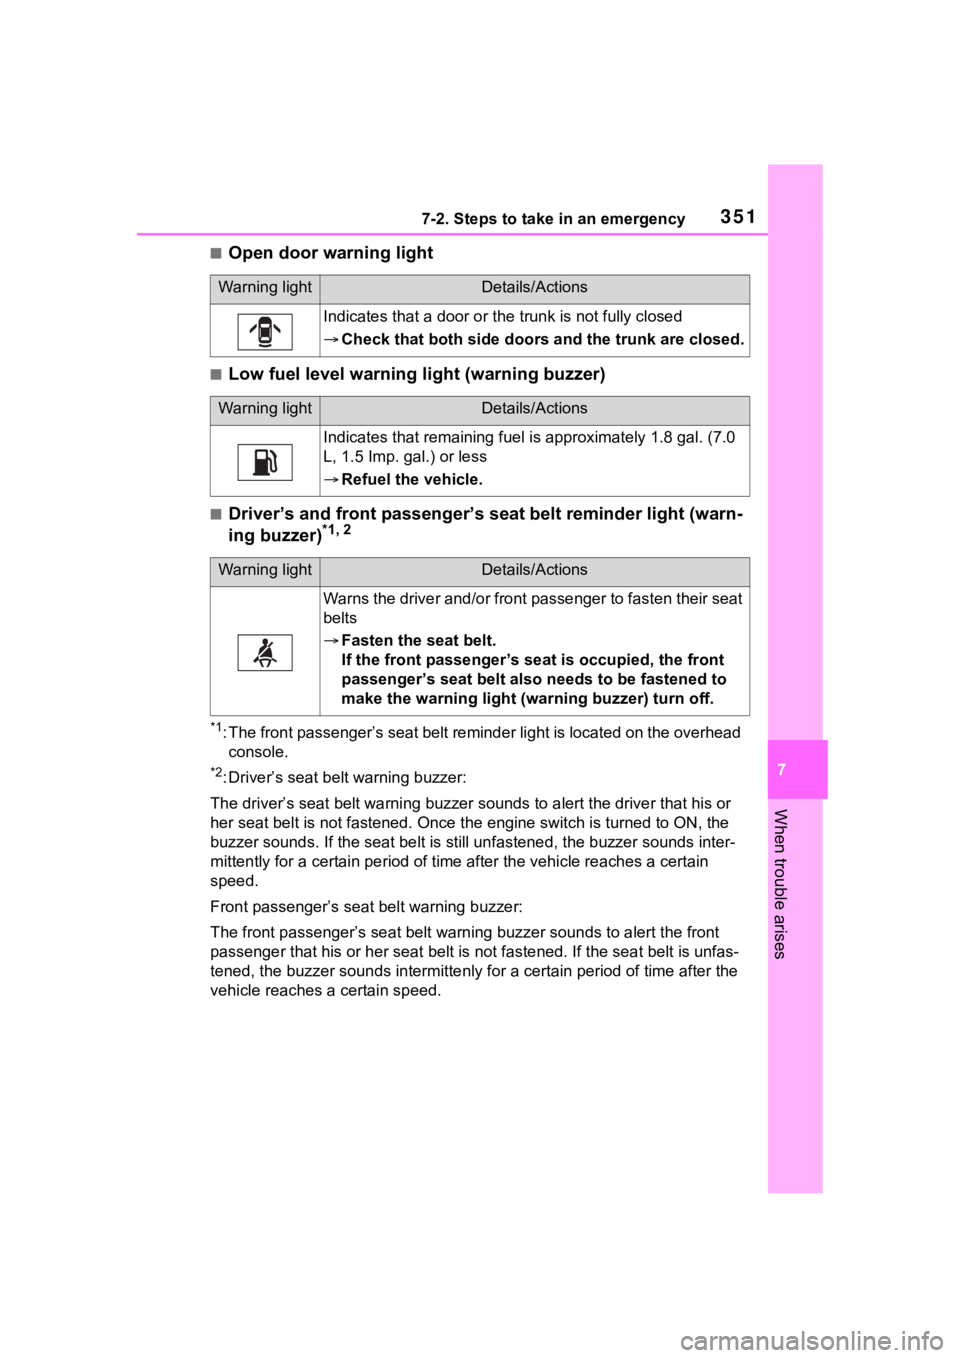
■Open door warning light
■Low fuel level warning light (warning buzzer)
■Driver’s and front passenger’s seat belt reminder light (warn-
ing buzzer)*1, 2
*1: The front passenger’s seat belt reminder light is located on t he overhead
console.
*2: Driver’s seat belt warning buzzer:
The driver’s seat belt warning buzzer sounds to alert the driver that his or
her seat belt is not fastened. O nce the engine switch is turned to ON, the
buzzer sounds. If the seat belt is still un fastened, the buzzer sounds inter-
mittently for a certain period of time after the vehicle reache s a certain
speed.
Front passenger’s seat belt warning buzzer:
The front passenger’s seat belt w arning buzzer sounds to alert the front
passenger that his or her seat belt is not fastened. If the seat belt is unfas-
tened, the buzzer sounds intermittenly for a certain period of time after the
vehicle reaches a certain speed.
Warning lightDetails/Actions
Indicates that a door or the trunk is not fully closed
Check that both side doors and the trunk are closed.
Warning lightDetails/Actions
Indicates that remaining fuel is approximately 1.8 gal. (7.0
L, 1.5 Imp. gal.) or less
Refuel the vehicle.
Warning lightDetails/Actions
Warns the driver and/or front passenger to fasten their seat
belts
Fasten the seat belt.
If the front passenger’s se at is occupied, the front
passenger’s seat belt also needs to be fastened to
make the warning light (w arning buzzer) turn off.
Page 355 of 449
3557-2. Steps to take in an emergency
7
When trouble arises
■If the tire pressure warning light
frequently comes on after blink-
ing for 1 minute
If the tire pressure warning light fre-
quently comes on after blinking for 1
minute when the engine switch is
turned to ON, have it checked by
your Toyota dealer.
■Warning buzzer
In some cases, the buzzer may not
be heard due to being in a noisy
location or audio sound.
WARNING
■If both the ABS and the brake
system warning lights remain
on
Stop your vehicle in a safe place
immediately and contact your Toy-
ota dealer. The vehicle will
become extremely unstable
during braking, and the ABS sys-
tem may fail, which could cause
an accident resulting in death or
serious injury.
■When the electric power
steering system warning light
comes on
The steering wheel may become
extremely heavy.
When steering wheel operations
are heavier than usual, grip the
steering wheel firmly and operate
it using more force than usual.
■If the tire pressure warning
light comes on
Be sure to observe the following
precautions. Failure to do so
could cause a loss of vehicle con-
trol and result in death or serious
injury.
●Stop your vehicle in a safe place
as soon as possible. Adjust the
tire inflation pressure immedi-
ately.
●If the tire pressure warning light
comes on even after tire infla-
tion pressure adjustment, it is
probable that you have a flat
tire. Check the tires. If a tire is
flat, repair the flat tire by using
emergency tire puncture repair
kit.
●Avoid abrupt maneuvering and
braking. If the vehicle tires dete-
riorate, you could lose control of
the steering wheel or the
brakes.
■If a blowout or sudden air
leakage should occur
The tire pressure warning system
may not activate immediately.
■Maintenance of the tires
Each tire, includi ng the spare (if
provided), should be checked
monthly when cold and inflated to
the inflation pressure recom-
mended by the vehicle manufac-
turer on the vehicle placard or tire
inflation pressure label (tire and
load information label). (If your
vehicle has tires of a different size
than the size indicated on the
vehicle placard or tire inflation
pressure label [tire and load infor-
mation label], you should deter-
mine the proper tire inflation
pressure for those tires.)
Page 357 of 449
3577-2. Steps to take in an emergency
7
When trouble arises
■Warning messages
The warning messages explained
below may differ from the actual
messages according to operation
conditions and vehicle specifica-
tions.
■Warning buzzer
In some cases, the buzzer may not
be heard due to being in a noisy
location or audio sound.
■If “Check Owner’s Manual” is
displayed
●If the following messages are
shown, following the instructions,
accordingly.
• “High Coolant Temperature” ( P.375)
• “Transmission Oil Temperature” ( P.149)
●If any of the following messages
are shown on the multi-informa-
tion display, it may indicate a mal-
function. Have the vehicle
inspected by your Toyota dealer
immediately.
• “EyeSight OFF”
• “Headlights Disabled”
• “ABS”
• “Steering System”
• “Vehicle Stability Control”
• “Transmission”
• “Low Tire Pressure”
• “RAB Disabled”
• “BSD/RCTA Disabled”
• “Keyless Access System Dis- abled”
• “Auto Headlight Leveler Disabled”
• “SRH Disabled”
●If any of the following messages
are shown on the multi-informa-
tion display, it may indicate a mal-
function. Immediately stop the
vehicle and contact your Toyota
dealer.
• “Brake System”
• “Check Engine”
• “SRS Airbag System”
If a war ning message
is displayed
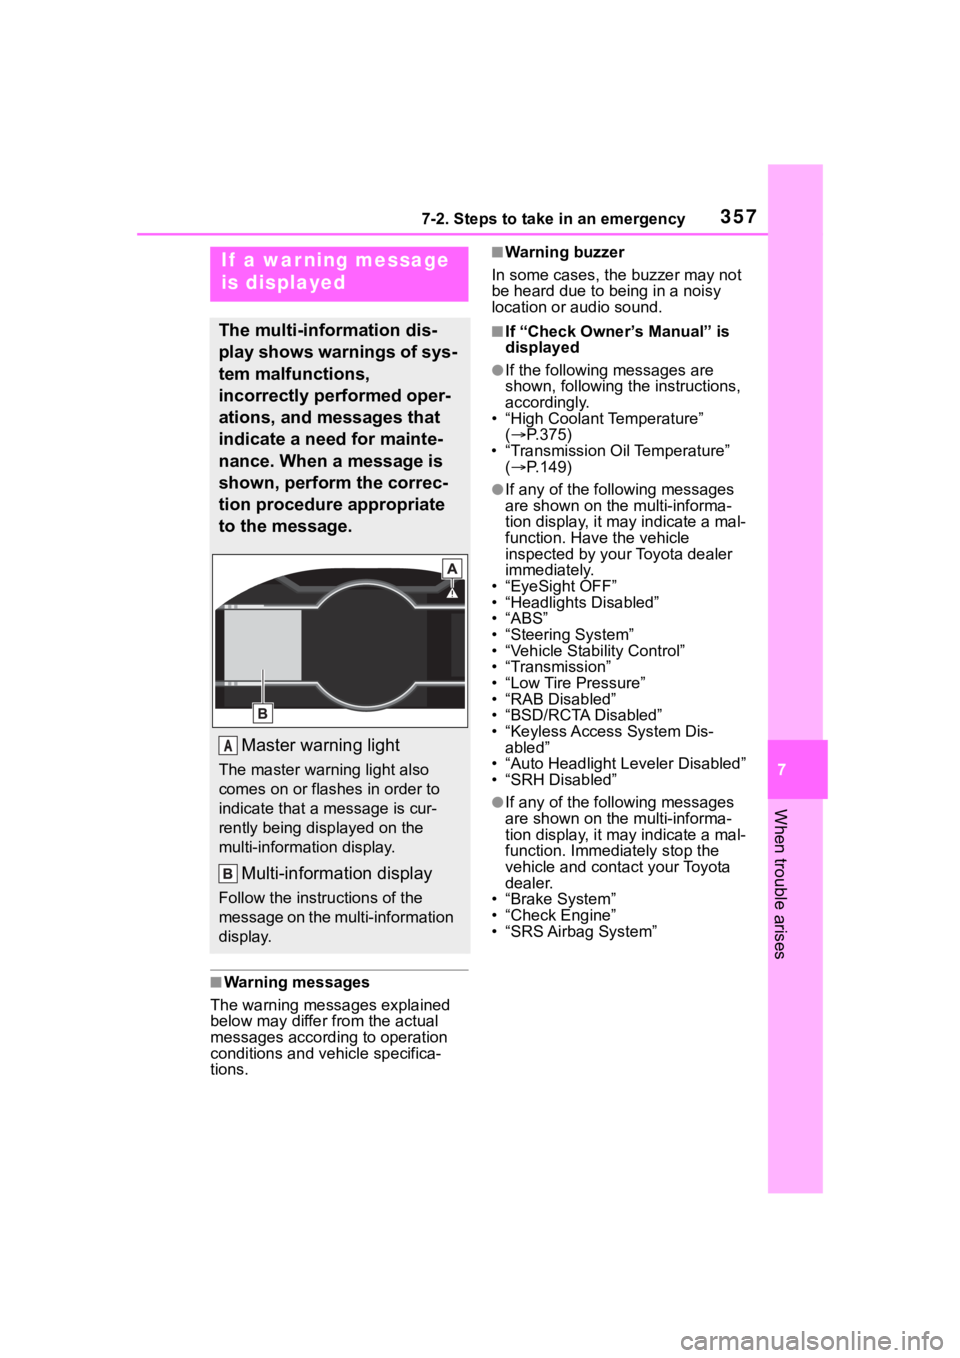
The multi-information dis-
play shows warnings of sys-
tem malfunctions,
incorrectly performed oper-
ations, and messages that
indicate a need for mainte-
nance. When a message is
shown, perform the correc-
tion procedure appropriate
to the message.
Master warning light
The master warning light also
comes on or flashes in order to
indicate that a message is cur-
rently being displayed on the
multi-information display.
Multi-information display
Follow the instru ctions of the
message on the multi-information
display.
A
Page 358 of 449
3587-2. Steps to take in an emergency
Stop the vehicle in a safe
place on a hard, flat surface.
Set the parking brake.
Shift the shift lever to P (auto-
matic transmission) or R
(manual transmission).
Stop the engine.
Turn on the emergency flash-
ers. ( P.338)
Check the degree of the tire damage.
A tire should only be repaired
with the emergency tire punc-
ture repair kit if the damage is
caused by a nail or screw pass-
ing through the tire tread.
• Do not remove the nail or screw from the tire. Removing
the object may widen the
opening and disenable emer-
gency repair with the kit.
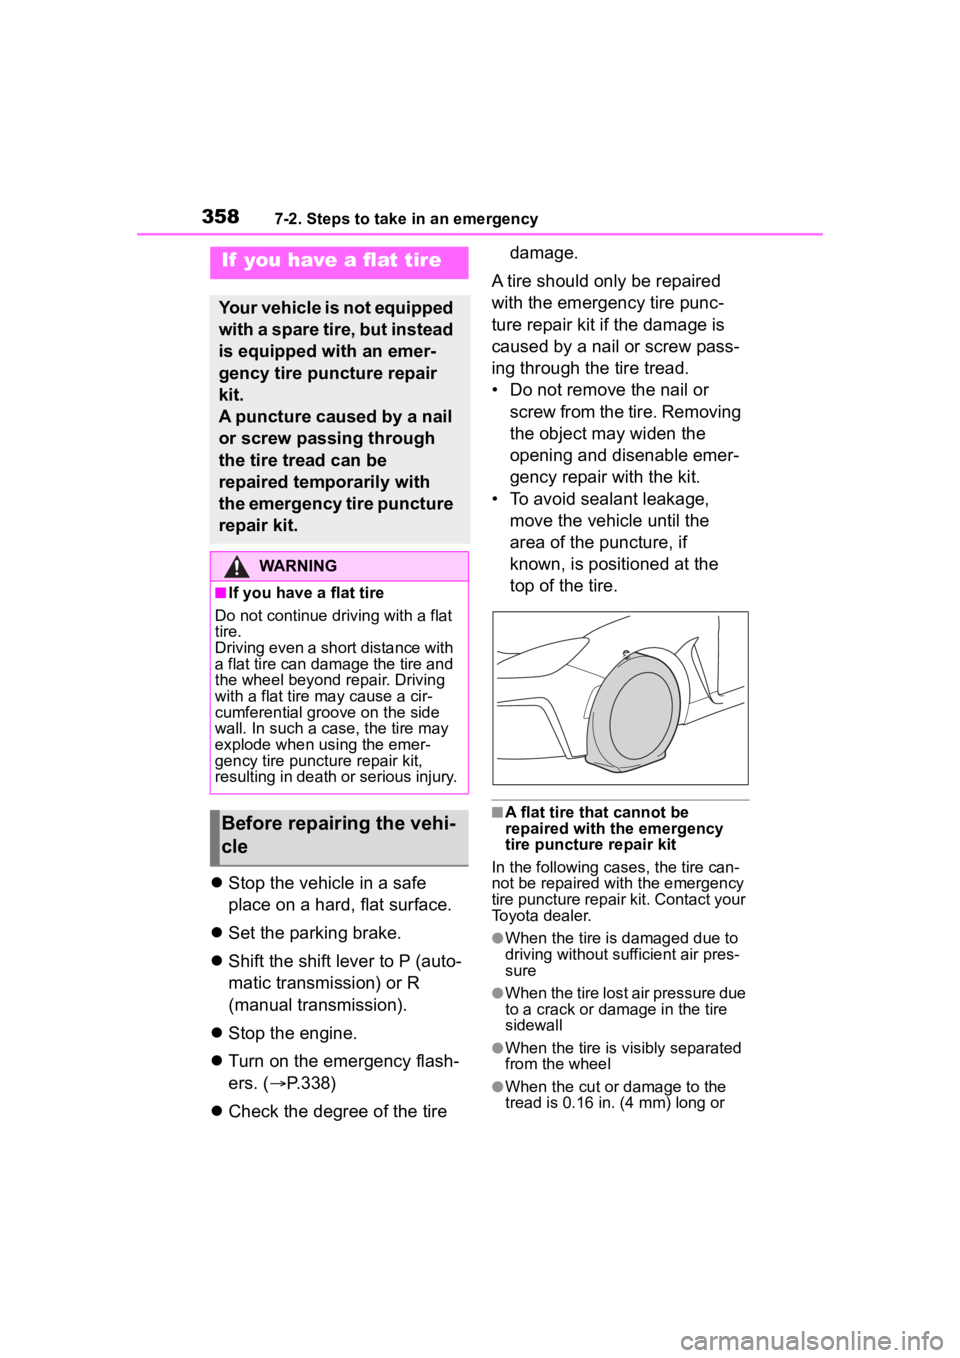
• To avoid sealant leakage, move the vehicle until the
area of the puncture, if
known, is positioned at the
top of the tire.
■A flat tire that cannot be
repaired with the emergency
tire puncture repair kit
In the following cases, the tire can-
not be repaired with the emergency
tire puncture repair kit. Contact your
Toyota dealer.
●When the tire is damaged due to
driving without sufficient air pres-
sure
●When the tire lost air pressure due
to a crack or damage in the tire
sidewall
●When the tire is visibly separated
from the wheel
●When the cut or damage to the
tread is 0.16 in. (4 mm) long or
If you have a flat tire
Your vehicle is not equipped
with a spare tire, but instead
is equipped with an emer-
gency tire puncture repair
kit.
A puncture caused by a nail
or screw passing through
the tire tread can be
repaired temporarily with
the emergency tire puncture
repair kit.
WARNING
■If you have a flat tire
Do not continue driving with a flat
tire.
Driving even a short distance with
a flat tire can damage the tire and
the wheel beyond repair. Driving
with a flat tire may cause a cir-
cumferential groove on the side
wall. In such a case, the tire may
explode when using the emer-
gency tire puncture repair kit,
resulting in death or serious injury.
Before repairing the vehi-
cle
Page 363 of 449
3637-2. Steps to take in an emergency
7
When trouble arises
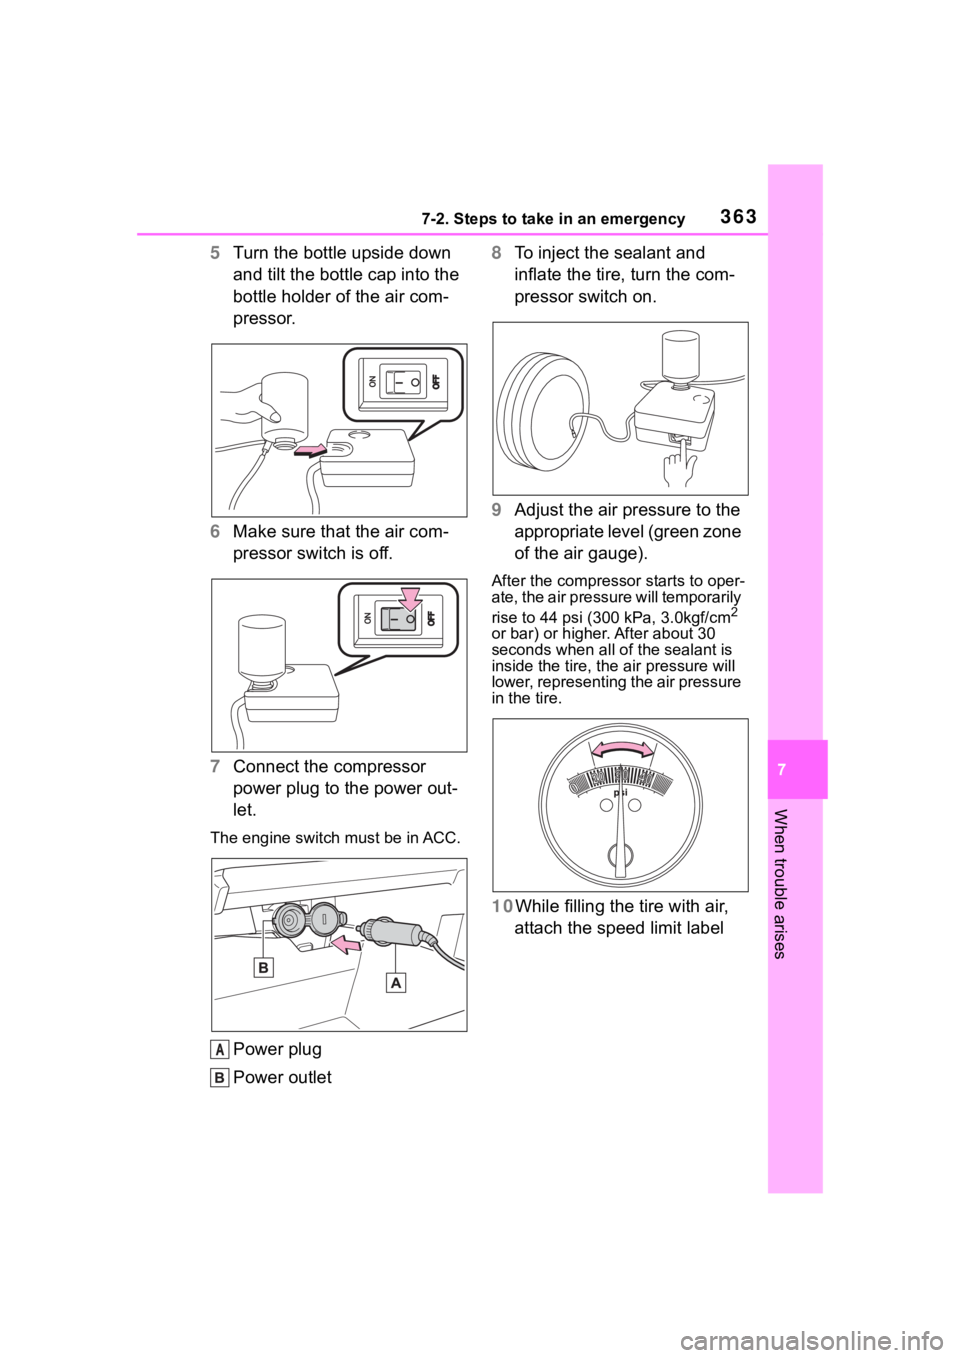
5Turn the bottle upside down
and tilt the bottle cap into the
bottle holder of the air com-
pressor.
6 Make sure that the air com-
pressor switch is off.
7 Connect the compressor
power plug to the power out-
let.
The engine switch must be in ACC.
Power plug
Power outlet 8
To inject the sealant and
inflate the tire, turn the com-
pressor switch on.
9 Adjust the air pressure to the
appropriate level (green zone
of the air gauge).
After the compress or starts to oper-
ate, the air pressure will temporarily
rise to 44 psi (300 kPa, 3.0kgf/cm
2
or bar) or higher. After about 30
seconds when all o f the sealant is
inside the tire, the air pressure will
lower, representing the air pressure
in the tire.
10While filling the tire with air,
attach the speed limit label
A
Page 367 of 449
3677-2. Steps to take in an emergency
7
When trouble arises
One of the following may be the
cause of the problem:
There may not be sufficient
fuel in the vehicle’s tank.
Refuel the vehicle.
The engine may be flooded.
Try to restart the engine again
following correct starting pro-
cedures. ( P.145)
There may be a malfunction
in the engine immobilizer sys-
tem. ( P.80)
One of the following may be the
cause of the problem:
The battery may be dis-
charged. ( P.372)
NOTICE
●Make sure to stand the kit with
the bottle vertical. The kit can-
not work properly if it is laid on
its side.
■Handling the emergency tire
puncture repair kit
●The compressor power source
should be 12 V DC suitable for
vehicle use. Do not connect the
compressor to any other
source.
●If gasoline splatters on the kit,
the kit may deteriorate. Take
care not to allo w gasoline to
contact it.
●Store the emergency tire punc-
ture repair kit in the trunk. The
kit may be thrown around during
sudden braking and so forth,
damaging the kit.
Place the repair kit in a storage to
prevent it from b eing exposed to
dirt or water.
●Store the kit in its assigned
place out of reach of children.
●Do not disassemble or modify
the kit. Do not subject parts
such as the air pressure indica-
tor to impacts. This may cause a
malfunction.
■To avoid damage to the tire
pressure warning valves and
transmitters
When a tire is repaired with liquid
sealants, the tire pressure warn-
ing valve and transmitter may not
operate properly. If a liquid seal-
ant is used, contact your Toyota
dealer as soon as possible. After
use of liquid sealant, make sure to
replace the tire pressure warning
valve and transmitter when repair-
ing or replacing the tire. (
P.316)
If the engine will not
star t
If the engine will not start
even though correct starting
procedures are being fol-
lowed ( P.145), consider
each of the following points:
The engine will not start
even though the starter
motor operates normally.
The starter motor turns
over slowly, the interior
lights and headlights are
dim, or the horn does not
sound or sounds at a low
volume.