2023 SUBARU SOLTERRA change time
[x] Cancel search: change timePage 413 of 628

4136-1. Using the air conditioning system and defogger
Owners Manual_USA_M42C01_en
6
Interior features
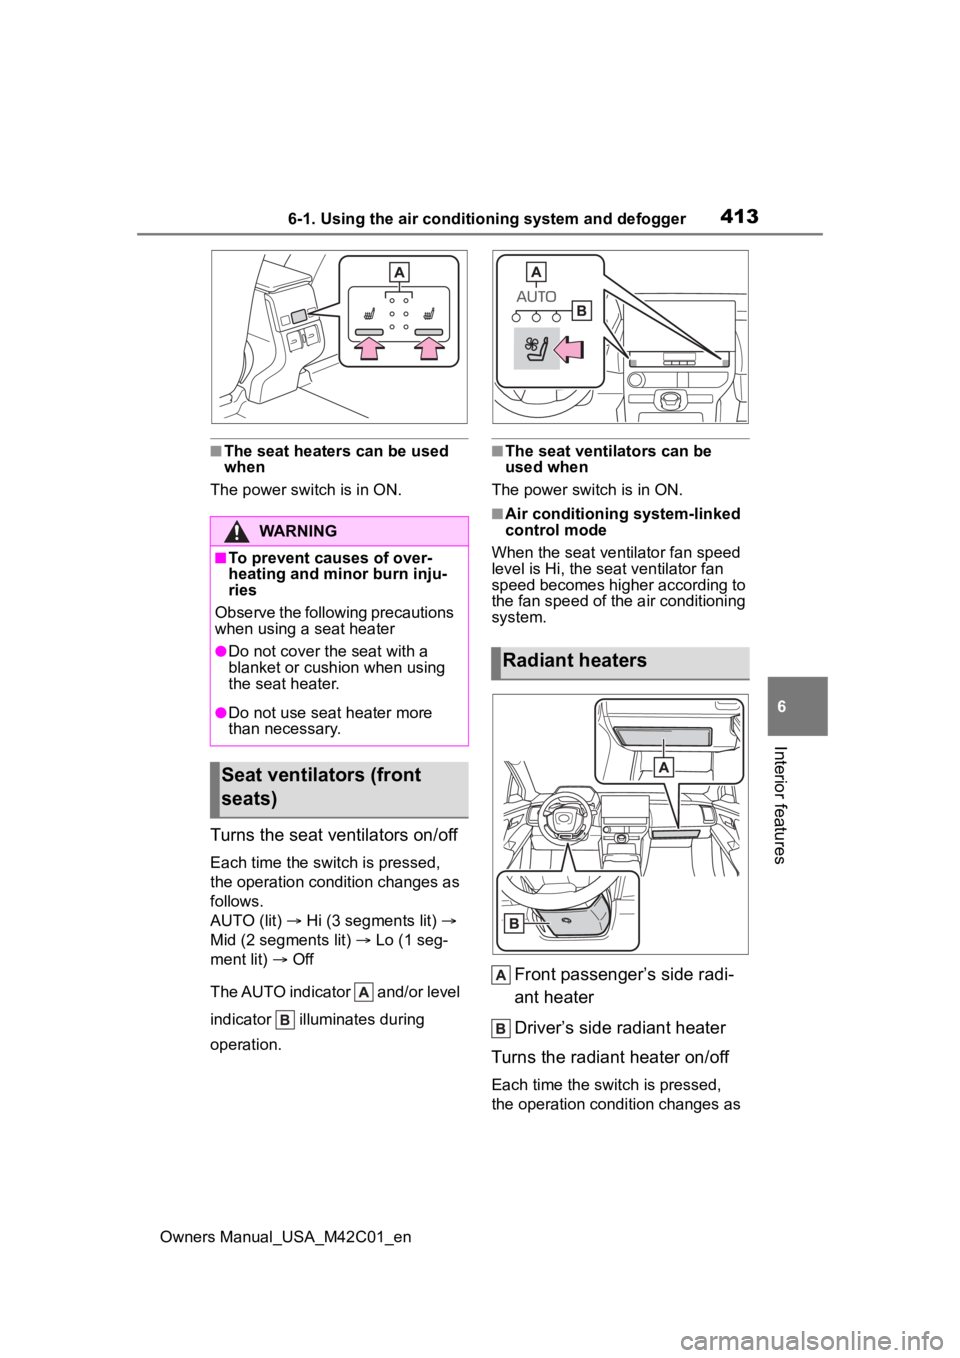
■The seat heaters can be used
when
The power swit ch is in ON.
Turns the seat ventilators on/off
Each time the switch is pressed,
the operation condition changes as
follows.
AUTO (lit) Hi (3 segments lit)
Mid (2 segments lit) Lo (1 seg-
ment lit) Off
The AUTO indicator and/or level
indicator illuminates during
operation.
■The seat ventilators can be
used when
The power switch is in ON.
■Air conditioning system-linked
control mode
When the seat ventilator fan speed
level is Hi, the seat ventilator fan
speed becomes higher according to
the fan speed of the air conditioning
system.
Front passenger’s side radi-
ant heater
Driver’s side radiant heater
Turns the radiant heater on/off
Each time the switch is pressed,
the operation condition changes as
WARNING
■To prevent causes of over-
heating and minor burn inju-
ries
Observe the following precautions
when using a seat heater
●Do not cover the seat with a
blanket or cushion when using
the seat heater.
●Do not use seat heater more
than necessary.
Seat ventilators (front
seats)
Radiant heaters
Page 416 of 628

4166-2. Using the interior lights
Owners Manual_USA_M42C01_enoff, the lights will go off automati-
cally after 20 minutes.
■The interior lights will turn on
automatically when
If any of the SRS airbags deploy
(inflate) or in the event of a strong
rear impact, the interior lights will
turn on automatically. The interior
lights will turn off automatically after
approximately 20 minutes.
The interior lights can be turned off
manually. However, in order to help
prevent further collisions, it is rec-
ommended that they be left on until
safety can be ensured.
(The interior lights may not turn on
automatically depending on the
force of the impact and conditions of
the collision.)
■Customization
Setting (e.g. the time elapsed before
the lights turn off) can be changed.
(Customizable features: P.575)
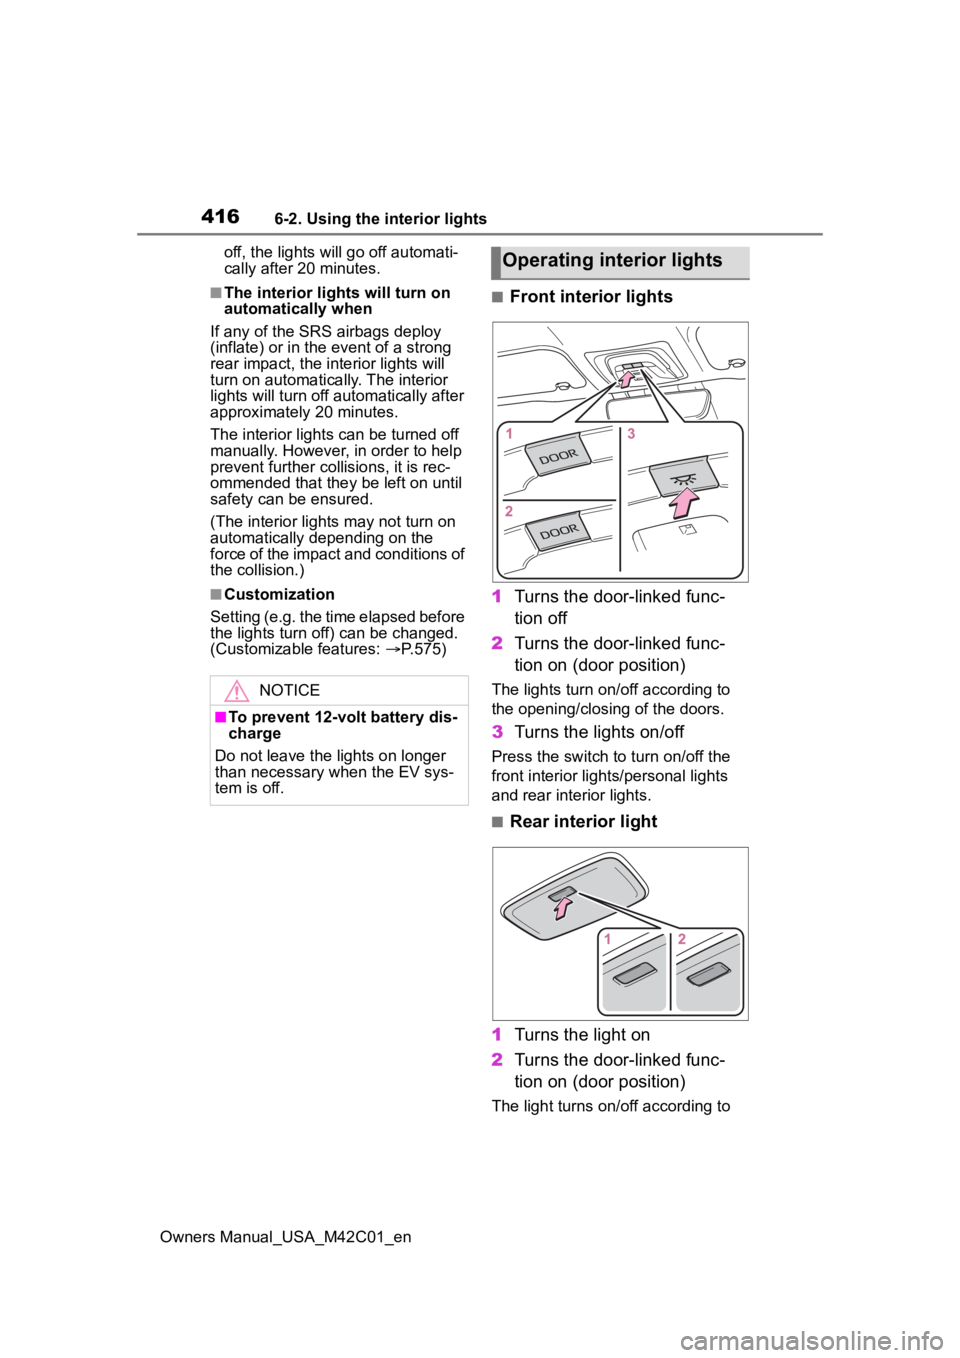
■Front interior lights
1 Turns the door-linked func-
tion off
2 Turns the door-linked func-
tion on (door position)
The lights turn on/off according to
the opening/closing of the doors.
3Turns the lights on/off
Press the switch to turn on/off the
front interior lights/personal lights
and rear interior lights.
■Rear interior light
1 Turns the light on
2 Turns the door-linked func-
tion on (door position)
The light turns on/off according to
NOTICE
■To prevent 12-volt battery dis-
charge
Do not leave the lights on longer
than necessary when the EV sys-
tem is off.
Operating interior lights
Page 437 of 628

4376-4. Using the other interior features
Owners Manual_USA_M42C01_en
6
Interior features
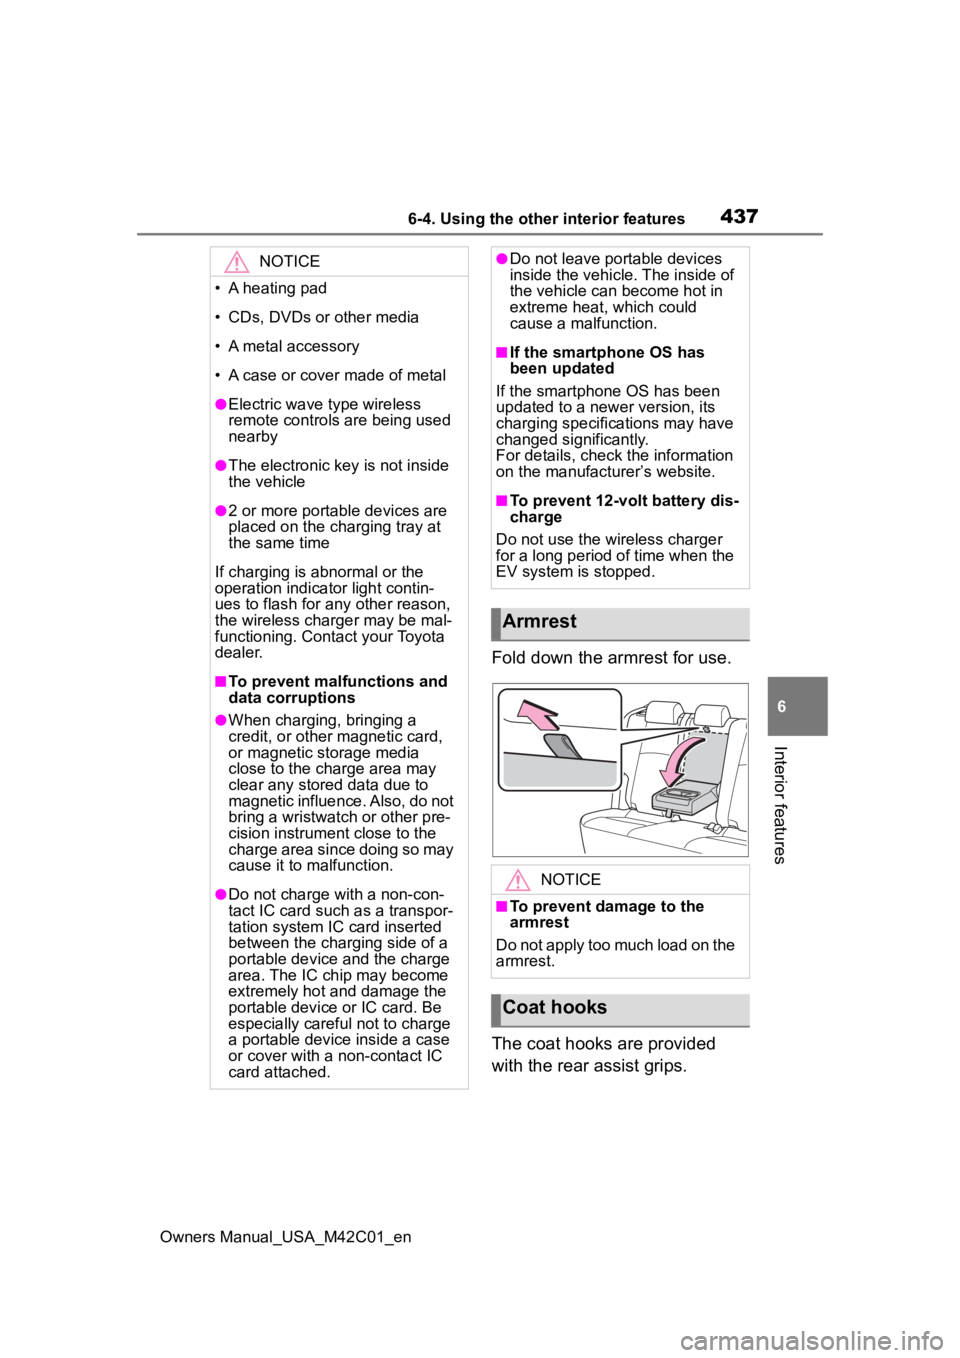
Fold down the armrest for use.
The coat hooks are provided
with the rear assist grips.
NOTICE
• A heating pad
• CDs, DVDs or other media
• A metal accessory
• A case or cover made of metal
●Electric wave type wireless
remote controls are being used
nearby
●The electronic key is not inside
the vehicle
●2 or more portable devices are
placed on the charging tray at
the same time
If charging is abnormal or the
operation indicator light contin-
ues to flash for any other reason,
the wireless charger may be mal-
functioning. Contact your Toyota
dealer.
■To prevent malfunctions and
data corruptions
●When charging, bringing a
credit, or other magnetic card,
or magnetic storage media
close to the charge area may
clear any stored data due to
magnetic influence. Also, do not
bring a wristwatch or other pre-
cision instrument close to the
charge area since doing so may
cause it to malfunction.
●Do not charge with a non-con-
tact IC card such as a transpor-
tation system IC card inserted
between the charging side of a
portable device and the charge
area. The IC chip may become
extremely hot and damage the
portable device or IC card. Be
especially careful not to charge
a portable device inside a case
or cover with a non-contact IC
card attached.
●Do not leave portable devices
inside the vehicle. The inside of
the vehicle can become hot in
extreme heat, which could
cause a malfunction.
■If the smartphone OS has
been updated
If the smartphone OS has been
updated to a newer version, its
charging specifications may have
changed significantly.
For details, check the information
on the manufacturer’s website.
■To prevent 12-volt battery dis-
charge
Do not use the wireless charger
for a long period of time when the
EV system is stopped.
Armrest
NOTICE
■To prevent damage to the
armrest
Do not apply too much load on the
armrest.
Coat hooks
Page 478 of 628

4787-3. Do-it-yourself maintenance
Owners Manual_USA_M42C01_enmore, park the vehicle in a safe
place for approximately 15 minutes
and then drive th
e vehicle again.
■When performing wheel posi-
tion registration
●Normally, wheel position registra-
tion can be completed within
approximately 30 minutes.
●Wheel position registration is per-
formed while driving at a vehicle
speed of approximately 25 mph
(40 km/h) or more.
■The initialization operation
●If the power switch is turned off
while registering the wheel posi-
tion, the next time the power
switch is turned to ON, the wheel
position registr ation will resume
and it will not be necessary to
restart the procedure.
●While the position of each tire is
being determined and the inflation
pressures are not being displayed
on the multi-information display, if
the inflation pres sure of a tire
drops, the tire pressure warning
light will come on.
■If the tire pressure warning sys-
tem is not registered properly
●In the following situations, wheel
position registration may take lon-
ger than usual to b e completed or
may not be possible.
• Vehicle is not driven at approxi-
mately 25 mph ( 40 km/h) or more
• Vehicle is driven on unpaved roads
If initialization does not complete
after driving for 1 hour or more, park
the vehicle in a safe place for
approximately 15 minutes and then
drive the vehicle again.
●If the vehicle is reversed during
wheel position registration, all
data collected until then will be
cleared. Perform driving again.
■When you need to setting
the tire pressure
In the following situations, it will
be necessary to perform the tire
inflation pressure setting proce-
dure of the tire pressure warning
system.
When the specified tire infla-
tion pressure has changed,
such as due to carried load,
etc.
When the tire inflation pres-
sure is changed such as
when the tire size is changed.
If the tire inflation pressure has
been adjusted to the specified
level, perform the tire inflation
setting procedure by selecting
specified inflation pressure on
the multi-information display.
When the tire inflation pressure
is to be other than specified,
such as when tires other than
the specified size are used, etc.,
set the tire inflation pressure
using the current pressure.
Make sure to adjust the tire
inflation pressure of each tire to
the appropriate level before per-
forming tire pressure setting.
The tire pressure warning sys-
tem operates based on this tire
inflation pressure.
Setting the tire pressure
Page 481 of 628

4817-3. Do-it-yourself maintenance
Owners Manual_USA_M42C01_en
7
Maintenance and care
does not blink 3 times when start-
ing the tire inflation pressure set-
ting procedure, the procedure
may not have started. Perform the
procedure again from the begin-
ning.
●If tire inflation pressure setting
procedure cannot be completed
after performing the above proce-
dure, contact your Toyota dealer.
■When the registering ID
codes
The tire pressure warning valve
and transmitter is equipped with
a unique ID code.
When new tire pressure warning
valves and transmitters are
installed, new ID codes must be
registered in the tire pressure
warning computer.
■How to registration ID code
1 Park the vehicle in a safe
place, wait for approximately
15 minutes.
2 Start the EV system.
( P.231)
The ID code registration procedure cannot be performed while the
vehicle is moving.
3
Press or of the meter
control switches and select
.
4 Press or of the meter
control switches and select
“Vehicle Settings”, and then
press and hold the “OK”.
5 Press or of the meter
control switches and select
“TPWS Setting”, and then
press “OK”.
6 Press or of the meter
control switches and select
“Tire Set Switching”, and then
press “OK”.
7 Press or of the meter
control switches and select
“Register New Valve/ID” and
then press “OK”.
8 Check if the desired wheel
set (“Tire Set 1” or “Tire Set
2”) is displayed.
ID codes will be regi stered to the
displayed wheel set.
To change the whee l set to be reg-
istered, press or of the
meter control switches, and then
select the wheel set you wish to
register.
If ID codes have already been reg-
istered for that wheel set, the tire
pressure warning light will slowly
blink 3 times, and a message indi-
cating that change is occurring will
WARNING
■When setting using the cur-
rent tire inflation pressure
Make sure to adjust the tire infla-
tion pressure of each tire to the
appropriate level before perform-
ing tire pressure setting. Other-
wise, the tire pressure warning
light may not illuminate even if the
tire inflation pressure drops or
may illuminate ev en though the
tire inflation pressure is normal.
Registering ID codes
Page 482 of 628

4827-3. Do-it-yourself maintenance
Owners Manual_USA_M42C01_enbe displayed on the multi-informa-
tion display.
“Setting Pressure Wait a
Moment”
9 Press or of the meter
control switches and select
“OK” and then press “OK”.
The tire pressure warning light will
slowly blink 3 times and a message
indicating that ID code registration
is being performed will be displayed
on the multi-inform ation display.
Wheel set changing will be can-
celed and registration will begin.
When registration is being per-
formed, the tire pressure warning
light will blink for approximately 1
minute then illumi nate and “--” will
be displayed for the inflation pres-
sure of each tire on the multi-infor-
mation display.
“Setting Pressure Wait a
Moment” 10Drive straight (with occa-
sional left and right turns) at
approximately 25 mph (40
km/h) or more for approxi-
mately 10 to 30 minutes.
When registration is complete, the
tire pressure warn ing light will turn
off and a message indicating that
registration has been completed
will be displayed on the multi-infor-
mation display.
Registration may take longer than
normal to complete if the vehicle
speed cannot be maintained at
approximately 25 mph (40 km/h) or
more. If registration cannot be com-
pleted after driving for 1 hour or
more, perform the registration pro-
cedure again from the beginning.
■When registering ID codes
●Normally, wheel position registra-
tion can be completed within
approximately 30 minutes.
●ID code registrati on is performed
while driving at a vehicle speed of
approximately 25 mph (40 km/h)
or more.
●ID codes can be registered by
yourself, but depending on the
driving conditions and driving
environment, registration may
take some time to complete.
●When using a wheel set which all
of the ID codes have already been
registered, the wheel set can be
changed in a short amount of
time.
■If ID codes are not registered
properly
●In the following situations, ID code
registration may take longer than
usual to be completed or may not
be possible.
• When the vehicle has not been parked for approximately 15 min-
utes or more before being driven
• Vehicle is not dr iven at approxi-
mately 25 mph (40 km/h) or more
Page 483 of 628

4837-3. Do-it-yourself maintenance
Owners Manual_USA_M42C01_en
7
Maintenance and care
• Vehicle is driven on unpaved roads
• Vehicle is driven near other vehi-
cles and system cannot recog-
nize tire pressure warning valves
and transmitters of your vehicle
over those of other vehicles
• Wheel with tire p ressure warning
valve and transmitter installed is
inside or near the vehicle
●If the vehicle is reversed during
registration, all da ta collected until
then will be cleared. Perform driv-
ing again.
●If registration doe s not complete
after driving for 1 hour or more,
perform the ID c ode registration
procedure again from the begin-
ning.
●If the tire pressure warning light
does not blink 3 times when start-
ing ID code registration proce-
dure, the procedure may not have
started. Perform the procedure
again from the beginning.
●If ID codes cannot be registered
even when perfor ming the above
procedure, contact your Toyota
dealer.
To cancel ID code registration
after it has been started, select
“Register New Valve / ID” again
on the multi-information display.
If ID code registration has been
canceled, the tire pressure
warning light will turn off.
If the warning light does not turn
off, ID code registration may not
have been cancelled correctly.
To cancel registration, select
“Register New Valve / ID” again
on the multi-information display. Your vehicle is equipped with a
tire pressure warning system
with a function to register two
sets of ID codes. This allows for
registration of a second wheel
set, for example a winter set.
The wheel set can be
changed only if a second
wheel set has been registered
to the system. If a second
wheel set has not been regis-
tered, message will be dis-
played and it will not be
possible to change to the
selected wheel set.
ID codes can be registered by
yourself.
Only a change between both
registered wheel set is possi-
ble, mixing between these
wheel sets is not supported.
While registering ID codes, it
may not be possible to
change between wheel sets
normally. Cancel registration
before changing between
wheel sets.
■How to change between
wheel sets
1 Install the desired wheel set.
2 Start the EV system.
( P.231)
The ID code selecting procedure
cannot be performed while the
vehicle is moving.
Canceling ID code regis-
tration
Selecting wheel set
Page 484 of 628

4847-3. Do-it-yourself maintenance
Owners Manual_USA_M42C01_en
3Press or of the meter
control switches and select
.
4 Press or of the meter
control switches and select
“Vehicle Settings”, and then
press and hold the “OK”.
5 Press or of the meter
control switches and select
“TPWS Setting”, and then
press “OK”.
6 Press or of the meter
control switches and select
“Tire Set Switching”, and then
press “OK”.
7 Press or of the meter
control switches and select
“Register Valve/ID” and then
press “OK”.
8 Press or of the meter
control switches and wheel
set (“Tire Set 1” or “Tire Set
2”) is selected.
9 Press or of the meter
control switches and select
“OK” and then press “OK”.
The tire pressure warning
light will slowly blink 3 times,
a message indicating that
change is occurring will be
displayed, and the wheel set
change will begin.Wheel set change will begin and
the tire pressure warning light will
blink for 1 minute and then illumi-
nate. Also, while the change is
being performed, “--” will be dis-
played for the tire inflation pressure
of each tire on the multi-information
display.
After approximatel y 2 minutes, the
wheel set change will complete, the
tire pressure warn ing light will turn
off, and a completion message will
be displayed on the multi-informa-
tion display.
If changing does not complete after
approximately 4 minutes, a mes-
sage indicating that the change
could not be completed will be dis-
played.
Check which wheel set is installed
and perform the change procedure
again from the beginning.
“Setting Pressure Wait a
Moment”
10If the specified tire inflation pressure of the wheel set
installed differs from that of
the previous set, it will be
necessary to perform the tire
inflation pressure setting pro-
cedure of the tire pressure
warning system.
If the specified tire inflation pres-
sure is the same, it will not be nec-
essary to per form the tire inflation
pressure setting procedure.