2023 SUBARU BRZ warning light
[x] Cancel search: warning lightPage 227 of 432

Starting and Operating7
Starting and Operating
7-1. Fuel.......................................................................223
Fuel Requirements .......................................................223
Fuel Filler Lid and Cap .................................................224
7-2. State Emission Testing (U.S. Only) ...................227
7-3. Preparing to Drive ...............................................228
7-4. Starting and Stopping Engine ...........................229
Safety Precautions ............................................ ...........229
Operating Range for Push-Button Start System .......229
General Precautions When St arting Engine ..............229
Starting Engine .............................................................230
Stopping Engine ...........................................................232
When Access Key Fob Does Not Operate
Properly.......................................................................232
Steering Lock ................................................................232
7-5. Manual Transmission .........................................233
Shifting Speeds ............................................................234
Driving Tips ...................................................................235
7-6. Automatic Transmission ....................................235
Select Lever ..... .......................................... ...................236
Adaptive Control...........................................................237
Shift Lock Function ......................................................238
Selection of Manual Mode ...........................................239
Driving Tips ...................................................................240
7-7. Driving Mode Select Switch (If Equipped) ........241
Normal Mode .................................................................241
Sport Mode ....................................................................241
Snow Mode....................................................................241
Driving Mode Select Switch.........................................241
7-8. Active Sound Control .........................................242
7-9. Power Steering ....................................................242
7-10. Braking...............................................................243
Braking Tips ..................................................................243 Brake System ............................................................... 244
Disc Brake Pad Wear Warning Indicators ................. 245
7-11. ABS (Anti-Lock Brake System) ........................245
ABS Self-Check............................................................ 245
ABS Warning Light ...................................................... 245
7-12. Electronic Brake Force Distribution (EBD)
System ...............................................................246
EBD System Malfunctions .......................................... 246
7-13. Vehicle Stability Control (VSC)/TRAC
System ...............................................................247
Vehicle Stability Control (VSC) System ..................... 247
TRAC System ............................................................... 247
Vehicle Stability Control (VSC) System Monitor....... 248
Vehicle Stability Control (VSC) OFF Switch .............. 248
7-14. TRACK Mode .....................................................250
TRACK Mode ................................................................ 250
Selecting TRAC Mode and Ve hicle Stability Control
(VSC) Mode ............................................................... 251
7-15. Tire Pressure Monitoring System (TPMS)
(If Equipped) ......................................................251
Certification for the Transmitter ................................. 253
Certification for the Receiver...................................... 253
TPMS Screen ................................................................ 254
Initializing the Tire Pressure Monitoring System ..... 254
How to Initialize the Tire Pressure Monitoring
System (If Equipped) ................................................. 254
If You Press the Tire Pressure Monitoring Reset
Switch Accidentally................................................... 254
Initialization Procedure ............................................... 254
When Initialization of the Tire Pressure Monitoring System has Failed ..................................................... 255
Registering ID Codes .................................................. 255
BRZ_U.book 221 ページ 2022年3月29日 火曜日 午後3時59分
Page 228 of 432

Starting and Operating
Changing the ID code set ............................................ 255
7-16. Parking Your Vehicle ........................................255
Parking Brake ............................................................... 255
Parking Tips.................................................................. 256
7-17. Hill Start Assist System ....................................257
To Activate/Deactivate the Hill Start Assist
System ........................................................................ 258
Hill Start Assist Indicator Light................................... 259
7-18. Cruise Control (Models without the
EyeSight system) ..............................................260
To Set Cruise Control .................................................. 260
To Temporarily Cancel the Cr uise Control ................ 261
To Turn Off the Cruise Control ................................... 262
To Change the Cruising Speed ................................... 262
Cruise Control Indicator Light .................................... 263
7-19. Rear View Camera .............................................263
How to Use the Rear View Camera ............................. 264
Viewing Range on the Screen ..................................... 265
Help Lines ..................................................................... 266
7-20. BSD/RCTA (If Equipped)...................................268
System Features .......................................................... 268 System Operation......................................................... 270
BSD/RCTA Approach Indi
cator Light/Warning
Buzzer ......................................................................... 271
BSD/RCTA OFF Indicator ............................................ 273
BSD/RCTA Warning Indicator ..................................... 274
To Turn On/Off the BSD/RCTA .................................... 274
Certification for the BSD/RCTA................................... 274
Handling of Radar Sensors ......................................... 276
7-21. Reverse Automatic Braking (RAB) System
(If Equipped) ..................................................... 277
Reverse Automatic Braking (RAB) System
Overview ..................................................................... 278
Operating Conditions................................................... 279
Sonar Audible Alarm .................................................... 282
Automatic Braking Operation ..................................... 284
Canceling the Reverse Au tomatic Braking (RAB)
System Operation ...................................................... 285
Reverse Automatic Braking (RAB) System
ON/OFF Setting .......................................................... 286
RAB Warning Indicator ................................................ 286
Handling of the Sonar Sensors ................................... 286
BRZ_U.book 222 ページ 2022年3月29日 火曜日 午後3時59分
Page 229 of 432
Fuel
223
Starting and Operating7
– CONTINUED –
7-1. Fuel■Fuel RequirementsThe engine is designed to operate using
unleaded gasoline with an octane rating
of 93 AKI (98 RON) or higher .
If unleaded gasoline with an octane
rating of 93 AKI (98 RON) is not available,
unleaded gasoline with an octane rating of
91 AKI (95 RON) may be used with no
detriment to engine durability or
driveability.
However, you may notice a slight
decrease in maximum engine perfor-
mance and you may hear some knocking
(pinging) from the engine while using 91
AKI (95 RON) fuel. Use of 91 AKI (95 RON)
fuel will not affect your warranty
coverage.
▼ Fuel octane rating
Using a gasoline with a lower octane
rating can cause persistent and heavy
knocking, which can damage the engine.
Do not be concerned if your vehicle some-
times knocks lightly when you drive up a
hill or when you accelerate. See your
dealer or a qualified service technician if
you use a fuel with the specified octane
rating and your vehi cle knocks heavily or
persistently.
▽RON
This octane rating is the Research Octane
Number.
▽AKI
This octane rating is the average of the
Research Octane and Motor Octane
numbers and is commonly referred to as
the Anti Knock Index (AKI).
▼ Unleaded gasoline
The neck of the fuel filler pipe is designed
to accept only an unleaded gasoline filler
nozzle. Under no circumstances should
leaded gasoline be used because it will
damage the emission control system and
may impair driveability and fuel economy. ▼
Reformulated gasoline
SUBARU supports the use of reformu-
lated gasoline when available. Reformu-
lated gasoline has been blended to burn
more cleanly and reduce vehicle emis-
sions.
▼ MMT
Some gasoline contains an octane-
enhancing additive called MMT (Methylcy-
clopentadienyl Manganese Tricarbonyl). If
you use such fuels, your emission control
system performance may deteriorate and
the CHECK ENGINE warning light/
malfunction indicator light may turn on. If
this happens, return to your authorized
SUBARU Dealer for service. If it is deter-
mined that the condition is caused by the
type of fuel used, repairs may not be
covered by your warranty.
▼ Gasoline for cleaner air
Your use of gasoline with detergent addi-
tives will help prevent deposits from
forming in your engi ne and fuel system.
This helps keep your engine in tune and
your emission cont rol system working
properly, and is a way of doing your part
for cleaner air. If you continuously use a
high quality fuel with the proper detergent
and other additives, you should never
CAUTION
Use of a fuel which is low in
quality or use of an inappropriate
fuel additive may cause damage
to the engine and/or fuel system. Some gas stations, particularly
those in high altitude areas, offer
fuels posted as regular octane
gasoline with an octane rating
below 93 AKI (98 RON). Use of
those fuels are not recom-
mended.
BRZ_U.book 223 ページ 2022年3月29日 火曜日 午後3時59分
Page 231 of 432
Fuel
225
Starting and Operating7
– CONTINUED –
Press the unlock side of the power
door locking switch.
3. The fuel filler lid opens automatically.
Open it further by hand.
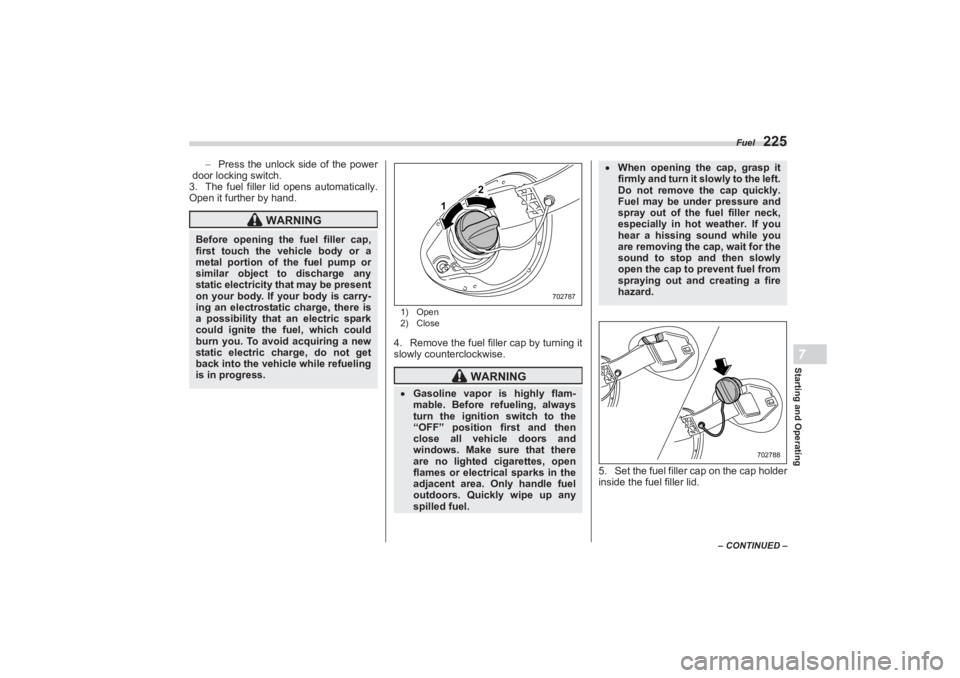
1) Open
2) Close4. Remove the fuel filler cap by turning it
slowly counterclockwise.
5. Set the fuel filler cap on the cap holder
inside the fuel filler lid.
WARNING
Before opening the fuel filler cap,
first touch the veh icle body or a
metal portion of the fuel pump or
similar object to discharge any
static electricity that may be present
on your body. If your body is carry-
ing an electrostatic charge, there is
a possibility that an electric spark
could ignite the fuel, which could
burn you. To avoid acquiring a new
static electric charge, do not get
back into the vehicle while refueling
is in progress.
WARNING
Gasoline vapor is highly flam-
mable. Before refueling, always
turn the ignition switch to the
“OFF” position first and then
close all vehicle doors and
windows. Make sure that there
are no lighted cigarettes, open
flames or electrical sparks in the
adjacent area. Only handle fuel
outdoors. Quickly wipe up any
spilled fuel.
1
2
702787
When opening the cap, grasp it
firmly and turn it slowly to the left.
Do not remove the cap quickly.
Fuel may be under pressure and
spray out of the fuel filler neck,
especially in hot weather. If you
hear a hissing sound while you
are removing the cap, wait for the
sound to stop and then slowly
open the cap to prevent fuel from
spraying out and creating a fire
hazard.
702788
BRZ_U.book 225 ページ 2022年3月29日 火曜日 午後3時59分
Page 232 of 432
Fuel
2266. Stop filling the tank after the fuel filler
pump automatically stops. Do not add any
more fuel.
7. Put the cap back on and turn it clock-
wise until you hear a clicking noise. Be
certain not to catch the tether under the
cap while tightening.
8. Close the fuel filler lid completely.
NOTE You will see the “ ” sign in the
fuel gauge. This indicates that the fuel
filler lid is located on the right side of
the vehicle.
If the fuel filler cap is not tightened
until it clicks or if the tether is caught
under the cap, the CHECK ENGINE
warning light/malfunction indicator
light may illuminate. Refer to "CHECK
ENGINE Warning Light/Malfunction
Indicator Light" P136.
To lock the fuel filler lid, perform one
of the operations below. However if
these operations are performed when
the fuel filler lid is open, the fuel filler
lid will not lock when it is subsequently
closed. - Press the “ ” button on the key
fob.
- Press the lock side of the power
door locking switch.
WARNING
When refueling, insert the fuel
nozzle securely into the fuel filler
pipe. If the nozzle is lifted or not
fully inserted, its automatic stop-
ping mechanism may not func-
tion, causing fuel to overflow the
tank and creating a fire hazard. Stop refueling when the auto-
matic stop mechanism on the fuel
nozzle activates. If you continue
to add fuel, temperature changes
or other conditions may cause
fuel to overflow from the tank and
create a fire hazard.
CAUTION
Make sure that the cap is tightened
until it clicks to prevent fuel spillage
in the event of an accident.
CAUTION
Do not let fuel sp ill on the exterior
surfaces of the vehicle. Because
fuel may damage th e paint, be sure
to wipe off any spilled fuel quickly.
Paint damage caused by spilled fuel
is not covered under the SUBARU
Limited Warranty.
CAUTION
Never add any cleaning agents to
the fuel tank. Th e addition of a
cleaning agent may cause
damage to the fuel system. After refuelin g, turn the cap to the
right until it clicks to ensure that it
is fully tightened. If the cap is not
securely tightened, fuel may leak
out while the vehicle is being
driven or fuel spillage could
occur in the event of an accident,
creating a fire hazard. Do not let fuel spill on the exterior
surfaces of the vehicle. Because
fuel may damage the paint, be
sure to wipe off any spilled fuel
quickly. Paint damage caused by
spilled fuel is not covered under
the SUBARU Limited Warranty. Always use a genuine SUBARU
fuel filler cap. If you use the
wrong cap, it may not fit or have
proper venting and your fuel tank
and emission control system may
be damaged. It could also lead to
fuel spillage and a fire.
BRZ_U.book 226 ページ 2022年3月29日 火曜日 午後3時59分
Page 233 of 432
State Emission Testing (U.S. Only)
227
Starting and Operating7
– CONTINUED –
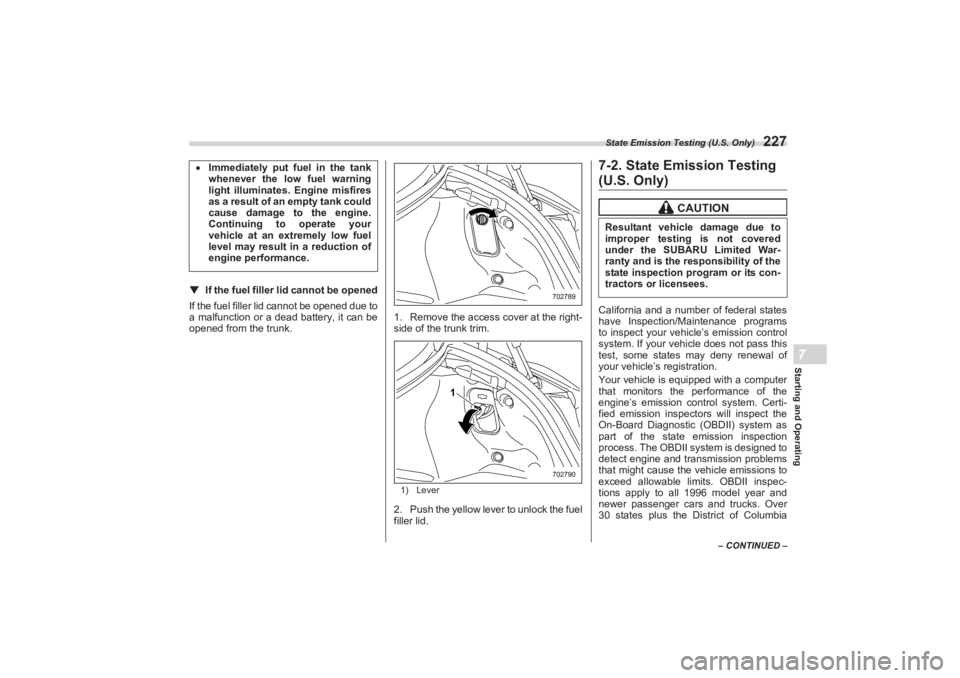
▼If the fuel filler lid cannot be opened
If the fuel filler lid cannot be opened due to
a malfunction or a dead battery, it can be
opened from the trunk. 1. Remove the access cover at the right-
side of the trunk trim.
1) Lever2. Push the yellow lever to unlock the fuel
filler lid.
7-2. State Emission Testing (U.S. Only)California and a number of federal states
have Inspection/Maintenance programs
to inspect your vehicle’s emission control
system. If your vehicle does not pass this
test, some states may deny renewal of
your vehicle’s registration.
Your vehicle is equipped with a computer
that monitors the performance of the
engine’s emission control system. Certi-
fied emission inspectors will inspect the
On-Board Diagnostic (OBDII) system as
part of the state emission inspection
process. The OBDII system is designed to
detect engine and transmission problems
that might cause the vehicle emissions to
exceed allowable limits. OBDII inspec-
tions apply to all 1996 model year and
newer passenger cars and trucks. Over
30 states plus the District of Columbia
Immediately put fuel in the tank
whenever the low fuel warning
light illuminates. Engine misfires
as a result of an empty tank could
cause damage to the engine.
Continuing to operate your
vehicle at an extremely low fuel
level may result in a reduction of
engine performance.
702789
1
702790
CAUTION
Resultant vehicle damage due to
improper testing is not covered
under the SUBARU Limited War-
ranty and is the responsibility of the
state inspection program or its con-
tractors or licensees.
BRZ_U.book 227 ページ 2022年3月29日 火曜日 午後3時59分
Page 234 of 432
Preparing to Drive
228have implemented emission inspection of
the OBDII system.
The inspection of the OBDII system
consists of a visual operational check of
the “ CHECK ENGINE ” warning light/
malfunction indicator light (MIL) and an
examination of the OBDII system with an
electronic scan tool.
A vehicle passes
the OBDII system
inspection if proper operation of the
“ CHECK ENGINE ” warning light is
observed, there are no stored diagnostic
trouble codes, and the OBDII readiness
monitors are all complete.
A vehicle fails
the OBDII inspection if
the “ CHECK ENGINE ” warning light is not
properly operating (light is illuminated or is
not working due to a burned out bulb) or
there is one or more diagnostic trouble
codes stored in the vehicle’s computer.
A state emission in spection may reject
(not pass or fail) a vehicle if the number of
OBDII system readiness monitors “ NOT
READY ” is greater than one. If the
vehicle’s battery has been recently
replaced or disconnected, the OBDII
system inspection may indicate that the
vehicle is not ready for the emission test.
Under this condition, the vehicle driver
should be instructed to drive his/her
vehicle for a few days to reset the readi-
ness monitors and return for an emission
re-inspection.
Owners of rejected or failing vehicles
should contact their SUBARU Dealer for
service.
7-3. Preparing to DriveYou should perform the following checks
and adjustments every day before you
start driving.
1. Check that all windows, mirrors, and
lights are clean and unobstructed.
2. Check the appearance and condition
of the tires. Also check tires for proper
inflation.
3. Look under the vehicle for any sign of
leaks.
4. Check that no small animals enter the
engine compartment.
5. Check that the hood and trunk are fully
closed.
6. Check the adjustment of the seat.
7. Check the adjustment of the inside
and outside mirrors.
8. Fasten your seatbelt. Check that your
passengers have fastened their seatbelts.
9. Check the operation of the warning
and indicator lights when the ignition
switch is turned to the “ON” position.
10. Check the gauges, indicator and
warning lights after starting the engine.
BRZ_U.book 228 ページ 2022年3月29日 火曜日 午後3時59分
Page 236 of 432

Starting and Stopping Engine
230On rare occasions, it may be difficult
to start the engine depending on the
fuel and the usage condition (repeated
driving of a distance in which the
engine has not warmed up suffi-
ciently). In such a case, it is recom-
mended that you change to a different
brand of fuel.
On rare occasions, transient
knocking may be heard from the
engine when the accelerator is oper-
ated rapidly such as a rapid start-up
and a rapid acceleration. This is not a
malfunction.
The engine starts more easily when
the headlights, air conditioner and rear
window defogger are turned off.■ Starting Engine
NOTEWhen pressing the push-button
ignition switch while depressing the
clutch pedal (MT models) or the brake
pedal (AT models): - The engine starter operates for a
maximum of 10 seconds and after
starting the engine, the starter stops
automatically.
- The engine can be started
regardless of the power status.
If the engine does not start, check
the security indicator light. Then press
the push-button ignition switch
without depressing the clutch pedal
(MT models) or the brake pedal (AT
models) to switch the power to “OFF”. - If the light had illuminated, try to
start the engine again.
- If the light had been off, press the
push-button ignition switch while
depressing the clutch pedal (MT
models) or the brake pedal (AT
models) more forcefully.
The engine start procedures may
not function depending on the radio
wave conditions around the vehicle. In
such a case, refer to "Starting Engine"
P326.
If the vehicle battery is discharged,
the steering cannot be unlocked.
Charge the battery.
WARNING
There are some general precau-
tions when starting the engine.
Carefully read the precautions
described in "General Precau-
tions When Starting Engine"
P229. If the steering lock cannot be
released after the engine has
started, never drive the vehicle.
The steering is still locked, and it
may result in an accident.
CAUTION
If a system malfunction warning
message is displayed on the
combination meter, there may be
a malfunction with the vehicle.
Contact a SUBARU dealer imme-
diately. If a steering lock warning
message is displayed on the
combination me ter after the
engine has started, it means that
the steering is still locked. While
moving the steering wheel right
and left, depress the brake pedal,
and press the push-button igni-
tion switch. Do not continue pressing the
push-button ignition switch for
more than 10 seconds. Doing so
could cause a malfunction. If the
engine does not start, stop
pressing the push -button ignition
switch. Instead, press the push-
button ignition switch without
depressing the clutch pedal (MT
models) or the brake pedal (AT
models) to switch the power
status to “OFF”. Wait 10 seconds,
and then press the push-button
ignition switch to start the
engine.
BRZ_U.book 230 ページ 2022年3月29日 火曜日 午後3時59分