2023 SUBARU BRZ lock
[x] Cancel search: lockPage 164 of 432

Combination Meter Display (Color TFT)
158*1: If equipped
*2: For details about EyeSight system, refer to the Owner’s Manual supplement for the EyeSight system.
Item
SettingsPage reference for
the vehicle system
operation
EyeSight
*1
Acquisition Sound ON/OFF
*2
Start AlertON/OFF
Accel Lv. Lv.1 (Eco)/Lv.2 (Comfort)/Lv.3 (Standard)/Lv.4 (Dynamic)
Select Drive Lane Right Lane/Left Lane
Units km, km/h, l/100km / miles, MPH, MPG127, 151 and *2
Warning Volume *1
Max/Mid/Min 277 and *2
Screen Settings Startup Scrn
ON/OFF -
GSI (MT models) ON/OFF 234
REV. Indicator
ON/OFF
130
RPM **00rpm
Buzzer ON/OFF
Car Settings Keyless Entry
Audible Signal
*1
ON/OFF
105 and 110
Hazard Flasher ON/OFF 106 and 110
Driver Door Unlock Driver Door Only/All 100
Defogger 15 minutes/Continuous 185
Interior Light 7.5 seconds/15 seconds/30 seconds 212
Auto Light Sensor Light Sensitivity Min/Low/Mid/High/Max
174
Wiper Link ON/OFF 175
Welcome Lighting Approaching Time Set 30 sec
onds/60 seconds/90 seconds/OFF
175
Leaving Time Set 30 seconds/60 seconds/90 seconds/OFF
1-Touch LN CHGR ON/OFF 182
BRZ_U.book 158 ページ 2022年3月29日 火曜日 午後3時59分
Page 168 of 432
Center Information Display (CID)
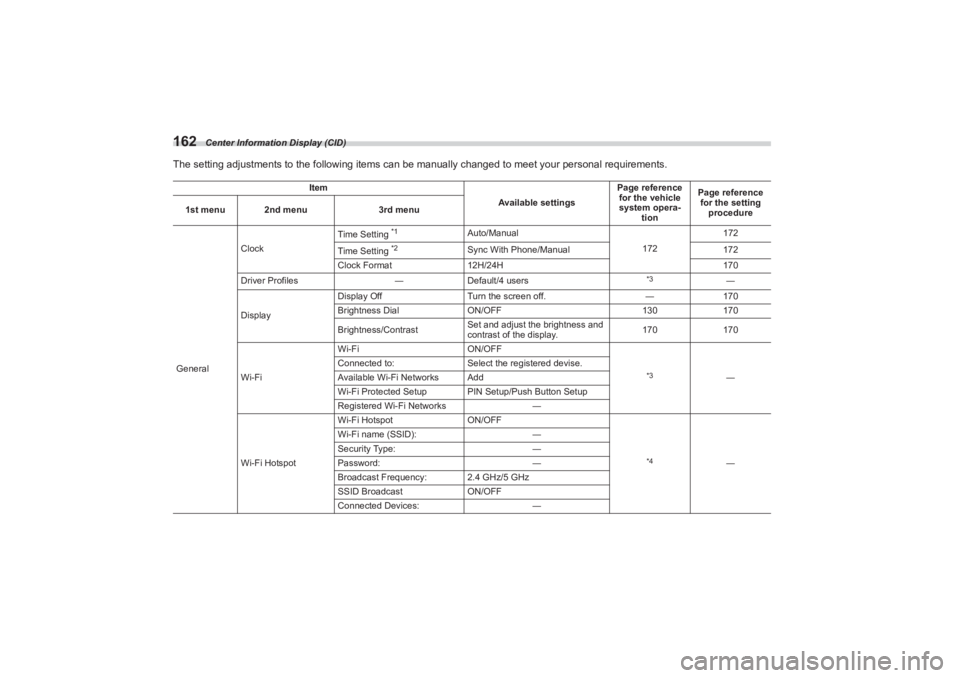
162The setting adjustments to the following items can be manually changed to meet your personal requirements.
Item
Available settingsPage reference
for the vehicle
system opera- tion Page reference
for the setting
procedure
1st menu 2nd menu
3rd menu
General Clock
Time Setting
*1
Auto/Manual
172172
Time Setting
*2
Sync With Phone/Manual 172
Clock Format 12H/24H 170
Driver Profiles ―Default/4 users
*3
―
Display Display Off
Turn the screen off. ―170
Brightness Dial ON/OFF 130170
Brightness/Contrast Set and adjust the brightness and
contrast of the display.
170
170
Wi-Fi Wi-Fi
ON/OFF
*3
―
Connected to:
Select the registered devise.
Available Wi-Fi Networks Add
Wi-Fi Protected Setup PIN Setup/Push Button Setup
Registered Wi-Fi Networks ―
Wi-Fi Hotspot Wi-Fi Hotspot
ON/OFF
*4
―
Wi-Fi name (SSID):
―
Security Type: ―
Password: ―
Broadcast Frequency: 2.4 GHz/5 GHz
SSID Broadcast ON/OFF
Connected Devices: ―
BRZ_U.book 162 ページ 2022年3月29日 火曜日 午後3時59分
Page 172 of 432
Center Information Display (CID)
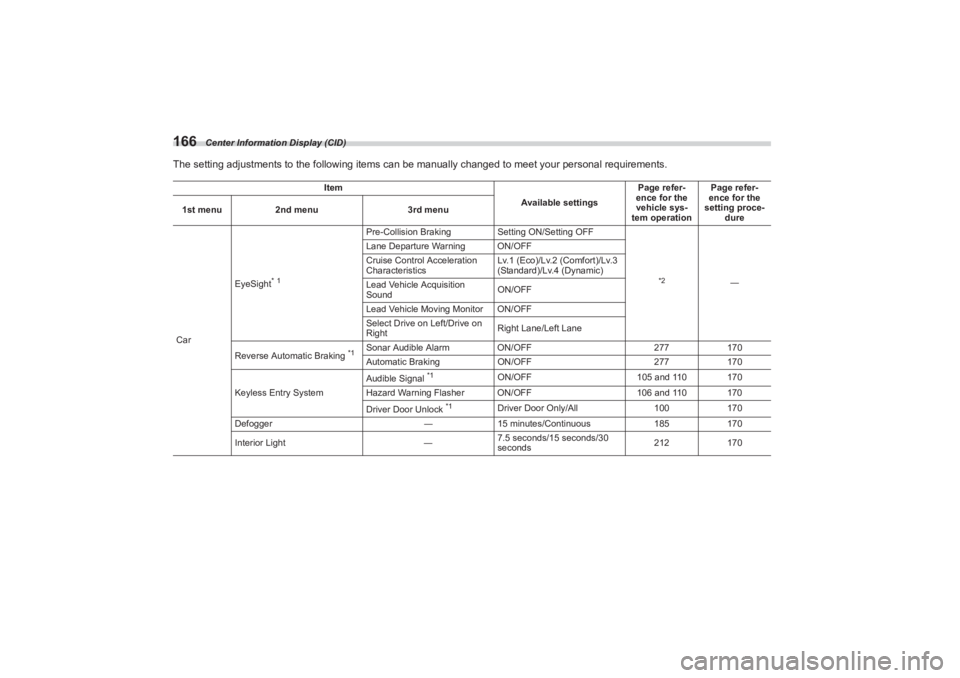
166The setting adjustments to the following items can be manually changed to meet your personal requirements.
Item
Available settingsPage refer-
ence for the
vehicle sys-
tem operation Page refer-
ence for the
setting proce- dure
1st menu
2nd menu 3rd menu
Car EyeSight
* 1
Pre-Collision Braking
Setting ON/Setting OFF
*2
―
Lane Departure Warning ON/OFF
Cruise Control Acceleration
Characteristics
Lv.1 (Eco)/Lv.2 (Comfort)/Lv.3
(Standard)/Lv.4 (Dynamic)
Lead Vehicle Acquisition
Sound ON/OFF
Lead Vehicle Moving Monitor ON/OFF
Select Drive on Left/Drive on
Right Right Lane/Left Lane
Reverse Automatic Braking
*1
Sonar Audible Alarm ON/OFF 277170
Automatic Braking ON/OFF 277170
Keyless Entry System Audible Signal
*1
ON/OFF
105 and 110 170
Hazard Warning Flasher ON/OFF 106 and 110 170
Driver Door Unlock
*1
Driver Door Only/All 100170
Defogger ―15 minutes/Continuous 185170
Interior Light ―7.5 seconds/15 seconds/30
seconds 212
170
BRZ_U.book 166 ページ 2022年3月29日 火曜日 午後3時59分
Page 178 of 432
Clock
172Maintenance Schedule setting:
The setting procedure is the same as
“Engine Oil” setting, but touch the “Mainte-
nance Schedule” item in step 2.NOTE Touch “Reset” to reset each setting.
Touch “Update” to revert to the
default value.
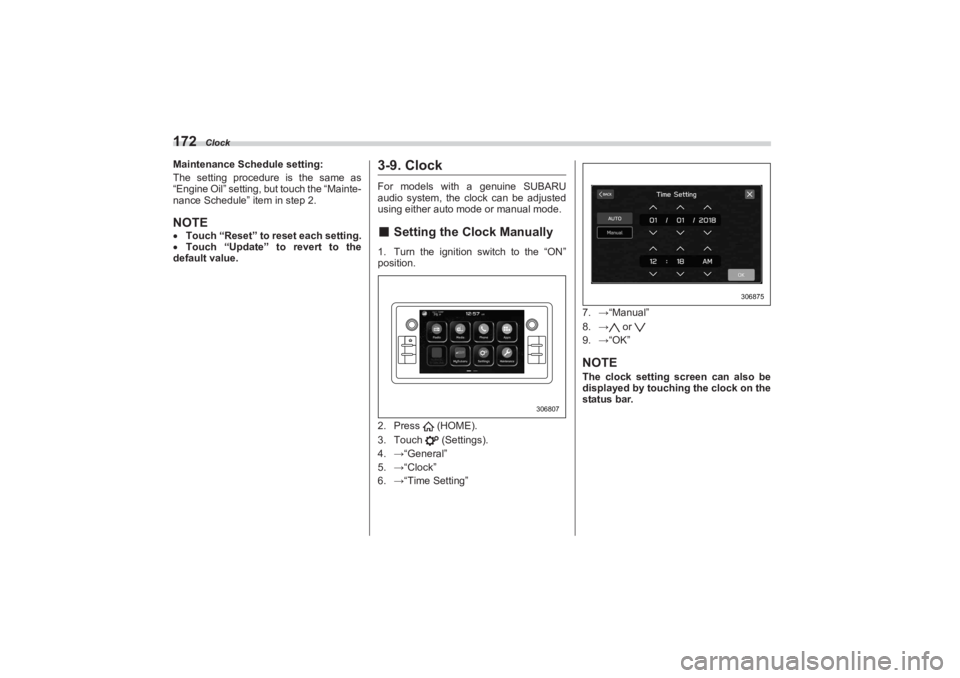
3-9. ClockFor models with a genuine SUBARU
audio system, the clock can be adjusted
using either auto mode or manual mode.■ Setting the Clock Manually1. Turn the ignition switch to the “ON”
position.
2. Press (HOME).
3. Touch (Settings).
4. →“General”
5. →“Clock”
6. →“Time Setting” 7.
→“Manual”
8. → or
9. →“OK”
NOTEThe clock setting screen can also be
displayed by touching the clock on the
status bar.
306807
306875
BRZ_U.book 172 ページ 2022年3月29日 火曜日 午後3時59分
Page 179 of 432
Clock
173
Instruments and Controls3
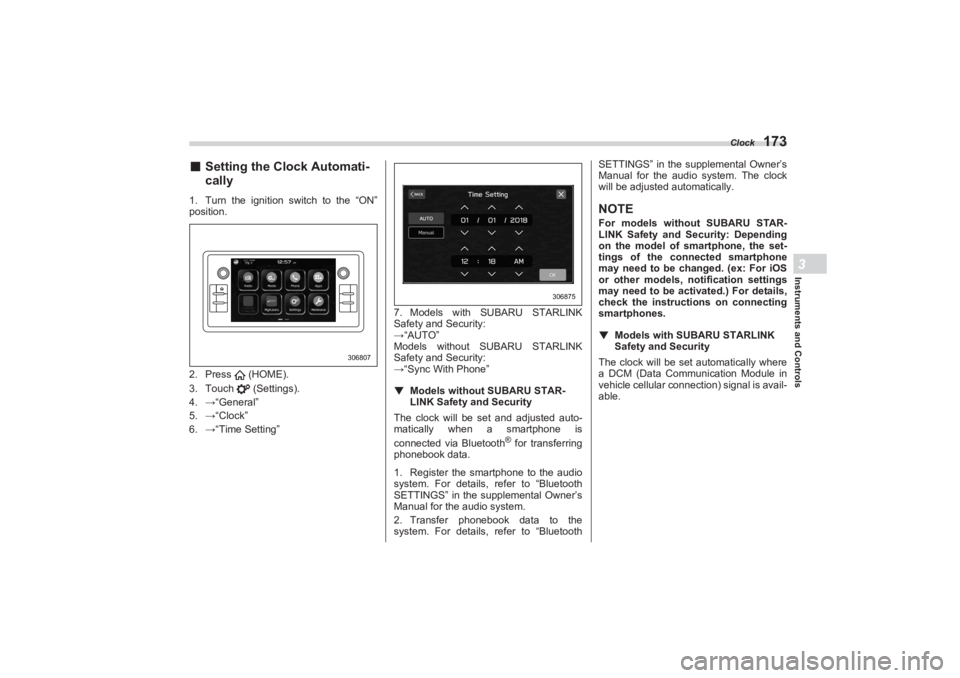
■Setting the Clock Automati-
cally1. Turn the ignition switch to the “ON”
position.
2. Press (HOME).
3. Touch (Settings).
4. →“General”
5. →“Clock”
6. →“Time Setting” 7. Models with SUBARU STARLINK
Safety and Security:
→ “AUTO”
Models without SUBARU STARLINK
Safety and Security:
→ “Sync With Phone”
▼ Models without SUBARU STAR -
LINK Safety and Security
The clock will be set and adjusted auto-
ma tically when a smartphone is
connected via Bluetooth
® for transferring
phonebook data.
1. Register the smartphone to the audio
system. For details, refer to “Bluetooth
SETTINGS” in the supplemental Owner’s
Manual for the audio system.
2. Transfer phonebook data to the
system. For details, refer to “Bluetooth SETTINGS” in the supplemental Owner’s
Manual for the audi o system. The clock
will be adjusted automatically.
NOTEFor models with out SUBARU STAR-
LINK Safety and Security: Depending
on the model of smartphone, the set-
tings of the connected smartphone
may need to be changed. (ex: For iOS
or other models, notification settings
may need to be activated.) For details,
check the instructions on connecting
smartphones.
▼ Models with SUBAR U STARLINK
Safety and SecurityThe clock will be set automatically where
a DCM (Data Communication Module in
vehicle cellular connection) signal is avail-
able.
306807
306875
BRZ_U.book 173 ページ 2022年3月29日 火曜日 午後3時59分
Page 181 of 432

Light Control Switch
175
Instruments and Controls3
– CONTINUED –
automatically be turned off after approxi-
mately 20 minutes.
If a door is opened or closed, the battery
saving function will temporarily be
canceled and the lights will automatically
be turned off after approximately 20
minutes.▼ Auto-on/off wiper-linked headlights
While the light control switch is in the
“AUTO” position, the headlights will auto-
matically turn on when the windshield
wipers operate several times. The head-
lights will automatica lly turn off approxi-
mately 1 minute after the wiper stops.
The ON/OFF setting of this function can
be changed by operating the combination
meter display (color TFT) or the center
information display. For details, refer to
"Settings Display" P157 or "Car
settings" P165. Also, the setting can be
changed by a SUBARU dealer. Consult
your SUBARU dealer for details.
▼ Welcome lighting function
The welcome lighting function turns on the
low beam headlight for smooth
approaching to or exiting from the vehicle
at night or in a dark place.
The function is activated while all of the
following conditions are met.
The light control swit ch is in the “AUTO”
position
It is dark enough to turn on the auto on/
off headlights
NOTEIf the engine is turn ed off after turning
off the light swit ch, the welcome
lighting function may not operate (for
Canada models).
▽ When approaching
While the welcome lighting function is acti-
vated, the low beam headlights will auto-
matically illuminate when unlocking the
doors by using the remote keyless entry
system.
The low beam headlights will remain illu-
minated for 30 seconds
*1 and then turn
off. However, if any of the following opera-
tions is done, the low beam headlights will
turn off.
The ignition switch is turned to the “ON”
position.
The doors are locked.
The light control switch is turned to a
position other than “AUTO”. ▽
When exiting
While the welcome lighting function is acti-
vated, the low beam headlights will remain
illuminated even when the push-button
ignition switch is turned to the “OFF”
status.
The low beam headlights will turn off
under any of the following conditions.
30 seconds have passed since the
door is opened and closed.
*1
The light control switch is turned to a
position other than “AUTO”.
The locking procedure is performed
twice. When performing the unlocking
procedure after performing the locking
procedure, perform the locking procedure
twice again.*1: The setting for the period of time in which
the low beam headlights remain on by the
welcome lighting function can be changed
by a SUBARU dealer. Contact your
SUBARU dealer for details. Also, you can
change the setting by operating the combi-
nation meter display (color TFT) or the
center information display. For details, refer
to "Settings Display" P157 or "Car
settings" P165.
BRZ_U.book 175 ページ 2022年3月29日 火曜日 午後3時59分
Page 189 of 432
Wiper and Washer
183
Instruments and Controls3
– CONTINUED –
3-14. Wiper and Washer
NOTEThe windshield wiper motor is
protected against overloads by a
circuit breaker. If the motor operates
continuously under an unusually
heavy load, the circuit breaker may trip
to stop the motor temporarily. If this
happens, park your vehicle in a safe
location, turn off th e wiper switch, and
wait for approximately 10 minutes. The
circuit breaker will reset itself, and the
wipers will again operate normally.
Clean your blade rubbers and
window glass periodically with a
washer solution to prevent streaking,
WARNING
In freezing weather, do not use the
windshield washer until the wind-
shield is sufficiently warmed by the
defroster.Otherwise the washer fluid can
freeze on the windshield, blocking
your view.
CAUTION
Do not operate the washer contin-
uously for more than 10 seconds,
or when the washer fluid tank is
empty. This may cause over-
heating of the washer motor.
Check the washer fluid level
frequently, such as at fuel stops. Do not operate the wipers when
the windshield is dry. This may
scratch the glass, damage the
blade rubbers and cause the
wiper motor to bu rn out. Before
operating the wiper on a dry wind-
shield always use the windshield
washer.
In freezing weather, be sure that
the blade rubbers are not frozen
to the windshield before
switching on the wipers.
Attempting to op erate the wiper
with the blade rubbers frozen to
the window glass could cause not
only the blade rubbers to be
damaged but also might cause
the wiper motor to fail. If the blade
rubbers are frozen to the window
glass, be sure to operate the
defroster before turning on the
wiper. If the wipers stop during opera-
tion because of ice or some other
obstruction on the window, this
might cause the wiper motor to
fail even if the wiper switch is
turned off. If this occurs,
promptly stop the vehicle in a
safe location, turn the ignition
switch to the “OFF” position and
clean the window glass to allow
proper wiper operation.
Use clean water if windshield
washer fluid is unavailable. In
areas where water freezes in
winter, use SUBARU Windshield
Washer Fluid or the equivalent.
Refer to "Windshield Washer
Fluid" P366.
Also, when driving the vehicle
when there are freezing tempera-
tures, use non-freezing type
wiper blades. Do not clean the wiper blades
with gasoline or a solvent, such
as paint thinner or benzine. This
will cause deterioration of the
wiper blades.
BRZ_U.book 183 ページ 2022年3月29日 火曜日 午後3時59分
Page 193 of 432
Mirrors
187
Instruments and Controls3
– CONTINUED –
dimming feature will default to on with
each ignition cycle.▼ To Operate the Compass Feature
1. To turn the compass feature on/off,
press and hold the “ ” switch for more
than 3 seconds or until the display turns
on/off. The compass feature will default to
on with each ignition cycle.
2. If the display reads “C”, slowly drive
the vehicle in circles until compass is cali-
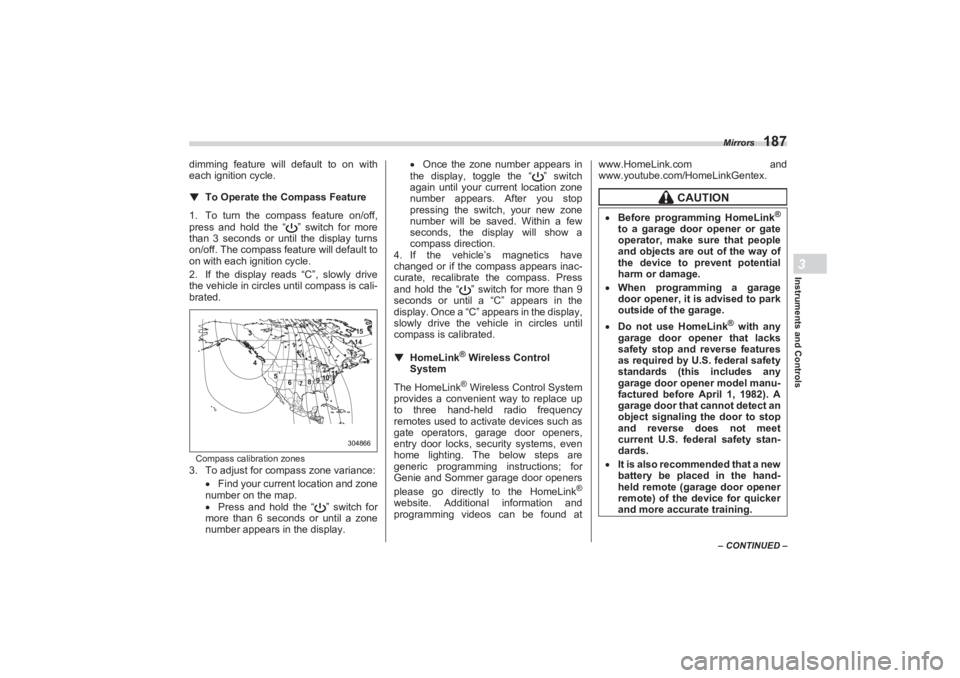
brated.Compass calibration zones3. To adjust for compass zone variance:
Find your current location and zone
number on the map.
Press and hold the “ ” switch for
more than 6 seconds or until a zone
number appears in the display.
Once the zone number appears in
the display, toggle the “ ” switch
again until your current location zone
number appears. After you stop
pressing the switch, your new zone
number will be saved. Within a few
seconds, the disp lay will show a
compass direction.
4. If the vehicle’s magnetics have
changed or if the compass appears inac-
curate, recalibrate the compass. Press
and hold the “ ” switch for more than 9
seconds or until a “C” appears in the
display. Once a “C” a ppears in the display,
slowly drive the vehicle in circles until
compass is calibrated.
▼ HomeLink
® Wireless Control
System
The HomeLink
® Wireless Control System
provides a convenient way to replace up
to three hand-held radio frequency
remotes used to acti vate devices such as
gate operators, garage door openers,
entry door locks, se curity systems, even
home lighting. The below steps are
generic programming instructions; for
Genie and Sommer garage door openers
please go directly to the HomeLink
®
website. Additional information and
programming videos can be found at www.HomeLink.com and
www.youtube.com/HomeLinkGentex.
304866 15
14
13
12
11
10
9
8
7
6
5
4
3
CAUTION
Before programming HomeLink
®
to a garage door opener or gate
operator, make sure that people
and objects are out of the way of
the device to prevent potential
harm or damage.
When programming a garage
door opener, it is advised to park
outside of the garage. Do not use HomeLink
® with any
garage door opener that lacks
safety stop and reverse features
as required by U.S. federal safety
standards (this includes any
garage door opener model manu-
factured before April 1, 1982). A
garage door that cannot detect an
object signaling the door to stop
and reverse does not meet
current U.S. federal safety stan-
dards.
It is also recommended that a new
battery be placed in the hand-
held remote (garage door opener
remote) of the device for quicker
and more accurate training.
BRZ_U.book 187 ページ 2022年3月29日 火曜日 午後3時59分