2023 SUBARU BRZ lock
[x] Cancel search: lockPage 197 of 432
Mirrors
191
Instruments and Controls3
– CONTINUED –
Proceed with “Programming a New
HomeLink
® button” step 4 to complete.
▽ Using HomeLink
®
To operate, simply press and release the
programmed HomeLink
® button. Activa-
tion will now occur for the trained device
(i.e. garage door opener, gate operator,
security system, entry door lock, home/
office lighting, etc.). For convenience, the
hand-held remote of the device may also
be used at any time.
▽Erasing HomeLink® buttons
To erase programming from the three
buttons (individual buttons cannot be
erased but can be “reprogrammed” as
outlined below), follow the step noted:
Press and hold the two outer HomeLink
®
buttons for at least 10 seconds. The LED
indicator will change from continuously lit
to rapidly flashing. Release both buttons.
Do not hold for longer than 20 seconds.
HomeLink
® is now ready to be
programmed at any time beginning with
“Programming a New HomeLink
® button”-
step 1. ▽
Reprogramming a Single
HomeLink
® button
To program a previously trained button,
follow these steps:
1. Press and hold the desired
HomeLink
® button. DO NOT release the
button.
2. The indicator light will begin to slowly
flash orange after 20 seconds. The
HomeLink® button can be released at this
point. Proceed with “Programming a New
HomeLink® button”- step 3.
3. If you do not complete the program-
ming of a new device to the button, it will
revert to the previously stored program-
ming.
▽Garage Door Two-Way Commu -
nication
HomeLink® has the capability of commu-
nicating with your garage door opener.
HomeLink® can receive and display
“closing” or “opening” status messages
from compatible garage door opener
systems. At any time, HomeLink
® can
also recall and display the last recorded
status communicated by the garage door
opener to indicate your garage door being
“closed” or “opened”. HomeLink
® has the capability of receiving
this communication from the garage door
opener at a range up to 820 feet (250 m).
Range may be reduced by obstacles such
as houses or trees. You may have to slow
your vehicle speed to successfully receive
the garage door opener communication.
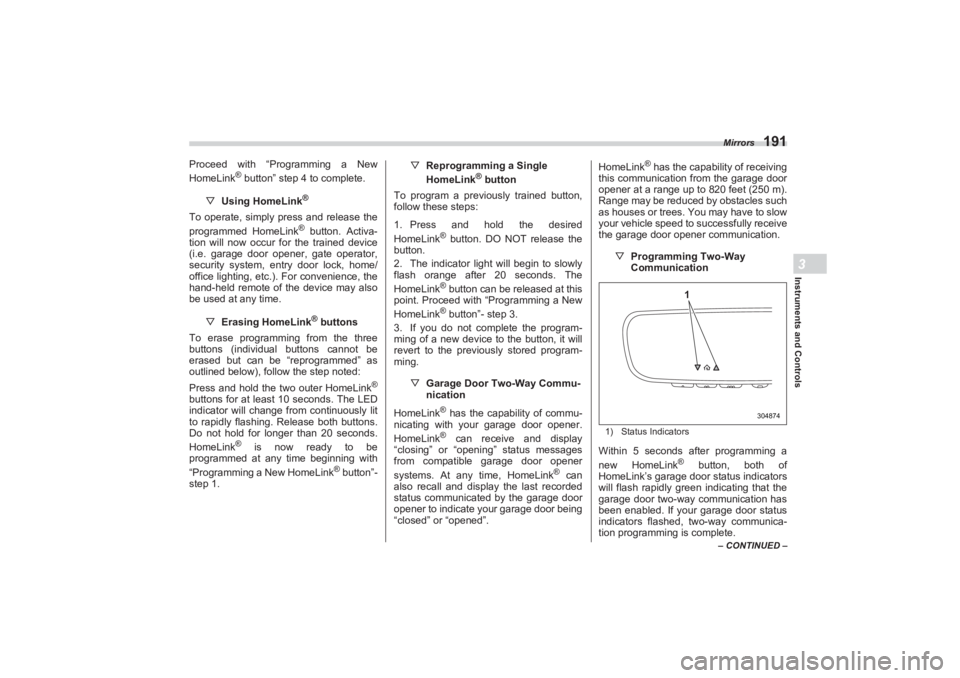
▽Programming Two-Way
Communication
1) Status IndicatorsWithin 5 seconds after programming a
new HomeLink
® button, both of
HomeLink’s garage door status indicators
will flash rapidly green indicating that the
garage door two-way communication has
been enabled. If your garage door status
indicators flashed, two-way communica-
tion programming is complete.
304874
1
BRZ_U.book 191 ページ 2022年3月29日 火曜日 午後3時59分
Page 201 of 432
Tilt/Telescopic Steering Wheel
195
Instruments and Controls3
3-17. Tilt/Telescopic SteeringWheel
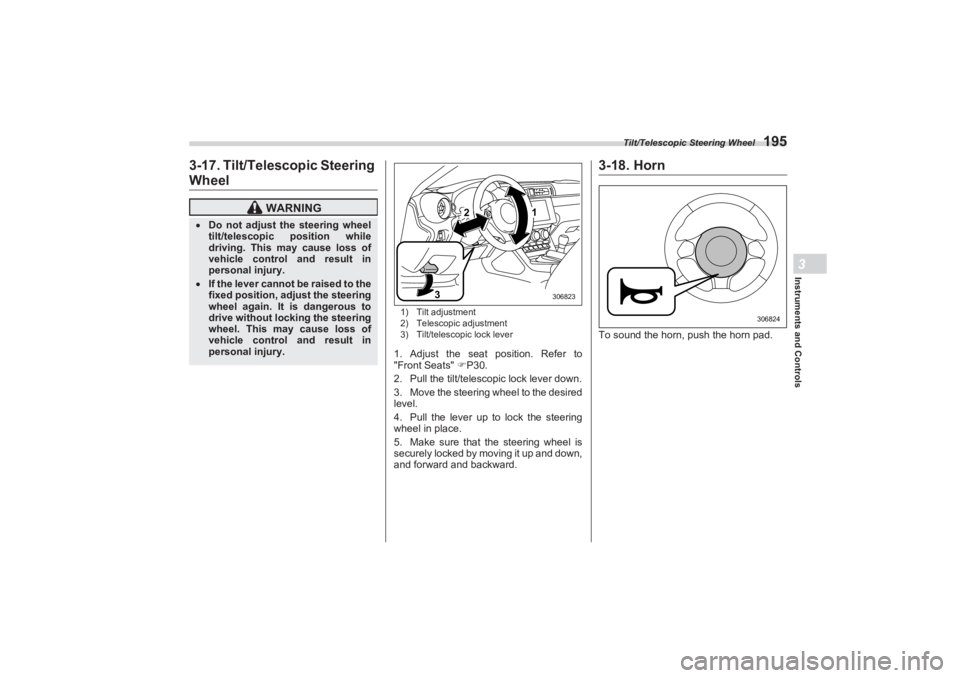
1) Tilt adjustment
2) Telescopic adjustment
3) Tilt/telescopic lock lever1. Adjust the seat position. Refer to
"Front Seats" P30.
2. Pull the tilt/telescopic lock lever down.
3. Move the steering wheel to the desired
level.
4. Pull the lever up to lock the steering
wheel in place.
5. Make sure that the steering wheel is
securely locked by moving it up and down,
and forward and backward.
3-18. HornTo sound the horn, push the horn pad.
WARNING
Do not adjust the steering wheel
tilt/telescopic position while
driving. This may cause loss of
vehicle control and result in
personal injury. If the lever cannot be raised to the
fixed position, adjust the steering
wheel again. It is dangerous to
drive without locking the steering
wheel. This may cause loss of
vehicle control and result in
personal injury.
2
3
1
306823
306824
BRZ_U.book 195 ページ 2022年3月29日 火曜日 午後3時59分
Page 212 of 432
Air Filtration System
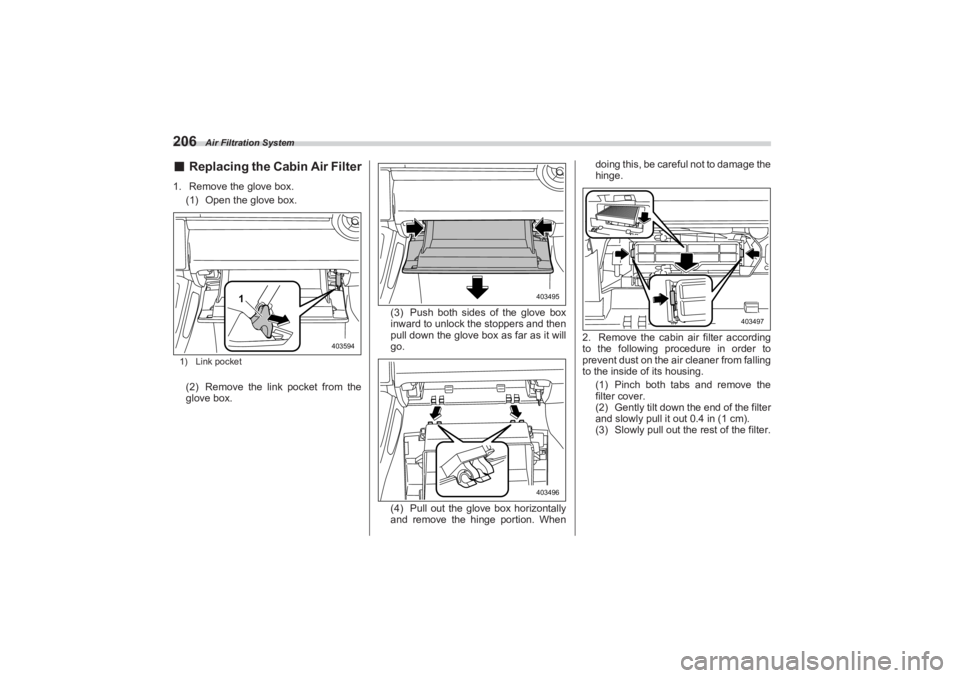
206■Replacing the Cabin Air Filter1. Remove the glove box.
(1) Open the glove box.1) Link pocket(2) Remove the link pocket from the
glove box. (3) Push both sides of the glove box
inward to unlock the stoppers and then
pull down the glove box as far as it will
go.
(4) Pull out the glove box horizontally
and remove the hinge portion. When doing this, be careful not to damage the
hinge.
2. Remove the cabin air filter according
to the following procedure in order to
prevent dust on the air cleaner from falling
to the inside of its housing.
(1) Pinch both tabs and remove the
filter cover.
(2) Gently tilt down the end of the filter
and slowly pull it out 0.4 in (1 cm).
(3) Slowly pull out the rest of the filter.
1
403594
403495403496
403497
BRZ_U.book 206 ページ 2022年3月29日 火曜日 午後3時59分
Page 218 of 432
Interior Light
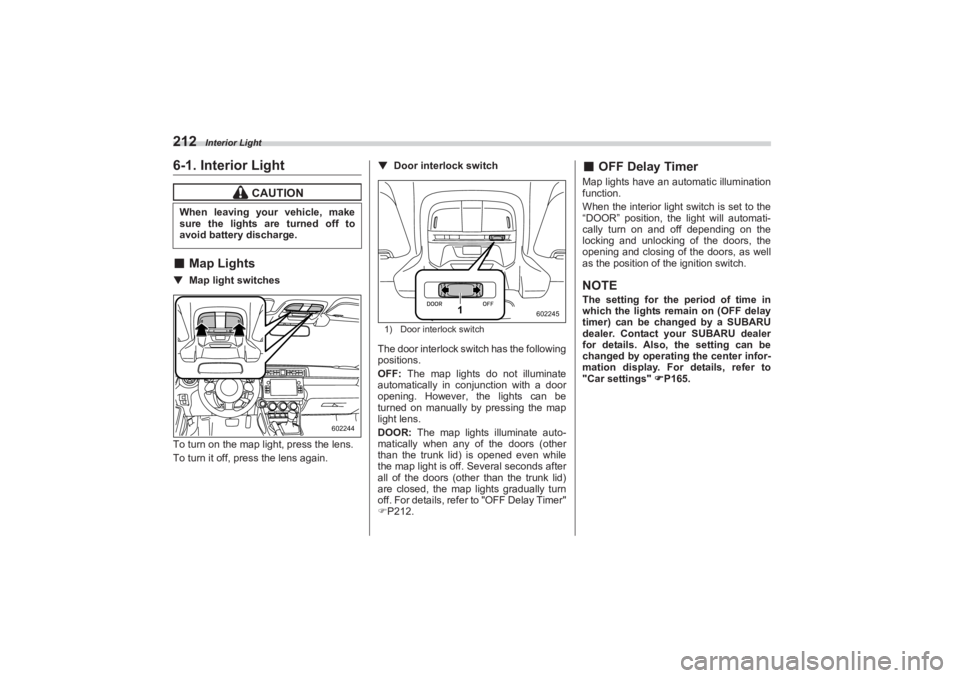
2126-1. Interior Light■Map Lights▼ Map light switches
To turn on the map light, press the lens.
To turn it off, press the lens again. ▼
Door interlock switch
1) Door interlock switchThe door interlock switch has the following
positions.
OFF: The map lights do not illuminate
automatically in conjunction with a door
opening. However, the lights can be
turned on manually by pressing the map
light lens.
DOOR: The map lights illuminate auto-
matically when any of the doors (other
than the trunk lid) is opened even while
the map light is off. Several seconds after
all of the doors (other than the trunk lid)
are closed, the map lights gradually turn
off. For details, refer to "OFF Delay Timer"
P212.
■ OFF Delay TimerMap lights have an automatic illumination
function.
When the interior light switch is set to the
“DOOR” position, the light will automati-
cally turn on and off depending on the
locking and unlocking of the doors, the
opening and closing of the doors, as well
as the position of the ignition switch.NOTEThe setting for the period of time in
which the lights remain on (OFF delay
timer) can be changed by a SUBARU
dealer. Contact your SUBARU dealer
for details. Also, the setting can be
changed by operating the center infor-
mation display. For details, refer to
"Car settings" P165.
CAUTION
When leaving your vehicle, make
sure the lights are turned off to
avoid battery discharge.
602244
1
602245
BRZ_U.book 212 ページ 2022年3月29日 火曜日 午後3時59分
Page 219 of 432
Sun Visors
213
Interior Equipment6
– CONTINUED –
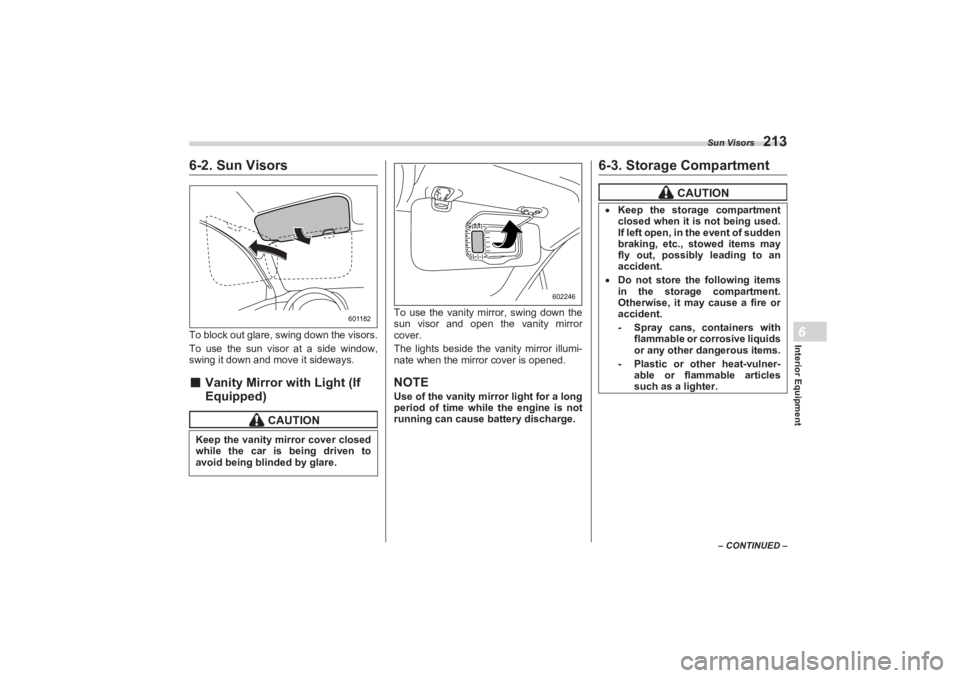
6-2. Sun VisorsTo block out glare, swing down the visors.
To use the sun visor at a side window,
swing it down and move it sideways.■ Vanity Mirror with Light (If
Equipped)
To use the vanity mirror, swing down the
sun visor and open the vanity mirror
cover.
The lights beside the vanity mirror illumi-
nate when the mirror cover is opened.NOTEUse of the vanity mirror light for a long
period of time while the engine is not
running can cause battery discharge.
6-3. Storage Compartment
CAUTION
Keep the vanity mirror cover closed
while the car is being driven to
avoid being blinded by glare.
601182
602246
CAUTION
Keep the storage compartment
closed when it is not being used.
If left open, in the event of sudden
braking, etc., stowed items may
fly out, possibly leading to an
accident. Do not store the following items
in the storage compartment.
Otherwise, it may cause a fire or
accident.
- Spray cans, containers with
flammable or corrosive liquids
or any other dangerous items.- Plastic or other heat-vulner- able or flammable articles
such as a lighter.
BRZ_U.book 213 ページ 2022年3月29日 火曜日 午後3時59分
Page 227 of 432

Starting and Operating7
Starting and Operating
7-1. Fuel.......................................................................223
Fuel Requirements .......................................................223
Fuel Filler Lid and Cap .................................................224
7-2. State Emission Testing (U.S. Only) ...................227
7-3. Preparing to Drive ...............................................228
7-4. Starting and Stopping Engine ...........................229
Safety Precautions ............................................ ...........229
Operating Range for Push-Button Start System .......229
General Precautions When St arting Engine ..............229
Starting Engine .............................................................230
Stopping Engine ...........................................................232
When Access Key Fob Does Not Operate
Properly.......................................................................232
Steering Lock ................................................................232
7-5. Manual Transmission .........................................233
Shifting Speeds ............................................................234
Driving Tips ...................................................................235
7-6. Automatic Transmission ....................................235
Select Lever ..... .......................................... ...................236
Adaptive Control...........................................................237
Shift Lock Function ......................................................238
Selection of Manual Mode ...........................................239
Driving Tips ...................................................................240
7-7. Driving Mode Select Switch (If Equipped) ........241
Normal Mode .................................................................241
Sport Mode ....................................................................241
Snow Mode....................................................................241
Driving Mode Select Switch.........................................241
7-8. Active Sound Control .........................................242
7-9. Power Steering ....................................................242
7-10. Braking...............................................................243
Braking Tips ..................................................................243 Brake System ............................................................... 244
Disc Brake Pad Wear Warning Indicators ................. 245
7-11. ABS (Anti-Lock Brake System) ........................245
ABS Self-Check............................................................ 245
ABS Warning Light ...................................................... 245
7-12. Electronic Brake Force Distribution (EBD)
System ...............................................................246
EBD System Malfunctions .......................................... 246
7-13. Vehicle Stability Control (VSC)/TRAC
System ...............................................................247
Vehicle Stability Control (VSC) System ..................... 247
TRAC System ............................................................... 247
Vehicle Stability Control (VSC) System Monitor....... 248
Vehicle Stability Control (VSC) OFF Switch .............. 248
7-14. TRACK Mode .....................................................250
TRACK Mode ................................................................ 250
Selecting TRAC Mode and Ve hicle Stability Control
(VSC) Mode ............................................................... 251
7-15. Tire Pressure Monitoring System (TPMS)
(If Equipped) ......................................................251
Certification for the Transmitter ................................. 253
Certification for the Receiver...................................... 253
TPMS Screen ................................................................ 254
Initializing the Tire Pressure Monitoring System ..... 254
How to Initialize the Tire Pressure Monitoring
System (If Equipped) ................................................. 254
If You Press the Tire Pressure Monitoring Reset
Switch Accidentally................................................... 254
Initialization Procedure ............................................... 254
When Initialization of the Tire Pressure Monitoring System has Failed ..................................................... 255
Registering ID Codes .................................................. 255
BRZ_U.book 221 ページ 2022年3月29日 火曜日 午後3時59分
Page 230 of 432
Fuel
224need to add any fuel system cleaning
agents to your fuel tank.
Many gasolines are now blended with
materials called oxygenates. Use of these
fuels can also help keep the air cleaner.
Oxygenated blend fuels, such as ethanol
(ethyl or grain alcohol) may be used in
your vehicle, but should contain no more
than 15% ethanol for the proper operation
of your SUBARU.
Do not use any gasoline that contains
more than 15% ethanol, including from
any pump labeled E30, E50 or E85 (which
are only some examples of fuel containing
more than 15% ethanol).
In addition, some gasoline suppliers are
now producing reformulated gasolines,
which are designed to reduce vehicle
emissions. SUBARU approves the use of
reformulated gasoline.
If you are not sure what the fuel contains,
you should ask your service station oper-
ators if their gasolines contain detergents
and oxygenates and if they have been
reformulated to reduce vehicle emissions.
As additional guidance, only use fuels
suited for your vehicle as explained in the
following description.
Fuel should be unleaded and have an
octane rating no lower than that specified
in this manual.
Methanol (methyl or wood alcohol) is
sometimes mixed with unleaded gasoline.
Methanol can be used in your vehicle
ONLY if it does not exceed 5% of the fuel
mixture AND if it is accompanied by suffi-
cient quantities of the proper cosolvent
and corrosion inhibitors required to
prevent damage to the fuel system. Do not
use fuel containing methanol EXCEPT
under these conditions.
If undesirable driveability problems are
experienced and you suspect they may be
fuel related, try a different brand of gaso-
line before seeking service at your
SUBARU dealer.
Fuel system damage or driveability
problems which result from the use of
improper fuel are not covered under the
SUBARU Limited Warranty.
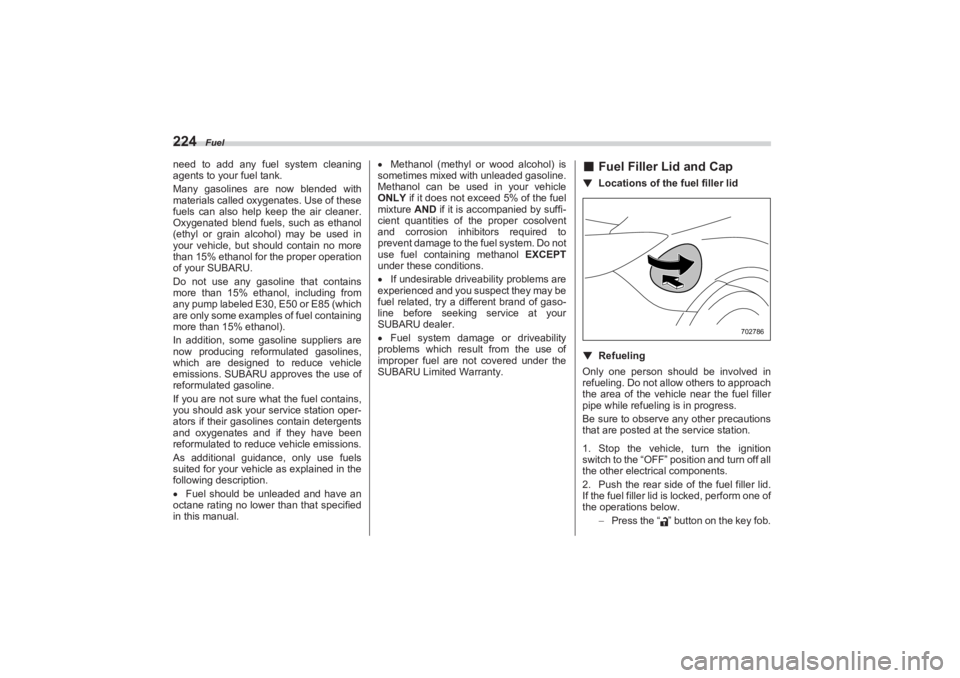
■ Fuel Filler Lid and Cap▼ Locations of the fuel filler lid▼RefuelingOnly one person should be involved in
refueling. Do not allow others to approach
the area of the vehicl e near the fuel filler
pipe while refueling is in progress.
Be sure to observe any other precautions
that are posted at the service station.
1. Stop the vehicle, turn the ignition
switch to the “OFF” position and turn off all
the other electrical components.
2. Push the rear side of the fuel filler lid.
If the fuel filler lid is locked, perform one of
the operations below.
Press the “ ” button on the key fob.
702786
BRZ_U.book 224 ページ 2022年3月29日 火曜日 午後3時59分
Page 231 of 432
Fuel
225
Starting and Operating7
– CONTINUED –
Press the unlock side of the power
door locking switch.
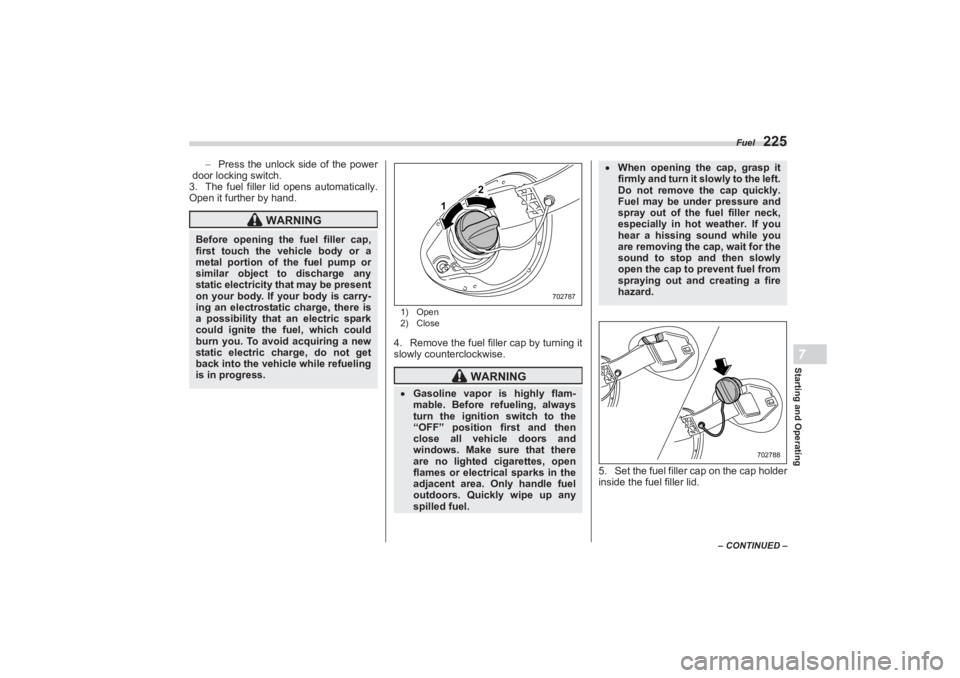
3. The fuel filler lid opens automatically.
Open it further by hand.
1) Open
2) Close4. Remove the fuel filler cap by turning it
slowly counterclockwise.
5. Set the fuel filler cap on the cap holder
inside the fuel filler lid.
WARNING
Before opening the fuel filler cap,
first touch the veh icle body or a
metal portion of the fuel pump or
similar object to discharge any
static electricity that may be present
on your body. If your body is carry-
ing an electrostatic charge, there is
a possibility that an electric spark
could ignite the fuel, which could
burn you. To avoid acquiring a new
static electric charge, do not get
back into the vehicle while refueling
is in progress.
WARNING
Gasoline vapor is highly flam-
mable. Before refueling, always
turn the ignition switch to the
“OFF” position first and then
close all vehicle doors and
windows. Make sure that there
are no lighted cigarettes, open
flames or electrical sparks in the
adjacent area. Only handle fuel
outdoors. Quickly wipe up any
spilled fuel.
1
2
702787
When opening the cap, grasp it
firmly and turn it slowly to the left.
Do not remove the cap quickly.
Fuel may be under pressure and
spray out of the fuel filler neck,
especially in hot weather. If you
hear a hissing sound while you
are removing the cap, wait for the
sound to stop and then slowly
open the cap to prevent fuel from
spraying out and creating a fire
hazard.
702788
BRZ_U.book 225 ページ 2022年3月29日 火曜日 午後3時59分