2023 PEUGEOT LANDTREK tow
[x] Cancel search: towPage 4 of 164
2
Contents
■
Overview
■
Eco-driving
1Dashboard instrumentsInstrument panels 8
Warning and indicator lamps 9
Total distance recorder 16
Lighting dimmer 16
Trip computer 16
Monochrome screen 17
Touch screen 18
2AccessElectronic key with remote control function
and built-in key 20
Keyless Entry and Start 22
Central locking 23
Back-up procedures 24
Doors 25
Tailgate 26
Alarm 27
Electric windows 28
3Ease of use and comfortFront seats 30
2-seat front bench seat 31
Steering wheel adjustment 32
Mirrors 33
Rear bench seat 34
Heating and Ventilation 36
Heating 37
Manual air conditioning 37
Dual-zone automatic air conditioning 38
Front demisting/defrosting 40
Rear screen demisting/defrosting 40
Front fittings 40
Courtesy lamps 42
Rear fittings 43
Tipper body fittings 44
4Lighting and visibilityExterior lighting control stalk 47
Cornering lighting 48
Direction indicators 49
Headlamp beam height adjustment 49
Automatic illumination of headlamps 49
Guide-me-home and welcome lighting 50
Wiper control stalk 50
Changing a wiper blade 51
Automatic wipers 52
5SafetyGeneral safety recommendations 53
Hazard warning lamps 53
Horn 54
Electronic stability control (ESC) 54
Hill Assist Descent Control 56
Seat belts 57
Airbags 59
Child seats 62
Deactivating the front passenger airbag 63
ISOFIX child seats 64
Child lock 65
6DrivingDriving recommendations 66
Starting / Switching off the engine with the key 68
Starting/Switching off the engine
with Keyless Entry and Start
70
Manual parking brake 72
Locking the rear differential 72
4-wheel drive transmission selector 73
6-speed manual gearbox 74
6-speed automatic gearbox 75
Driving mode 77
Hill start assist 77
Gear shift indicator 78
Tyre under-inflation detection 78
Driving and manoeuvring aids -
General recommendations
80
Speed limiter 81
Overspeed alert at 75 mph (120
km/h) 82
Cruise control - Specific recommendations 82
Cruise control 82
Lane departure warning 84
Parking sensors 86
Reversing camera 87
"Off-Road" camera 88
360° camera 89
7Practical informationRecommended fuel 94
Refuelling 94
Towing device 95
Snow chains 95
Roof bars 96
Bonnet 96
Engine compartment 97
Checking levels 98 CarM an uals 2 .c o m
Page 5 of 164
3
Contents
Checks 100
AdBlue® (BlueHDi) 103
Maintenance 105
Free-wheeling 111
Advice on care and maintenance 111
8In the event of a breakdownWarning triangle 11 4
Fire extinguisher 11 4
Running out of fuel (Diesel) 11 5
Tool kit 11 5
Spare wheel 11 6
Changing a bulb 120
Fuses 124
12
V battery 124
Towing the vehicle 128
9Technical dataEngine technical data and towed loads 131
Petrol engines 132
Diesel engines 133
Dimensions 135
Identification markings 135
10Bluetooth® audio systemMenus 137
Steering mounted controls 138
Radio 138
Media 139
Telephone 139
11Peugeot Connect 10" TouchscreenFirst steps 141
Steering mounted controls 141
Menus 142
Navigation 143
Radio 143
Music player 143
Telephone 144
Applications 145
Settings 146
12Vehicle data recording and privacy
■
Alphabetical index CarM an uals 2 .c o m
Page 23 of 164
21
Access
2► Press it again to unlock the other doors.
Complete or selective unlocking, and alarm
deactivation (depending on version), is confirmed
by the flashing of the direction indicators.
Depending on version, the door mirrors unfold.
Opening the windows
Depending on version, holding the
unlocking button pressed for more than 3
seconds opens the windows.
The windows stop when the button is released.
With the key
Driver's door
► T urn the key in the driver's door lock towards
the front of the vehicle to unlock it.
If the vehicle has an alarm, it will not be
deactivated. Opening a door will trigger the
alarm, which can be stopped by pressing the
remote control unlocking button.
Tailgate (depending on version)
►
T
urn the dedicated key in the tailgate lock to
the left to unlock.
Locking the vehicle
With the remote control
► Press this button to lock the vehicle.
Locking and alarm activation is confirmed by the
lighting of the direction indicators.
Depending on version, the door mirrors fold.
An improperly closed door prevents the vehicle from locking.
If the vehicle is unlocked but the doors
are not subsequently opened, the vehicle
will automatically lock itself again after
approximately 30
seconds.
The vehicle can be locked with the bonnet
open or released.
Closing the windows
Holding the locking button pressed for
more than 3 seconds closes the windows.
When closing windows, ensure that no
person or object could prevent their
correct closure.
With the key
Driver's door
► T urn the key in the driver's door lock towards
the rear of the vehicle to lock it.
Check that the doors are properly closed.
Tailgate (depending on version)
►
T
urn the dedicated key in the tailgate lock to
the right to lock it.
Locating the vehicle
Helps you to locate your vehicle from a distance,
with the vehicle locked:
– The direction indicators flash for approximately
10 seconds.
–
The sidelamps and dipped beam headlamps
come on for 30 seconds.
► Press this button.
Remote audible signal
Used to locate the vehicle when it is not visible.
Also used to dissuade anyone who wants to
enter the vehicle or damage it.
► Press this button twice consecutively
to activate the horn twice.
Advice
Remote control
The remote control is a sensitive, high-
frequency device; avoid handling it in your
pocket, due to the risk of unintentionally
unlocking the vehicle.
Avoid pressing the remote control buttons
while out of range of the vehicle, due to
the risk of rendering the remote control
inoperative. It would then be necessary to
reset it.
The remote control does not work
when the
key is in the ignition switch, even when the
ignition is switched off. CarM an uals 2 .c o m
Page 26 of 164
24
Access
Back-up procedures
Lost keys, remote control,
electronic key
Go to a PEUGEOT dealer with the vehicle's
registration certificate, your personal
identification documents and if possible, the label
bearing the key code.
The PEUGEOT dealer will be able to retrieve the
key code and the transponder code, enabling a
new key to be ordered.
Complete unlocking/locking
of the vehicle with the key
Use this procedure in the following situations:
– Remote control battery discharged.
–
Remote control malfunction.
–
V
ehicle battery discharged.
–
V
ehicle in an area subject to strong
electromagnetic interference.
In the first case, change the remote control
battery.
In the second case, reinitialise
the remote
control.
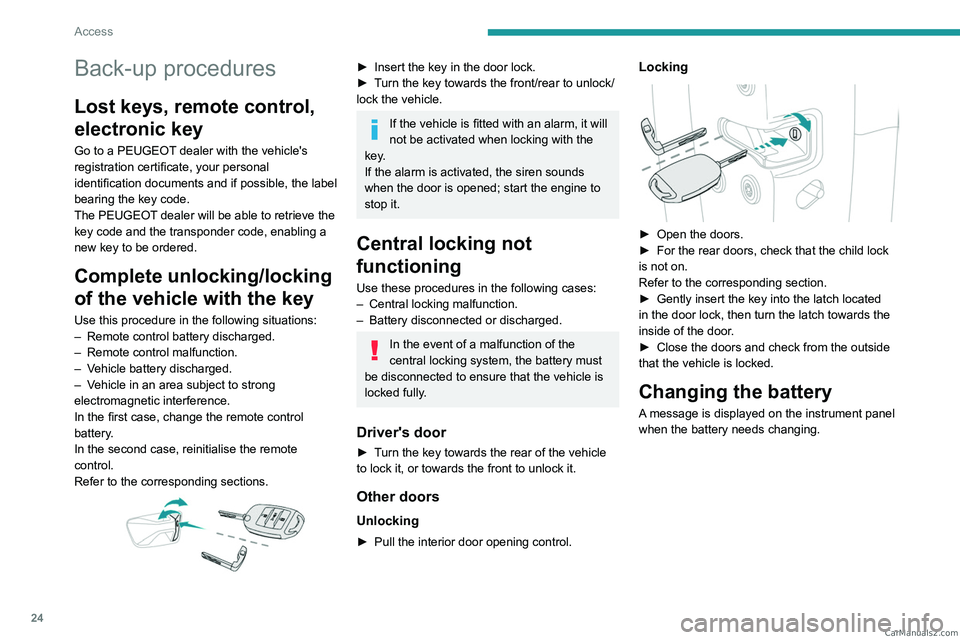
Refer to the corresponding sections.
► Insert the key in the door lock.
► T urn the key towards the front/rear to unlock/
lock the vehicle.
If the vehicle is fitted with an alarm, it will
not be activated when locking with the
key.
If the alarm is activated, the siren sounds
when the door is opened; start the engine to
stop it.
Central locking not
functioning
Use these procedures in the following cases:
– Central locking malfunction.
–
Battery disconnected or discharged.
In the event of a malfunction of the
central locking system, the battery must
be disconnected to ensure that the vehicle is
locked fully.
Driver's door
► Turn the key towards the rear of the vehicle
to lock it, or towards the front to unlock it.
Other doors
Unlocking
► Pull the interior door opening control.
Locking
► Open the doors.
► For the rear doors, check that the child lock
is not on.
Refer to the corresponding section.
►
Gently insert the key into the latch located
in the door lock, then turn the latch towards the
inside of the door
.
►
Close the doors and check from the outside
that the vehicle is locked.
Changing the battery
A message is displayed on the instrument panel
when the battery needs changing. CarM an uals 2 .c o m
Page 32 of 164
30
Ease of use and comfort
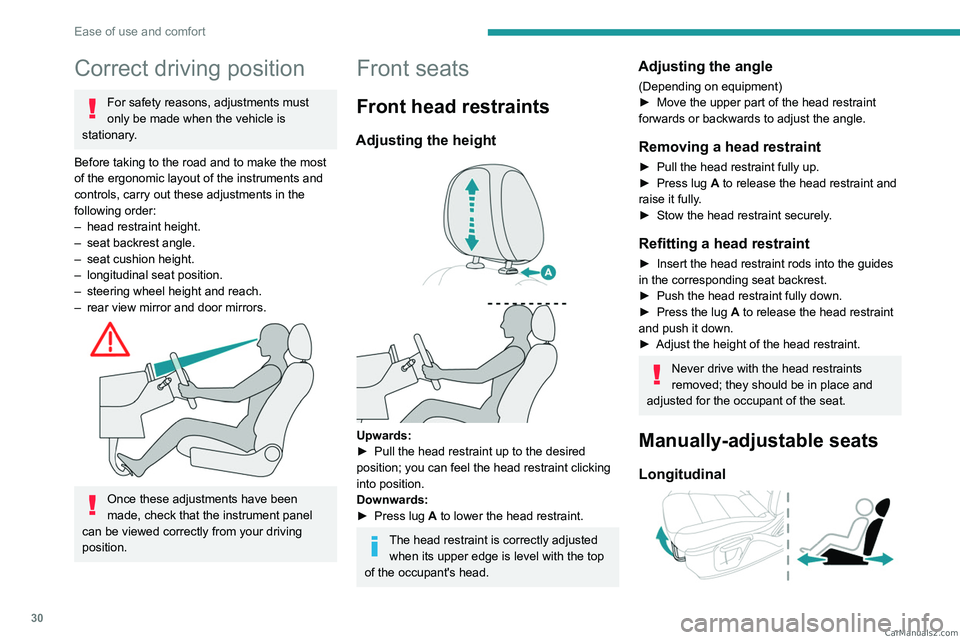
Correct driving position
For safety reasons, adjustments must
only be made when the vehicle is
stationary.
Before taking to the road and to make the most
of the ergonomic layout of the instruments and
controls, carry out these adjustments in the
following order:
–
head restraint height.
–
seat backrest angle.
–
seat cushion height.
–
longitudinal seat position.
–
steering wheel height and reach.
–
rear view mirror and door mirrors.
Once these adjustments have been
made, check that the instrument panel
can be viewed correctly from your driving
position.
Front seats
Front head restraints
Adjusting the height
Upwards:
► Pull the head restraint up to the desired
position; you can feel the head restraint clicking
into position.
Downwards:
►
Press lug
A to lower the head restraint.
The head restraint is correctly adjusted when its upper edge is level with the top
of the occupant's head.
Adjusting the angle
(Depending on equipment)
► Move the upper part of the head restraint
forwards or backwards to adjust the angle.
Removing a head restraint
► Pull the head restraint fully up.
► Press lug A to release the head restraint and
raise it fully.
►
Stow the head restraint securely
.
Refitting a head restraint
► Insert the head restraint rods into the guides
in the corresponding seat backrest.
►
Push the head restraint fully down.
►
Press the lug
A to release the head restraint
and push it down.
►
Adjust the height of the head restraint.
Never drive with the head restraints
removed; they should be in place and
adjusted for the occupant of the seat.
Manually-adjustable seats
Longitudinal
CarM an uals 2 .c o m
Page 34 of 164
32
Ease of use and comfort
Folding the backrests
The backrests must only be operated with the vehicle stationary.
While driving, having a passenger in the rear,
behind the front benchseat is prohibited if the
benchseat backrests are tilted.
When sharp deceleration occurs, objects
placed on the folded backrest can turn into
projectiles.
Preliminary operations:
►
Lower the head restraints.
►
Check that no person or object will interfere
with folding down the backrests (clothing,
luggage, etc.).
►
Check that the outer seat belt is properly
tensioned along the pillars, the central belt is
stowed and the tongues of the belts are correctly
in the stowed position.
Deactivation of the front passenger
airbag is recommended.
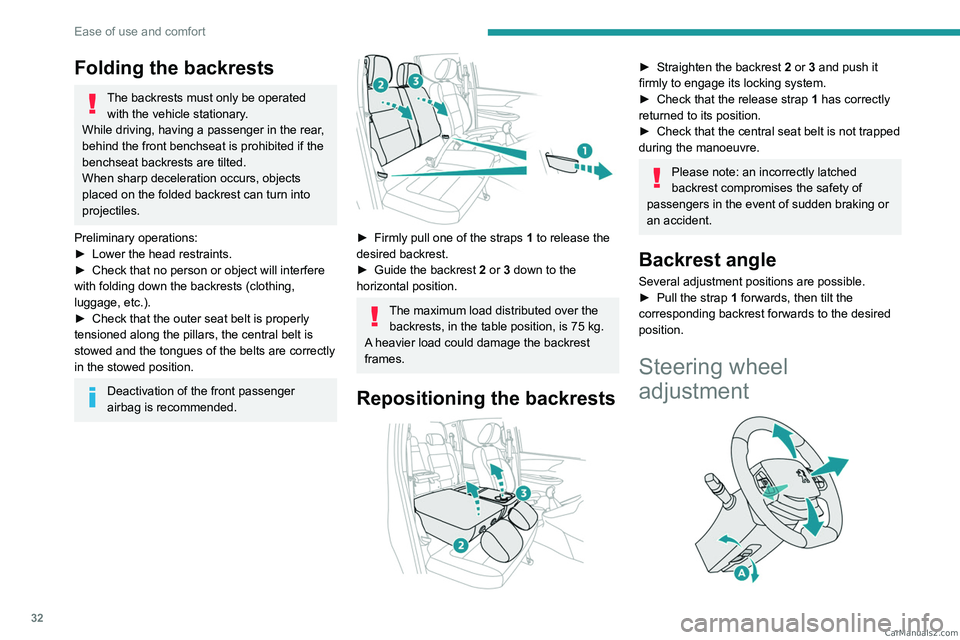
► Firmly pull one of the straps 1 to release the
desired backrest.
►
Guide the backrest
2 or 3 down to the
horizontal position.
The maximum load distributed over the backrests, in the table position, is 75 kg.
A heavier load could damage the backrest
frames.
Repositioning the backrests
► Straighten the backrest 2 or 3 and push it
firmly to engage its locking system.
►
Check that the release strap 1
has correctly
returned to its position.
►
Check that the central seat belt is not trapped
during the manoeuvre.
Please note: an incorrectly latched
backrest compromises the safety of
passengers in the event of sudden braking or
an accident.
Backrest angle
Several adjustment positions are possible.
► Pull the strap 1 forwards, then tilt the
corresponding backrest forwards to the desired
position.
Steering wheel
adjustment
CarM an uals 2 .c o m
Page 35 of 164
33
Ease of use and comfort
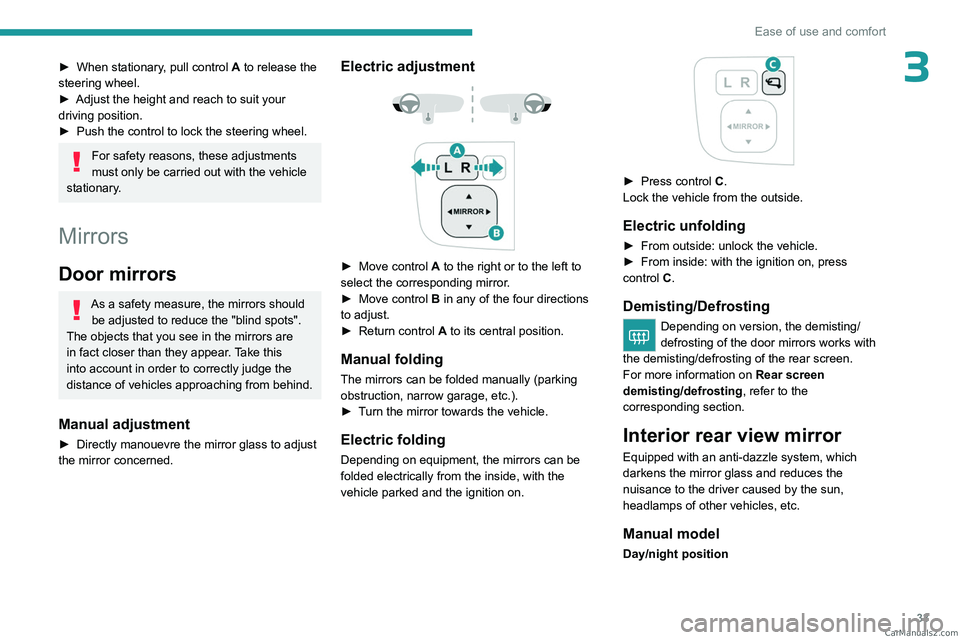
3► When stationary, pull control A to release the
steering wheel.
►
Adjust the height and reach to suit your
driving position.
►
Push the control to lock the steering wheel.
For safety reasons, these adjustments
must only be carried out with the vehicle
stationary.
Mirrors
Door mirrors
As a safety measure, the mirrors should be adjusted to reduce the "blind spots".
The objects that you see in the mirrors are
in fact closer than they appear. Take this
into account in order to correctly judge the
distance of vehicles approaching from behind.
Manual adjustment
► Directly manouevre the mirror glass to adjust
the mirror concerned.
Electric adjustment
► Move control A to the right or to the left to
select the corresponding mirror.
►
Move control
B in any of the four directions
to adjust.
►
Return control A
to its central position.
Manual folding
The mirrors can be folded manually (parking
obstruction, narrow garage, etc.).
►
T
urn the mirror towards the vehicle.
Electric folding
Depending on equipment, the mirrors can be
folded electrically from the inside, with the
vehicle parked and the ignition on.
► Press control C.
Lock the vehicle from the outside.
Electric unfolding
► From outside: unlock the vehicle.
► From inside: with the ignition on, press
control
C.
Demisting/Defrosting
Depending on version, the demisting/
defrosting of the door mirrors works with
the demisting/defrosting of the rear screen.
For more information on Rear screen
demisting/defrosting , refer to the
corresponding section.
Interior rear view mirror
Equipped with an anti-dazzle system, which
darkens the mirror glass and reduces the
nuisance to the driver caused by the sun,
headlamps of other vehicles, etc.
Manual model
Day/night position CarM an uals 2 .c o m
Page 36 of 164
34
Ease of use and comfort
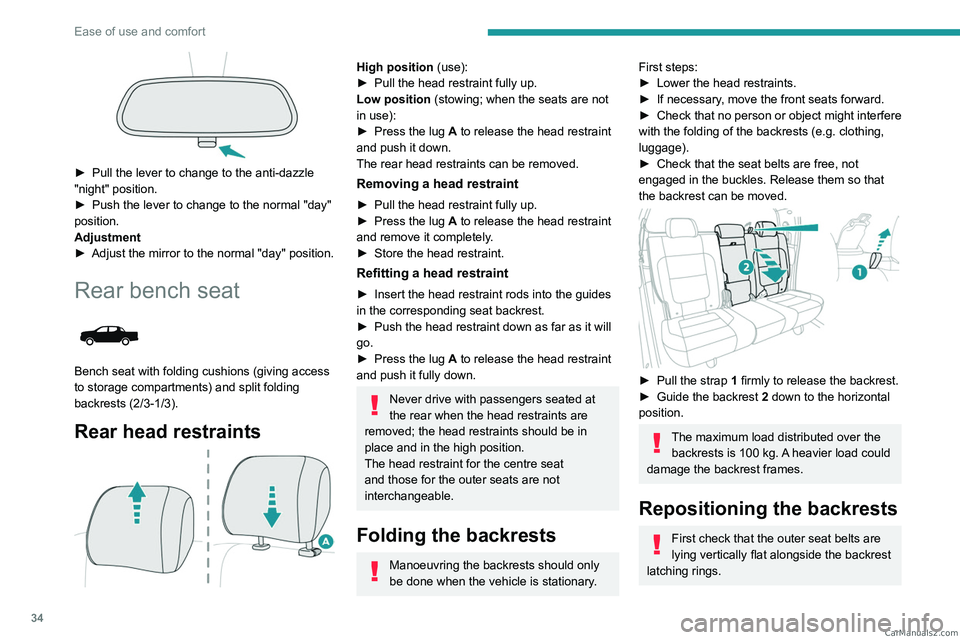
► Pull the lever to change to the anti-dazzle
"night" position.
►
Push the lever to change to the normal "day"
position.
Adjustment
►
Adjust the mirror to the normal "day" position.
Rear bench seat
Bench seat with folding cushions (giving access
to storage compartments) and split folding
backrests (2/3-1/3).
Rear head restraints
High position (use):
► Pull the head restraint fully up.
Low position (stowing; when the seats are not
in use):
►
Press the lug
A to release the head restraint
and push it down.
The rear head restraints can be removed.
Removing a head restraint
► Pull the head restraint fully up.
► Press the lug A to release the head restraint
and remove it completely.
►
Store the head restraint.
Refitting a head restraint
► Insert the head restraint rods into the guides
in the corresponding seat backrest.
►
Push the head restraint down as far as it will
go.
►
Press the lug
A to release the head restraint
and push it fully down.
Never drive with passengers seated at
the rear when the head restraints are
removed; the head restraints should be in
place and in the high position.
The head restraint for the centre seat
and those for the outer seats are not
interchangeable.
Folding the backrests
Manoeuvring the backrests should only
be done when the vehicle is stationary.
First steps:
► Lower the head restraints.
►
If necessary
, move the front seats forward.
►
Check
that no person or object might interfere
with the folding of the backrests (e.g.
clothing,
luggage).
►
Check that the seat belts are free, not
engaged in the buckles. Release them so that
the backrest can be moved.
► Pull the strap 1 firmly to release the backrest.
► Guide the backrest 2 down to the horizontal
position.
The maximum load distributed over the backrests is 100 kg. A heavier load could
damage the backrest frames.
Repositioning the backrests
First check that the outer seat belts are
lying vertically flat alongside the backrest
latching rings. CarM an uals 2 .c o m