2023 PEUGEOT LANDTREK tow
[x] Cancel search: towPage 38 of 164
36
Ease of use and comfort
For more information on the Tool kit,
refer to the corresponding section.
Repositioning the seat
cushions
Before lowering the seat cushion to the
normal position, make sure that you take
the seat belt buckle and hold it during the
operation.
► Remove hook 3 from the head restraint rod.
► Guide seat cushion 2
to the horizontal
position and push it firmly to lock it.
►
Check that the release strap 1
has correctly
returned to its position, then store it in its case.
►
Check that the seat belt buckles did not slip
under the seat cushions during the manoeuvre.
Heating and Ventilation
Air intake
The air circulating in the passenger compartment
is filtered and originates either from the
exterior, via the grille located at the base of the
windscreen, or from the inside in air recirculation
mode.
Controls
The controls are grouped together on the centre
console panel.
Air distribution
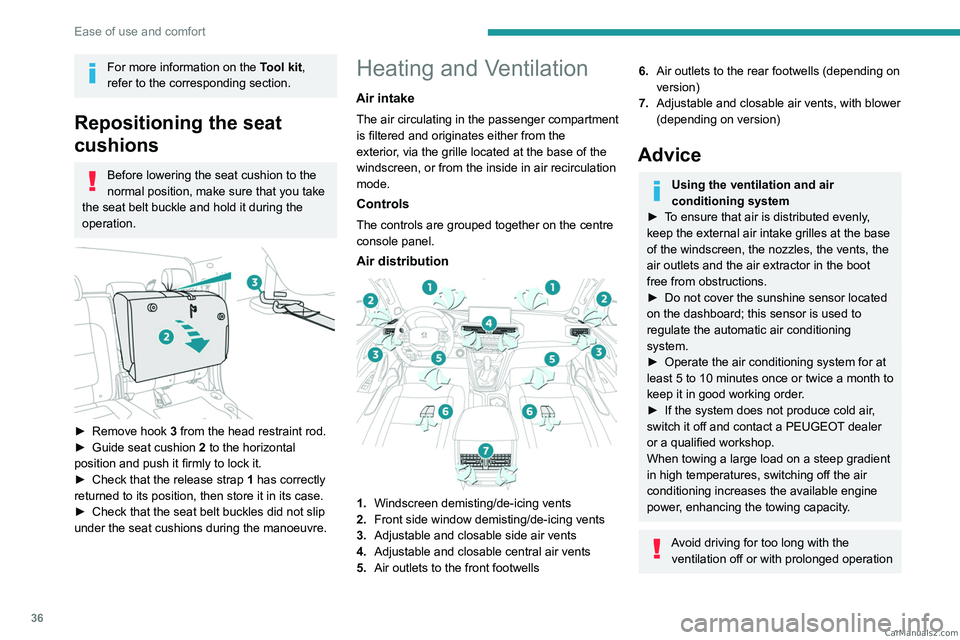
1. Windscreen demisting/de-icing vents
2. Front side window demisting/de-icing vents
3. Adjustable and closable side air vents
4. Adjustable and closable central air vents
5. Air outlets to the front footwells
6.Air outlets to the rear footwells (depending on
version)
7. Adjustable and closable air vents, with blower
(depending on version)
Advice
Using the ventilation and air
conditioning system
►
T
o ensure that air is distributed evenly,
keep the external air intake grilles at the base
of the windscreen, the nozzles, the vents, the
air outlets and the air extractor in the boot
free from obstructions.
►
Do not cover the sunshine sensor located
on the dashboard; this sensor is used to
regulate the automatic air conditioning
system.
►
Operate the air conditioning system for at
least 5 to 10 minutes once or twice a month to
keep it in good working order
.
►
If the system does not produce cold air
,
switch it off and contact a PEUGEOT dealer
or a qualified workshop.
When towing a large load on a steep gradient
in high temperatures, switching off the air
conditioning increases the available engine
power, enhancing the towing capacity.
Avoid driving for too long with the ventilation off or with prolonged operation CarM an uals 2 .c o m
Page 39 of 164
37
Ease of use and comfort
3of interior air recirculation. Risk of misting and
deterioration of the air quality!
If the interior temperature is very high
after the vehicle has stood for a long
time in the sunshine, air the passenger
compartment for a few moments.
Put the air flow control at a setting high
enough to quickly change the air in the
passenger compartment.
Condensation created by the air
conditioning results in a discharge of
water underneath the vehicle. This is perfectly
normal.
Servicing the ventilation and air
conditioning system
►
Ensure that the passenger compartment
filter is in good condition and have the filter
elements replaced regularly
.
We recommend using a composite passenger
compartment filter. Its specific active additive
helps protect against polluting gases and bad
smells.
►
T
o ensure correct operation of the
air conditioning system, have it checked
according to the recommendations in the
Manufacturer’s service schedule.
Heating
Manual air conditioning
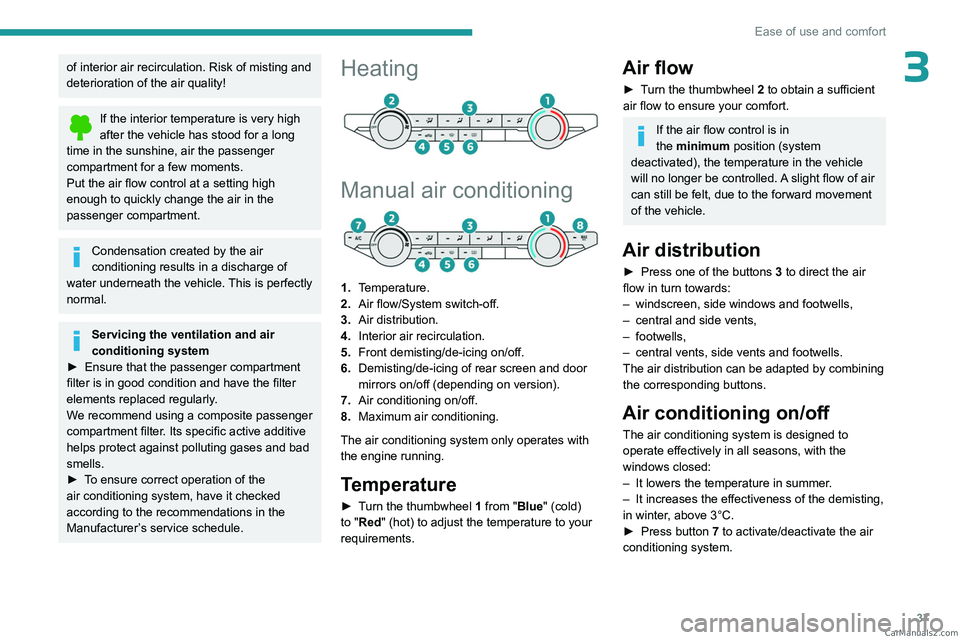
1. Temperature.
2. Air flow/System switch-off.
3. Air distribution.
4. Interior air recirculation.
5. Front demisting/de-icing on/off.
6. Demisting/de-icing of rear screen and door
mirrors on/off (depending on version).
7. Air conditioning on/off.
8. Maximum air conditioning.
The air conditioning system only operates with
the engine running.
Temperature
► Turn the thumbwheel 1 from "Blue" (cold)
to "Red" (hot) to adjust the temperature to your
requirements.
Air flow
► Turn the thumbwheel 2 to obtain a sufficient
air flow to ensure your comfort.
If the air flow control is in
the minimum position (system
deactivated), the temperature in the vehicle
will no longer be controlled. A slight flow of air
can still be felt, due to the forward movement
of the vehicle.
Air distribution
► Press one of the buttons 3 to direct the air
flow in turn towards:
–
windscreen, side windows and footwells,
–
central and side vents,
–
footwells,
–
central vents, side vents and footwells.
The air distribution can be adapted by combining
the corresponding buttons.
Air conditioning on/off
The air conditioning system is designed to
operate effectively in all seasons, with the
windows closed:
–
It lowers the temperature in summer
.
–
It increases the effectiveness of the demisting,
in winter
, above 3°C.
►
Press button
7 to activate/deactivate the air
conditioning system. CarM an uals 2 .c o m
Page 40 of 164
38
Ease of use and comfort
Air conditioning does not operate when the air flow is deactivated.
To obtain cool air more quickly, enable interior
air recirculation for a brief period. Then return
to the intake of exterior air.
Switching off the air conditioning may result in
some discomfort (humidity or misting).
Maximum air conditioning
The system automatically adjusts the
temperature setting to the lowest possible, the
air distribution towards the central and side air
vents, the air flow to maximum and activates
recirculation of interior air.
►
Press button
8 to activate/deactivate the
function (confirmed by the indicator lamp coming
on/going off).
Once the function is deactivated, the system
returns to the previous settings.
Dual-zone automatic air
conditioning
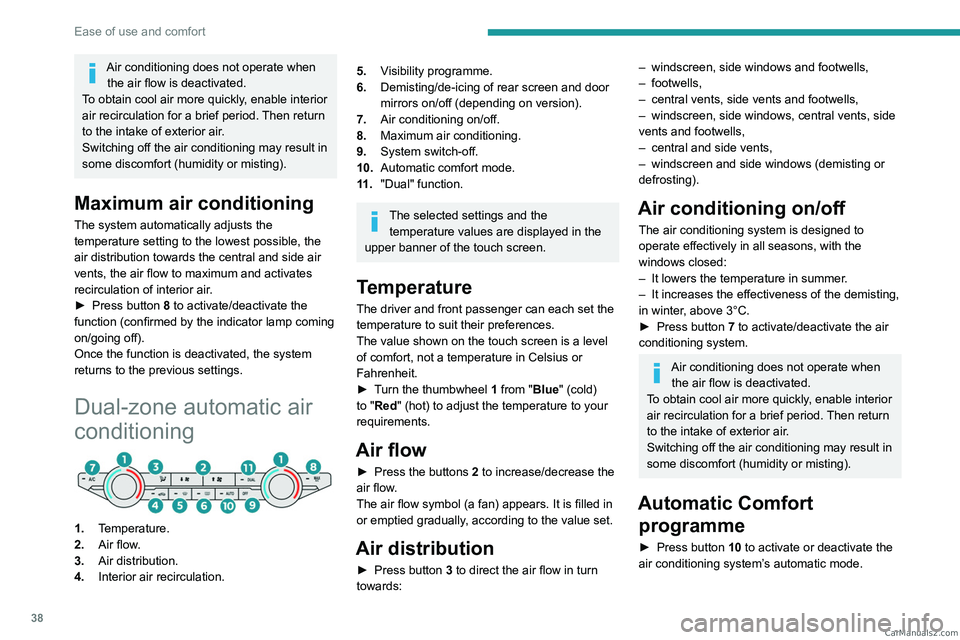
1. Temperature.
2. Air flow.
3. Air distribution.
4. Interior air recirculation.
5.Visibility programme.
6. Demisting/de-icing of rear screen and door
mirrors on/off (depending on version).
7. Air conditioning on/off.
8. Maximum air conditioning.
9. System switch-off.
10. Automatic comfort mode.
11 . "Dual" function.
The selected settings and the
temperature values are displayed in the
upper banner of the touch screen.
Temperature
The driver and front passenger can each set the
temperature to suit their preferences.
The value shown on the touch screen is a level
of comfort, not a temperature in Celsius or
Fahrenheit.
►
T
urn the thumbwheel 1 from "Blue" (cold)
to "Red" (hot) to adjust the temperature to your
requirements.
Air flow
► Press the buttons 2 to increase/decrease the
air flow.
The air flow symbol (a fan) appears. It is filled in
or emptied gradually, according to the value set.
Air distribution
► Press button 3 to direct the air flow in turn
towards:
– windscreen, side windows and footwells,
– footwells,
–
central vents, side vents and footwells,
–
windscreen, side windows, central vents, side
vents and footwells,
–
central and side vents,
–
windscreen and side windows (demisting or
defrosting).
Air conditioning on/ off
The air conditioning system is designed to
operate effectively in all seasons, with the
windows closed:
–
It lowers the temperature in summer
.
–
It increases the effectiveness of the demisting,
in winter
, above 3°C.
►
Press button
7 to activate/deactivate the air
conditioning system.
Air conditioning does not operate when the air flow is deactivated.
To obtain cool air more quickly, enable interior
air recirculation for a brief period. Then return
to the intake of exterior air.
Switching off the air conditioning may result in
some discomfort (humidity or misting).
Automatic Comfort programme
► Press button 10 to activate or deactivate the
air conditioning system’s automatic mode. CarM an uals 2 .c o m
Page 41 of 164
39
Ease of use and comfort
3When the indicator lamp in the button is on, the
air conditioning system operates automatically:
the system manages the temperature, air
flow and air distribution in the passenger
compartment in an optimum way according to
the selected comfort level.
In cold weather with the engine cold, the
air flow is increased gradually until the
comfort setting has been reached, in order to
limit the delivery of cold air into the passenger
compartment.
On entering the vehicle, if the interior
temperature is much colder or warmer than
the comfort setting requested, there is no
need to alter the value displayed to more
quickly reach the required level of comfort.
The system automatically corrects the
temperature difference as quickly as possible.
Manual mode
It is possible to make a different choice from that
offered by the system by changing a setting.
The other functions will still be automatically
managed.
The indicator lamp in the " AUTO” button goes
out if you change a setting.
Visibility programme
► Press the " visibility" button 5 to demist or
de-ice the windscreen and side windows more
quickly. The system automatically manages the air
conditioning, air flow and air intake, and provides
optimum distribution towards the windscreen and
side windows.
►
Press the "
visibility
" button 5 again to stop
the programme.
Or
►
Press the "
AUTO" button 10 to return to the
automatic comfort programme.
"Dual” function
The comfort setting for the passenger side
can be indexed to the driver's comfort setting
(mono-zone).
►
Press the corresponding button 11 to
activate/deactivate the function.
The indicator lamp in the button comes on when
the function is activated.
The function is deactivated automatically if a
passenger uses the temperature control.
Maximum air conditioning
The system automatically adjusts the
temperature setting to the lowest possible, the
air distribution towards the central and side air
vents, the air flow to maximum and activates
recirculation of interior air.
►
Press button
8 to activate/deactivate the
function (confirmed by the indicator lamp coming
on/going off).
Once the function is deactivated, the system
returns to the previous settings.
Interior air recirculation
The intake of exterior air prevents the formation
of mist on the windscreen and side windows.
Recirculating the interior air isolates the
passenger compartment from outside odours
and fumes and allows the desired passenger
compartment temperature to be achieved more
rapidly.
► Press this button to activate/deactivate
the function (confirmed by the
illumination/extinction of the indicator lamp).
This function is activated automatically when reverse gear is engaged.
Switching off the air
conditioning system
With heating or manual air conditioning
– Adjust the air flow to the minimum setting,
" OFF " position.
With automatic dual-zone air conditioning
► Press this button.
This action deactivates all of the functions of the
air conditioning system.
The temperature is no longer regulated. A slight
flow of air can still be felt, due to the forward
movement of the vehicle. CarM an uals 2 .c o m
Page 42 of 164
40
Ease of use and comfort
Front demisting/defrosting
With heating or manual air
conditioning
► Adjust the temperature to maximum (red).
► Adjust the air flow to maximum.
► Press this button to activate the air
distribution to the "Windscreen" position;
its indicator lamp comes on.
►
Check that the recirculation of interior air is
deactivated; its indicator lamp must be off.
►
Depending on version, switch on the air
conditioning by pressing the " A/C
" button; its
indicator lamp comes on.
With automatic dual-zone
air conditioning
Automatic Visibility programme
This mode allows the windscreen and side
windows to be demisted or defrosted as quickly
as possible.
► Press this button to activate/deactivate
the mode (confirmed by the illumination/
extinction of the
indicator lamp).
The programme automatically manages the air
conditioning (depending on version), air flow
and air intake, and provides optimum distribution
towards the windscreen and side windows.
It is possible to manually change the air flow
without deactivating the automatic Visibility
programme.
In wintry conditions, before moving off, it
is essential to remove any snow or ice
from the windscreen around the sensor.
Otherwise, the operation of equipment which
uses the sensor may be affected.
Rear screen demisting/
defrosting
This demisting/de-icing only works with the engine running.
Depending on version, it also demists/de-ices
the door mirrors.
► Press this button to activate/deactivate
the function (confirmed by the indicator
lamp coming on/switching off).
Demisting/defrosting switches off automatically
to prevent an excessive consumption of
electrical current.
Switch off demisting/defrosting when
you no longer need it; reducing
electrical consumption in turn decreases
energy consumption.
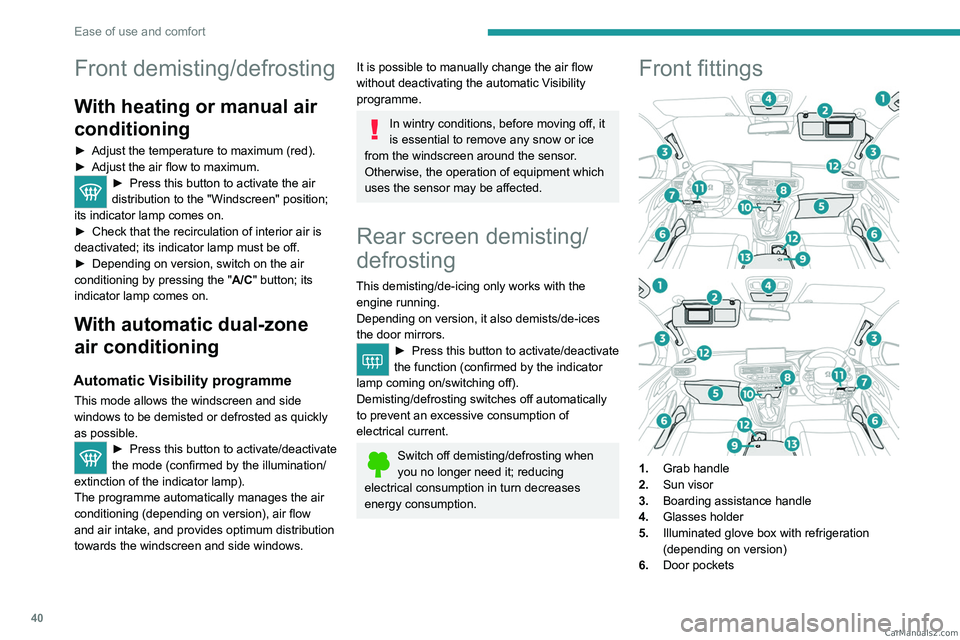
Front fittings
1. Grab handle
2. Sun visor
3. Boarding assistance handle
4. Glasses holder
5. Illuminated glove box with refrigeration
(depending on version)
6. Door pockets CarM an uals 2 .c o m
Page 46 of 164
44
Ease of use and comfort
Storage boxes
Storage boxes are provided in the floor, under
the cushions of the rear bench seat.
They may contain the vehicle’s tools.
►
T
o open them, raise the corresponding
seat cushion and lift the carpet (depending on
version).
For more information on the Rear bench seat,
and especially on tilting the seat cushions, refer
to the corresponding section.
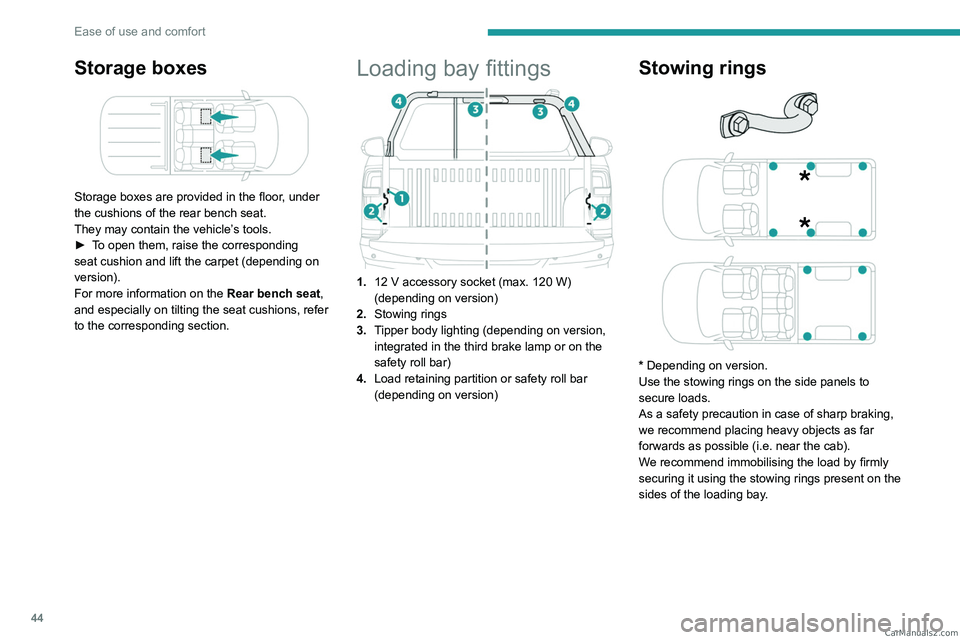
Loading bay fittings
1. 12 V accessory socket (max. 120 W)
(depending on version)
2. Stowing rings
3. Tipper body lighting (depending on version,
integrated in the third brake lamp or on the
safety roll bar)
4. Load retaining partition or safety roll bar
(depending on version)
Stowing rings
* Depending on version.
Use the stowing rings on the side panels to
secure loads.
As a safety precaution in case of sharp braking,
we recommend placing heavy objects as far
forwards as possible (i.e. near the cab).
We recommend immobilising the load by firmly
securing it using the stowing rings present on the
sides of the loading bay. CarM an uals 2 .c o m
Page 47 of 164
45
Ease of use and comfort
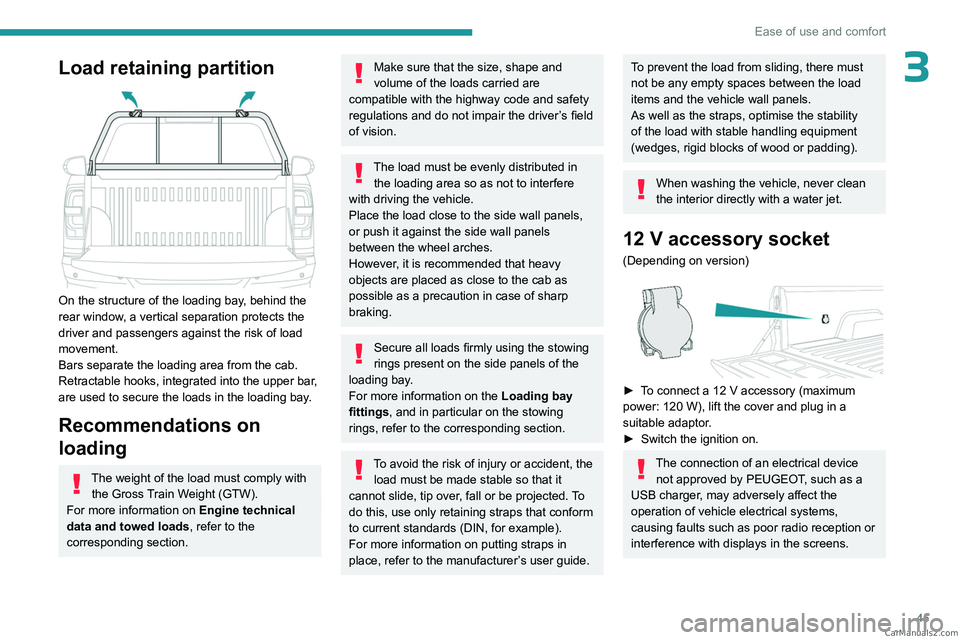
3Load retaining partition
On the structure of the loading bay, behind the
rear window, a vertical separation protects the
driver and passengers against the risk of load
movement.
Bars separate the loading area from the cab.
Retractable hooks, integrated into the upper bar,
are used to secure the loads in the loading bay.
Recommendations on
loading
The weight of the load must comply with the Gross Train Weight (GTW).
For more information on Engine technical
data and towed loads , refer to the
corresponding section.
Make sure that the size, shape and
volume of the loads carried are
compatible with the highway code and safety
regulations and do not impair the driver’s field
of vision.
The load must be evenly distributed in the loading area so as not to interfere
with driving the vehicle.
Place the load close to the side wall panels,
or push it against the side wall panels
between the wheel arches.
However, it is recommended that heavy
objects are placed as close to the cab as
possible as a precaution in case of sharp
braking.
Secure all loads firmly using the stowing
rings present on the side panels of the
loading bay.
For more information on the Loading bay
fittings, and in particular on the stowing
rings, refer to the corresponding section.
To avoid the risk of injury or accident, the load must be made stable so that it
cannot slide, tip over, fall or be projected. To
do this, use only retaining straps that conform
to current standards (DIN, for example).
For more information on putting straps in
place, refer to the manufacturer’s user guide.
To prevent the load from sliding, there must
not be any empty spaces between the load
items and the vehicle wall panels.
As well as the straps, optimise the stability
of the load with stable handling equipment
(wedges, rigid blocks of wood or padding).
When washing the vehicle, never clean
the interior directly with a water jet.
12 V accessory socket
(Depending on version)
► To connect a 12 V accessory (maximum
power: 120 W), lift the cover and plug in a
suitable adaptor.
►
Switch the ignition on.
The connection of an electrical device not approved by PEUGEOT, such as a
USB charger, may adversely affect the
operation of vehicle electrical systems,
causing faults such as poor radio reception or
interference with displays in the screens. CarM an uals 2 .c o m
Page 53 of 164
51
Lighting and visibility
4Fast wiping.
If the ignition has been switched off with
the windscreen wipers active, you must
operate the control stalk again to reactivate
wiping when the ignition is switched on again
(unless the ignition was off for less than
a
minute).
Decreasing or increasing the wiping
frequency
► Rotate the ring to increase/decrease
the wiping frequency (with " INT
" or
"AUTO" wiping position).
Windscreen wash
► Pull the wiper control stalk towards you and
hold.
A
final wiping cycle is performed when
screenwashing ends.
To avoid damaging the wiper blades, do not operate the screenwash if the
screenwash reservoir is empty.
Only operate the screenwash if there is no
risk of the fluid freezing on the windscreen
and hindering visibility. During the winter
period, use "very cold climate" rated products.
Never top up with water.
Changing a wiper blade
To check that the wiper blades have not become rough, gently slide your finger
along the blade.
To maintain the effectiveness of the wipers, it
is advisable to:
–
handle them with care.
–
clean them regularly using soapy water
.
–
clean the windscreen regularly with a
special detergent.
–
avoid using them to hold cardboard on the
windscreen.
–
replace them at the first signs of wear
.
For safety reasons and to avoid
damaging the windscreen or the
windscreen wiper blades, always clean them
if foreign bodies
are present (for example:
sand, dust, oil, bird droppings).
Never use petrol, thinner or another similar
solvent to clean the wiper blades.
Never shake, rotate or bend the wiper arm
and blade.
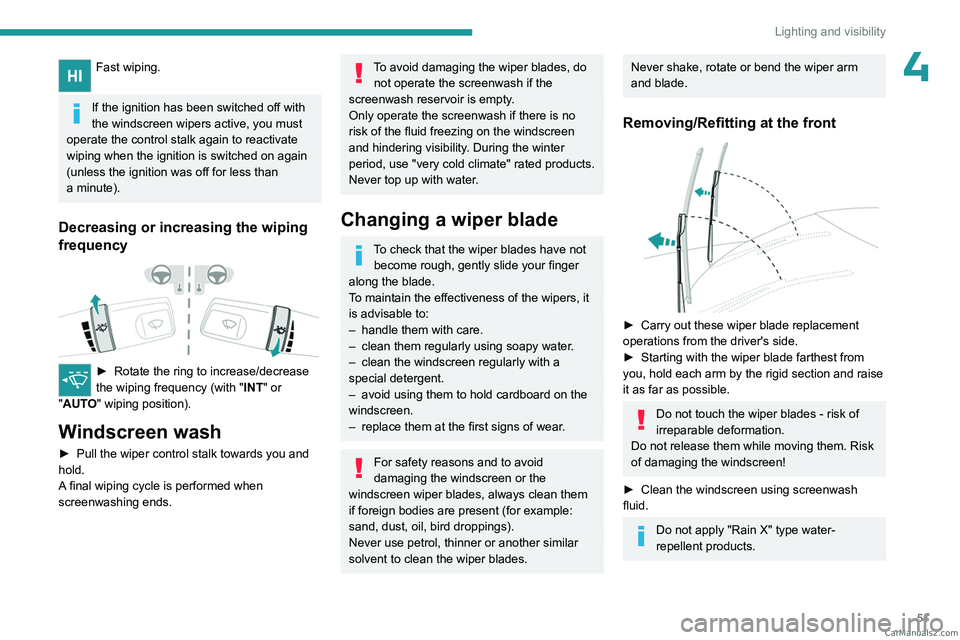
Removing/Refitting at the front
► Carry out these wiper blade replacement
operations from the driver's side.
►
Starting with the wiper blade farthest from
you, hold each arm by the rigid section and raise
it as far as possible.
Do not touch the wiper blades - risk of
irreparable deformation.
Do not release them while moving them. Risk
of damaging the windscreen!
►
Clean the windscreen using screenwash
fluid.
Do not apply "Rain X" type water-
repellent products. CarM an uals 2 .c o m