Page 105 of 164
 .
In the event of i")
103
Practical information
7Swapping tyres
To optimise wear and increase the lifetime of the tyres, swap the tyres
approximately every 3,100 to 6,200 miles
(5,000 to 10,000 km) .
In the event of irregular wear, bring the
swapping forward.
Shock absorbers
It is not easy for drivers to detect when
shock absorbers are worn. Nevertheless,
the shock absorbers have a major impact on
road holding and braking performance.
For your safety and driving comfort, it is
important to have them regularly checked by a
PEUGEOT dealer or a qualified workshop.
Timing and accessory kits
The timing and accessory kits are used
from the time the engine is started until it
is switched off. It is normal for them to wear over
time.
A
faulty timing or accessory kit can damage
the engine, rendering it unusable. Observe the recommended replacement frequency, stated in
distance travelled or time elapsed, whichever is
reached first.
AdBlue® (BlueHDi)
To respect the environment and ensure
compliance with the Euro 6 standard, without
adversely affecting the performance or fuel
consumption of its Diesel engines, PEUGEOT
has taken the decision to equip its vehicles with
a system that combines SCR (Selective Catalytic
Reduction) with a Diesel Particle Filter (DPF) for
the treatment of exhaust gases.
SCR system
Using a liquid called AdBlue® that contains
urea, a catalytic converter turns up to 85% of
the nitrogen oxides (NOx) into nitrogen and
water, which are harmless to health and the
environment.
The AdBlue® is contained in a special
tank holding about 18 litres.
Its capacity allows a driving range of
approximately 3,000
miles (5,000 km) (which
may vary considerably depending on your
driving style and the vehicle). An alert system
is automatically triggered when the remaining
range reaches 1,500 miles (2,400
km), i.e. once
the reserve level has been reached.
Several alerts are triggered successively during
the remaining 1,500 miles (2,400
km) until the
tank is empty and the vehicle is immobilised.
For more information on the Warning
and indicator lamps and the associated
alerts, or the Indicators, please refer to the
corresponding sections.
Once the AdBlue® tank is empty, a device
required by law prevents the engine from
being restarted.
If the SCR system is faulty, the level of
emissions from the vehicle will no longer meet
the Euro 6 standard and the vehicle starts
polluting the environment.
In the event of a confirmed SCR system
malfunction, it is essential to visit a
PEUGEOT dealer or a qualified workshop as
soon as possible. After 685 miles (1,100 km),
a device is automatically activated to prevent
the engine from starting.
In both cases, a range indicator indicates
the distance that can be travelled before the
vehicle is immobilised.
Freezing of the AdBlue®
AdBlue® freezes at temperatures below
around -11°C.
The SCR system includes a heater for the
AdBlue
® tank, allowing you to continue driving
in very cold conditions. CarM an uals 2 .c o m
Page 106 of 164

104
Practical information
Supply of AdBlue®
It is recommended that the AdBlue® be topped
up as soon as the first alert is issued indicating
that the reserve level has been reached.
For the correct operation of the SCR
system:
–
Use
only AdBlue
® fluid that meets the ISO
22241 standard.
–
Never
transfer AdBlue
® to another container
as it would lose its purity.
–
Never
dilute AdBlue
® with water.
You can obtain AdBlue
® from a PEUGEOT
dealer or a qualified workshop, as well as service
stations equipped with AdBlue
® pumps specially
designed for passenger vehicles.
Recommendations on storage
AdBlue® freezes at about -11°C and deteriorates
above +25°C. Containers should be stored in a
cool area and protected from direct sunlight.
Under these conditions, the fluid can be kept for
at least a year.
If the fluid has frozen, it can be used once it has
completely thawed out at room temperature.
Never store AdBlue® containers in your
vehicle.
Precautions for use
AdBlue® is a urea-based solution. This fluid is
non-flammable, colourless and odourless (when
kept in a cool place).
In the event of contact with the skin, wash the
affected area with soap and running water. In the
event of contact with the eyes, immediately rinse
the eyes with large amounts of water or with an
eye wash solution for at least 15 minutes. Seek
medical attention if you feel a persistent burning
sensation or irritation.
If swallowed, immediately wash out the mouth
with clean water and then drink plenty of water.
In certain conditions (high temperature, for
example), the risk of release of ammonia cannot
be excluded: do not inhale the fluid. Ammonia
vapours have an irritant effect on mucous
membranes (eyes, nose and throat).
Store AdBlue® out of the reach of
children, in its original container.
Procedure
Before starting the top-up procedure, ensure that
the vehicle is parked on a flat and level surface.
In wintry conditions, ensure that the temperature
of the vehicle is above -11°C. Otherwise the
AdBlue
® may be frozen and so cannot be poured
into the tank. Park the vehicle in a warmer area
for a few hours to allow the top-up to be carried
out.
Never pour the AdBlue® into the Diesel
fuel tank.
If any AdBlue® is splashed, or if there are
any spillages on the bodywork, rinse
immediately with cold water or wipe with a
damp cloth.
If the fluid has crystallised, clean it off using a
sponge and hot water.
Important: in the event of a top-up after
a breakdown because of a lack of
AdBlue, it is essential to wait around 5
minutes before switching on the ignition,
without opening the driver’s door,
unlocking the vehicle, inserting the key
into the ignition switch, or bringing the
key for the "Keyless Entry and Start"
system into the passenger compartment.
Switch on the ignition, then wait for 10
seconds before starting the engine.
►
Switch off the ignition and remove the key
from the switch to switch off the engine.
or
►
With Keyless Entry and Start, press the
"
START/STOP" button to switch off the engine.
CarM an uals 2 .c o m
Page 107 of 164

105
Practical information
7► Turn the blue cap of the AdBlue® tank anti-
clockwise and remove it.
►
With a container of
AdBlue
®: after checking
the expiry date, read the instructions on the
label carefully before pouring the contents of the
container into the vehicle's AdBlue
® tank.
►
With an
AdBlue® pump: insert the nozzle and
fill the tank until the nozzle automatically cuts
out.
In order not to overfill the AdBlue® tank:
–
Add between 10 and 13 litres using
AdBlue® containers.
–
Stop after the nozzle’ s first automatic cut-
out, if you are refilling at a service station.
The system only registers AdBlue
®
intermediate top-ups of 5
litres or more.
If the AdBlue® tank is completely empty
– which is confirmed by the message
“Top up AdBlue: Starting impossible ” – it is
essential to add at least 10
litres.
Top-up detection may not be instantaneous
after addition. It may take a few minutes of
driving before the top-up detection is effective.
Maintenance
For more information on the Engine
compartment, in particular the location of the
components under the bonnet, refer to the
corresponding section.
For the maintenance of your vehicle, you can
also contact a PEUGEOT dealer or a qualified
workshop.
Vehicle maintenance must always be
carried out with the engine switched off
and the ignition off.
Take care when working under the bonnet, as
certain areas of the engine may be extremely
hot (risk of burns) and the cooling fan could
start at any time (even with the ignition off).
Wait at least one hour after switching off the
engine before working on the vehicle - risk of
burns!
Take care with objects or clothing that could
be caught in the blades of the cooling fan -
risk of strangulation!
Always wear gloves, protective glasses and
suitable clothing to avoid direct contact with
liquids against the skin or eyes.
In the event of contact with the skin, wash
the affected area thoroughly with soap and
running water.
In the event of contact with the eyes,
immediately rinse the eyes with large
amounts of water or with an eye wash
solution for at least 15 minutes. Seek medical
attention if you feel a persistent burning
sensation or irritation.
Never go underneath the vehicle raised
using a jack; always use an axle
stand-type support.
When working on the vehicle's electrical
system, take care not to cause a short circuit -
risk of burns and fire.
Flammable products and all sources of heat
(sparks, for example) must be kept away from
the battery, the fuel tank and all components
of the fuel system.
Never run the engine in a closed space
without sufficient ventilation; always use a
ventilation system such as an exhaust gas
extractor, for example.
Never leave liquids (oil, coolant) unattended.
Keep these liquids out of the reach of children
and animals.
The liquids and components replaced must have the same characteristics and
comply with the manufacturer's
recommendations.
General checks
Check the following components to ensure
proper operation and longevity of the vehicle.
For more information on the components
to be
checked, refer to the Checking levels, Checks
and Advice on care
sections. CarM an uals 2 .c o m
Page 108 of 164
 are working properly.
Check the condition of the door mirrors and
the adjustment controls.
Check that all the doo")
106
Practical information
Daily checks
Check that all vehicle lamps (front and
rear) are working properly.
Check the condition of the door mirrors and
the adjustment controls.
Check that all the doors can be opened,
closed and locked correctly.
Regularly check all levels, the condition of the
tyres and the bodywork.
Monthly checks
Check:
–
The engine coolant level.
–
The absence of leaks on all the pipes and
hoses visible on the vehicle as well as the
tanks.
–
The proper functioning of the elements of
the: •
Heating and ventilation system.
•
Air conditioning system.
•
Parking brake (application and release).
•
Horn.
–
The tightening of the wheel nuts (if
necessary
, retighten them to the specific
tightening values).
–
The good condition of the wipers.
–
The absence of significant play in the
steering wheel and steering.
–
The correct travel of the brake pedal as
well as the clutch pedal.
General recommendations
related to maintenance
operations
Electronic engine management
computer
The electronic computer is not completely
waterproof. When performing maintenance
in the rain or washing the engine, it must be
protected from water.
Never remove or disconnect any part of the
electronic injection system to avoid the entry
of moisture, oil or any other foreign body.
Do not install a radio antenna or other
equipment likely to generate interference near
the electronic computer.
Do not expose the electronic computer to a
temperature higher than 105°C.
Before any welding operation on the vehicle,
it is essential to disconnect the electronic
computer - risk of damage to the electronic
system components.
Fuel system
All work on the fuel system must be
carried out only by a PEUGEOT dealer or a
qualified workshop.
Electrical system
Never:
– disconnect the battery cables or the
electrical wiring harness connectors when the
engine is running.
–
reverse the polarities when reconnecting
the battery (risk of damage to electronic
components).
–
pierce the insulation of the electrical wires
during an electrical check or diagnosis.
Changing the 12 V battery
Petrol and BlueHDi Diesel engines
CarM an uals 2 .c o m
Page 109 of 164

107
Practical information
7HDi Diesel engine
► Switch off the engine and the ignition.
In the engine compartment:
►
Loosen and disconnect the cable from the
negative terminal
1
.
►
Lift the protective cover
, then loosen and
disconnect the cable from the positive terminal
2
.
►
Loosen and remove the retaining clamp
3
.
►
Remove and change the battery
.
For more information on the 12 V battery
and in particular the precautionary measures
to be taken before any work, refer to the
corresponding section.
Be sure to observe the polarity before
reconnecting the cables to the terminals
of the new battery.
To reassemble, perform the operations in the
reverse order to those for removal.
When connecting cables, always start with
the positive terminal.
Changing the passenger
compartment filter
► Switch off the engine and the ignition.
In the passenger compartment:
►
Open the glove box.
►
Unclip the damper 1
on the side of the glove
box.
►
Press the walls
2 on each side of the glove
box 3, then tilt it downwards to release it
completely.
►
Pull the glove box 3
towards you to unclip
and remove it.
► Unclip and remove the protective cover 4
using a suitable tool.
►
Press the 2 clips located to the right of the
cover
5 of the heating unit and pull it out towards
you.
► Remove the passenger compartment filter 6
from the heating unit and change it. CarM an uals 2 .c o m
Page 110 of 164

108
Practical information
To reassemble, perform the operations in the reverse order to those for removal.
Install the new passenger compartment
filter with the arrow pointing down.
When disassembling/reassembling, avoid
forcing the plastic parts.
Changing the air filter
Petrol and BlueHDi Diesel engines
HDi Diesel engine
► Switch off the engine and the ignition.
In the engine compartment:
►
Unclip the retaining clips 1
.
►
With a HDi Diesel engine, disconnect the
connector
2 from the airflow meter.
►
Lift the upper part
A of the air unit and tilt it
to the side.
►
Remove the air filter from the lower section of
the air unit (note the direction of fitting).
►
Clean the 2 sections of the air unit and place
the new air filter in the lower section (observe
the direction of fitting of the air filter to guarantee
sealing).
►
Refit the upper section
A
on the filter, taking
care not to pinch the seal.
►
Clip the retaining clips 1
.
►
With a HDi Diesel engine, reconnect the
connector
2 to the airflow meter.
Never remove the air filter when the
engine is running - risk of injury and
damage!
When the upper section of the air unit is
removed, always make sure that no debris or
dust enters the engine air intake pipe - risk of
serious damage to the engine!
Always use an original air filter or one suitable
for the vehicle - risk of damage to the engine.
Changing the engine oil
► Switch off the engine and the ignition.
► Unscrew and remove the engine oil filler cap.
►
Under the vehicle, place a container below
the drain plug.
Do not remove the drain plug when the
engine is hot - risk of burns (hot oil)!
►
Loosen the drain plug with a suitable wrench
and remove it.
►
W
ait until the oil has completely drained into
the container. CarM an uals 2 .c o m
Page 111 of 164
.
For more information on Engine oil and in
particular on oil fill")
109
Practical information
7► Change the plug seal and screw the plug
back on the housing (tighten to a torque of 3.5 to
4 daN.m).
For more information on Engine oil and in
particular on oil filling and checking the level,
refer to the corresponding section.
Always change engine oil with an oil corresponding to the engine and in
accordance with the manufacturer's
recommendations.
Never start the engine without oil - risk of
serious damage to the engine!
Be careful, the oil is a petroleum-based
product. It is harmful if swallowed and
irritating to the skin and eyes.
Keep the drained oil out of the reach of
children and animals.
Changing the oil filter
Petrol engine
HDi Diesel engine
BlueHDi Diesel engine
► Switch off the engine and the ignition.
► Under the vehicle, place a container below
the oil filter
.
►
Loosen and remove the oil filter with a
suitable wrench.
►
Clean the seal face using a clean, lint-free
cloth.
►
Oil the seal of the new filter (use new oil).
►
Screw the new filter back on, making sure
that the seal is correctly positioned against the
seal face.
►
T
ighten the oil filter correctly with your hands,
without forcing it, to avoid leaks.
After the operation, check the engine oil level with the dipstick and top up if
necessary.
For more information on Engine oil and in
particular on checking the level, refer to the
corresponding section.
Never start the engine without the oil
filter - risk of splashing and serious
damage to the engine!
Changing the Diesel fuel
filter
HDi Diesel engine
CarM an uals 2 .c o m
Page 112 of 164

11 0
Practical information
BlueHDi Diesel engine
► Switch off the engine and the ignition.
► Place a container below the Diesel fuel filter .
►
Remove the retaining clamp 1
, then unscrew
and remove the Diesel fuel filter 2 with a suitable
wrench.
►
Clean the seal face using a clean, lint-free
cloth.
►
Screw the new filter back on, making sure
that the seal is correctly positioned against the
contact surface.
►
T
ighten the Diesel fuel filter correctly with
your hands, without forcing it, to avoid leaks.
►
Put the retaining clamp 1
back in place.
After the operation, bleed the air contained in the fuel system.
For more information on Running out of fuel
(Diesel) and in particular the procedure for
bleeding the Diesel fuel system, refer to the
corresponding section.
Cleaning the throttle body
Removing the throttle body
Petrol and BlueHDi Diesel engines
HDi Diesel engine
► Switch off the engine and the ignition.
► Disconnect connector 1
from the throttle
body.
►
Loosen the clamp 2
on the air hose.
►
Disconnect the air hose A
from the throttle
body.
►
Unscrew and remove the screws 3
fixing the
throttle body to the air intake manifold.
►
Remove the throttle body B
, ensuring that the
seal does not fall.
When the throttle body is removed,
always make sure that no debris or dust
enters the engine air intake pipe or the intake
manifold - risk of serious damage to the
engine!
Never start the engine when the throttle body
is removed.
Cleaning the throttle body
Before cleaning, make sure that you
correctly protect the electrical connector
of the throttle body against any projection of
liquid (oil, water, detergent or solvent).
►
Remove grease and carbon deposits from
the surface of the main duct with a specific
"carburettor" type cleaner
.
►
Rotate the throttle valve inside the duct to
clean the seats on each side.
►
Wipe and dry the throttle body with a soft,
lint-free cloth.
If no cleaning has been done for a long
time, deposits may be difficult to remove.
Clean and wipe the throttle body several
times with a soft, lint-free cloth.
Never immerse the throttle body in a
cleaning liquid or in an ultrasonic tank.
Never use:
–
detergents containing methyl ketone or
other highly corrosive substances as well as
household cleaning detergent; CarM an uals 2 .c o m
 1
1 2
2 3
3 4
4 5
5 6
6 7
7 8
8 9
9 10
10 11
11 12
12 13
13 14
14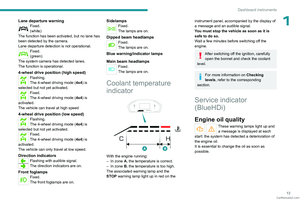 15
15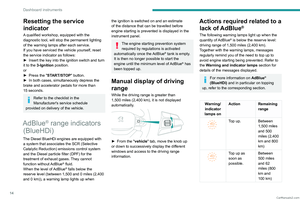 16
16 17
17 18
18 19
19 20
20 21
21 22
22 23
23 24
24 25
25 26
26 27
27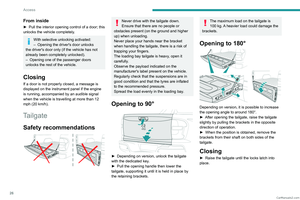 28
28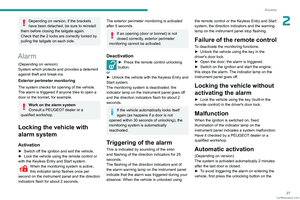 29
29 30
30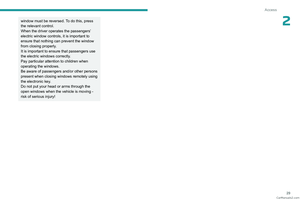 31
31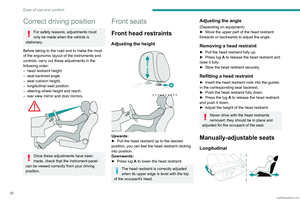 32
32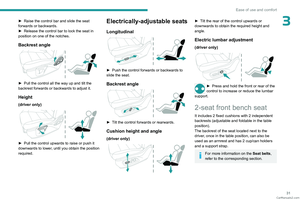 33
33 34
34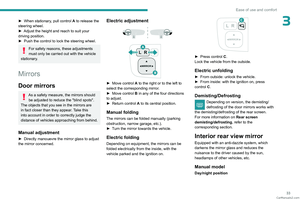 35
35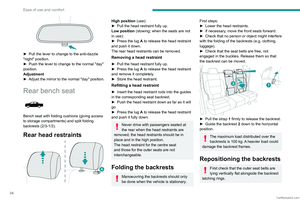 36
36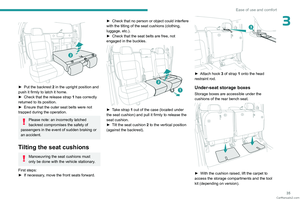 37
37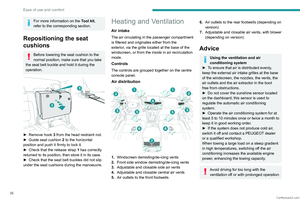 38
38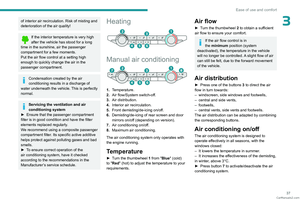 39
39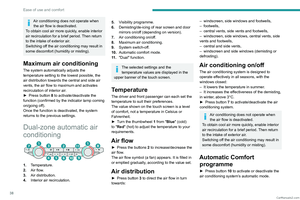 40
40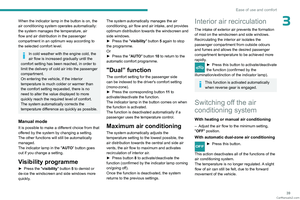 41
41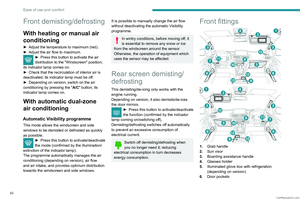 42
42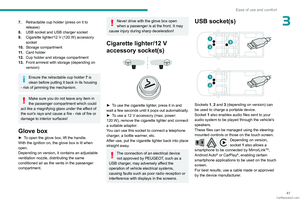 43
43 44
44 45
45 46
46 47
47 48
48 49
49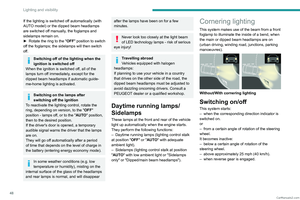 50
50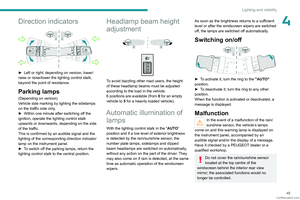 51
51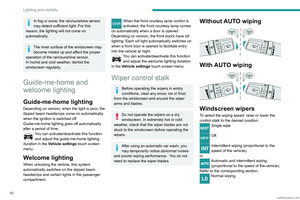 52
52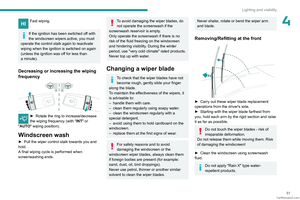 53
53 54
54 55
55 56
56 57
57 58
58 59
59 60
60 61
61 62
62 63
63 64
64 65
65 66
66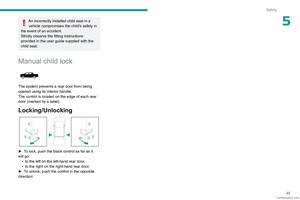 67
67 68
68 69
69 70
70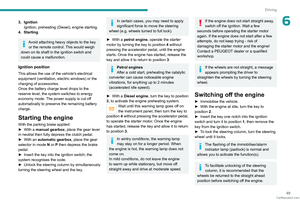 71
71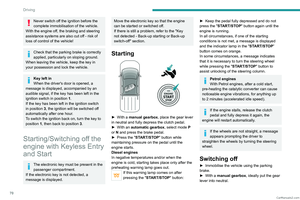 72
72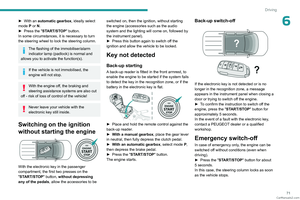 73
73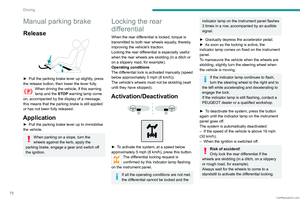 74
74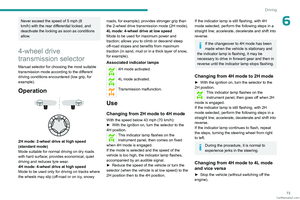 75
75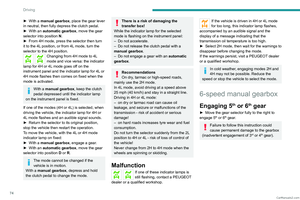 76
76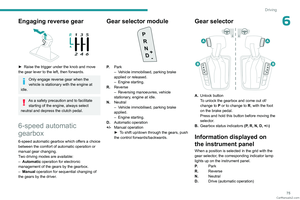 77
77 78
78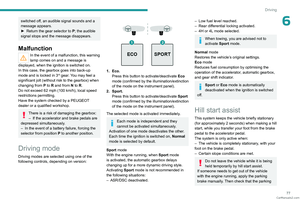 79
79 80
80 81
81 82
82 83
83 84
84 85
85 86
86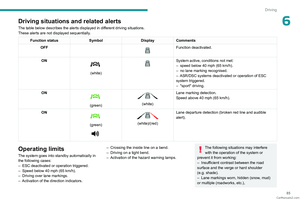 87
87 88
88 89
89 90
90 91
91 92
92 93
93 94
94 95
95 96
96 97
97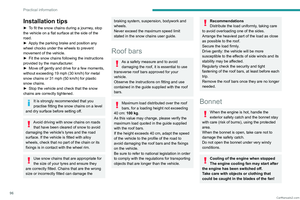 98
98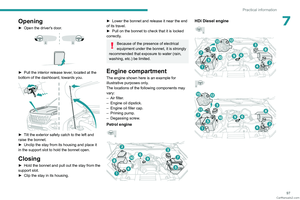 99
99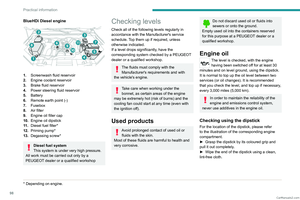 100
100 101
101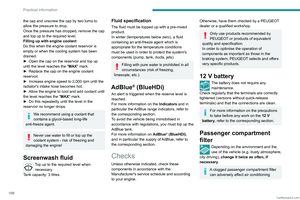 102
102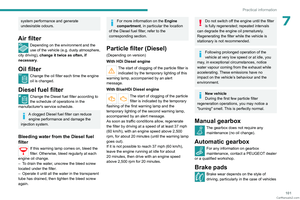 103
103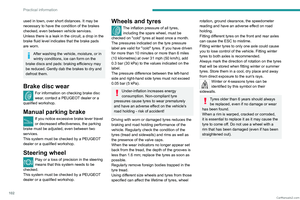 104
104 105
105 106
106 107
107 108
108 109
109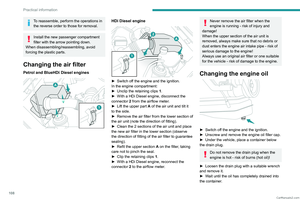 110
110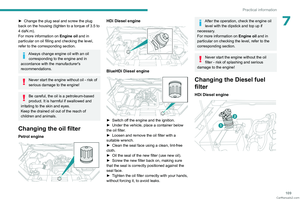 111
111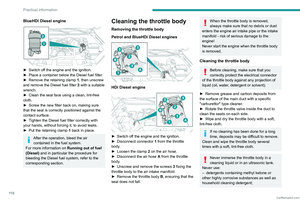 112
112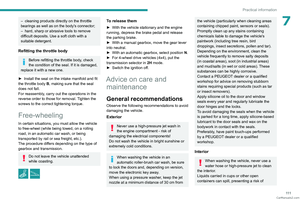 113
113 114
114 115
115 116
116 117
117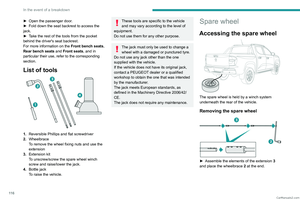 118
118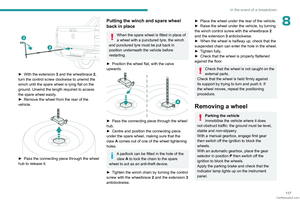 119
119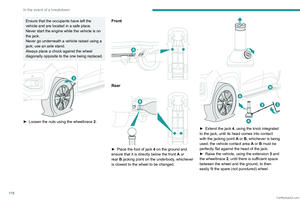 120
120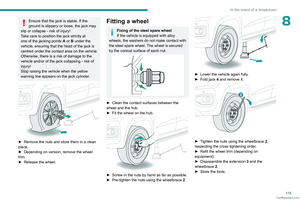 121
121 122
122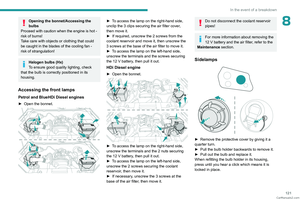 123
123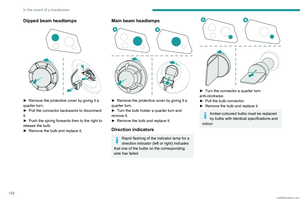 124
124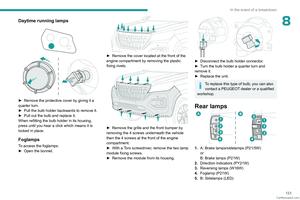 125
125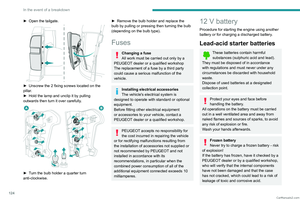 126
126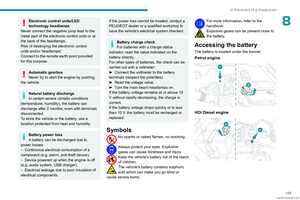 127
127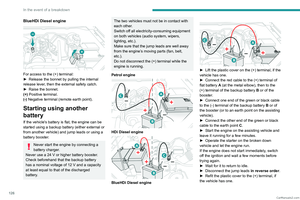 128
128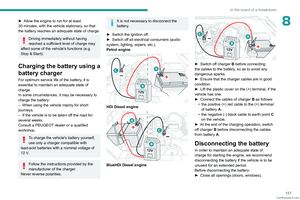 129
129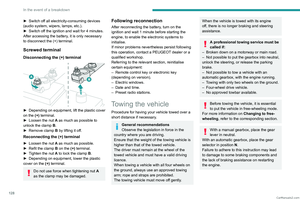 130
130 131
131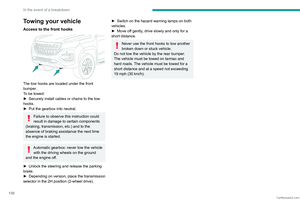 132
132 133
133 134
134 135
135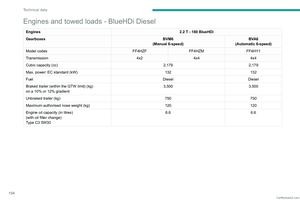 136
136 137
137 138
138 139
139 140
140 141
141 142
142 143
143 144
144 145
145 146
146 147
147 148
148 149
149 150
150 151
151 152
152 153
153 154
154 155
155 156
156 157
157 158
158 159
159 160
160 161
161 162
162 163
163