2023 PEUGEOT 508 belt
[x] Cancel search: beltPage 95 of 244
93
Safety
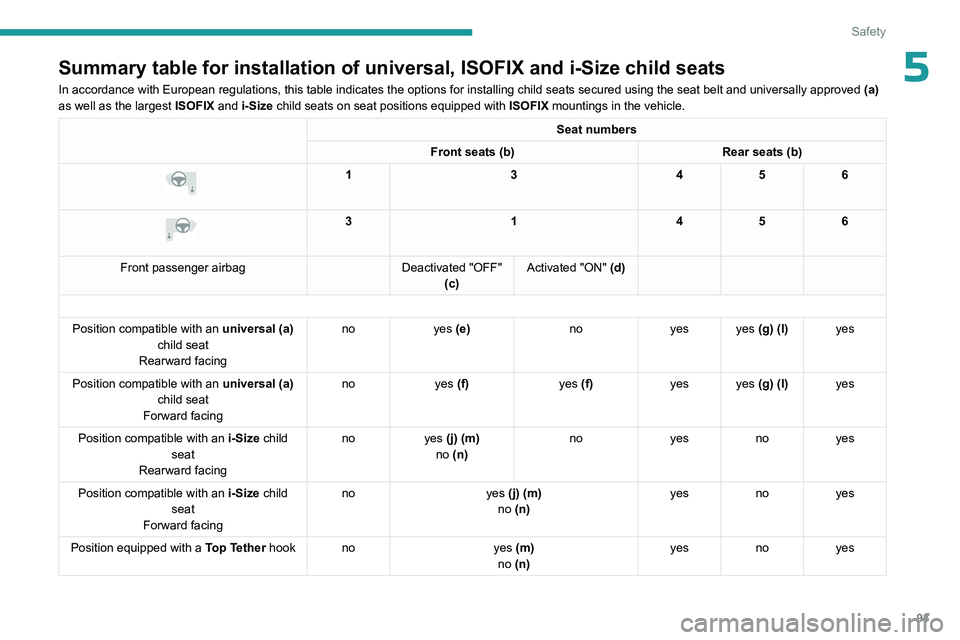
5Summary table for installation of universal, ISOFIX and i-Size child sea\
ts
In accordance with European regulations, this table indicates the option\
s for installing child seats secured using the seat belt and universally\
approved (a)
as well as the largest ISOFIX and i-Size child seats on seat positions equipped with ISOFIX mountings in the vehicle.
Seat numbers
Front seats (b) Rear seats (b)
13456
3 1456
Front passenger airbag Deactivated "OFF"
(c) Activated "ON" (d)
Position compatible with an universal (a)
child seat
Rearward facing no
yes (e) noyes yes (g) (l) yes
Position compatible with an universal (a)
child seat
Forward facing no
yes (f) yes (f)yes yes (g) (l) yes
Position compatible with an i-Size child
seat
Rearward facing no
yes (j) (m)
no (n) no
yesnoyes
Position compatible with an i-Size child
seat
Forward facing no
yes (j) (m)
no (n) yes
noyes
Position equipped with a Top Tether hook no yes (m)
no (n) yes
noyes
Page 96 of 244
94
Safety
Seat numbers
Front seats (b) Rear seats (b)
13456
3 1456
Front passenger airbag Deactivated "OFF"
(c) Activated "ON" (d)
"Carrycot " type of child seat
(L1 / L2) no
nononono
"Rearward facing" ISOFIX child seat
(R1 / R2 / R3) no
R3 (j) (m)
no (n) no
R2 (i) (k) no R2 (i) (k)
"Forward facing" ISOFIX child seat
(F2 / F2X / F3) no
F3 (j) (m)
no (n) F3 (k)
no F3 (k)
"Booster" child seat (B2 / B3) no
B3 (h) (j) B3noB3
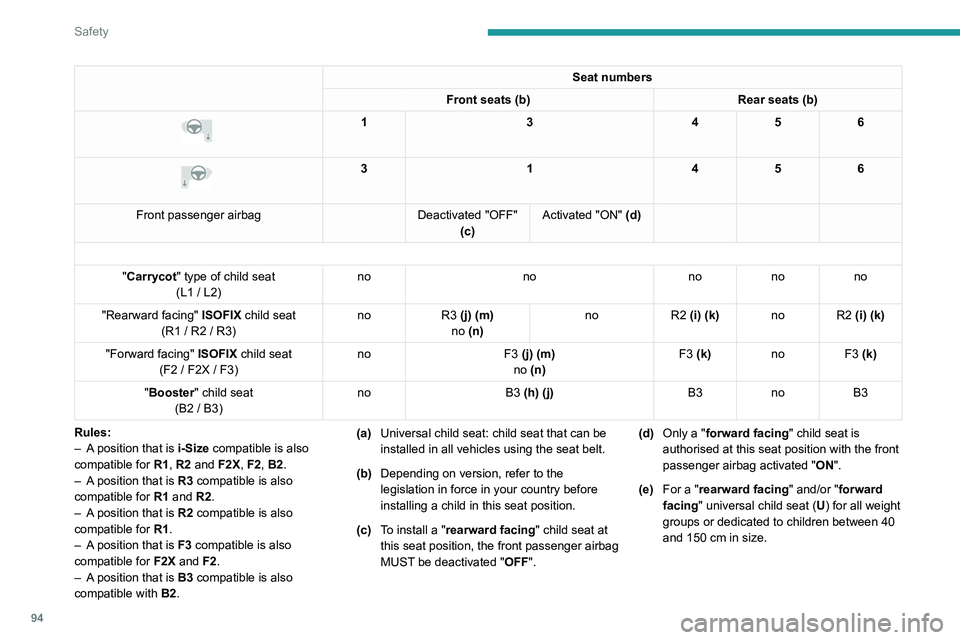
Rules:
–
A
position that is i-Size compatible is also
compatible for R1, R2 and F2X, F2, B2.
–
A
position that is R3 compatible is also
compatible for R1 and R2.
–
A
position that is R2 compatible is also
compatible for R1.
–
A
position that is F3 compatible is also
compatible for F2X and F2.
–
A
position that is B3 compatible is also
compatible with B2. (a)
Universal child seat: child seat that can be
installed in all vehicles using the seat belt.
(b) Depending on version, refer to the
legislation in force in your country before
installing a child in this seat position.
(c) To install a "rearward facing" child seat at
this seat position, the front passenger airbag
MUST be deactivated "OFF". (d)
Only a "forward facing" child seat is
authorised at this seat position with the front
passenger airbag activated " ON".
(e) For a "rearward facing" and/or "forward
facing" universal child seat ( U) for all weight
groups or dedicated to children between 40
and 150
cm in size.
Page 97 of 244
95
Safety
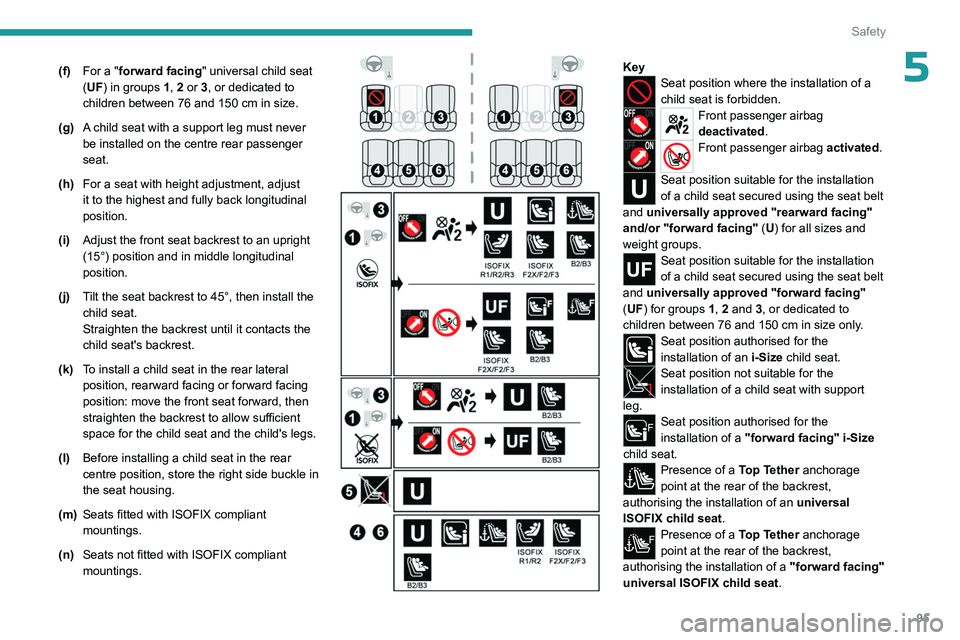
5(f)For a "forward facing" universal child seat
(UF) in groups 1, 2 or 3, or dedicated to
children between 76 and 150
cm in size.
(g) A child seat with a support leg must never
be installed on the centre rear passenger
seat.
(h) For a seat with height adjustment, adjust
it to the highest and fully back longitudinal
position.
(i) Adjust the front seat backrest to an upright
(15°) position and in middle longitudinal
position.
(j) Tilt the seat backrest to 45°, then install the
child seat.
Straighten the backrest until it contacts the
child seat's backrest.
(k) To install a child seat in the rear lateral
position, rearward facing or forward facing
position: move the front seat forward, then
straighten the backrest to allow sufficient
space for the child seat and the child's legs.
(l) Before installing a child seat in the rear
centre position, store the right side buckle in
the seat housing.
(m) Seats fitted with ISOFIX compliant
mountings.
(n) Seats not fitted with ISOFIX compliant
mountings.
KeySeat position where the installation of a
child seat is forbidden.
Front passenger airbag
deactivated.
Front passenger airbag activated.
Seat position suitable for the installation
of a child seat secured using the seat belt
and universally approved "rearward facing"
and/or "forward facing" (U) for all sizes and
weight groups.
Seat position suitable for the installation
of a child seat secured using the seat belt
and universally approved "forward facing"
(UF) for groups 1, 2 and 3, or dedicated to
children between 76 and 150
cm in size only.
Seat position authorised for the
installation of an i-Size child seat.
Seat position not suitable for the
installation of a child seat with support
leg.
Seat position authorised for the
installation of a "forward facing" i-Size
child seat.
Presence of a Top Tether anchorage
point at the rear of the backrest,
authorising the installation of an universal
ISOFIX child seat .
Presence of a Top Tether anchorage
point at the rear of the backrest,
authorising the installation of a "forward facing"
universal ISOFIX child seat .
Page 111 of 244
109
Driving
6Gear shift indicator
This system is designed to reduce fuel
consumption by recommending the most suitable
gear.
Operation
Depending on the driving situation and
the vehicle's equipment, the system may
recommend skipping one or more gears.
Gear engagement recommendations are
not to be considered mandatory. Indeed, the
configuration of the road, the traffic density and
safety remain determining factors when choosing
the best gear. Therefore, the driver remains
responsible for deciding whether or not to follow
the system’s advice.
The system cannot be deactivated.
The system is only active in mode M of
the automatic gearbox.
The information appears on the instrument panel, in the form of an arrow
and the recommended gear.
The system adapts the gear change instructions according to the driving
conditions (e.g.
slope, load) and driving style
(e.g.
power demand, acceleration, braking).
The system never suggests:
–
engaging first gear
.
–
engaging reverse gear
.
Stop & Start
The Stop & Start function puts the engine temporarily into standby - STOP mode - during
phases when the vehicle is stationary (e.g.
red
lights, traffic jams). The engine automatically
restarts - START mode - as soon as the driver
indicates the intention of moving off again.
Primarily designed for urban use, the function
is intended to reduce fuel consumption and
exhaust emissions as well as the noise level
when stationary.
The function does not affect the functionalities of
the vehicle, in particular the braking.
Deactivation/Reactivation
By default, the function is activated when the
ignition is switched on.
It is configured in the ADAS touch screen
application.
or
Direct access to the Shortcuts for driving aids .
The display of a message on the instrument
panel confirms the change of state.
If the function is deactivated while the engine is
in STOP mode, it will restart immediately.
Associated indicator lamps
Function activated: engine on standby
(STOP mode)
Function deactivated or malfunction
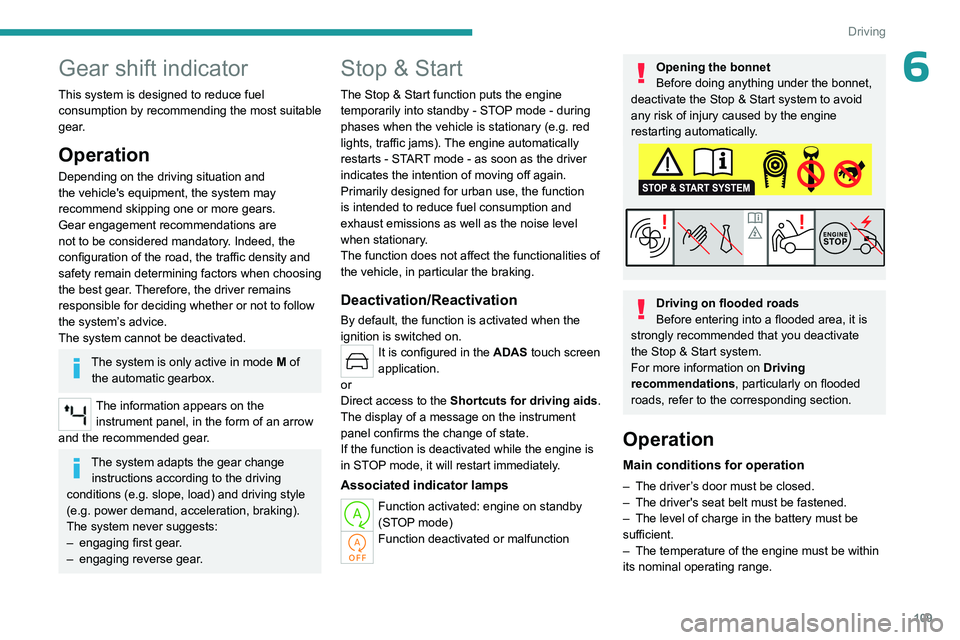
Opening the bonnet
Before doing anything under the bonnet,
deactivate the Stop & Start system to avoid
any risk of injury caused by the engine
restarting automatically.
Driving on flooded roads
Before entering into a flooded area, it is
strongly recommended that you deactivate
the Stop & Start system.
For more information on Driving
recommendations, particularly on flooded
roads, refer to the corresponding section.
Operation
Main conditions for operation
– The driver ’s door must be closed.
– The driver's seat belt must be fastened.
–
The level of charge in the battery must be
sufficient.
–
The temperature of the engine must be within
its nominal operating range.
Page 132 of 244
130
Driving
Operating conditions and
limits
Vehicle moving forward without trailer.
Brake system operational.
ASR system activated.
Seat belts fastened for all passengers.
Stabilised speed on roads with no or low
curvature.
This warning lamp lights up on the instrument panel without any additional
message, to indicate that the automatic braking
system is not available.
This is a normal behavior indicating that a
condition is not fulfilled and which does not
request the support of a workshop.
In any situations with ignition on where automatic
braking presents a risk, deactivating the system
via the driving aids touch screen application is
recommended, for instance:
–
T
owing a trailer (particularly a trailer without its
own braking system).
–
Carrying long objects on roof bars.
–
Driving with snow chains.
–
Using an automatic car wash.
–
Performing any maintenance (e.g.
changing a
wheel, working inside the engine compartment).
–
Placing the vehicle on a rolling bench in a
workshop.
–
T
owing the vehicle.
–
Following a damage of the windscreen close
to the detection camera.
The system is automatically deactivated when the use of certain types of
"space-saver" spare wheel (smaller diameter)
is detected, or if a fault with the brake pedal
switch or at least two brake lamps is detected.
Following a severe crash (e.g.
with airbag
deployment), the system is automatically
deactivated.
Have it checked by a PEUGEOT dealer or a
qualified workshop.
In case the detection is degraded or
temporarily unavailable by environment
conditions, then a driver indication is not
displayed (because a driver action is not
requested).
It can be dangerous to drive if the brake
lamps are not in perfect working order.
The driver must not overload the vehicle (keep within the GVW limit and load
height limits for roof bars).
Collision Risk Alert
This function warns the driver if there is a risk
of collision with the preceding vehicle, or with a
pedestrian or cyclist.
Modifying the alert trigger threshold
The trigger threshold determines the sensitivity
with which the function warns of the risk of
collision.
► In the ADAS touch screen application,
select Functions>Automatic Braking
System .
►
Select one of the 3 preset
thresholds:
"Far", "Medium" or "Near".
The selected threshold is memorised when the
ignition is switched off.
Operation
Depending on the collision risk detected by the
system and the alert trigger threshold chosen
by the driver, different levels of alert may be
triggered and displayed on the instrument panel.
The system takes into account the vehicle
dynamics, the difference speed of the own
vehicle and the object identified for the
collision risk, and the operation of the vehicle
(e.g.
actions on the pedals, steering wheel) to
trigger the alert at the most relevant moment.
(orange)
Level 1: visual alert only, warning that the
preceding vehicle is very close.
The message "Vehicle close" is displayed.
(red)
Level 2: visual and audible alert, warning
that a collision is imminent.
The message "Brake! " is displayed.
Level 3: a micro-braking may be given,
confirming the risk of collision (optional).
Page 134 of 244

132
Driving
The brake pedal may feel hard and vibrate slightly while the function is
operating.
If the vehicle comes to a complete stop,
automatic braking is maintained for 1 to
2
seconds.
Deactivation/Activation
By default, the system is automatically activated
at every engine start.
It is configured in the ADAS touch screen
application.
Deactivation of the system is signalled by
the illumination of this warning lamp,
accompanied by the display of a message.
The system cannot be deactivated above 10 km/h.
Malfunction
This warning lamp lights up on the instrument panel with the message
"Driving Assistance Sensor blind: Clean
sensor, see User Manual" if the sensor is
masked.
This is a normal behavior, which does not
request the support of a qualified workshop.
In this case, stop the vehicle and verify if the
front camera or the front radar is covered by dirt,
mud, sand, snow, ice or anything preventing the
sensing.
The system is operational again after the
detection field has been cleaned.
In the event of a malfunction, this warning
lamp lights up on the instrument panel,
accompanied by the display of a message and
an audible signal.
Have it checked by a PEUGEOT dealer or a
qualified workshop.
If these warning lamps come on
after the engine has been switched
off and then restarted, contact a PEUGEOT
dealer or a qualified workshop to have the
system checked.
These warning lamps light up on the instrument panel and/or in the
warning lamp display for seat belts and front
passenger airbag to indicate that the driver's
and/or front passenger's seat belt is not fastened
(depending on version). The automatic braking
system is deactivated until the seat belts are
fastened.
Distraction detection
For more information, refer to the
General recommendations on the use
of driving and manoeuvring aids .
The function comprises the "Driver Attention
Warning" system combined with the "Driver
Attention Warning by Camera" system.
These systems are in no way designed to keep the driver awake or to prevent
the driver from falling asleep at the wheel.
It is the driver’s responsibility to stop if feeling
tired.
Take a break if you are feeling tired or at least
every 2 hours.
Driver Attention Warning
The system triggers an alert when it detects that the driver has not taken a
break after two hours of driving at a speed above
43 mph (70
km/h).
This alert is issued via the display of a message
encouraging the driver to take a break,
accompanied by an audible signal.
If the driver does not follow this advice, the alert
is repeated hourly until the vehicle is stopped.
The system resets itself if one of the following
conditions is met:
–
With the engine running, the vehicle has been
stationary for more than 15 minutes.
–
The ignition has been switched off for a few
minutes.
–
The driver's seat belt is unfastened and their
door is opened.
As soon as the speed of the vehicle drops below 43 mph (70 km/h), the
system goes into standby.
Driving time starts being counted again once
the speed reaches above 43
mph (70 km/h).
Page 185 of 244
183
In the event of a breakdown
8Accessing the battery
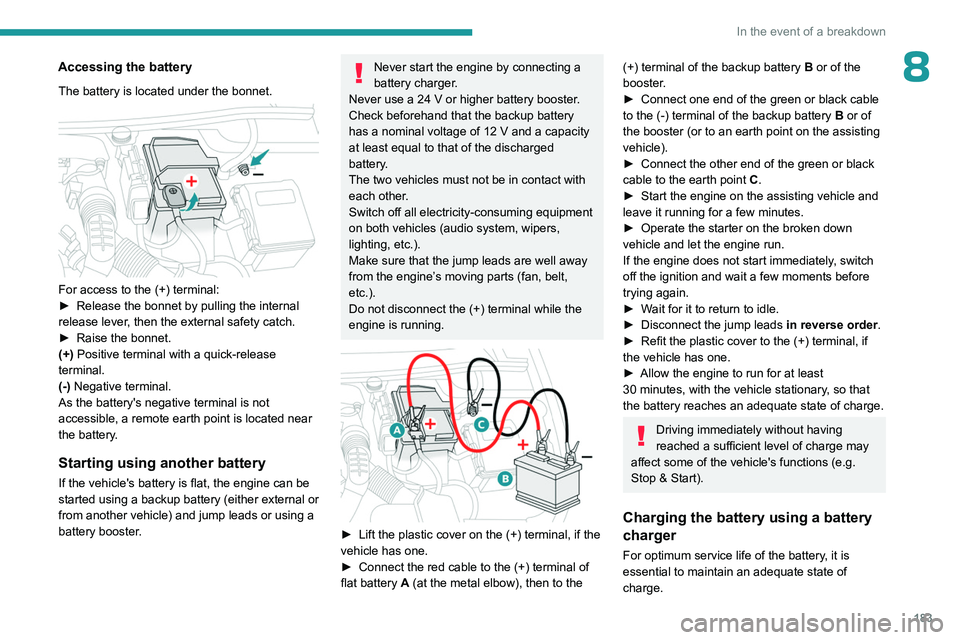
The battery is located under the bonnet.
For access to the (+) terminal:
► Release the bonnet by pulling the internal
release lever
, then the external safety catch.
►
Raise the bonnet.
(+)
Positive terminal with a quick-release
terminal.
(-) Negative terminal.
As the battery's negative terminal is not
accessible, a remote earth point is located near
the battery.
Starting using another battery
If the vehicle's battery is flat, the engine can be
started using a backup battery (either external or
from another vehicle) and jump leads or using a
battery booster.
Never start the engine by connecting a
battery charger.
Never use a 24
V or higher battery booster.
Check beforehand that the backup battery
has a nominal voltage of 12
V and a capacity
at least equal to that of the discharged
battery.
The two vehicles must not be in contact with
each other.
Switch off all electricity-consuming equipment
on both vehicles (audio system, wipers,
lighting, etc.).
Make sure that the jump leads are well away
from the engine’s moving parts (fan, belt,
etc.).
Do not disconnect the (+) terminal while the
engine is running.
► Lift the plastic cover on the (+) terminal, if the
vehicle has one.
►
Connect the red cable to the (+) terminal of
flat battery
A (at the metal elbow), then to the
(+) terminal of the backup battery B or of the
booster .
►
Connect one end of the green or black cable
to the (-) terminal of the backup battery
B or of
the booster (or to an earth point on the assisting
vehicle).
►
Connect the other end of the green or black
cable to the earth point
C
.
►
Start the engine on the assisting vehicle and
leave it running for a few minutes.
►
Operate the starter on the broken down
vehicle and let the engine run.
If the engine does not start immediately
, switch
off the ignition and wait a few moments before
trying again.
►
W
ait for it to return to idle.
►
Disconnect the jump leads in reverse order.
►
Refit the plastic cover to the (+) terminal, if
the vehicle has one.
►
Allow the engine to run for at least
30
minutes, with the vehicle stationary, so that
the battery reaches an adequate state of charge.
Driving immediately without having
reached a sufficient level of charge may
affect some of the vehicle's functions (e.g.
Stop & Start).
Charging the battery using a battery
charger
For optimum service life of the battery, it is
essential to maintain an adequate state of
charge.
Page 214 of 244

212
Vehicle data recording and privacy
Vehicle data recording
and privacy
Electronic control units are installed in your
vehicle. These control units process data
received from the vehicle's sensors, for example,
or data they generate themselves or exchange
with each other. Some of these control units are
required for the correct operation of your vehicle,
some others assist you while driving (driving or
manoeuvring aids), while others provide comfort
or infotainment functions.
The following contains general information about
how data is processed within the vehicle.
You will find additional information about the
specific data which is downloaded, stored
and transmitted to third parties and what it is
used for in your vehicle under the keyword
"Data protection". This information is directly
associated with the references for the functions
in question contained in the corresponding
vehicle handbook, or in the general terms and
conditions of sale.
This information is also available online.
Vehicle operating data
The control units process the data used for the
operation of the vehicle.
This data includes, for example:
–
Information about the state of the vehicle
(e.g.
speed, travel time, lateral acceleration,
wheel rotation rate, fastened seat belts display). –
Environmental conditions (e.g.
temperature,
rain sensor, distance sensor).
As a general rule, this data is temporary, is
not stored for longer than one operating cycle
and is only used within the vehicle itself. The
control units often record this data (including the
vehicle's key). This function allows either the
temporary or permanent storage of information
about the state of the vehicle, stresses on
components, servicing requirements, as well as
events and technical errors.
Depending on the vehicle's equipment level, the
data stored is as follows:
–
Operating state of system components
(e.g.
filling level, tyre pressures, battery charge
status).
–
Faults and malfunctions in important system
components (e.g.
lamps, brakes).
–
System reactions in specific driving situations
(e.g.
deployment of an airbag, triggering of
stability control and braking systems).
–
Information about events which have
damaged the vehicle.
–
For electric and rechargeable hybrid vehicles,
the traction battery charge level and the
estimated driving range.
In particular circumstances (e.g.
if the vehicle
has detected a malfunction), it may be necessary
to record data which would otherwise simply not
be stored.
When taking your vehicle in for servicing
(e.g.
repairs, maintenance), the stored operating
data may be read along with the vehicle's identification number and used if necessary.
The personnel working for the servicing network
(e.g.
garages, manufacturers) or third parties
(e.g. roadside assistance agents) may read
the vehicle's data. This also applies to work
carried out under warranty and quality assurance
measures.
This data is generally read via the OBD
(On-Board Diagnostics) port fitted by law to
the vehicle. It is used to report on the technical
state of the vehicle or its components and
facilitates the diagnosis of malfunctions, in
compliance with warranty obligations and for
quality improvement. This data, in particular the
information relating to stress on components,
technical events, operator errors and other
malfunctions, is sent to the Manufacturer, if
necessary, along with the vehicle's identification
number. The Manufacturer's liability may also be
engaged. The Manufacturer may also use the
operating data taken from the vehicle for product
recalls. This data may also be used to check the
customer's warranty and any claims made under
warranty.
Any malfunctions stored in the vehicle may be
reset by an after-sales service company during
servicing or repair work, or at your request.