2023 PEUGEOT 408 wheel size
[x] Cancel search: wheel sizePage 4 of 244

2
Contents
■
Overview
■
Eco-driving
1Dashboard instrumentsDriver information 10
Digital instrument panels 10
Warning and indicator lamps 11
Indicators 17
Manual test 19
Total distance recorder 19
Trip computer 19
10-inch touch screen 20
i-Toggles 22
Remotely operable additional functions
(Rechargeable hybrid)
22
2AccessElectronic key with remote control function and
built-in key 24
Proximity Keyless Entry and Start 26
Central locking 28
Back-up procedures 29
Doors 31
Boot 31
Motorised tailgate 31
Alarm 35
Electric windows 37
Sunroof 38
3Ease of use and comfortDriving position 40
Front seats 41
Steering wheel adjustment 45
Heated steering wheel 45
Mirrors 45
Rear bench seat 47
Heating and Ventilation 48
Dual-zone automatic air conditioning 49
Front demisting/defrosting 52
Rear screen demisting/defrosting 52
Heated windscreen 53
Temperature pre-conditioning
(Rechargeable hybrid)
53
Front fittings 54
Courtesy lamps 57
Interior ambient lighting 58
Rear fittings 58
Boot fittings 59
4Lighting and visibilityExterior lighting control stalk 61
Direction indicators 62
Headlamp beam height adjustment 62
Automatic illumination of headlamps 63
Guide-me-home and welcome lighting 63
Automatic lighting systems - General
recommendations
64
Automatic headlamp dipping 64
Peugeot Matrix LED Technology 2.0 65
Night Vision 67
Wiper control stalk 68
Intermittent wipers 70
Automatic wipers 70
Changing a wiper blade 71
5SafetyGeneral safety recommendations 72
Hazard warning lamps 72
Horn 73
Pedestrian horn (Rechargeable hybrid) 73
Emergency or assistance 73
Electronic stability control (ESC) 75
Seat belts 78
Airbags 80
Active bonnet 82
Child seats 83
Deactivating the front passenger airbag 84
ISOFIX child seats 85
i-Size child seats 87
Installing child seats 88
Child lock 90
6DrivingDriving recommendations 91
Starting/switching off the engine 92
Starting rechargeable hybrid vehicles 93
Electric parking brake 94
Automatic gearbox 96
Driving modes 99
Hill start assist 100
Gear shift indicator 101
Stop & Start 101
Tyre under-inflation detection 103
Driving and manoeuvring aids - General
recommendations
104
Steering wheel with hands-on detection 106
Shortcuts for driving aids 106
Road signs recognition 107
Speed limiter 111
Cruise control - Specific recommendations 11 2 CarM an uals 2 .c o m
Page 8 of 244

6
Overview
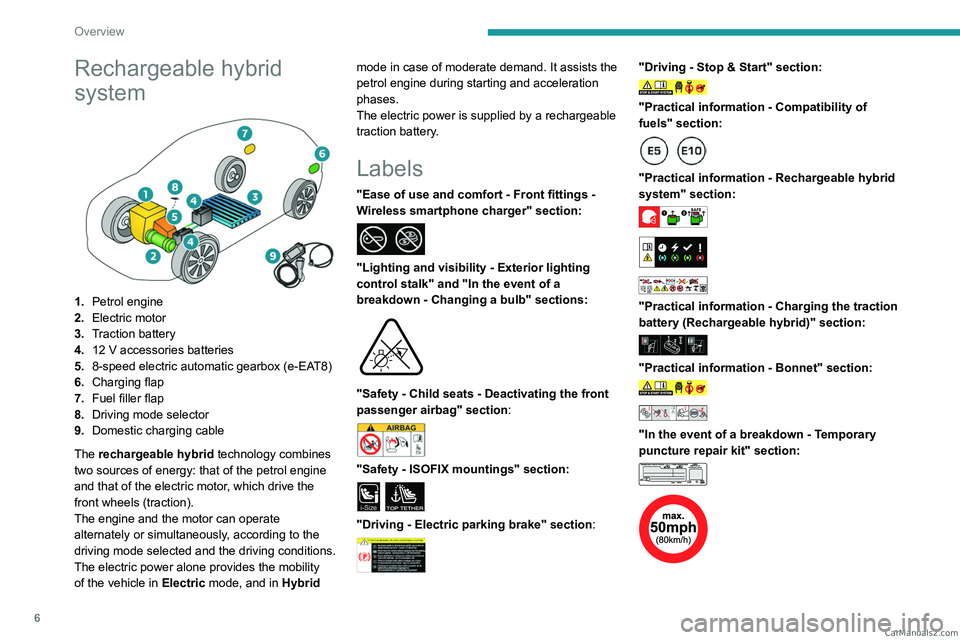
Rechargeable hybrid
system
1.Petrol engine
2. Electric motor
3. Traction battery
4. 12 V accessories batteries
5. 8-speed electric automatic gearbox (e-EAT8)
6. Charging flap
7. Fuel filler flap
8. Driving mode selector
9. Domestic charging cable
The rechargeable hybrid technology combines
two sources of energy: that of the petrol engine
and that of the electric motor, which drive the
front wheels (traction).
The engine and the motor can operate
alternately or simultaneously, according to the
driving mode selected and the driving conditions.
The electric power alone provides the mobility
of the vehicle in Electric mode, and in Hybrid mode in case of moderate demand. It assists the
petrol engine during starting and acceleration
phases.
The electric power is supplied by a rechargeable
traction battery.
Labels
"Ease of use and comfort - Front fittings -
Wireless smartphone charger" section:
"Lighting and visibility - Exterior lighting
control stalk" and "In the event of a
breakdown - Changing a bulb" sections:
"Safety - Child seats - Deactivating the front
passenger airbag" section:
"Safety - ISOFIX mountings" section:
i-SizeTOP TETHER
"Driving - Electric parking brake" section:
"Driving - Stop & Start" section:
"Practical information - Compatibility of
fuels" section:
"Practical information - Rechargeable hybrid
system" section:
"Practical information - Charging the traction
battery (Rechargeable hybrid)" section:
"Practical information - Bonnet" section:
"In the event of a breakdown - Temporary
puncture repair kit" section:
CarM an uals 2 .c o m
Page 106 of 244

104
Driving
audible signal and, depending on equipment, the
display of a message.
►
Reduce speed immediately
, avoid excessive
steering movements and avoid sudden braking.
►
Stop the vehicle as soon as it is safe to do
so.
The loss of pressure detected may not always cause visible deformation of the
tyre.
Do not rely on just a visual check.
►
Using a compressor
, such as the one in
the temporary puncture repair kit, check the
pressures of all four tyres when cold.
►
If it is not possible to carry out this check
immediately
, drive carefully at reduced speed.
►
In the event of a puncture, use the
temporary puncture repair kit or the spare wheel
(depending on equipment).
Driving too slowly may not ensure
optimum monitoring.
The alert is not immediately triggered in the
event of a sudden loss of pressure or tyre
blow-out. This is because analysis of the
values read by the wheel's speed sensors
can take several minutes.
The alert may be delayed at speeds below
25 mph (40 km/h), or when adopting a sporty
driving mode.
The alert is kept active until the system is reinitialised.
Reinitialisation
► The system must be reinitialised after any
adjustment to the pressure of one or more tyres,
and after changing one or more wheels.
Before reinitialising the system, make
sure that the pressures of the four tyres
are correct for the conditions of use of the
vehicle and conform to the values written on
the tyre pressure label.
Check the pressures of the four tyres before
performing the reinitialisation.
The system does not advise if a pressure is
incorrect at the time of reinitialisation.
With the vehicle stationary, the system
can be reinitialised in the
Settings>Vehicle touch screen application.
►
Then select
Safety > Tire Pressure Setup.
►
Press
YES to confirm.
The
reinitialisation is confirmed by the display of
a message and an audible signal.
Malfunction
In the event of a malfunction,
these warning lamps light up on
the instrument panel.
A message appears, accompanied by an audible
signal.
In this case, the tyre under-inflation monitoring
function is no longer performed.
Have it checked by a PEUGEOT dealer or a
qualified workshop.
Non-standard or 'space-saver' spare
wheel
The use of this type of spare wheel may
suspend tyre pressure monitoring.
In this case, the malfunction warning lamp
comes on and disappears once the wheel
has been replaced by one of uniform size (the
same as the others), the pressure readjusted
and the
reinitialisation carried out.
Driving and manoeuvring
aids - General
recommendations
Driving and manoeuvring aids cannot, in
any circumstances, replace the need for
vigilance on the part of the driver.
The driver must comply with the Highway
Code, must remain in control of the vehicle in
all circumstances and must be able to retake
control of it at all times. The driver must adapt
the speed to climatic conditions, traffic and
the state of the road.
It is the driver's responsibility to constantly
monitor traffic conditions, assess the distance
and relative speed of other vehicles, and
anticipate their manoeuvres before using the
direction indicator and changing lanes.
These systems do not make it possible to
exceed the laws of physics. CarM an uals 2 .c o m
Page 161 of 244

159
Practical information
7► Place the 7 central fixing brackets (upper:
1 ; lower: 2) and pre-engage them in the front
bumper grille.
►
Press on the upper middle part to clip.
►
Repeat the same steps for the left and right
side parts with the 5 side fixing brackets (upper:
3
; lower: 4).
►
Check that the unit is firmly held by pressing
its edge.
T
o remove the screen, press down on the upper
fixing brackets 1 and 3, then tilt the screen down.
Snow chains
In wintry conditions, snow chains improve
traction as well as the behaviour of the vehicle
when braking.
Snow chains must be fitted only to the
front wheels. They must never be fitted to
"space-saver" type spare wheels.
Observe the legislation in force in your
country relating to the use of snow
chains and maximum authorised speeds.
Only use chains that have been designed for the
type of wheel fitted to your vehicle:
Original tyre size Maximum link size 215/65 R17 9 mm
225/55 R18 9 mm
Original tyre size Maximum link size
205/55 R19 9 mm
245/40 R20 -
For more information, contact a PEUGEOT
dealer or a qualified workshop.
Installation tips
► To fit the snow chains during a journey, stop
the vehicle on a flat surface at the side of the
road.
►
Apply the parking brake and position any
wheel chocks under the wheels to prevent
movement of the vehicle.
►
Fit the snow chains following the instructions
provided by the manufacturer
.
►
Move off gently and drive for a few moments,
without exceeding 31
mph (50 km/h).
►
Stop the vehicle and check that the snow
chains are correctly tightened.
It is strongly recommended that you
practise fitting the snow chains on a level
and dry surface before setting off.
Avoid driving with snow chains on roads that have been cleared of snow to avoid
damaging the vehicle's tyres and the road
surface. If the vehicle is fitted with alloy
wheels, check that no part of the chain or its
fixings is in contact with the wheel rim.
Energy economy mode
This system manages the duration of use of
certain functions, in order to conserve a sufficient
level of charge in the battery with the ignition off.
After switching off the engine and for a maximum
cumulative period of around 30 minutes, you can
continue to use functions such as the audio and
telematics system, dipped beam headlamps or
courtesy lamps.
Selecting the mode
A confirmation message is displayed when
energy economy mode is entered, and the active
functions are placed on standby.
If a telephone call is in progress at the
time, it will be maintained for around 10
minutes via the audio system’s hands-free
system.
Exiting the mode
These functions are automatically reactivated the
next time the vehicle is used.
To restore the use of these functions
immediately, start the engine and let it run:
–
For less than 10 minutes, to use the
equipment for approximately 5 minutes.
–
For more than 10 minutes, to use the
equipment for approximately 30 minutes.
Let the engine run for the specified duration to
ensure that the battery charge is sufficient. CarM an uals 2 .c o m
Page 166 of 244

164
Practical information
Brake disc wear
For information on checking brake disc
wear, contact a PEUGEOT dealer or a
qualified workshop.
Electric parking brake
This system does not require any routine servicing. However, in the event of a
problem, do not hesitate to have the system
checked by a PEUGEOT dealer or a qualified
workshop.
For more information on the Electric
parking brake, refer to the
corresponding section.
Wheels and tyres
The inflation pressure of all tyres, including the spare wheel, must be
checked on "cold” tyres.
The pressures indicated on the tyre pressure
label are valid for "cold" tyres. If you have driven
for more than 10 minutes or more than 6 miles
(10 kilometres) at over 31 mph (50
km/h), add
0.3 bar (30 kPa) to the values indicated on the
label.
Under-inflation increases energy
consumption. Non-compliant tyre
pressures cause tyres to wear prematurely
and have an adverse effect on the vehicle's
road holding - risk of accident! Driving with worn or damaged tyres reduces the
braking and road holding performance of the
vehicle. Regularly check the condition of the
tyres (tread and sidewalls) and rims as well as
the presence of the valve caps.
When the wear indicators no longer appear set
back from the tread, the depth of the grooves is
less than 1.6 mm; replace the tyres as soon as
possible.
Using different size wheels and tyres from those
specified can affect the lifetime of tyres, wheel
rotation, ground clearance, the speedometer
reading and have an adverse effect on road
holding.
Fitting different tyres on the front and rear axles
can cause the ESC to mistime.
Always mark the direction of rotation on the tyres
that will be stored when fitting winter or summer
tyres. Store them in a cool, dry place and away
from direct exposure to the sun's rays.
Winter or 4-seasons tyres can be
identified by this symbol on their
sidewalls.
Shock absorbers
It is not easy for drivers to detect when
shock absorbers are worn. Nevertheless,
the shock absorbers have a major impact on
road holding and braking performance.
For your safety and driving comfort, it is
important to have them regularly checked by a
PEUGEOT dealer or a qualified workshop.
Timing and accessory kits
The timing and accessory kits are used
from the time the engine is started until it
is switched off. It is normal for them to wear over
time.
A
faulty timing or accessory kit can damage
the engine, rendering it unusable. Observe the
recommended replacement frequency, stated in
distance travelled or time elapsed, whichever is
reached first.
Free-wheeling
In certain situations, it is necessary to put the
vehicle into free-wheeling mode (e.g. towing, on
a rolling road, automatic car wash (Wash mode),
rail or sea transport).
Never leave the vehicle unattended with
the vehicle into free-wheeling mode.
/
Release procedure
With the vehicle stationary and the engine
running:
►
Depress and hold the brake pedal.
►
Select and hold the mode
N
on the push
selector.
►
Press the
START/STOP button around 1 s to
switch off the engine (confirmed by the flashing
of the P and N indicator lights). CarM an uals 2 .c o m