2023 PEUGEOT 408 fuel flap
[x] Cancel search: fuel flapPage 7 of 244

5
Overview
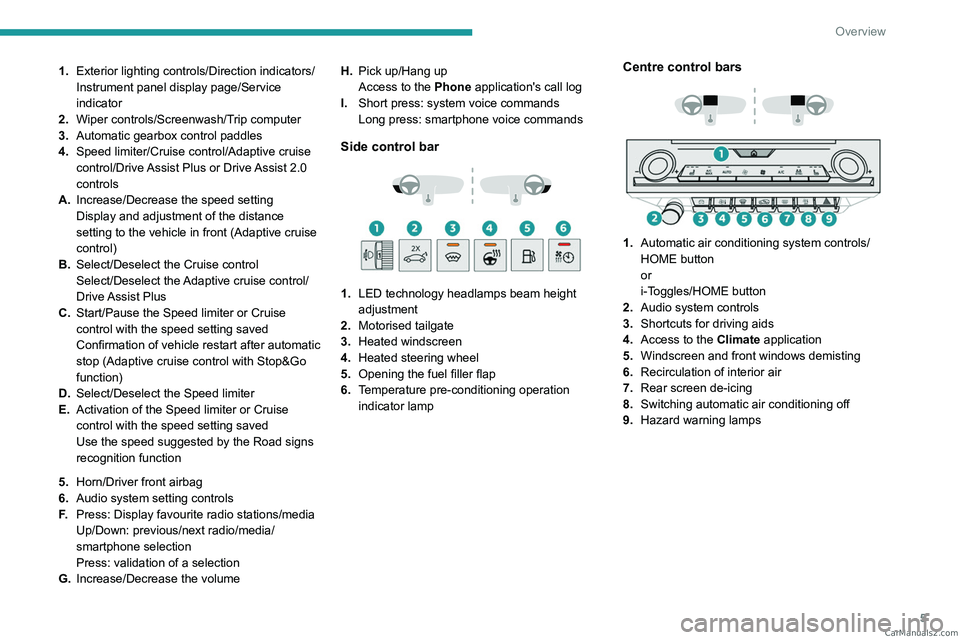
1.Exterior lighting controls/Direction indicators/
Instrument panel display page/Service
indicator
2. Wiper controls/Screenwash/Trip computer
3. Automatic gearbox control paddles
4. Speed limiter/Cruise control/Adaptive cruise
control/Drive Assist Plus or Drive Assist 2.0
controls
A. Increase/Decrease the speed setting
Display and adjustment of the distance
setting to the vehicle in front (Adaptive cruise
control)
B. Select/Deselect the Cruise control
Select/Deselect the Adaptive cruise control/
Drive Assist Plus
C. Start/Pause the Speed limiter or Cruise
control with the speed setting saved
Confirmation of vehicle restart after automatic
stop (Adaptive cruise control with Stop&Go
function)
D. Select/Deselect the Speed limiter
E. Activation of the Speed limiter or Cruise
control with the speed setting saved
Use the speed suggested by the Road signs
recognition function
5. Horn/Driver front airbag
6. Audio system setting controls
F. Press: Display favourite radio stations/media
Up/Down: previous/next radio/media/
smartphone selection
Press: validation of a selection
G. Increase/Decrease the volume H.
Pick up/Hang up
Access to the Phone application's call log
I. Short press: system voice commands
Long press: smartphone voice commands
Side control bar
1. LED technology headlamps beam height
adjustment
2. Motorised tailgate
3. Heated windscreen
4. Heated steering wheel
5. Opening the fuel filler flap
6. Temperature pre-conditioning operation
indicator lamp
Centre control bars
1. Automatic air conditioning system controls/
HOME button
or
i-Toggles/HOME button
2. Audio system controls
3. Shortcuts for driving aids
4. Access to the Climate application
5. Windscreen and front windows demisting
6. Recirculation of interior air
7. Rear screen de-icing
8. Switching automatic air conditioning off
9. Hazard warning lamps CarM an uals 2 .c o m
Page 8 of 244

6
Overview
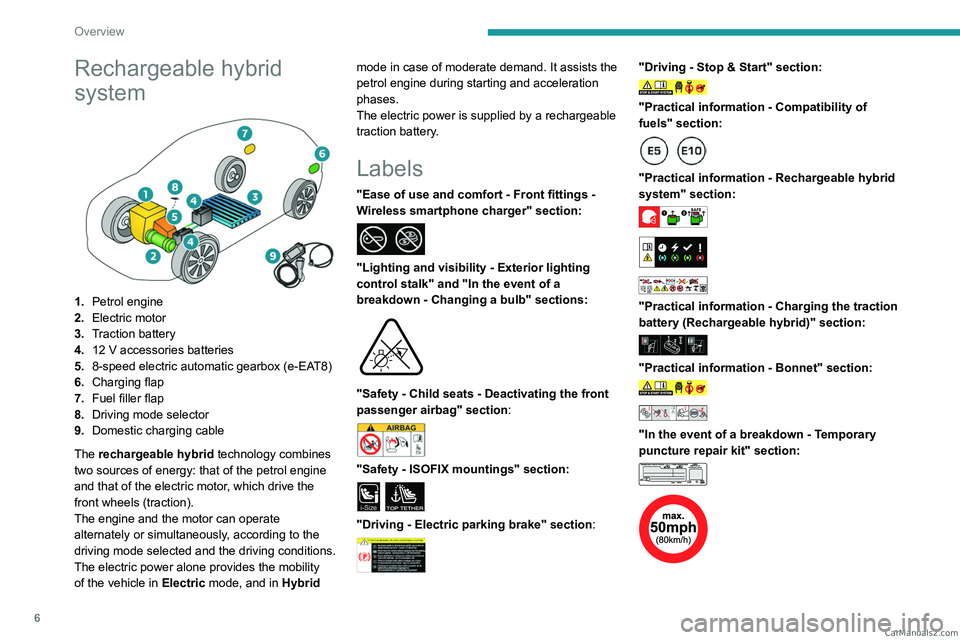
Rechargeable hybrid
system
1.Petrol engine
2. Electric motor
3. Traction battery
4. 12 V accessories batteries
5. 8-speed electric automatic gearbox (e-EAT8)
6. Charging flap
7. Fuel filler flap
8. Driving mode selector
9. Domestic charging cable
The rechargeable hybrid technology combines
two sources of energy: that of the petrol engine
and that of the electric motor, which drive the
front wheels (traction).
The engine and the motor can operate
alternately or simultaneously, according to the
driving mode selected and the driving conditions.
The electric power alone provides the mobility
of the vehicle in Electric mode, and in Hybrid mode in case of moderate demand. It assists the
petrol engine during starting and acceleration
phases.
The electric power is supplied by a rechargeable
traction battery.
Labels
"Ease of use and comfort - Front fittings -
Wireless smartphone charger" section:
"Lighting and visibility - Exterior lighting
control stalk" and "In the event of a
breakdown - Changing a bulb" sections:
"Safety - Child seats - Deactivating the front
passenger airbag" section:
"Safety - ISOFIX mountings" section:
i-SizeTOP TETHER
"Driving - Electric parking brake" section:
"Driving - Stop & Start" section:
"Practical information - Compatibility of
fuels" section:
"Practical information - Rechargeable hybrid
system" section:
"Practical information - Charging the traction
battery (Rechargeable hybrid)" section:
"Practical information - Bonnet" section:
"In the event of a breakdown - Temporary
puncture repair kit" section:
CarM an uals 2 .c o m
Page 26 of 244

24
Access
Electronic key with
remote control function
and built-in key
Remote control function
The remote control can be used to perform
the following remote functions (depending on
version):
–
Unlocking/Locking/Deadlocking the vehicle.
–
Unlocking/Locking the boot.
–
Folding/Unfolding the door mirrors.
–
Activating/Deactivating the alarm.
–
Locating the vehicle.
–
Closing the windows.
–
Closing the sunroof.
–
Activating the vehicle’
s electronic immobiliser.
Back-up procedures allow the vehicle to be
locked/unlocked in the event of a failure of the
remote control, the central locking, the battery,
etc. For more information on the Back-up
procedures, refer to the corresponding section.
Built-in key
Using the remote control built-in key, you can
perform the following operations (depending on
version):
–
Activation/Deactivation of the manual child
lock.
–
Activation/Deactivation of the front passenger
airbag.
–
Back-up Unlocking/Locking of the doors.
► To eject the key or put it back in place, pull
and hold the button.
Once the built-in key is ejected, always
keep it with you to be able to carry out
the corresponding back-up procedures.
Unlocking the vehicle
Selective unlocking (driver’s door, boot) is
configured in the Settings
> Vehicle
touch screen application.
Complete unlocking
► If the selective unlocking is deactivated,
press the unlocking button.
Selective unlocking
Driver's door
► Press the unlocking button.
The driver's door and the fuel filler flap are
unlocked (Petrol).
The driver's door is unlocked (Rechargeable
hybrid).
►
Press it
again to unlock the other doors and
the boot.
The charging nozzle can be unplugged on the
second press.
Complete or selective unlocking, and alarm
deactivation (depending on version), is confirmed
by the flashing of the direction indicators and the
lighting of the daytime running lamps.
Depending on version, the door mirrors unfold.
Selective unlocking and opening of
the tailgate
By default, selective unlocking of the tailgate
is deactivated and its motorised operation is
activated.
► With a motorised tailgate: press and
hold this button to unlock the boot and
trigger the motorised opening of the tailgate. CarM an uals 2 .c o m
Page 27 of 244

25
Access
2► With a non-motorised tailgate: press and hold
this button to unlock the boot and partially open
the tailgate.
When selective unlocking of the tailgate is
activated, the doors and the fuel filler flap remain
locked.
If selective unlocking of the tailgate is
deactivated, pressing the button unlocks the
whole vehicle.
If motorised operation of the tailgate is
deactivated, pressing the button partially
opens the tailgate.
To lock the vehicle, it is necessary to close
the tailgate again.
Locking the vehicle
Depending on version, the activation/
deactivation of the lock audible signal is
configured in the Settings
> Vehicle touch
screen application.
Normal locking
► Press the locking button.
The locking, and the activation of the alarm
depending on version,
is confirmed by the
lighting of the direction indicators and the
daytime running lamps.
Depending on version, the door mirrors fold.
An access (door or boot) that is not properly closed prevents locking of the
vehicle. However, if the vehicle is fitted with
an alarm, it will be activated after 45
seconds.
If the vehicle is unlocked but the doors or boot
are not subsequently opened,
the vehicle
will automatically lock itself again after about
30
seconds. If the vehicle is fitted with an
alarm, it will be reactivated automatically.
Deadlocking
Deadlocking renders the interior door
controls inoperative. It also deactivates
the central locking buttons.
The horn remains operational.
Never leave anyone inside the vehicle
when it is deadlocked.
►
Press the locking button.
►
Press the locking button again within 3
seconds to deadlock the vehicle (confirmed by
the temporary lighting of the direction indicators).
For the vehicles equipped with the Proximity
Keyless Entry and Start system, a double
audible signal indicates that the vehicle is not
deadlocked.
Closing the windows and sunroof
An audible signal sounds in the passenger
compartment before the start of movement to
warn any occupants.
►
T
o completely close the windows and,
depending on version, the sunroof, press the
locking button for more than 2 seconds.
►
Press again to stop closing.
Ensure that no person or object could
prevent the correct closing of the
windows and sunroof.
If, on versions with alarm, you want to
leave the windows and/or sunroof partially
open, you must first deactivate the interior
volumetric alarm protection.
For more information on the Alarm, refer to
the corresponding section.
Locating the vehicle
This function helps you to spot your vehicle from
a distance, with the vehicle locked:
–
The direction indicators flash for approximately
10 seconds.
–
The door mirror spotlamps come on.
–
The courtesy lamps come on.
► Press this button. CarM an uals 2 .c o m
Page 29 of 244

27
Access
2Depending on version, the door mirrors unfold.
If the electronic key remains around the
vehicle (zones A, B or C) for more than
15 minutes without action, the automatic
functions are deactivated. To unlock or lock
the vehicle, use the remote control or press
the driver's door handle.
If using the door handle does not lock/unlock
the vehicle, bring the electronic key closer
and repeat the desired action.
Selective unlocking
Driver’s door
It operates:
►
Either automatically when approaching the
driver
’s door, if the automatic functions are
activated.
►
Or by gently pressing the driver's door
handle.
The driver's door and the fuel filler flap are
unlocked (Petrol).
The driver's door is unlocked (Rechargeable
hybrid).
►
Once inside the vehicle, to unlock all
accesses, press the central unlocking button or
pull the opening control on any door
.
Selective unlocking of the tailgate
The tailgate unlocks automatically as you
approach the rear of the vehicle.
►
Press the tailgate control to open the boot.
The doors remain locked.
Locking the vehicle
Depending on version, the activation/
deactivation of the lock audible signal is
configured in the Settings
> Vehicle touch
screen application.
Normal locking
With the doors and boot closed, the vehicle
locks:
►
Either automatically
, upon leaving zone B, if
the automatic functions are activated.
►
Or by gently pressing the driver's door
handle.
Locking is confirmed by the lighting of the
direction indicators, and by a double audible
signal when the vehicle is locked upon walking
away
.
The alarm does not activate when locking automatically from a distance (the
direction indicators do not light up).
It is not possible to lock the vehicle if the
electronic key is left inside the vehicle.
Deadlocking
Deadlocking renders the interior door
controls inoperative. It also deactivates
the central locking buttons.
The horn remains operational.
Never leave anyone inside the vehicle
when it is deadlocked.
► Gently press the driver's door handle to lock
the vehicle.
►
Press it again within 3
seconds to deadlock
the vehicle (confirmed by the temporary lighting
of the direction indicators).
A double audible signal indicates that the vehicle
is not deadlocked.
Advice
If one of the doors or the boot is still open
or if the electronic key for the Keyless
Entry and Start
system has been left inside
the vehicle, central locking will not take place.
If the vehicle is unlocked but the doors or
tailgate are not subsequently opened, the
vehicle will automatically lock itself again after
about 30
seconds. If fitted to the vehicle, the
alarm is automatically reactivated (if
previously activated). CarM an uals 2 .c o m
Page 145 of 244

143
Practical information
Peugeot & TotalEnergies,
a partnership in performance !
For more than 25 years of partnership, TotalEnergies and Peugeot have
pushed the limits of performance in sports competition with historic
victories, in endurance races or in rallies. Today, the two brands continue
their common motorsport adventure by setting out to conquer the 24h
of Le Mans and the FIA World Endurance Championship in the Hybrid
Hypercar category. So many challenges for which Peugeot exclusively
recommends high-tech Quartz lubricants for the protection of its
engines throughout their life. TotalEnergies therefore equips Peugeot
vehicles with Quartz lubricants from their fi rst fi lling in the factory to the
approved maintenance networks to guarantee them optimal day-to-
day operation. Peugeot & TotalEnergies: offi cial partners in performance !
Keep your engine younger for longer !
Quartz Ineo Xtra First 0W-20 is a very high performance lubricant
resulting from the joint work of the Peugeot and TotalEnergies R&D
teams. Its innovative technology extends your engine’s life while
reaching signifi cant fuel savings and thus limiting CO
2 emissions. The
product is now available in new packaging* made of 50% recycled
material and 100% recyclable.
* 1L & 5L produced in Europe
7Compatibility of fuels
Petrol fuels conforming to the EN228 standard
containing up to 5% and 10% ethanol
respectively.
The only petrol fuel additives authorised for use are those that meet the B715001
standard.
Travelling abroad
Certain fuels could damage your vehicle’s
engine.
In certain countries, the use of a particular
fuel may be required (specific octane rating,
specific trade name, etc.) to ensure correct
operation of the engine.
For all additional information, consult a dealer.
Refuelling
Fuel tank capacity: approximately 52 litres
(Petrol) or 40 litres (Rechargeable hybrid).
Reserve level: approximately 6 litres.
Low fuel level
When the low fuel level is reached, this
warning lamp lights up on the instrument
panel, accompanied by the display of a message
and an audible signal. When it first comes on,
about 6 litres of fuel remain.
Until sufficient fuel is added, this warning lamp
appears every time the ignition is switched on,
accompanied by the message and the audible
signal. When driving, this message and audible
signal are repeated with increasing frequency as
the fuel level drops towards 0.
You must refuel as soon as possible to avoid
running out of fuel.
A small arrow by the warning lamp indicates which side of the vehicle the
fuel filler flap is located on.
Stop & Start
Never refuel with the engine in STOP
mode; you must switch off the ignition.
Refuelling
Any addition of fuel must be in quantities of at
least 10 litres, in order to be registered by the
fuel gauge.
Opening the filler flap may create a noise caused
by an inrush of air. This vacuum is entirely
normal, resulting from the sealing of the fuel
system.
To refuel in complete safety:
►
Always switch off the engine.
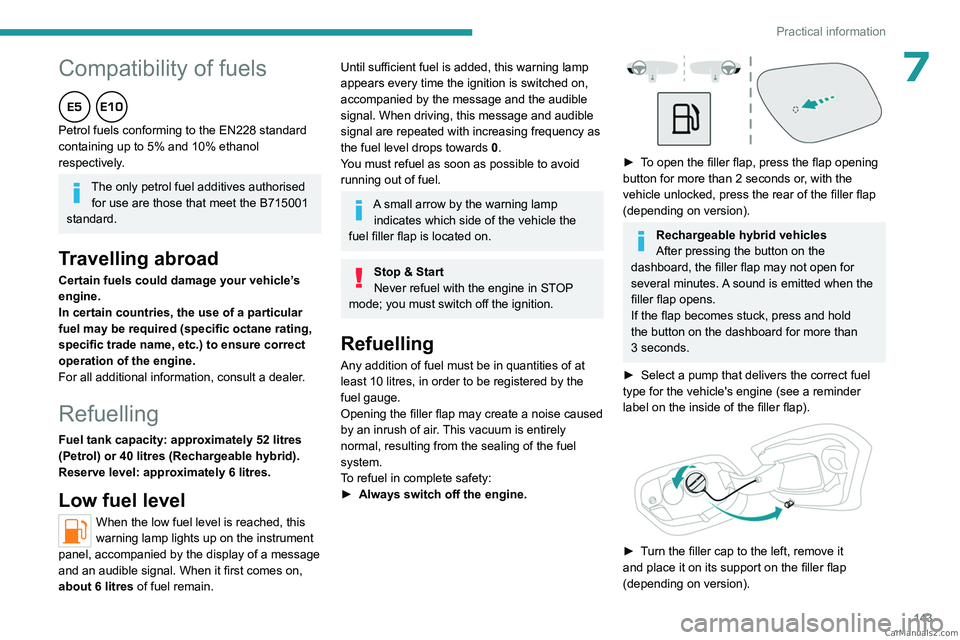
► To open the filler flap, press the flap opening
button for more than 2 seconds or, with the
vehicle unlocked, press the rear of the filler flap
(depending on version).
Rechargeable hybrid vehicles
After pressing the button on the
dashboard, the filler flap may not open for
several minutes. A sound is emitted when the
filler flap opens.
If the flap becomes stuck, press and hold
the button on the dashboard for more than
3
seconds.
►
Select a pump that delivers the correct fuel
type for the vehicle's engine (see a reminder
label on the inside of the filler flap).
► Turn the filler cap to the left, remove it
and place it on its support on the filler flap
(depending on version). CarM an uals 2 .c o m
Page 146 of 244

144
Practical information
► Insert the filler nozzle and push it in as far as
possible before starting to refuel (to minimise the
risk of splashing).
►
Fill the tank.
Do not continue after the nozzle’
s third cut-
out. Doing so may cause malfunctions.
►
Put the filler cap back in place and turn it to
the right (depending on version).
►
Push the fuel filler flap to close it.
The vehicle is fitted with a catalytic converter
,
which helps to reduce the level of harmful
emissions in the exhaust gases.
For petrol engines, you must use unleaded
fuel.
The filler neck is narrower, allowing only
unleaded petrol nozzles to be inserted.
If you have put in the wrong fuel for
the vehicle, you must have the fuel
tank drained and filled with the correct fuel
before starting the engine.
Rechargeable hybrid
system
Electrical system
The electrical circuit of the rechargeable hybrid
system is identified by orange cables and its
components are marked with this symbol:
The rechargeable hybrid powertrain uses a voltage of between 240 V and 400 V.
This system may be hot both when the
ignition is on and after switching it off.
Comply with the warning messages shown
on the labels, particularly inside the charging
flap.
High voltage system voltage is
dangerous and can cause burns or other
injuries or even fatal electric shock.
Since damage to high voltage components is
not visible, PEUGEOT recommends that you:
–
Never touch the components, damaged
or not, and never let your jewelry or other
metallic objects come into contact with these
components.
–
Never work on the orange high voltage
cables or on any other high voltage
component marked with the Electric risk label.
Any intervention on the high voltage system
must be carried out by qualified persons in
workshops qualified and approved to carry
out this type of work.
–
Never damage, modify or remove the
orange high voltage cables or disconnect
them from the high voltage network.
– Never open, modify or remove the cover of
the traction battery .
–
Never work with cutting and forming
tools or heat sources near high voltage
components and cables.
In case of low level of fluid in the cooling
tank, the refilling shall only be performed in a
qualified and trained workshop to verify that
the leakage is not in the traction battery
.
Any intervention on the high voltage system
must be carried out by qualified persons in
workshops qualified and approved to carry
out this type of work.
Damage to the vehicle or the traction battery
could result in the leakage of toxic gases or
fluids either immediately or later. PEUGEOT
recommends that you:
–
Always inform the fire and emergency
services in the event of an incident, warning
that the vehicle is equipped with a traction
battery
.
–
Never touch the liquids leaking from the
traction battery
.
–
Do not inhale the gases emitted by the
traction battery which are toxic.
–
Move away from the vehicle in the event of
incident or accident, the gases emitted being
flammable and could cause a fire.
CarM an uals 2 .c o m
Page 210 of 244

208
Alphabetical index
A
ABS 75
Accelerated charging unit (Wallbox)
146–147
Accessories
72
Active LED Vision
63, 65
Active Safety Brake
126–127, 129
Adjusting headlamps
62
Adjusting head restraints
41
Adjusting seat
41–42
Adjusting the air distribution
49, 51
Adjusting the air flow
49, 51
Adjusting the headlamp beam height
62
Adjusting the height and reach of
the steering wheel
45
Adjusting the lumbar support
42
Adjusting the seat angle
42
Adjusting the temperature
50
Adjusting the time
203
Advice on care and maintenance
145, 165
Advice on driving
8, 91–92
Airbags
80–82, 84
Airbags, curtain
81–82
Airbags, front
80–81, 85
Airbags, lateral
81–82
Air conditioning
49, 52
Air conditioning, automatic
52
Air conditioning, dual-zone automatic
49
Air intake
51–52
Air vents
48
Alarm
35–36
Amplifier, audio
57
Anti-lock braking system (ABS)
75
Antitheft / Immobiliser 25
Applications
21–22
Armrest, front
56
Armrest, rear
58
Assistance call
73–74
Assistance, emergency braking
76, 128
Audio streaming (Bluetooth)
200
B
Battery, 12 V 159, 163, 177–181
Battery, ancillaries
177
Battery, charging
177–178, 181
Battery, remote control
29–30
Blanking screen (snow shield)
158
Blind
38
Bluetooth (hands-free)
197
Bluetooth (telephone)
197–198
Bodywork
165
Bonnet
160
Bonnet, active
82
Boot
31, 34, 60
Brake discs
163–164
Brake lamps
176
Brakes
163–164
Braking
98
Braking assistance system
75–76
Braking, automatic emergency
126–127, 129
Braking, dynamic emergency
95–96
Bulbs (changing)
175–176
C
Capacity, fuel tank 143
Care of the bodywork
165
Central locking
27–28
Changing a bulb
175–176
Changing a fuse
177
Changing a wheel
168, 172
Changing a wiper blade
71
Changing the remote control battery
29
Changing to free-wheeling
164
Charge level indicator (Rechargeable
hybrid)
19
Charger, induction
55
Charger, wireless
55
Charging cable
148
Charging cable (Rechargeable
hybrid)
146–147, 152
Charging connector (Rechargeable
hybrid)
146, 151–153
Charging flap (Rechargeable
hybrid)
146, 151–153
Charging the traction battery
(Rechargeable hybrid)
18, 144, 151–153
CHECK
19
Checking the engine oil level
17
Checking the levels
161–162
Checking tyre pressures
(using the kit)
169, 171
Checks
161, 163–164
Checks, routine
163–164
Child lock
90
Children
79, 85–87 CarM an uals 2 .c o m