2023 PEUGEOT 408 stop start
[x] Cancel search: stop startPage 165 of 244
163
Practical information
7Fluid specification
The fluid must be topped up with a pre-mixed
product.
In winter (temperatures below zero), a fluid
containing an anti-freeze agent which is
appropriate for the temperature conditions
must be used in order to protect the system's
components (pump, tank, ducts, jets).
Filling with pure water is prohibited in all
circumstances (risk of freezing,
limescale, etc.).
Checks
Unless otherwise indicated, check these
components in accordance with the
Manufacturer's service schedule and according
to your engine.
Otherwise, have them checked by a PEUGEOT
dealer or a qualified workshop.
Only use products recommended by
PEUGEOT or products of equivalent
quality and specification.
In order to optimise the operation of
components as important as those in the
braking system, PEUGEOT selects and offers
very specific products.
12 V battery
The battery does not require any maintenance.
Check regularly that the terminals are correctly
tightened (versions without quick-release
terminals) and that the connections are clean.
For more information on the precautions
to take before any work on the 12 V
battery, refer to the corresponding section.
Versions equipped with Stop & Start are
fitted with a 12 V lead-acid battery with
special technology and specifications.
Its replacement should be carried out only by
a PEUGEOT dealer or a qualified workshop.
Passenger compartment
filter
Depending on the environment and the
use of the vehicle (e.g. dusty atmosphere,
city driving), change it twice as often, if
necessary .
A clogged passenger compartment filter
can adversely affect air conditioning
system performance and generate
undesirable odours.
Air filter
Depending on the environment and the
use of the vehicle (e.g. dusty atmosphere,
city driving), change it twice as often, if
necessary .
Oil filter
Change the oil filter each time the engine
oil is changed.
Automatic gearbox
The gearbox does not require any
maintenance (no oil change).
Brake pads
Brake wear depends on the style of
driving, particularly in the case of vehicles
used in town, over short distances. It may be
necessary to have the condition of the brakes
checked, even between vehicle services.
Unless there is a leak in the circuit, a drop in the
brake fluid level indicates that the brake pads
are worn.
After washing the vehicle, moisture, or in wintry conditions, ice can form on the
brake discs and pads: braking efficiency may
be reduced. Gently dab the brakes to dry and
defrost them. CarM an uals 2 .c o m
Page 166 of 244
164
Practical information
Brake disc wear
For information on checking brake disc
wear, contact a PEUGEOT dealer or a
qualified workshop.
Electric parking brake
This system does not require any routine servicing. However, in the event of a
problem, do not hesitate to have the system
checked by a PEUGEOT dealer or a qualified
workshop.
For more information on the Electric
parking brake, refer to the
corresponding section.
Wheels and tyres
The inflation pressure of all tyres, including the spare wheel, must be
checked on "cold” tyres.
The pressures indicated on the tyre pressure
label are valid for "cold" tyres. If you have driven
for more than 10 minutes or more than 6 miles
(10 kilometres) at over 31 mph (50
km/h), add
0.3 bar (30 kPa) to the values indicated on the
label.
Under-inflation increases energy
consumption. Non-compliant tyre
pressures cause tyres to wear prematurely
and have an adverse effect on the vehicle's
road holding - risk of accident! Driving with worn or damaged tyres reduces the
braking and road holding performance of the
vehicle. Regularly check the condition of the
tyres (tread and sidewalls) and rims as well as
the presence of the valve caps.
When the wear indicators no longer appear set
back from the tread, the depth of the grooves is
less than 1.6 mm; replace the tyres as soon as
possible.
Using different size wheels and tyres from those
specified can affect the lifetime of tyres, wheel
rotation, ground clearance, the speedometer
reading and have an adverse effect on road
holding.
Fitting different tyres on the front and rear axles
can cause the ESC to mistime.
Always mark the direction of rotation on the tyres
that will be stored when fitting winter or summer
tyres. Store them in a cool, dry place and away
from direct exposure to the sun's rays.
Winter or 4-seasons tyres can be
identified by this symbol on their
sidewalls.
Shock absorbers
It is not easy for drivers to detect when
shock absorbers are worn. Nevertheless,
the shock absorbers have a major impact on
road holding and braking performance.
For your safety and driving comfort, it is
important to have them regularly checked by a
PEUGEOT dealer or a qualified workshop.
Timing and accessory kits
The timing and accessory kits are used
from the time the engine is started until it
is switched off. It is normal for them to wear over
time.
A
faulty timing or accessory kit can damage
the engine, rendering it unusable. Observe the
recommended replacement frequency, stated in
distance travelled or time elapsed, whichever is
reached first.
Free-wheeling
In certain situations, it is necessary to put the
vehicle into free-wheeling mode (e.g. towing, on
a rolling road, automatic car wash (Wash mode),
rail or sea transport).
Never leave the vehicle unattended with
the vehicle into free-wheeling mode.
/
Release procedure
With the vehicle stationary and the engine
running:
►
Depress and hold the brake pedal.
►
Select and hold the mode
N
on the push
selector.
►
Press the
START/STOP button around 1 s to
switch off the engine (confirmed by the flashing
of the P and N indicator lights). CarM an uals 2 .c o m
Page 173 of 244
171
In the event of a breakdown
8If after approximately 7 minutes, the
pressure of 2 bar is not reached, this
indicates that the tyre is not repairable;
contact a PEUGEOT dealer or a qualified
workshop for assistance.
►
Move the switch to position
"O".
►
Disconnect the compressor's electric plug
from the vehicle's 12
V socket.
►
Remove the kit.
►
Refit the cap on the valve.
►
Remove and store the bottle of sealant.
The sealant product is harmful if swallowed and causes irritation to the
eyes.
Keep this product out of the reach of children.
The use-by date of the fluid is marked on the
bottle.
After use, do not discard the bottle into the
environment; take it to a PEUGEOT dealer or
an authorised waste disposal site.
Do not forget to obtain a new bottle of
sealant, available from a PEUGEOT dealer or
a qualified workshop.
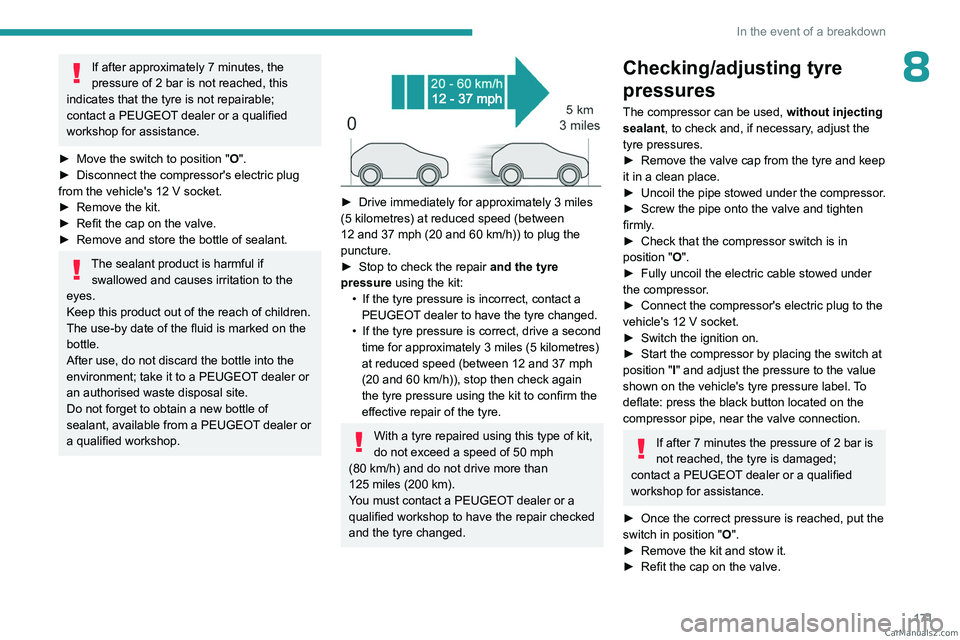
► Drive immediately for approximately 3 miles
(5 kilometres) at reduced speed (between
12 and 37
mph (20 and 60 km/h)) to plug the
puncture.
►
Stop to check the repair
and the tyre
pressure using the kit:
•
If the tyre pressure is incorrect, contact a
PEUGEOT
dealer to have the tyre changed.
•
If the tyre pressure is correct, drive a second
time for approximately 3
miles (5 kilometres)
at reduced speed (between 12 and 37
mph
(20 and 60
km/h)), stop then check again
the tyre pressure using the kit to confirm the
effective repair of the tyre.
With a tyre repaired using this type of kit,
do not exceed a speed of 50 mph
(80
km/h) and do not drive more than
125
miles (200 km).
You must contact a PEUGEOT dealer or a
qualified workshop to have the repair checked
and the tyre changed.
Checking/adjusting tyre
pressures
The compressor can be used, without injecting
sealant, to check and, if necessary, adjust the
tyre pressures.
►
Remove the valve cap from the tyre and keep
it in a clean place.
►
Uncoil
the pipe stowed under the compressor.
►
Screw the pipe onto the valve and tighten
firmly
.
►
Check that the compressor switch is in
position
"O".
►
Fully uncoil the electric cable stowed under
the compressor
.
►
Connect the compressor's electric plug to the
vehicle's 12
V socket.
►
Switch the ignition on.
►
Start the compressor by placing the switch at
position
"I" and adjust the pressure to the value
shown on the vehicle's tyre pressure label. To
deflate: press the black button located on the
compressor pipe, near the valve connection.
If after 7 minutes the pressure of 2 bar is
not reached, the tyre is damaged;
contact a PEUGEOT
dealer or a qualified
workshop for assistance.
►
Once the correct pressure is reached, put the
switch in position
"O".
►
Remove the kit and stow it.
►
Refit the cap on the valve. CarM an uals 2 .c o m
Page 180 of 244
178
In the event of a breakdown
Accessing the battery
The battery is located under the bonnet.
For access to the (+) terminal:
► Release the bonnet by pulling the internal
release lever
, then the external safety catch.
►
Raise the bonnet.
(+)
Positive terminal with a quick-release
terminal.
(-) Negative terminal.
As the battery's negative terminal is not
accessible, a remote earth point is located near
the battery.
Starting using another battery
If the vehicle's battery is flat, the engine can be
started using a backup battery (either external or
from another vehicle) and jump leads or using a
battery booster.
Never start the engine by connecting a
battery charger.
Never use a 24
V or higher battery booster.
Check beforehand that the backup battery
has a nominal voltage of 12
V and a capacity
at least equal to that of the discharged
battery.
The two vehicles must not be in contact with
each other.
Switch off all electricity-consuming equipment
on both vehicles (audio system, wipers,
lighting, etc.).
Make sure that the jump leads are well away
from the engine’s moving parts (fan, belt,
etc.).
Do not disconnect the (+) terminal while the
engine is running.
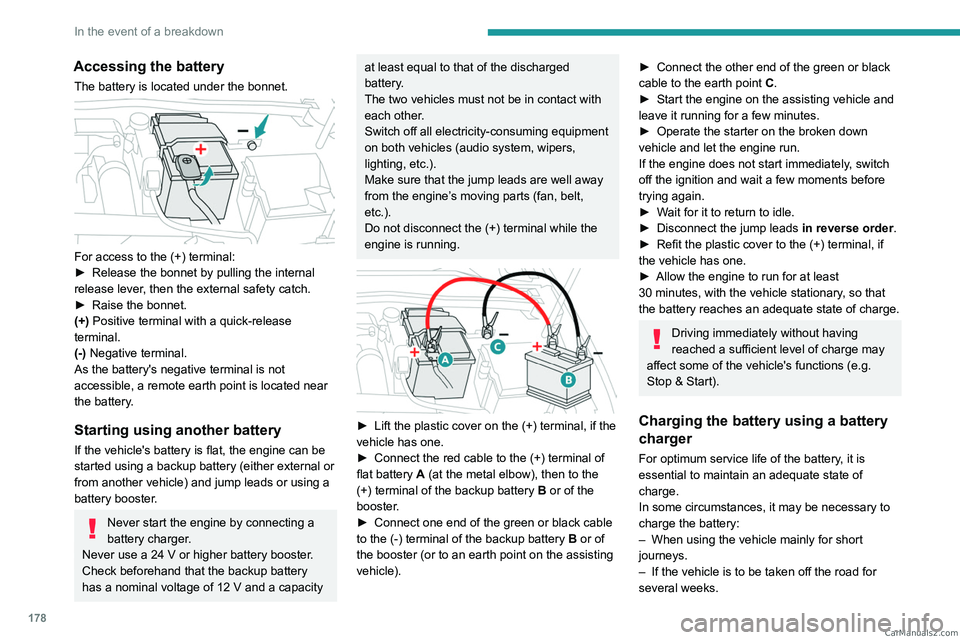
► Lift the plastic cover on the (+) terminal, if the
vehicle has one.
►
Connect the red cable to the (+) terminal of
flat battery
A (at the metal elbow), then to the
(+) terminal of the backup battery
B or of the
booster.
►
Connect one end of the green or black cable
to the (-) terminal of the backup battery
B or of
the booster (or to an earth point on the assisting
vehicle).
► Connect the other end of the green or black
cable to the earth point C .
►
Start the engine on the assisting vehicle and
leave it running for a few minutes.
►
Operate the starter on the broken down
vehicle and let the engine run.
If the engine does not start immediately
, switch
off the ignition and wait a few moments before
trying again.
►
W
ait for it to return to idle.
►
Disconnect the jump leads in reverse order.
►
Refit the plastic cover to the (+) terminal, if
the vehicle has one.
►
Allow the engine to run for at least
30
minutes, with the vehicle stationary, so that
the battery reaches an adequate state of charge.
Driving immediately without having
reached a sufficient level of charge may
affect some of the vehicle's functions (e.g.
Stop & Start).
Charging the battery using a battery
charger
For optimum service life of the battery, it is
essential to maintain an adequate state of
charge.
In some circumstances, it may be necessary to
charge the battery:
–
When using the vehicle mainly for short
journeys.
–
If the vehicle is to be taken off the road for
several weeks. CarM an uals 2 .c o m
Page 182 of 244
180
In the event of a breakdown
Reconnecting the (+) terminal
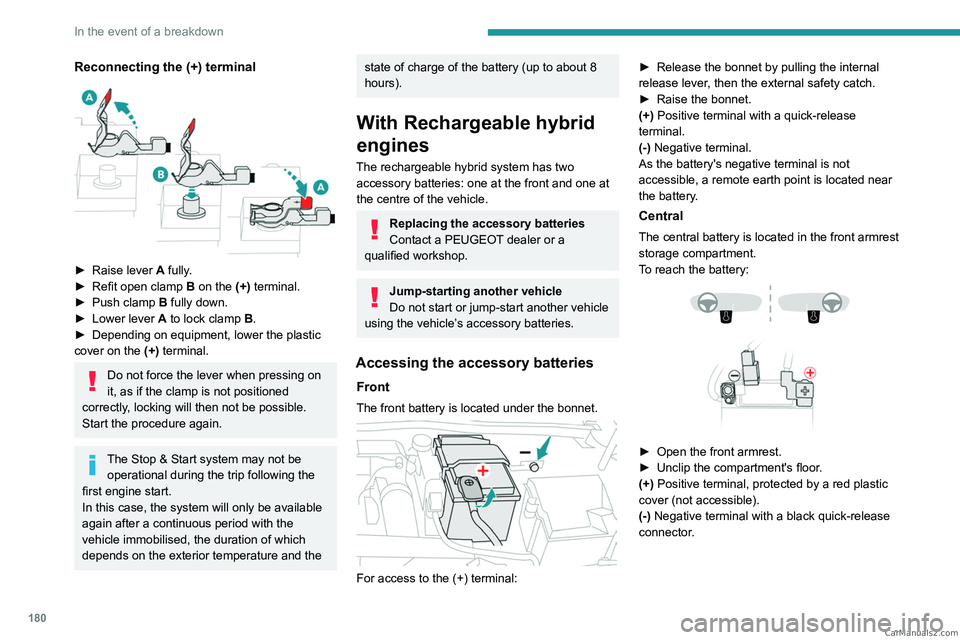
► Raise lever A fully.
► Refit open clamp B on the (+) terminal.
►
Push clamp
B fully down.
►
Lower lever
A
to lock clamp B.
►
Depending on equipment, lower the plastic
cover on the
(+) terminal.
Do not force the lever when pressing on
it, as if the clamp is not positioned
correctly, locking will then not be possible.
Start the procedure again.
The Stop & Start system may not be operational during the trip following the
first engine start.
In this case, the system will only be available
again after a continuous period with the
vehicle immobilised, the duration of which
depends on the exterior temperature and the
state of charge of the battery (up to about 8
hours).
With Rechargeable hybrid
engines
The rechargeable hybrid system has two accessory batteries: one at the front and one at
the centre of the vehicle.
Replacing the accessory batteries
Contact a PEUGEOT dealer or a
qualified workshop.
Jump-starting another vehicle
Do not start or jump-start another vehicle
using the vehicle’s accessory batteries.
Accessing the accessory batteries
Front
The front battery is located under the bonnet.
For access to the (+) terminal: ►
Release the bonnet by pulling the internal
release lever
, then the external safety catch.
►
Raise the bonnet.
(+)
Positive terminal with a quick-release
terminal.
(-) Negative terminal.
As the battery's negative terminal is not
accessible, a remote earth point is located near
the battery.
Central
The central battery is located in the front armrest
storage compartment.
To reach the battery:
► Open the front armrest.
► Unclip the compartment's floor .
(+) Positive terminal, protected by a red plastic
cover (not accessible).
(-) Negative terminal with a black quick-release
connector. CarM an uals 2 .c o m
Page 214 of 244

212
Alphabetical index
R
Radar (warnings) 105
Radio
199–200
Reading lamps
57
Reading lamps, touch-sensitive
58
READY (warning lamp)
160
Rear bench seat
47
Rear cross traffic alert
140
Rear screen (demisting)
52
Rechargeable
hybrid engine
9, 21, 160, 183, 187
Rechargeable
hybrid system
6, 9, 21, 93, 100, 144
Recharging the battery
177–178, 181
Recharging the traction battery
148
Recharging the traction battery
(Rechargeable hybrid)
144, 151–153
Recirculation, air
51–52
Recorder, trip distance
19
Reduction of electrical load (mode)
160
Regenerative braking (deceleration by
engine braking)
98
Reinitialising the remote control
30
Reinitialising the under-inflation detection
system
104
Reminder, lighting on
61
Remote control
24–27, 29
Remote functions
153
Remotely operable functions (Rechargeable
hybrid)
22, 53
Removing a wheel
172–174
Removing the mat
57
Replacing bulbs 175–176
Replacing fuses
177
Replacing the air filter
163
Replacing the oil filter
163
Replacing the passenger compartment
filter
163
Reservoir, screenwash
162
Resetting the trip
19–20
Reversing camera
105, 136–138
Reversing lamps
176
Roof bars
157–158
Roof, opening
38
S
Safety, children 80, 83–87
Screen, cold climate
158
Screenwash
69
Screenwash, front
69
Seat angle
42
Seat belts
78–79, 85
Seat belts, rear
78
Seats, electric
42–43
Seats, front
41–43
Seats, heated
43–44
Seats, rear
47–48, 83
Selector, gear
96–99
Semi-automatic lane changing
122
Sensors (warnings)
105
Serial number, vehicle
188
Servicing
17, 163–164
Settings, equipment
10, 21
Shield, snow 158
Sidelamps
62, 176
Silent vehicle warning sound (Rechargeable
hybrid)
73
Smartphone
22–23, 55
Snow chains
103, 159
Snow screen
158
Socket, 12 V
54
Socket, 12 V accessory
54, 60
Speakers
57
Speed limiter
109–112
Speed limit recognition
107, 109
Speedometer
10, 106
Sport mode
99–100
Spotlamps, side
64
Stability control (ESC)
75, 77
Starting/Stopping the vehicle
92
Starting the engine
92–93
Starting the vehicle
93, 98
Starting using another battery
94, 178
State of charge, battery
21
Station, radio
199–200
Stay, engine bonnet
160
Steering wheel
106
Steering wheel (adjustment)
45
Stickers, customising
166
Stopping the vehicle
93, 98–99
Stop & Start
20, 49, 52, 101–103,
143, 160, 163, 180
Storage
54, 56, 58
Storage box
60
Storage wells
60
Storing driving positions
43 CarM an uals 2 .c o m