2023 PEUGEOT 408 boot
[x] Cancel search: bootPage 170 of 244
168
In the event of a breakdown
Warning triangle
This reflective and dismantlable device is to be
installed on the side of the road when a vehicle
is broken down or damaged.
Before getting out of the vehicle
Turn on the hazard warning lamps, then
put on the safety vest to assemble and install
the triangle.
Storage
A compartment is provided in the storage box,
located under the boot carpet.
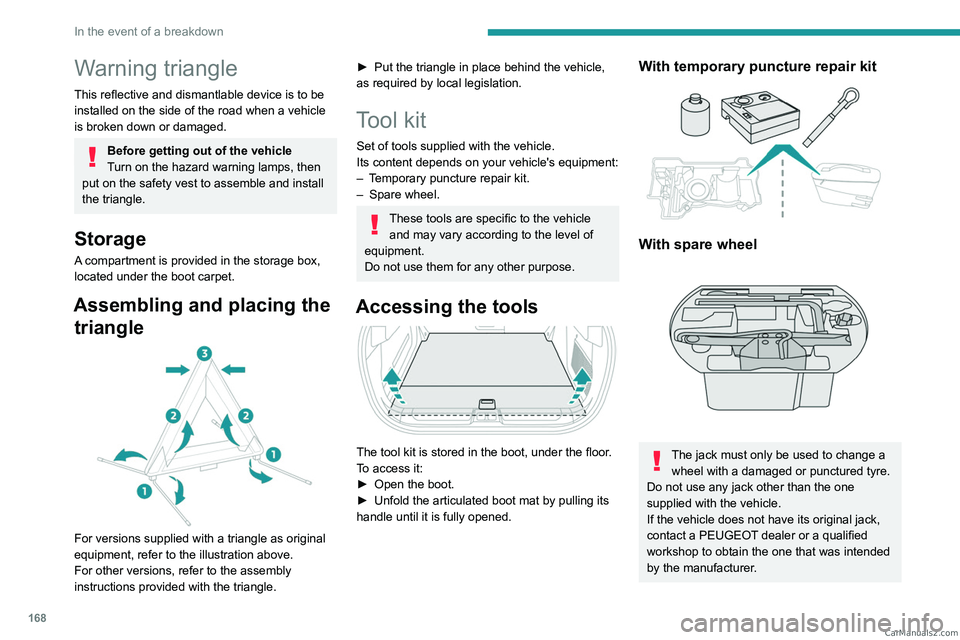
Assembling and placing the triangle
For versions supplied with a triangle as original
equipment, refer to the illustration above.
For other versions, refer to the assembly
instructions provided with the triangle.
► Put the triangle in place behind the vehicle,
as required by local legislation.
Tool kit
Set of tools supplied with the vehicle.
Its content depends on your vehicle's equipment:
–
T
emporary puncture repair kit.
–
Spare wheel.
These tools are specific to the vehicle and may vary according to the level of
equipment.
Do not use them for any other purpose.
Accessing the tools
The tool kit is stored in the boot, under the floor.
To access it:
►
Open the boot.
►
Unfold the articulated boot mat by pulling its
handle until it is fully opened.
With temporary puncture repair kit
With spare wheel
The jack must only be used to change a wheel with a damaged or punctured tyre.
Do not use any jack other than the one
supplied with the vehicle.
If the vehicle does not have its original jack,
contact a PEUGEOT dealer or a qualified
workshop to obtain the one that was intended
by the manufacturer. CarM an uals 2 .c o m
Page 174 of 244
172
In the event of a breakdown
Spare wheel
Visit this link to view explanatory videos:
http://q-r.to/bagGl9
For more information on the Tool kit,
refer to the corresponding section.
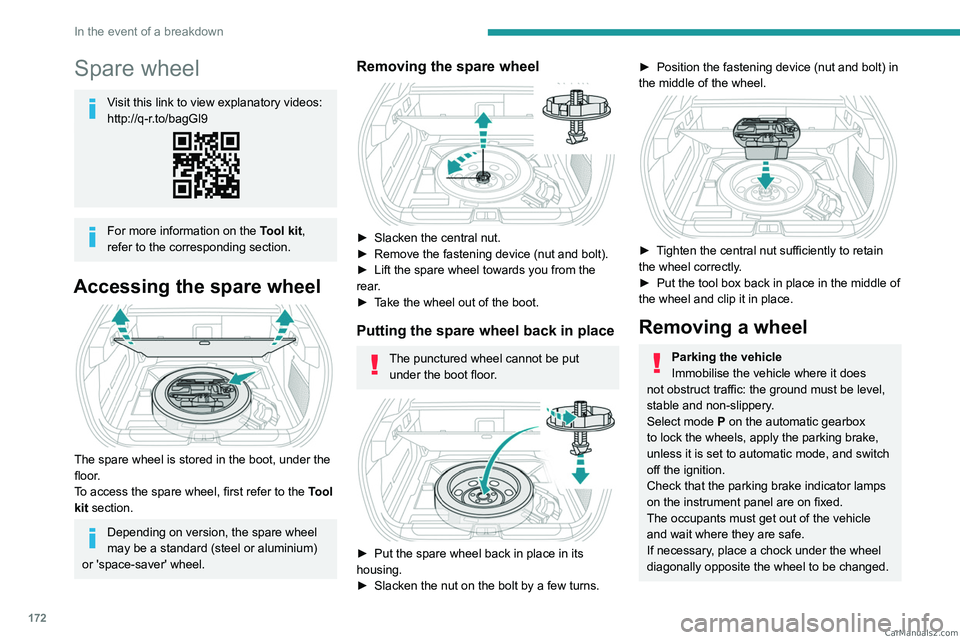
Accessing the spare wheel
The spare wheel is stored in the boot, under the
floor.
To access the spare wheel, first refer to the Tool
kit section.
Depending on version, the spare wheel
may be a standard (steel or aluminium)
or 'space-saver' wheel.
Removing the spare wheel
► Slacken the central nut.
► Remove the fastening device (nut and bolt).
►
Lift the spare wheel towards you from the
rear
.
►
T
ake the wheel out of the boot.
Putting the spare wheel back in place
The punctured wheel cannot be put under the boot floor.
► Put the spare wheel back in place in its
housing.
►
Slacken the nut on the bolt by a few turns.
► Position the fastening device (nut and bolt) in
the middle of the wheel.
► Tighten the central nut sufficiently to retain
the wheel correctly.
►
Put the tool box back in place in the middle of
the wheel and clip it in place.
Removing a wheel
Parking the vehicle
Immobilise the vehicle where it does
not obstruct traffic: the ground must be level,
stable and non-slippery.
Select mode
P on the automatic gearbox
to lock the wheels, apply the parking brake,
unless it is set to automatic mode, and switch
off the ignition.
Check that the parking brake indicator lamps
on the instrument panel are on fixed.
The occupants must get out of the vehicle
and wait where they are safe.
If necessary, place a chock under the wheel
diagonally opposite the wheel to be changed. CarM an uals 2 .c o m
Page 176 of 244
174
In the event of a breakdown
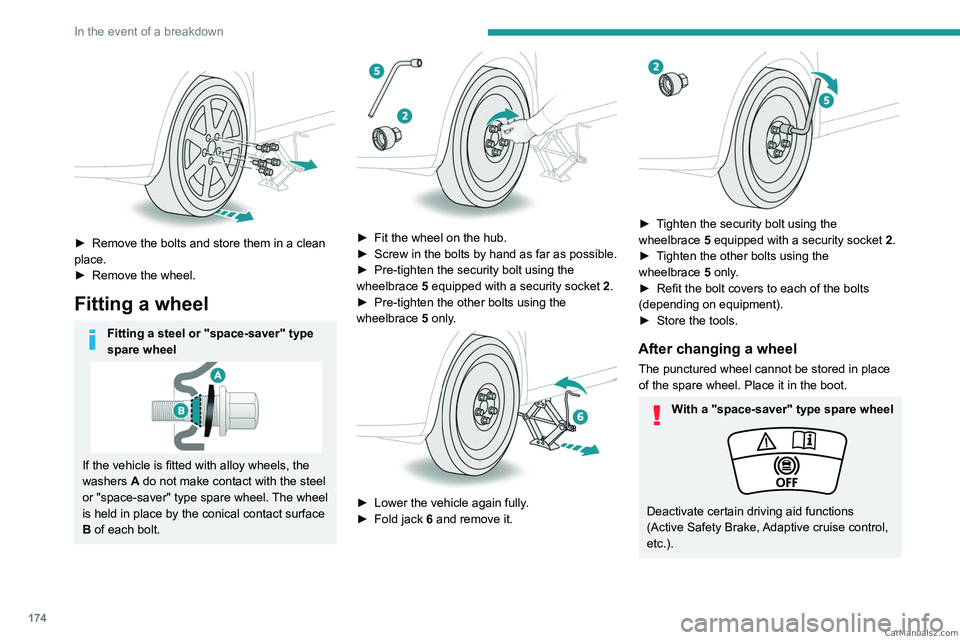
► Remove the bolts and store them in a clean
place.
►
Remove the wheel.
Fitting a wheel
Fitting a steel or "space-saver" type
spare wheel
If the vehicle is fitted with alloy wheels, the
washers A do not make contact with the steel
or "space-saver" type spare wheel. The wheel
is held in place by the conical contact surface
B of each bolt.
► Fit the wheel on the hub.
► Screw in the bolts by hand as far as possible.
►
Pre-tighten the security bolt using the
wheelbrace
5
equipped with a security socket
2
.
►
Pre-tighten the other bolts using the
wheelbrace
5
only.
► Lower the vehicle again fully .
► Fold jack 6 and remove it.
► Tighten the security bolt using the
wheelbrace 5 equipped with a security socket 2 .
►
T
ighten the other bolts using the
wheelbrace
5
only.
►
Refit the bolt covers to each of the bolts
(depending on equipment).
►
Store the tools.
After changing a wheel
The punctured wheel cannot be stored in place
of the spare wheel. Place it in the boot.
With a "space-saver" type spare wheel
Deactivate certain driving aid functions
(Active Safety Brake, Adaptive cruise control,
etc.). CarM an uals 2 .c o m
Page 181 of 244
179
In the event of a breakdown
8Consult a PEUGEOT dealer or a qualified
workshop.
To charge the vehicle's battery yourself, use only a charger compatible with
lead-acid batteries with a nominal voltage of
12
V.
Follow the instructions provided by the
manufacturer of the charger.
Never reverse polarities.
It is not necessary to disconnect the
battery.
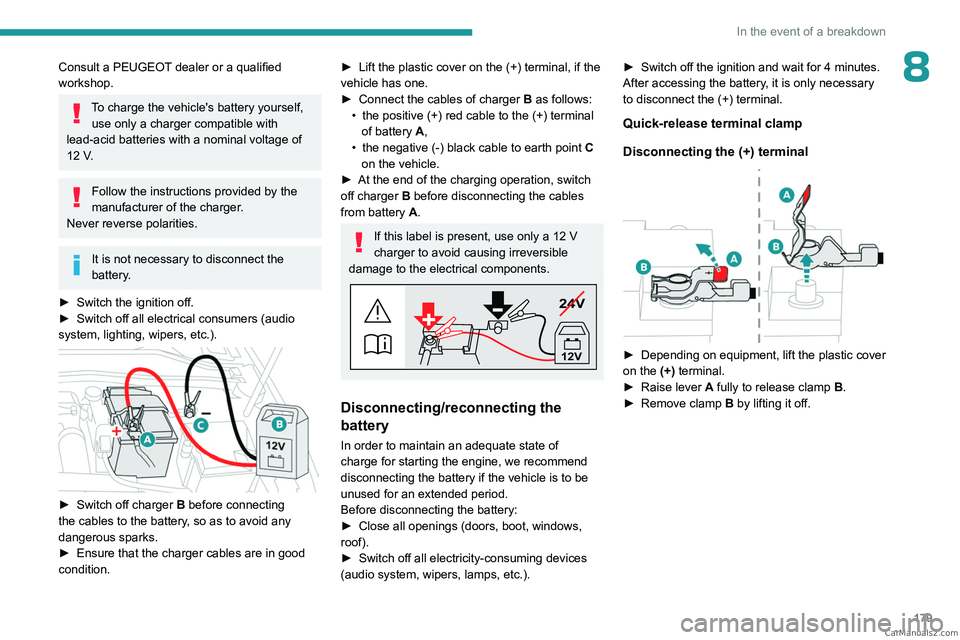
►
Switch the ignition off.
►
Switch off all electrical consumers (audio
system, lighting, wipers, etc.).
► Switch off charger B before connecting
the cables to the battery, so as to avoid any
dangerous sparks.
►
Ensure that the charger cables are in good
condition.
► Lift the plastic cover on the (+) terminal, if the
vehicle has one.
►
Connect the cables of charger B
as follows:
•
the positive (+) red cable to the (+) terminal
of battery
A,
•
the negative (-) black cable to earth point C
on the vehicle.
►
At the end of the charging operation, switch
off charger B
before disconnecting the cables
from battery A.
If this label is present, use only a 12 V
charger to avoid causing irreversible
damage to the electrical components.
24V
12V
Disconnecting/reconnecting the
battery
In order to maintain an adequate state of
charge for starting the engine, we recommend
disconnecting the battery if the vehicle is to be
unused for an extended period.
Before disconnecting the battery:
►
Close all openings (doors, boot, windows,
roof).
►
Switch off all electricity-consuming devices
(audio system, wipers, lamps, etc.). ►
Switch off the ignition and wait for 4
minutes.
After accessing the battery, it is only necessary
to disconnect the (+) terminal.
Quick-release terminal clamp
Disconnecting the (+) terminal
► Depending on equipment, lift the plastic cover
on the (+) terminal.
►
Raise lever
A
fully to release clamp
B
.
►
Remove clamp
B
by lifting it off. CarM an uals 2 .c o m
Page 200 of 244
198
PEUGEOT i-Connect Advanced - PEUGEOT i-Connect
Choose a connection type then confirm this
choice by pressing “APPLY".
Deleting a device
Press the "Settings" application.
In the list, select the "Connectivity".
Select "My Devices " to display the list of
paired devices.
Press this button.
Press "DELETE".
Confirm by pressing “ YES”.
Some devices that have just been
deleted from the system request a
connection, refuse this request.
Mirror Screen®
When a smartphone is connected using
Mirror Screen®, the vehicle's location and
some vehicle data is sent to the smartphone
(e.g. brand, left-hand or right-hand drive, day/
night mode, physical speed).
Apple®CarPlay® smartphone
connection
Connecting just one Apple®CarPlay® smartphone
can be carried out either by USB cable or using
a wireless connection.
First activate the Siri® function on your
Apple® smartphone.
If the device fails to connect, refer to the
Apple website to check that the device is
compatible with this function.
If the problem persists, delete all saved
connections on the smartphone and on the
system before attempting a new connection.
The cable connection requires that you
deactivate the CarPlay function in the Settings,
Bluetooth menu of your smartphone.
In the Bluetooth menu, click on the "i" next to
the relevant vehicle and deactivate CarPlay.
Connect the smartphone to the system
using the USB socket compatible with
Mirror Screen.
Apple
®CarPlay® is automatically launched a few
seconds after the USB connection has been
established. In some cases, it may be necessary
to unlock your device.
The smartphone charges when connected by the
USB cable.
The cable connection allows you to avoid
disconnections, especially when passing through
toll booths.
Only one USB socket enables the Mirror
Screen® connection (Apple®CarPlay®);
refer to the "Ease of use and comfort
- Fittings" section.
It is recommended that you use the device's
original USB cables, preferably with a short
cable to ensure optimum performance. The wireless connection of an Apple
®CarPlay®
smartphone can be initiated from the " My
Devices " menu.
First activate the smartphone’s CarPlay
®
function.
In the Bluetooth menu, click on the "i" next to
the relevant vehicle and activate CarPlay.
Press the "Settings" application.
In the list, select the "Connectivity".
Select "My Devices " to display the device
to be connected to Apple®CarPlay®.
If the device has already been connected to the
system via Bluetooth
®, select the device settings
from the list of known devices and choose
Apple
®CarPlay® as the wireless connection
mode.
If the device has never been connected to the
system before, it will have to be paired (refer to
the "Bluetooth
® connection" section).
The system detects if the smartphone is
compatible with Apple
®CarPlay® and offers to
connect to it following the pairing process.
Subsequent automatic connection of the
smartphone requires activation of the Bluetooth
®
on your device.
As soon as the connection is established, press this button to display the
"Apple
®CarPlay®" interface.To initiate the smartphone voice commands, press and hold the steering-
mounted control button. CarM an uals 2 .c o m
Page 201 of 244
199
PEUGEOT i-Connect Advanced - PEUGEOT i-Connect
10Android Auto smartphone connection
Connecting just one Android Auto smartphone
can be carried out either by USB cable or using
a wireless connection.
First install the "Android Auto"
application via "Play Store" on your
smartphone.
The "Android Auto" function requires a
compatible smartphone.
If the device fails to connect, refer to the
Android Auto website to check that the device
is compatible with this function.
If the problem persists, delete all saved
connections on the smartphone and on the
system before attempting a new connection.
To ensure an optimum wireless connection,
we recommend avoiding placing your
smartphone too close to other Wi-Fi networks
to which it can connect automatically.
The cable connection requires that you
deactivate the Android Auto wireless function,
in the Settings menu of the "Android Auto"
application of your smartphone.
Connect the smartphone to the system
using the USB socket compatible with
Mirror Screen
®.
Android Auto is automatically launched a few
seconds after the USB connection has been
established. A validation procedure on the
smartphone has to be followed for the first
connection, with the vehicle stationary.
The smartphone charges when connected by the
USB cable.
The cable connection allows you to avoid
disconnections, especially when passing through
toll booths.
Only one USB socket enables the Mirror
Screen® connection (Android Auto); refer
to the "Ease of use and comfort - Fittings"
section.
It is recommended that you use the device's
original USB cables, preferably with a short
cable to ensure optimum performance.
The wireless connection of an Android Auto
smartphone can be initiated from the " My
Devices " menu.
First activate the smartphone’s Android Auto
®
wireless function, in the Settings menu of the
"Android Auto" application of your smartphone.
Press the "Settings" application.
In the list, select the "Connectivity" tab.
Select "My Devices " to display the device
to be connected to Android Auto.
If the device has never been connected to the
system before, it will have to be paired (refer to
the "Bluetooth
® connection" section).
The system detects if the smartphone is
compatible with Android Auto and offers to
connect to it following the pairing process. If the device has already been connected to the
system via Bluetooth
®, select the device settings
from the list of known devices and choose
Android Auto as the wireless connection mode.
The subsequent automatic connection of the
smartphone requires activation of Bluetooth
® on
your device.
As soon as the connection is established, press this button to display the " Android
Auto" interface.
To initiate the smartphone voice commands, press and hold the steering-
mounted control button.
Media
Changing source
Press the "Media" application.
Press this button to change source (radio,
audio streaming via a USB socket,
Bluetooth
® or Mirror Screen®).
Selecting a radio station
Press the "Media" application.
In the list, select the "Player" tab.
Press one of the buttons to
perform an automatic search for
radio stations.
Or CarM an uals 2 .c o m
Page 210 of 244

208
Alphabetical index
A
ABS 75
Accelerated charging unit (Wallbox)
146–147
Accessories
72
Active LED Vision
63, 65
Active Safety Brake
126–127, 129
Adjusting headlamps
62
Adjusting head restraints
41
Adjusting seat
41–42
Adjusting the air distribution
49, 51
Adjusting the air flow
49, 51
Adjusting the headlamp beam height
62
Adjusting the height and reach of
the steering wheel
45
Adjusting the lumbar support
42
Adjusting the seat angle
42
Adjusting the temperature
50
Adjusting the time
203
Advice on care and maintenance
145, 165
Advice on driving
8, 91–92
Airbags
80–82, 84
Airbags, curtain
81–82
Airbags, front
80–81, 85
Airbags, lateral
81–82
Air conditioning
49, 52
Air conditioning, automatic
52
Air conditioning, dual-zone automatic
49
Air intake
51–52
Air vents
48
Alarm
35–36
Amplifier, audio
57
Anti-lock braking system (ABS)
75
Antitheft / Immobiliser 25
Applications
21–22
Armrest, front
56
Armrest, rear
58
Assistance call
73–74
Assistance, emergency braking
76, 128
Audio streaming (Bluetooth)
200
B
Battery, 12 V 159, 163, 177–181
Battery, ancillaries
177
Battery, charging
177–178, 181
Battery, remote control
29–30
Blanking screen (snow shield)
158
Blind
38
Bluetooth (hands-free)
197
Bluetooth (telephone)
197–198
Bodywork
165
Bonnet
160
Bonnet, active
82
Boot
31, 34, 60
Brake discs
163–164
Brake lamps
176
Brakes
163–164
Braking
98
Braking assistance system
75–76
Braking, automatic emergency
126–127, 129
Braking, dynamic emergency
95–96
Bulbs (changing)
175–176
C
Capacity, fuel tank 143
Care of the bodywork
165
Central locking
27–28
Changing a bulb
175–176
Changing a fuse
177
Changing a wheel
168, 172
Changing a wiper blade
71
Changing the remote control battery
29
Changing to free-wheeling
164
Charge level indicator (Rechargeable
hybrid)
19
Charger, induction
55
Charger, wireless
55
Charging cable
148
Charging cable (Rechargeable
hybrid)
146–147, 152
Charging connector (Rechargeable
hybrid)
146, 151–153
Charging flap (Rechargeable
hybrid)
146, 151–153
Charging the traction battery
(Rechargeable hybrid)
18, 144, 151–153
CHECK
19
Checking the engine oil level
17
Checking the levels
161–162
Checking tyre pressures
(using the kit)
169, 171
Checks
161, 163–164
Checks, routine
163–164
Child lock
90
Children
79, 85–87 CarM an uals 2 .c o m
Page 211 of 244
209
Alphabetical index
Children (safety) 90
Child seats
79, 83–85
Child seats, conventional
85, 88–89
Child seats, i-Size
87–89
Child seats, ISOFIX
85–86, 88–89
Cleaning (advice)
145, 165–167
Closing the boot
27, 31
Closing the doors
27, 31
Collision Risk Alert
126–128
Configuration, vehicle
10, 21
Connection, Bluetooth
197–198
Connectivity
202
Consumptions
22
Control, emergency boot release
31
Control, emergency door
29
Control, heated seats
43–44
Controls, steering mounted
97–98
Control stalk, lighting
61–62
Control stalk, wipers
68, 70
Control unit
146–148, 152
Courtesy lamp, front
58
Courtesy lamps
57–58
Cruise control
109–110, 112–114
Cruise control, adaptive
109–110, 114–115
Cruise control by speed limit
recognition
109–110
D
Date (setting) 203
Daytime running lamps
62
Deactivating the passenger airbag
80, 84–85
Deadlocking 25, 27
Deferred charging
22, 153
Deferred charging (Rechargeable
hybrid)
21–22, 146, 151
Defrosting
45, 52
Defrosting, front
52
Defrosting, rear screen
52
Demisting
45, 52
Demisting, front
52
Demisting, rear
52
Diagnosis, vehicle
19
Dials and gauges
10
Digital instrument panel
10
Dimensions
188
Dipstick
17, 161
Direction indicators (turn signals)
62, 176
Display, head-up
67
Display screen, instrument panel
10
Domestic charging
148
Domestic charging (Rechargeable
hybrid)
152–153
Doors
31
Drive Assist Plus
114–115
Driver’s attention warning
130–131
Driving
40–41, 91–92, 106
Driving abroad
66
Driving aids camera (warnings)
105
Driving aid shortcuts
106
Driving aids (recommendations)
104
Driving economically
8
Driving modes
99
Driving positions (storing)
43
Dynamic stability control (DSC)
76E
EBFD 75
Eco-driving (advice)
8
ECO mode
99
Electric automatic gearbox (Rechargeable
hybrid)
96
Electronic brake force distribution (EBFD)
75
Emergency braking assistance (EBA)
76
Emergency call
73–74
Emergency switching off
94
Emergency warning lamps
72, 168
Energy economy (mode)
159
Energy economy mode
159
Energy flows
21
Energy recovery
18, 98
Engine
164
Engine compartment
160–161
Engine, petrol
100, 161, 186
Engines
185–186
Environment
8, 30
e-Save function (energy reserve)
22
ESC (electronic stability control)
75
Expanded traffic sign recognition
11 0
Exterior lighting
64
F
Fatigue detection 130–131
Favourite driving functions
106
Filling the fuel tank
143
Filter, air
163 CarM an uals 2 .c o m