2023 NISSAN SENTRA steering wheel
[x] Cancel search: steering wheelPage 202 of 556
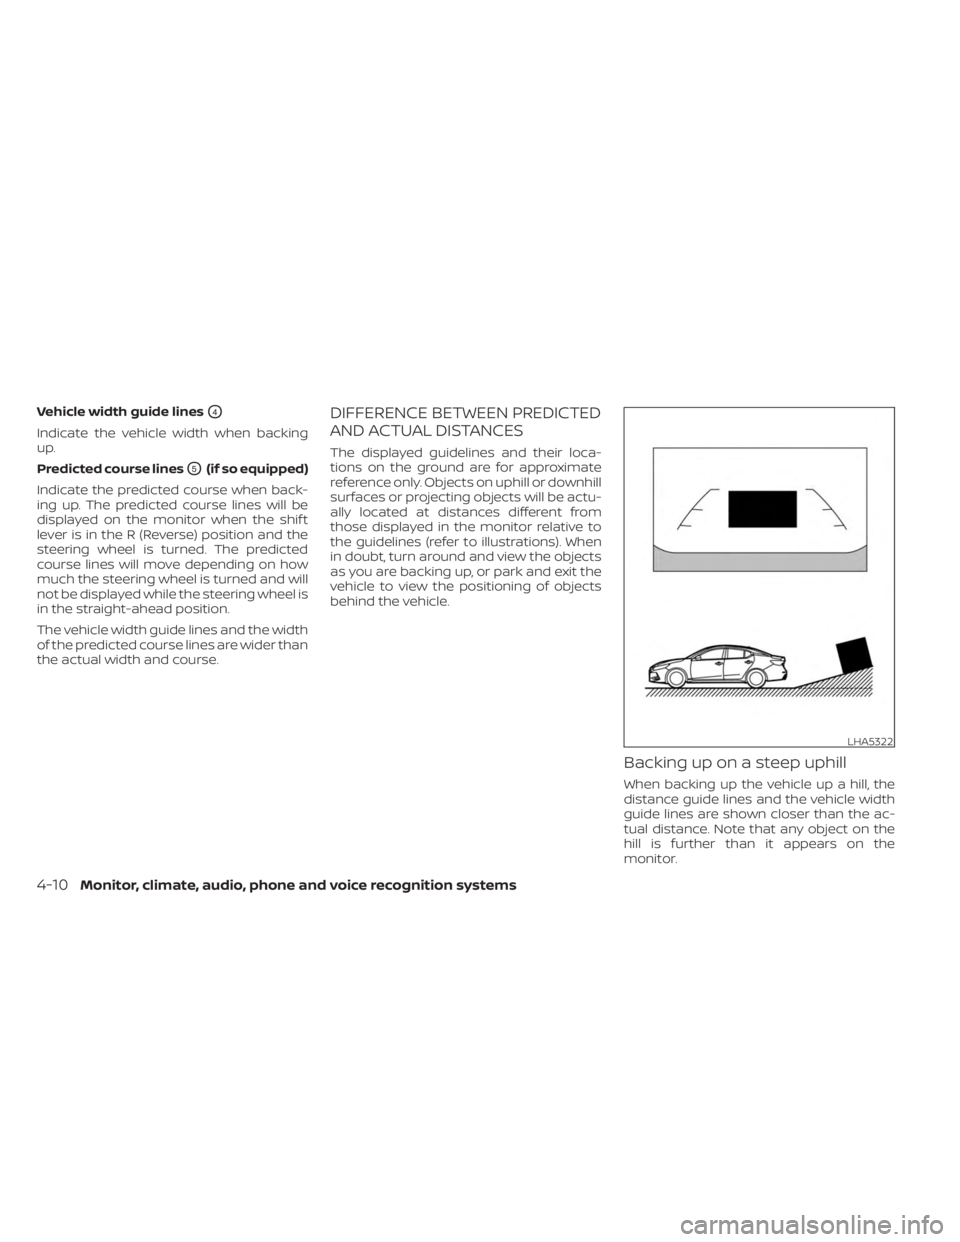
Vehicle width guide linesO4
Indicate the vehicle width when backing
up.
Predicted course lines
O5(if so equipped)
Indicate the predicted course when back-
ing up. The predicted course lines will be
displayed on the monitor when the shif t
lever is in the R (Reverse) position and the
steering wheel is turned. The predicted
course lines will move depending on how
much the steering wheel is turned and will
not be displayed while the steering wheel is
in the straight-ahead position.
The vehicle width guide lines and the width
of the predicted course lines are wider than
the actual width and course.
DIFFERENCE BETWEEN PREDICTED
AND ACTUAL DISTANCES
The displayed guidelines and their loca-
tions on the ground are for approximate
reference only. Objects on uphill or downhill
surfaces or projecting objects will be actu-
ally located at distances different from
those displayed in the monitor relative to
the guidelines (refer to illustrations). When
in doubt, turn around and view the objects
as you are backing up, or park and exit the
vehicle to view the positioning of objects
behind the vehicle.
Backing up on a steep uphill
When backing up the vehicle up a hill, the
distance guide lines and the vehicle width
guide lines are shown closer than the ac-
tual distance. Note that any object on the
hill is further than it appears on the
monitor.
LHA5322
4-10Monitor, climate, audio, phone and voice recognition systems
Page 204 of 556
object when backing up to the positionOA
if the object projects over the actual back-
ing up course.
HOW TO PARK WITH PREDICTED
COURSE LINES (if so equipped)
WARNING
• If the tires are replaced with different
sized tires, the predicted course lines
may be displayed incorrectly.
• On a snow-covered or slippery road,
there may be a difference between
the predicted course line and the ac-
tual course line.
• If the battery is disconnected or be-
comes discharged, the predicted
course lines may be displayed incor-
rectly. If this occurs, please perform
the following procedures:
– Turn the steering wheel from lock
to lock while the engine is
running.
– Drive the vehicle on a straight road
for more than 5 minutes.
• When the steering wheel is turned
with the ignition switch in the ACC
position, the predicted course lines
may be displayed incorrectly. 1. Visually check that the parking space is
safe before parking your vehicle.
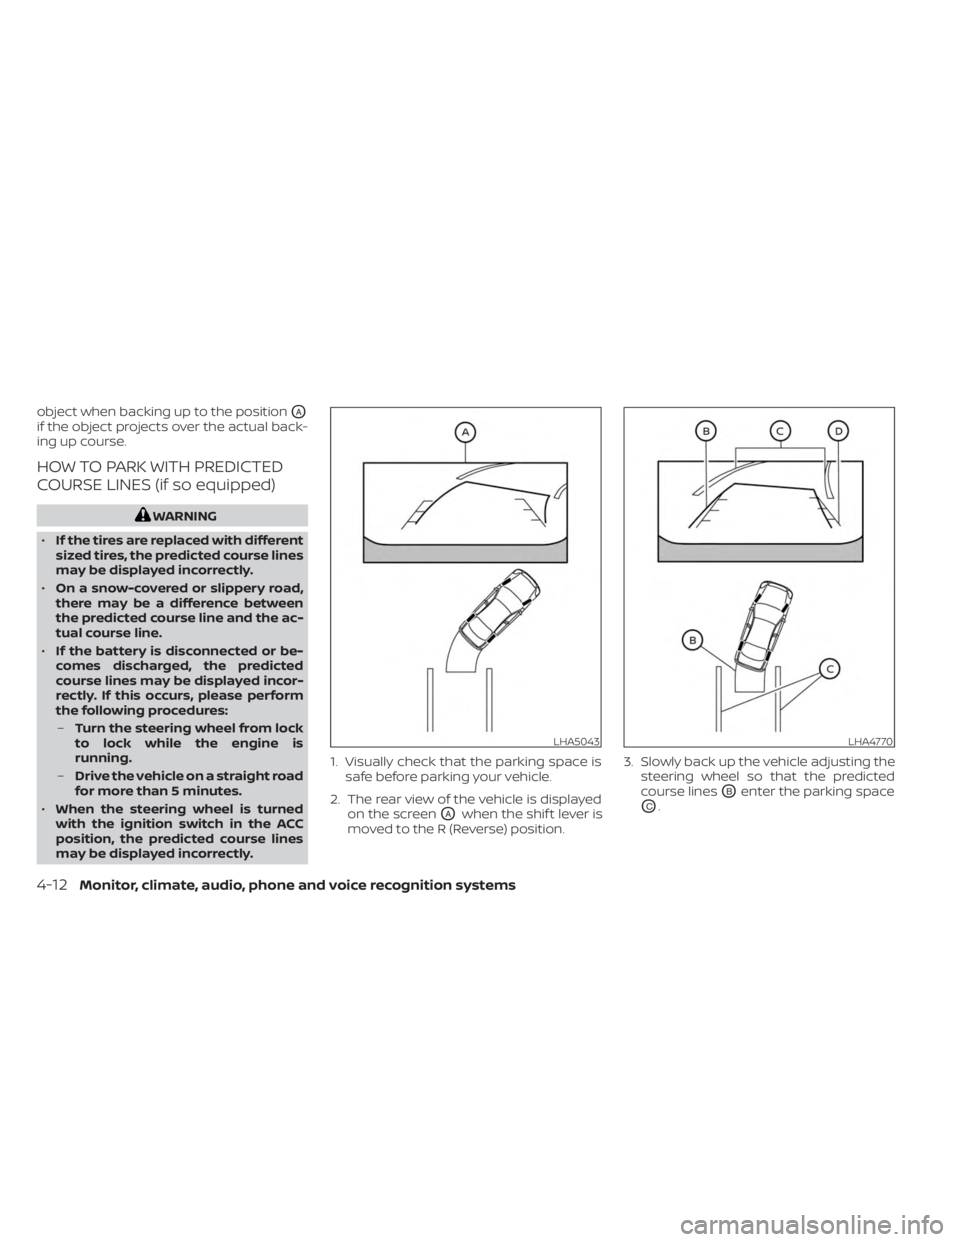
2. The rear view of the vehicle is displayed on the screen
OAwhen the shif t lever is
moved to the R (Reverse) position. 3. Slowly back up the vehicle adjusting the
steering wheel so that the predicted
course lines
OBenter the parking space
OC.
LHA5043LHA4770
4-12Monitor, climate, audio, phone and voice recognition systems
Page 205 of 556
4. Maneuver the steering wheel to makethe vehicle width guide lines
ODparallel
to the parking space
OCwhile referring
to the predicted course lines.
5. When the vehicle is parked in the space completely, move the shif t lever to the P
(Park) position and apply the parking
brake.
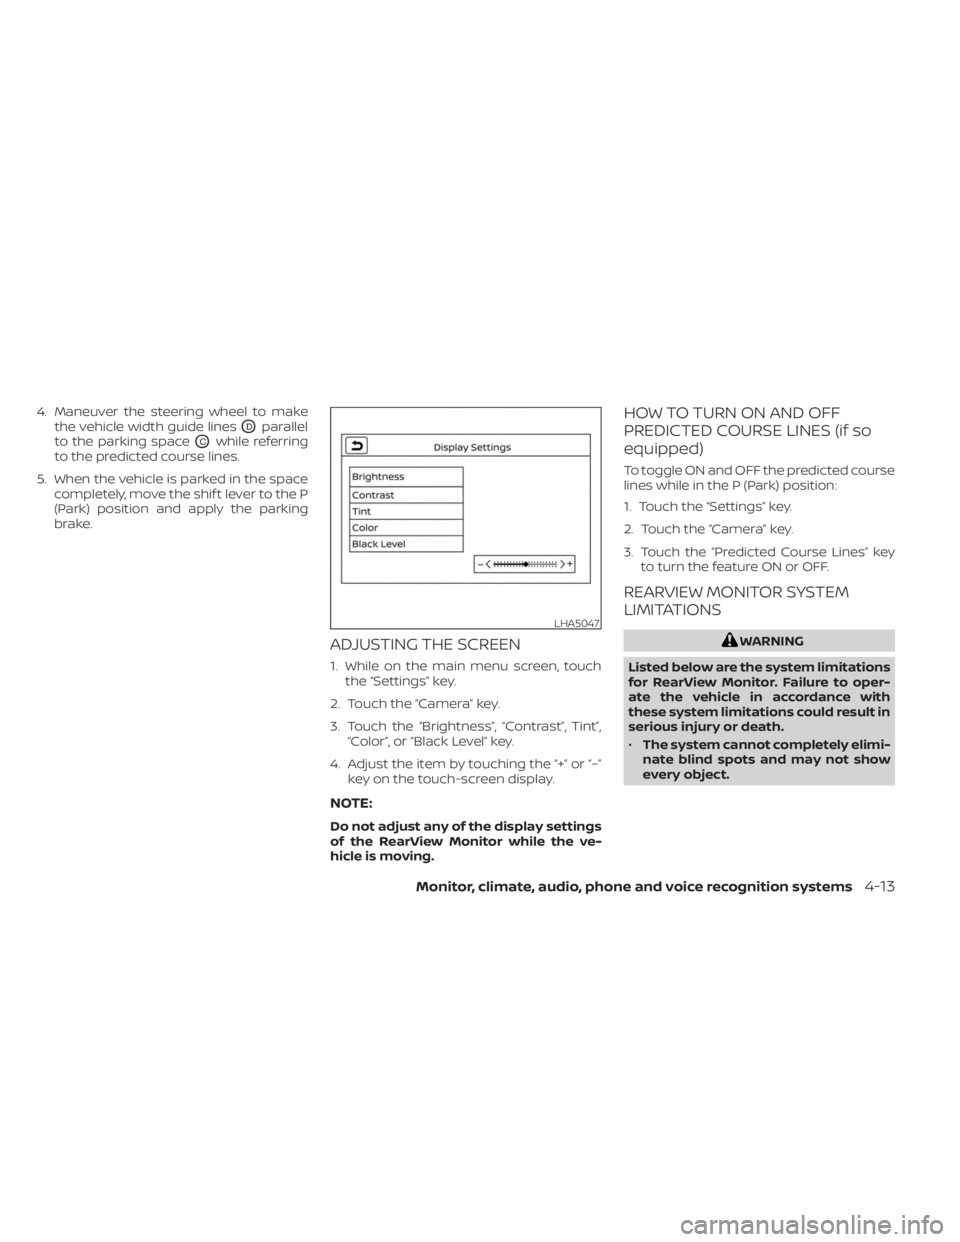
ADJUSTING THE SCREEN
1. While on the main menu screen, touchthe “Settings” key.
2. Touch the “Camera” key.
3. Touch the “Brightness”, “Contrast”, Tint”, “Color”, or “Black Level” key.
4. Adjust the item by touching the “+” or “–” key on the touch-screen display.
NOTE:
Do not adjust any of the display settings
of the RearView Monitor while the ve-
hicle is moving.
HOW TO TURN ON AND OFF
PREDICTED COURSE LINES (if so
equipped)
To toggle ON and OFF the predicted course
lines while in the P (Park) position:
1. Touch the “Settings” key.
2. Touch the “Camera” key.
3. Touch the “Predicted Course Lines” keyto turn the feature ON or OFF.
REARVIEW MONITOR SYSTEM
LIMITATIONS
WARNING
Listed below are the system limitations
for RearView Monitor. Failure to oper-
ate the vehicle in accordance with
these system limitations could result in
serious injury or death.
• The system cannot completely elimi-
nate blind spots and may not show
every object.
LHA5047
Monitor, climate, audio, phone and voice recognition systems4-13
Page 211 of 556
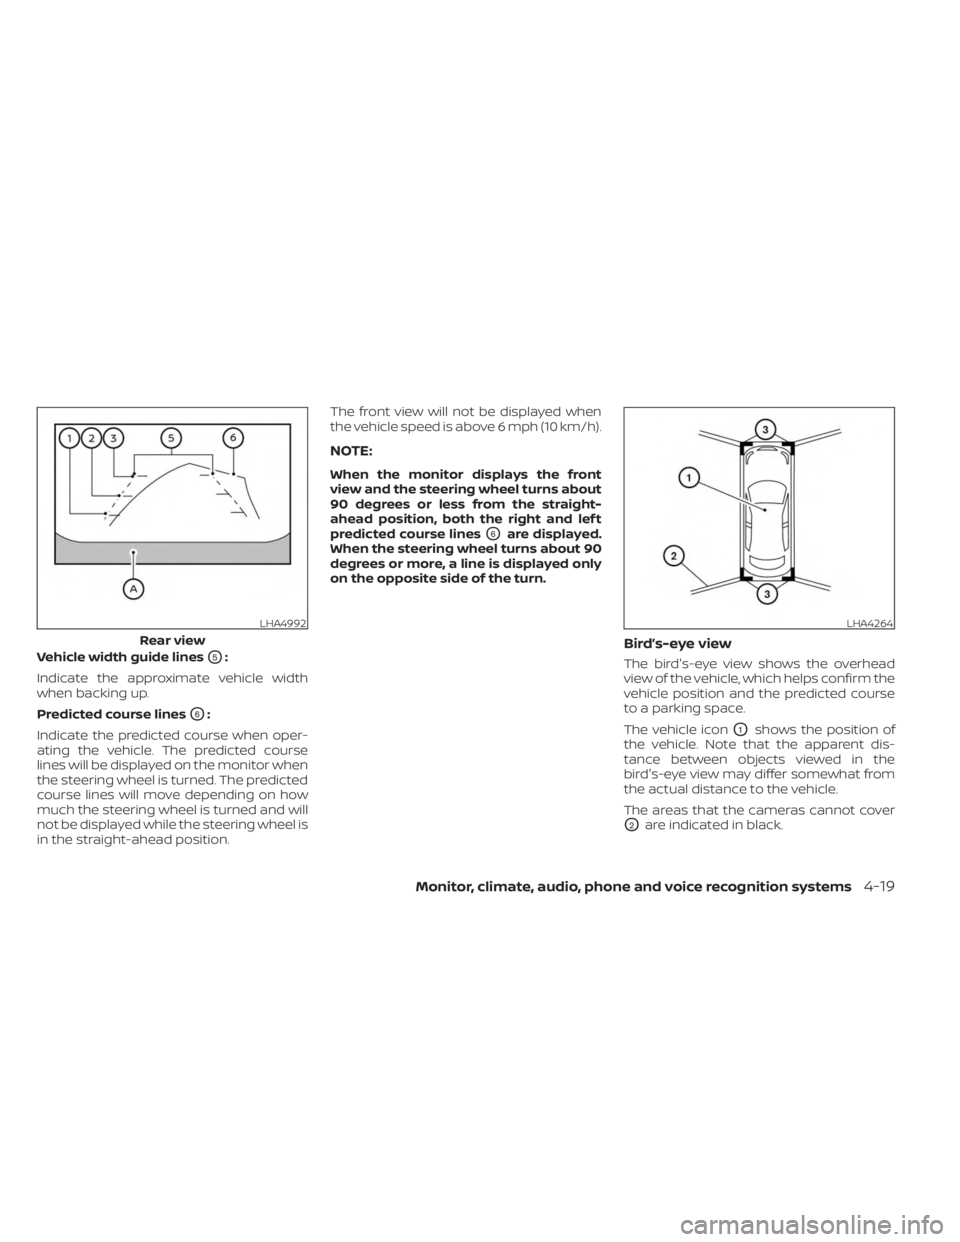
Vehicle width guide linesO5:
Indicate the approximate vehicle width
when backing up.
Predicted course lines
O6:
Indicate the predicted course when oper-
ating the vehicle. The predicted course
lines will be displayed on the monitor when
the steering wheel is turned. The predicted
course lines will move depending on how
much the steering wheel is turned and will
not be displayed while the steering wheel is
in the straight-ahead position. The front view will not be displayed when
the vehicle speed is above 6 mph (10 km/h).
NOTE:
When the monitor displays the front
view and the steering wheel turns about
90 degrees or less from the straight-
ahead position, both the right and lef t
predicted course lines
O6are displayed.
When the steering wheel turns about 90
degrees or more, a line is displayed only
on the opposite side of the turn.
Bird’s-eye view
The bird's-eye view shows the overhead
view of the vehicle, which helps confirm the
vehicle position and the predicted course
to a parking space.
The vehicle icon
O1shows the position of
the vehicle. Note that the apparent dis-
tance between objects viewed in the
bird's-eye view may differ somewhat from
the actual distance to the vehicle.
The areas that the cameras cannot cover
O2are indicated in black.
LHA4992
Rear view
LHA4264
Monitor, climate, audio, phone and voice recognition systems4-19
Page 214 of 556
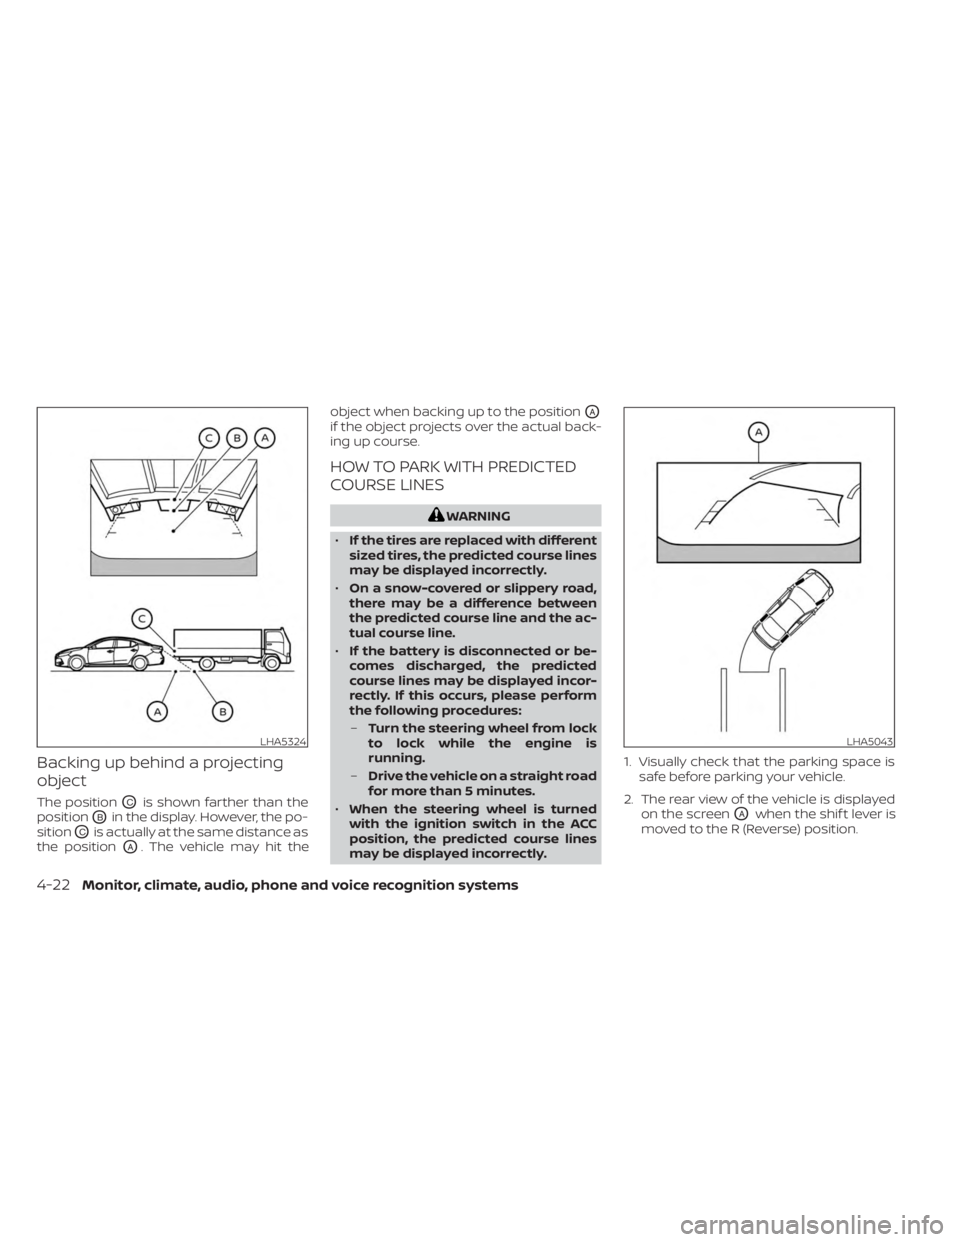
Backing up behind a projecting
object
The positionOCis shown farther than the
position
OBin the display. However, the po-
sition
OCis actually at the same distance as
the position
OA. The vehicle may hit the object when backing up to the position
OA
if the object projects over the actual back-
ing up course.
HOW TO PARK WITH PREDICTED
COURSE LINES
WARNING
• If the tires are replaced with different
sized tires, the predicted course lines
may be displayed incorrectly.
• On a snow-covered or slippery road,
there may be a difference between
the predicted course line and the ac-
tual course line.
• If the battery is disconnected or be-
comes discharged, the predicted
course lines may be displayed incor-
rectly. If this occurs, please perform
the following procedures:
– Turn the steering wheel from lock
to lock while the engine is
running.
– Drive the vehicle on a straight road
for more than 5 minutes.
• When the steering wheel is turned
with the ignition switch in the ACC
position, the predicted course lines
may be displayed incorrectly. 1. Visually check that the parking space is
safe before parking your vehicle.
2. The rear view of the vehicle is displayed on the screen
OAwhen the shif t lever is
moved to the R (Reverse) position.
LHA5324LHA5043
4-22Monitor, climate, audio, phone and voice recognition systems
Page 215 of 556
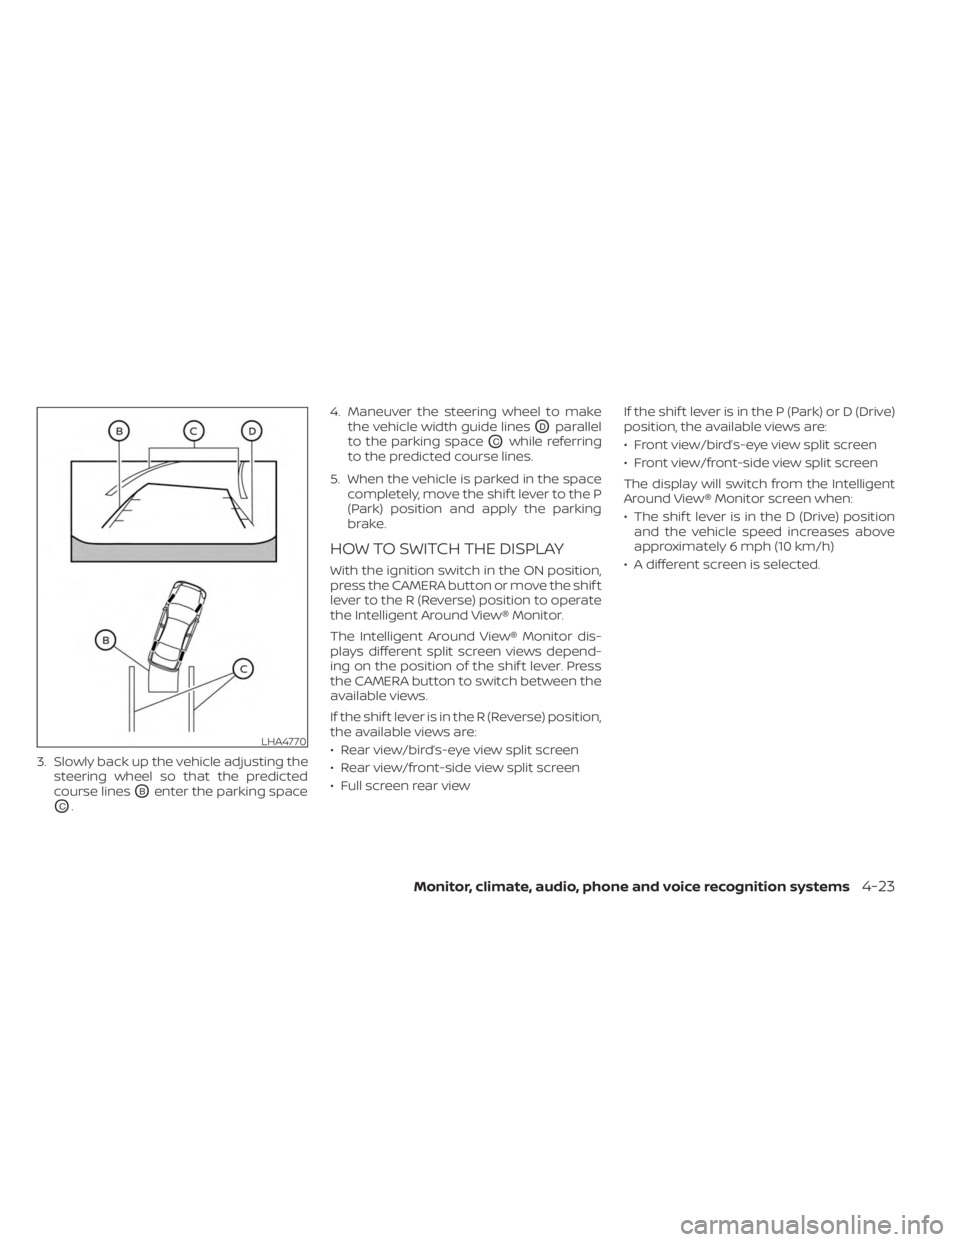
3. Slowly back up the vehicle adjusting thesteering wheel so that the predicted
course lines
OBenter the parking space
OC. 4. Maneuver the steering wheel to make
the vehicle width guide lines
ODparallel
to the parking space
OCwhile referring
to the predicted course lines.
5. When the vehicle is parked in the space completely, move the shif t lever to the P
(Park) position and apply the parking
brake.
HOW TO SWITCH THE DISPLAY
With the ignition switch in the ON position,
press the CAMERA button or move the shif t
lever to the R (Reverse) position to operate
the Intelligent Around View® Monitor.
The Intelligent Around View® Monitor dis-
plays different split screen views depend-
ing on the position of the shif t lever. Press
the CAMERA button to switch between the
available views.
If the shif t lever is in the R (Reverse) position,
the available views are:
• Rear view/bird’s-eye view split screen
• Rear view/front-side view split screen
• Full screen rear view If the shif t lever is in the P (Park) or D (Drive)
position, the available views are:
• Front view/bird’s-eye view split screen
• Front view/front-side view split screen
The display will switch from the Intelligent
Around View® Monitor screen when:
• The shif t lever is in the D (Drive) position
and the vehicle speed increases above
approximately 6 mph (10 km/h)
• A different screen is selected.
LHA4770
Monitor, climate, audio, phone and voice recognition systems4-23
Page 231 of 556
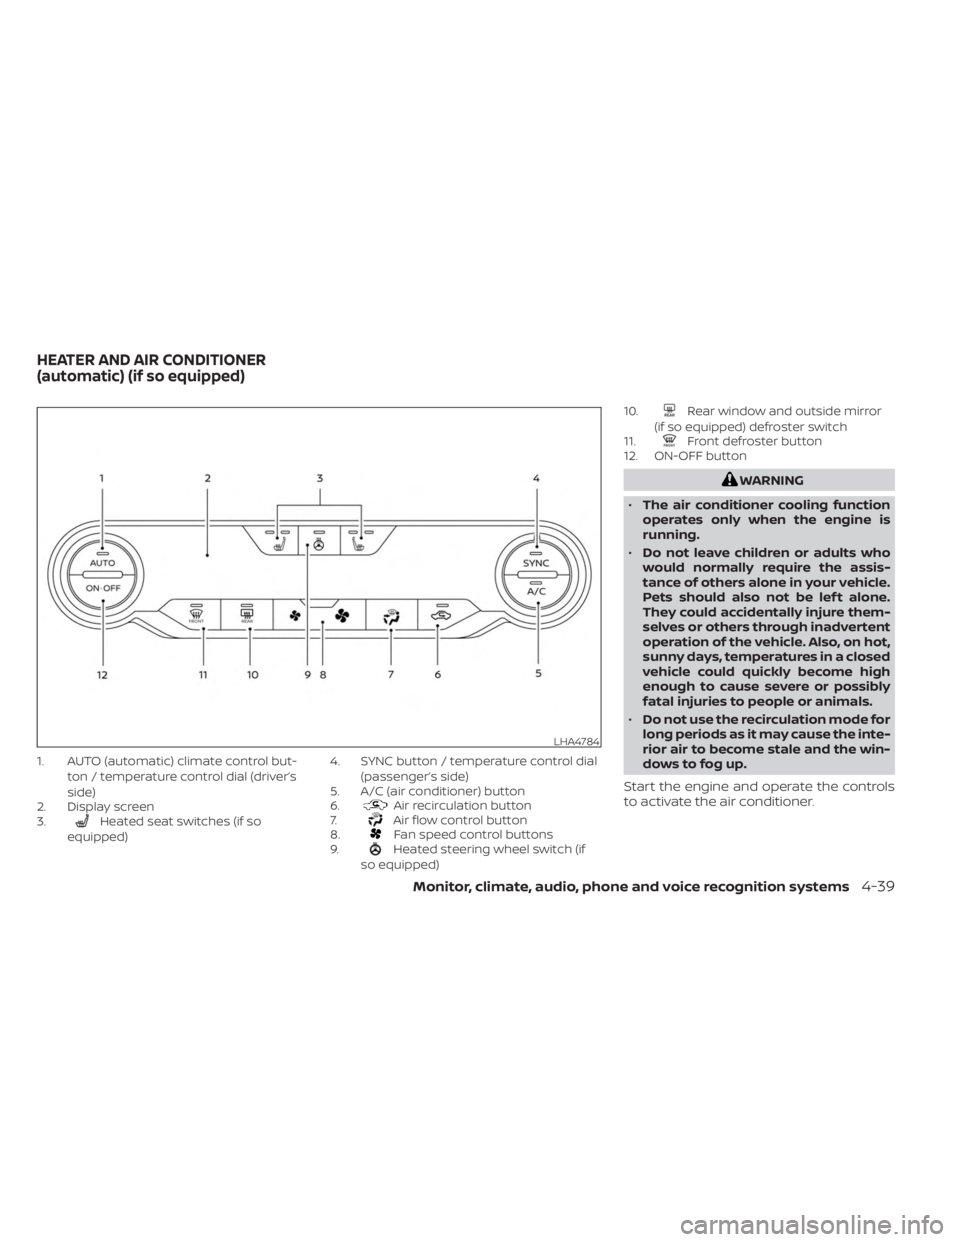
1. AUTO (automatic) climate control but-ton / temperature control dial (driver’s
side)
2. Display screen
3.
Heated seat switches (if so
equipped) 4. SYNC button / temperature control dial
(passenger’s side)
5. A/C (air conditioner) button
6.Air recirculation button
7.Air flow control button
8.Fan speed control buttons
9.Heated steering wheel switch (if
so equipped) 10.
Rear window and outside mirror
(if so equipped) defroster switch
11.
Front defroster button
12. ON-OFF button
WARNING
• The air conditioner cooling function
operates only when the engine is
running.
• Do not leave children or adults who
would normally require the assis-
tance of others alone in your vehicle.
Pets should also not be lef t alone.
They could accidentally injure them-
selves or others through inadvertent
operation of the vehicle. Also, on hot,
sunny days, temperatures in a closed
vehicle could quickly become high
enough to cause severe or possibly
fatal injuries to people or animals.
• Do not use the recirculation mode for
long periods as it may cause the inte-
rior air to become stale and the win-
dows to fog up.
Start the engine and operate the controls
to activate the air conditioner.
LHA4784
HEATER AND AIR CONDITIONER
(automatic) (if so equipped)
Monitor, climate, audio, phone and voice recognition systems4-39
Page 233 of 556
Remote Engine Start with
Intelligent Climate Control (if so
equipped)
Vehicles equipped with automatic climate
controls and Remote Engine Start function
may go into automatic heating or cooling
mode when Remote Engine Start is acti-
vated depending on outside and cabin
temperatures. During this period, the cli-
mate control display and buttons will be
inoperable until the ignition switch is
turned on. In Remote Engine Start defrost-
ing mode, the rear window defroster (if so
equipped), heated seats (if so equipped)
and heated steering wheel (if so equipped)
may be activated automatically.
MANUAL OPERATION
Fan speed control buttons
Press thefan speed control buttons
to manually control the fan speed.
Press the AUTO button to return to auto-
matic control of the fan speed.
Temperature control dial
The temperature control dial allows you to
adjust the temperature of the outlet air. To
lower the temperature, turn the dial to the
lef t. To increase the temperature, turn the
dial to the right. Temperature can be ad-
justed on the driver’s and passenger’s side.
Air recirculation
Press theair recirculation button to
recirculate interior air inside the vehicle.
The
indicator light on the button will
come on.
The air recirculation cannot be activated
when the air conditioner is in the
front
defrosting mode.
When the outside temperature exceeds
70°F (21°C), the air conditioning system may
default to air recirculation mode automati-
cally to reduce overall power consumption.
To exit air recirculation mode, deselect the
air recirculation button (indicator light will
turn off ) to enter fresh air mode.
Automatic intake air control
In the AUTO mode, the intake air will be
controlled automatically. To manually con-
trol the intake air, press the
air recir-
culation button. To return to the automatic control mode, press and hold the
air
recirculation button for about 2 seconds.
The indicator light will flash twice, and then
the intake air will be controlled
automatically.
A/C (air conditioner) button
Start the engine, press thefan speed
control buttons to the desired position and
press the
button to turn on the air
conditioner. To turn off the air conditioner,
press the
button again.
The air conditioner cooling function op-
erates only when the engine is running.
Air flow control
Pressing thebutton manually con-
trols air flow and selects the air outlet:
— Air flows from center and side
vents.
— Air flows from center and sidevents and foot outlets.
— Air flows mainly from the footoutlets.
— Air flows from defroster and footoutlets.
Monitor, climate, audio, phone and voice recognition systems4-41