2023 NISSAN SENTRA Driving lights
[x] Cancel search: Driving lightsPage 96 of 556
CHECKING LIGHTS
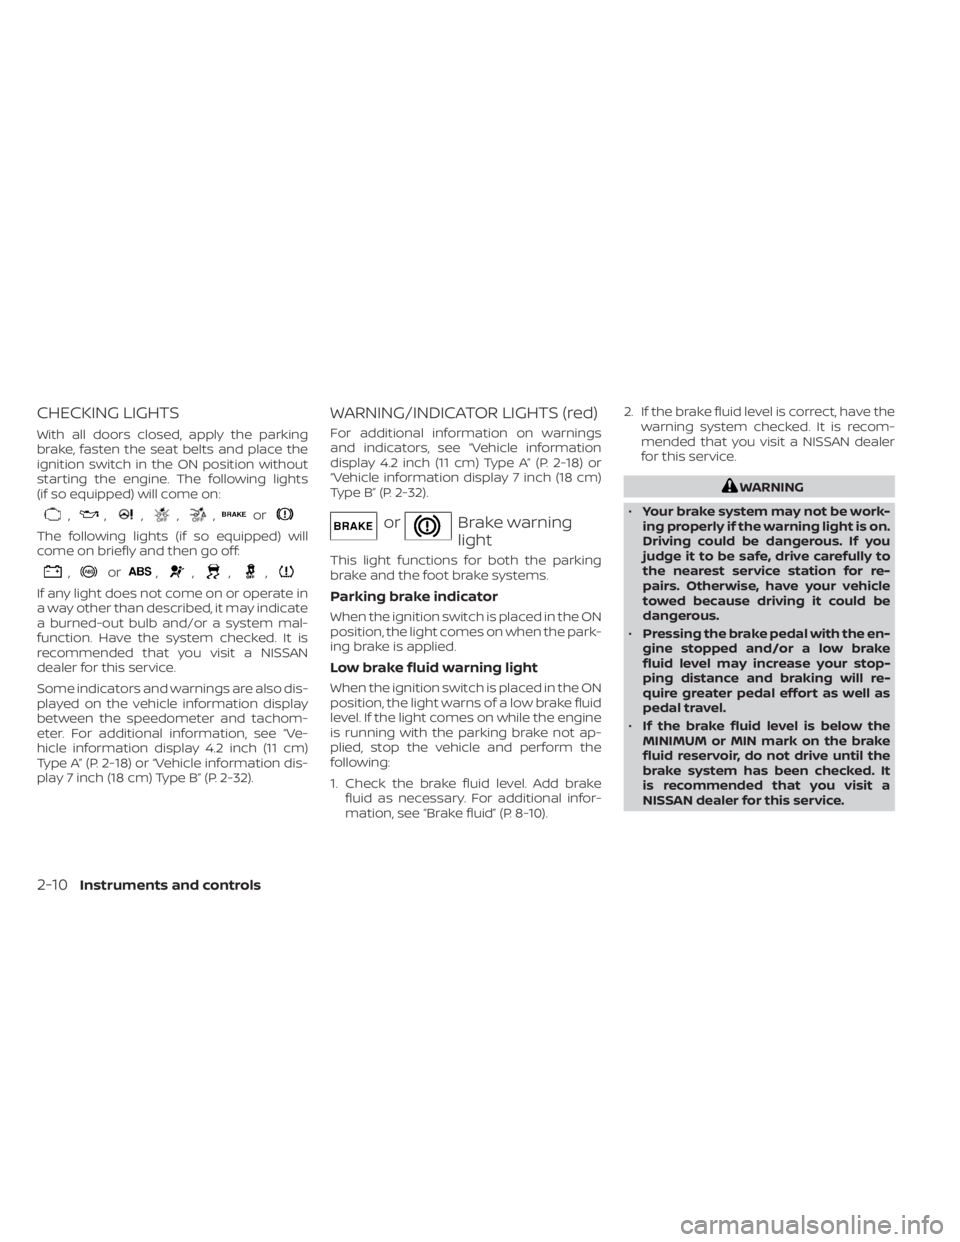
With all doors closed, apply the parking
brake, fasten the seat belts and place the
ignition switch in the ON position without
starting the engine. The following lights
(if so equipped) will come on:
,,,,,or
The following lights (if so equipped) will
come on briefly and then go off:
,or,,,,
If any light does not come on or operate in
a way other than described, it may indicate
a burned-out bulb and/or a system mal-
function. Have the system checked. It is
recommended that you visit a NISSAN
dealer for this service.
Some indicators and warnings are also dis-
played on the vehicle information display
between the speedometer and tachom-
eter. For additional information, see “Ve-
hicle information display 4.2 inch (11 cm)
Type A” (P. 2-18) or “Vehicle information dis-
play 7 inch (18 cm) Type B” (P. 2-32).
WARNING/INDICATOR LIGHTS (red)
For additional information on warnings
and indicators, see “Vehicle information
display 4.2 inch (11 cm) Type A” (P. 2-18) or
“Vehicle information display 7 inch (18 cm)
Type B” (P. 2-32).
orBrake warning
light
This light functions for both the parking
brake and the foot brake systems.
Parking brake indicator
When the ignition switch is placed in the ON
position, the light comes on when the park-
ing brake is applied.
Low brake fluid warning light
When the ignition switch is placed in the ON
position, the light warns of a low brake fluid
level. If the light comes on while the engine
is running with the parking brake not ap-
plied, stop the vehicle and perform the
following:
1. Check the brake fluid level. Add brakefluid as necessary. For additional infor-
mation, see “Brake fluid” (P. 8-10). 2. If the brake fluid level is correct, have the
warning system checked. It is recom-
mended that you visit a NISSAN dealer
for this service.
WARNING
• Your brake system may not be work-
ing properly if the warning light is on.
Driving could be dangerous. If you
judge it to be safe, drive carefully to
the nearest service station for re-
pairs. Otherwise, have your vehicle
towed because driving it could be
dangerous.
• Pressing the brake pedal with the en-
gine stopped and/or a low brake
fluid level may increase your stop-
ping distance and braking will re-
quire greater pedal effort as well as
pedal travel.
• If the brake fluid level is below the
MINIMUM or MIN mark on the brake
fluid reservoir, do not drive until the
brake system has been checked. It
is recommended that you visit a
NISSAN dealer for this service.
2-10Instruments and controls
Page 102 of 556
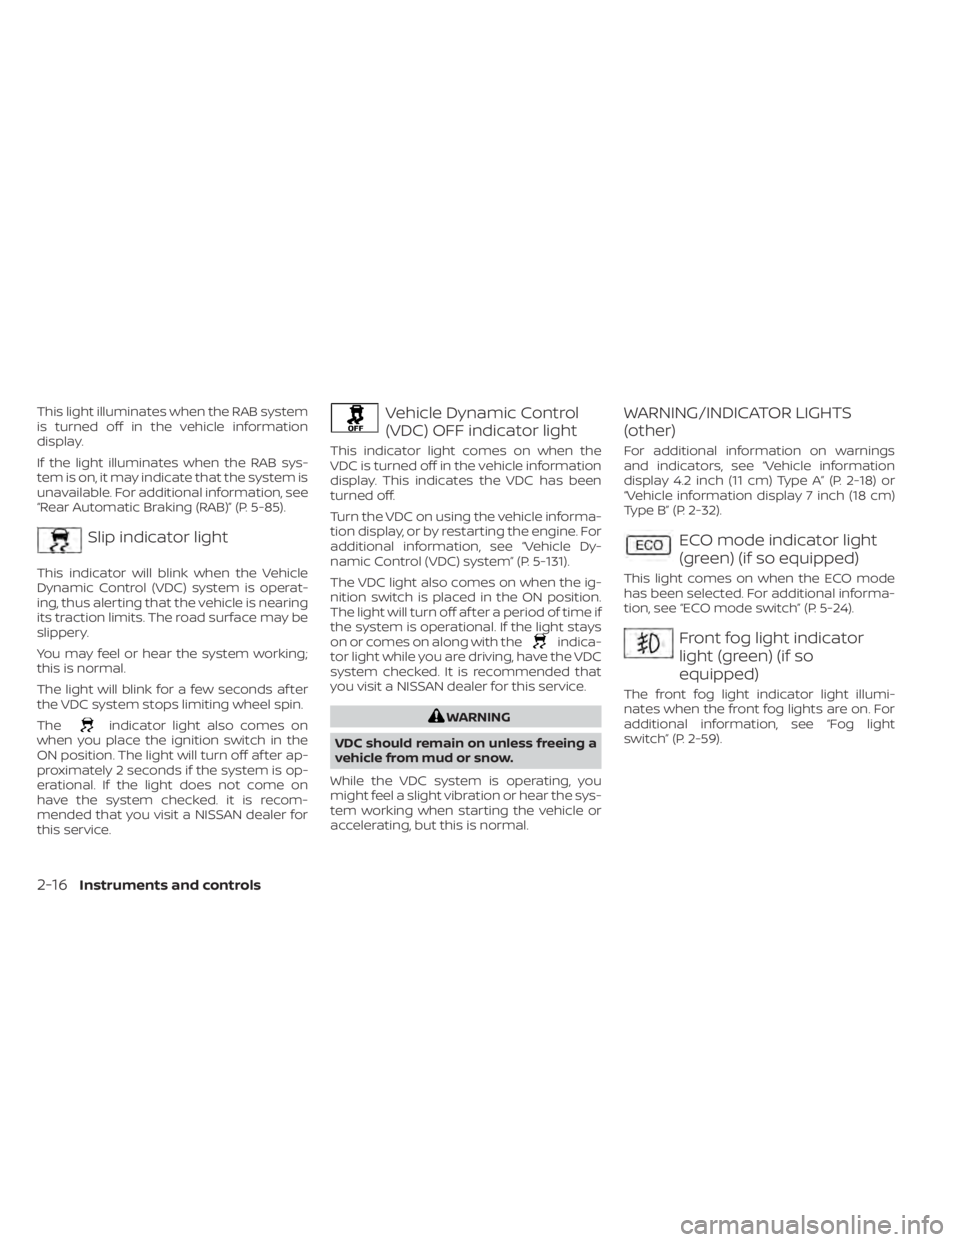
This light illuminates when the RAB system
is turned off in the vehicle information
display.
If the light illuminates when the RAB sys-
tem is on, it may indicate that the system is
unavailable. For additional information, see
“Rear Automatic Braking (RAB)” (P. 5-85).
Slip indicator light
This indicator will blink when the Vehicle
Dynamic Control (VDC) system is operat-
ing, thus alerting that the vehicle is nearing
its traction limits. The road surface may be
slippery.
You may feel or hear the system working;
this is normal.
The light will blink for a few seconds af ter
the VDC system stops limiting wheel spin.
The
indicator light also comes on
when you place the ignition switch in the
ON position. The light will turn off af ter ap-
proximately 2 seconds if the system is op-
erational. If the light does not come on
have the system checked. it is recom-
mended that you visit a NISSAN dealer for
this service.
Vehicle Dynamic Control
(VDC) OFF indicator light
This indicator light comes on when the
VDC is turned off in the vehicle information
display. This indicates the VDC has been
turned off.
Turn the VDC on using the vehicle informa-
tion display, or by restarting the engine. For
additional information, see “Vehicle Dy-
namic Control (VDC) system” (P. 5-131).
The VDC light also comes on when the ig-
nition switch is placed in the ON position.
The light will turn off af ter a period of time if
the system is operational. If the light stays
on or comes on along with the
indica-
tor light while you are driving, have the VDC
system checked. It is recommended that
you visit a NISSAN dealer for this service.
WARNING
VDC should remain on unless freeing a
vehicle from mud or snow.
While the VDC system is operating, you
might feel a slight vibration or hear the sys-
tem working when starting the vehicle or
accelerating, but this is normal.
WARNING/INDICATOR LIGHTS
(other)
For additional information on warnings
and indicators, see “Vehicle information
display 4.2 inch (11 cm) Type A” (P. 2-18) or
“Vehicle information display 7 inch (18 cm)
Type B” (P. 2-32).
ECO mode indicator light
(green) (if so equipped)
This light comes on when the ECO mode
has been selected. For additional informa-
tion, see “ECO mode switch” (P. 5-24).
Front fog light indicator
light (green) (if so
equipped)
The front fog light indicator light illumi-
nates when the front fog lights are on. For
additional information, see “Fog light
switch” (P. 2-59).
2-16Instruments and controls
Page 110 of 556
Customize Display
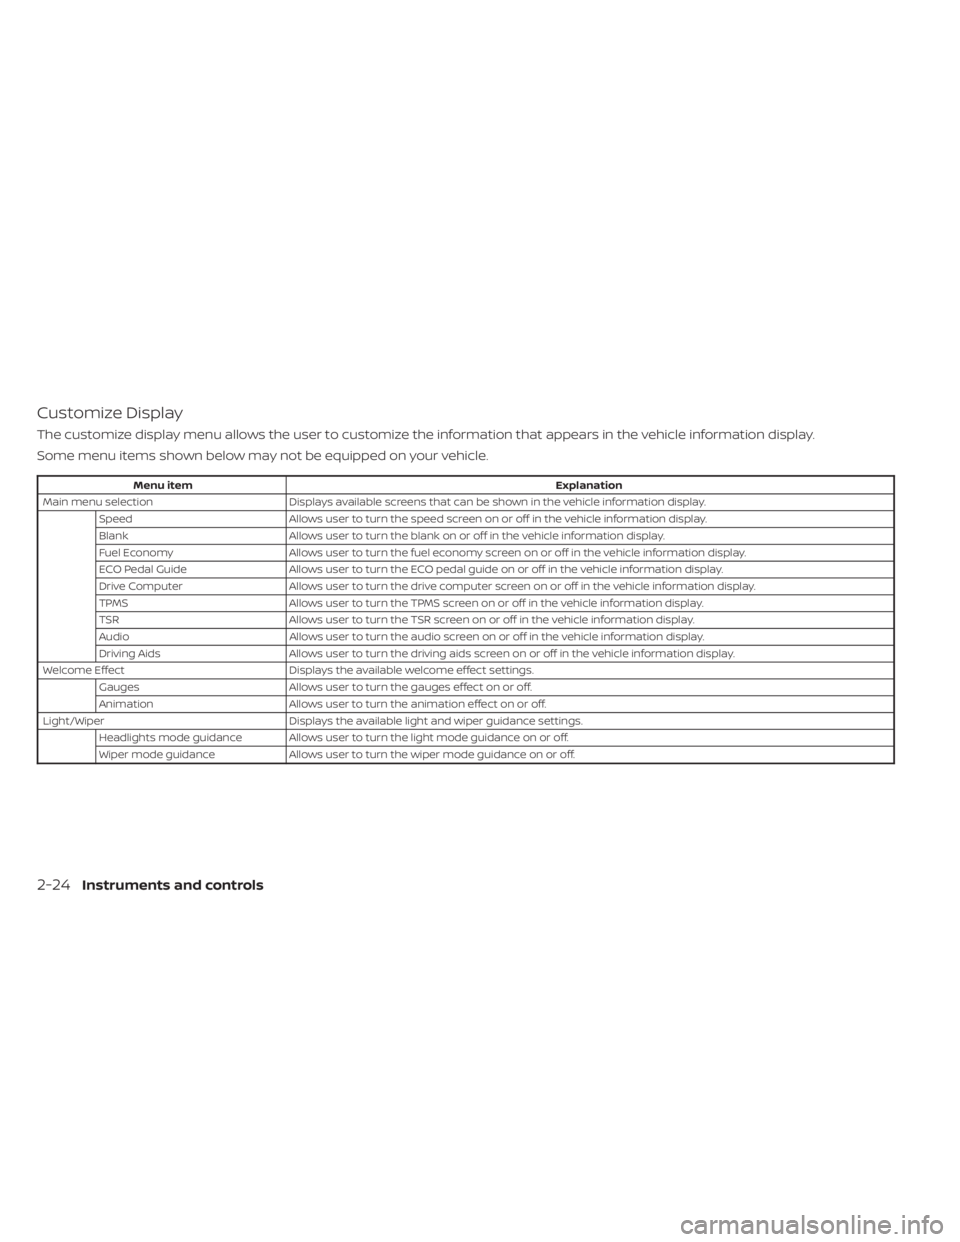
The customize display menu allows the user to customize the information that appears in the vehicle information display.
Some menu items shown below may not be equipped on your vehicle.
Menu itemExplanation
Main menu selection Displays available screens that can be shown in the vehicle information display.
Speed Allows user to turn the speed screen on or off in the vehicle information display.
Blank Allows user to turn the blank on or off in the vehicle information display.
Fuel Economy Allows user to turn the fuel economy screen on or off in the vehicle information display.
ECO Pedal Guide Allows user to turn the ECO pedal guide on or off in the vehicle information display.
Drive Computer Allows user to turn the drive computer screen on or off in the vehicle information display.
TPMS Allows user to turn the TPMS screen on or off in the vehicle information display.
TSR Allows user to turn the TSR screen on or off in the vehicle information display.
Audio Allows user to turn the audio screen on or off in the vehicle information display.
Driving Aids Allows user to turn the driving aids screen on or off in the vehicle information display.
Welcome Effect Displays the available welcome effect settings.
Gauges Allows user to turn the gauges effect on or off.
Animation Allows user to turn the animation effect on or off.
Light/Wiper Displays the available light and wiper guidance settings.
Headlights mode guidance Allows user to turn the light mode guidance on or off.
Wiper mode guidance Allows user to turn the wiper mode guidance on or off.
2-24Instruments and controls
Page 125 of 556
Customize Display
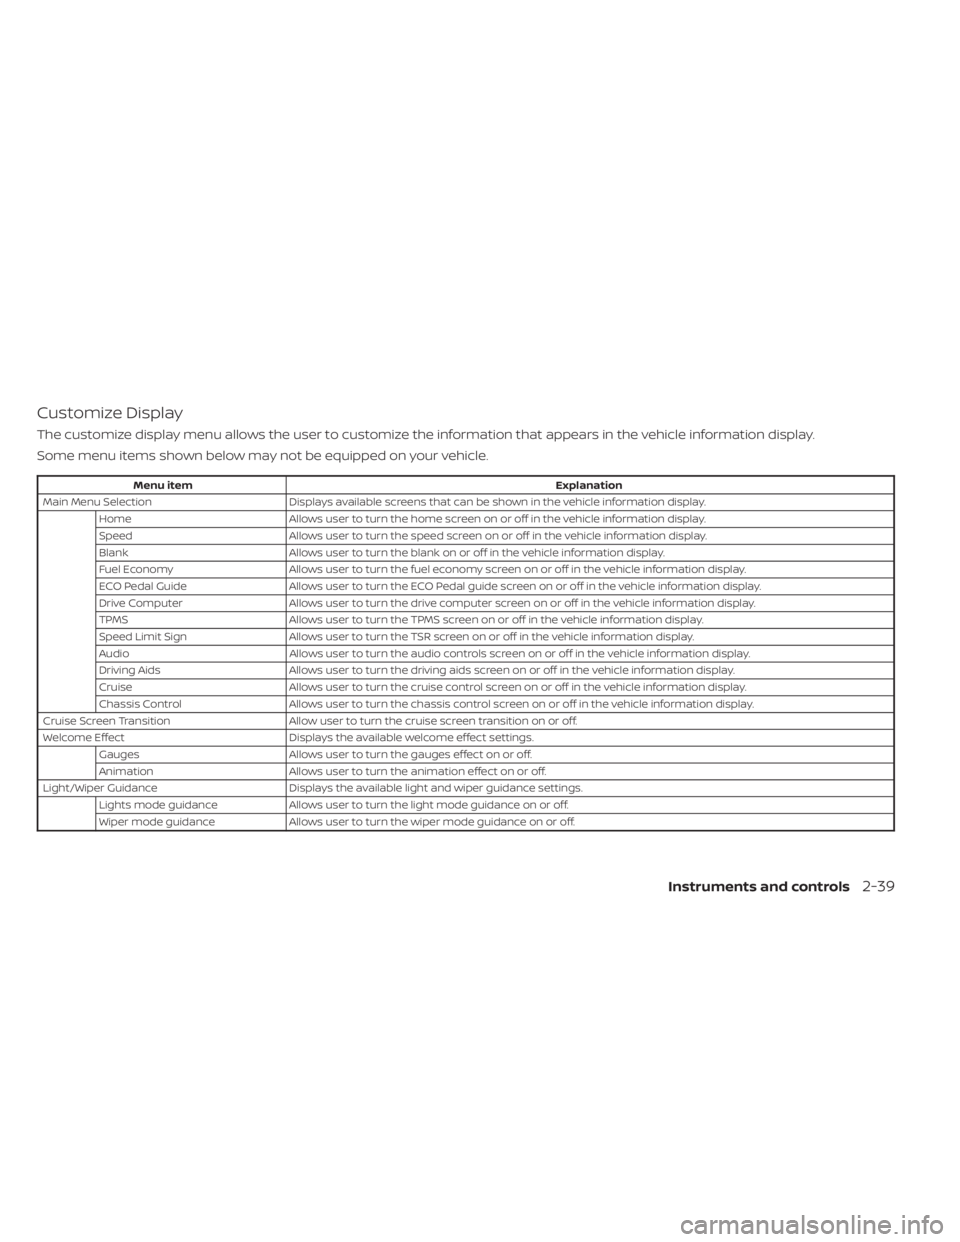
The customize display menu allows the user to customize the information that appears in the vehicle information display.
Some menu items shown below may not be equipped on your vehicle.
Menu itemExplanation
Main Menu Selection Displays available screens that can be shown in the vehicle information display.
Home Allows user to turn the home screen on or off in the vehicle information display.
Speed Allows user to turn the speed screen on or off in the vehicle information display.
Blank Allows user to turn the blank on or off in the vehicle information display.
Fuel Economy Allows user to turn the fuel economy screen on or off in the vehicle information display.
ECO Pedal Guide Allows user to turn the ECO Pedal guide screen on or off in the vehicle information display.
Drive Computer Allows user to turn the drive computer screen on or off in the vehicle information display.
TPMS Allows user to turn the TPMS screen on or off in the vehicle information display.
Speed Limit Sign Allows user to turn the TSR screen on or off in the vehicle information display.
Audio Allows user to turn the audio controls screen on or off in the vehicle information display.
Driving Aids Allows user to turn the driving aids screen on or off in the vehicle information display.
Cruise Allows user to turn the cruise control screen on or off in the vehicle information display.
Chassis Control Allows user to turn the chassis control screen on or off in the vehicle information display.
Cruise Screen Transition Allow user to turn the cruise screen transition on or off.
Welcome Effect Displays the available welcome effect settings.
Gauges Allows user to turn the gauges effect on or off.
Animation Allows user to turn the animation effect on or off.
Light/Wiper Guidance Displays the available light and wiper guidance settings.
Lights mode guidance Allows user to turn the light mode guidance on or off.
Wiper mode guidance Allows user to turn the wiper mode guidance on or off.
Instruments and controls2-39
Page 141 of 556
High Beam Assist
The High Beam Assist system will operate
when the vehicle is driven at speeds of ap-
proximately 25 mph (40 km/h) and above. If
an oncoming vehicle or leading vehicle ap-
pears in front of your vehicle when the
headlight high beam is on, the headlight
will be switched to the low beam
automatically.
WARNING
• The High Beam Assist system is a
convenience but it is not a substitute
for safe driving operation. The driver
should remain alert at all times, en-
sure safe driving practices and
switch the high beams and low beam
manually when necessary.
• The high beam or low beam may not
switch automatically under the fol-
lowing conditions. Switch the high
beam and low beam manually.
– During bad weather (rain, fog,
snow, wind, etc.).
– When a light source similar to a
headlight or tail light is in the vi-
cinity of the vehicle.
– When the headlights of the on-
coming vehicle or the leading ve- hicle are turned off, when the color
of the light is affected due to for-
eign materials on the lights, or
when the light beam is out of
position.
– When there is a sudden, continu-
ous change in brightness.
– When driving on a road that
passes over rolling hills, or a road
that has level differences.
– When driving on a road with many
curves.
– When a sign or mirror-like surface
is reflecting intense light towards
the front of the vehicle.
– When the container, etc. being
towed by a leading vehicle is re-
flecting intense light.
– When a headlight on your vehicle
is damaged or dirty.
– When the vehicle is leaning at an
angle due to a punctured tire, be-
ing towed, etc.
• The timing of switching the low
beam and high beam may change
under the following situations.
– The brightness of the headlights
of the oncoming vehicle or leading
vehicle. –
The movement and direction of
the oncoming vehicle and the
leading vehicle.
– When only one light on the on-
coming vehicle or the leading ve-
hicle is illuminated.
– When the oncoming vehicle or the
leading vehicle is a two-wheeled
vehicle.
– Road conditions (incline, curve,
the road surface, etc.).
– The number of passengers and
the amount of luggage.
Instruments and controls2-55
Page 173 of 556
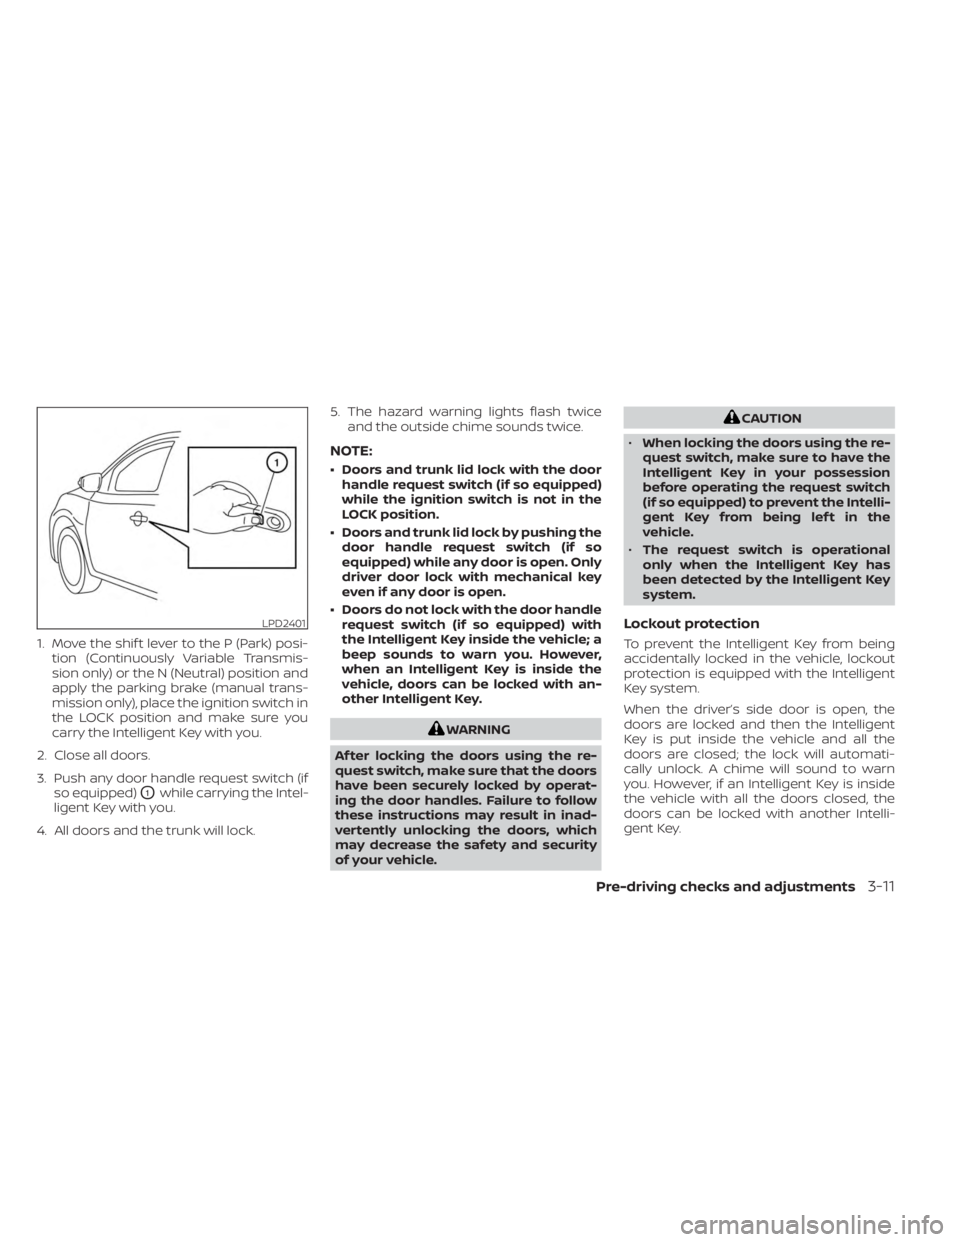
1. Move the shif t lever to the P (Park) posi-tion (Continuously Variable Transmis-
sion only) or the N (Neutral) position and
apply the parking brake (manual trans-
mission only), place the ignition switch in
the LOCK position and make sure you
carry the Intelligent Key with you.
2. Close all doors.
3. Push any door handle request switch (if so equipped)
O1while carrying the Intel-
ligent Key with you.
4. All doors and the trunk will lock. 5. The hazard warning lights flash twice
and the outside chime sounds twice.
NOTE:
• Doors and trunk lid lock with the doorhandle request switch (if so equipped)
while the ignition switch is not in the
LOCK position.
• Doors and trunk lid lock by pushing the door handle request switch (if so
equipped) while any door is open. Only
driver door lock with mechanical key
even if any door is open.
• Doors do not lock with the door handle request switch (if so equipped) with
the Intelligent Key inside the vehicle; a
beep sounds to warn you. However,
when an Intelligent Key is inside the
vehicle, doors can be locked with an-
other Intelligent Key.
WARNING
Af ter locking the doors using the re-
quest switch, make sure that the doors
have been securely locked by operat-
ing the door handles. Failure to follow
these instructions may result in inad-
vertently unlocking the doors, which
may decrease the safety and security
of your vehicle.
CAUTION
• When locking the doors using the re-
quest switch, make sure to have the
Intelligent Key in your possession
before operating the request switch
(if so equipped) to prevent the Intelli-
gent Key from being lef t in the
vehicle.
• The request switch is operational
only when the Intelligent Key has
been detected by the Intelligent Key
system.
Lockout protection
To prevent the Intelligent Key from being
accidentally locked in the vehicle, lockout
protection is equipped with the Intelligent
Key system.
When the driver’s side door is open, the
doors are locked and then the Intelligent
Key is put inside the vehicle and all the
doors are closed; the lock will automati-
cally unlock. A chime will sound to warn
you. However, if an Intelligent Key is inside
the vehicle with all the doors closed, the
doors can be locked with another Intelli-
gent Key.
LPD2401
Pre-driving checks and adjustments3-11
Page 174 of 556
NOTE:
The doors may not lock when the Intelli-
gent Key is in the same hand that is op-
erating the request switch (if so
equipped) to lock the door. Put the Intel-
ligent Key in a purse, pocket or your
other hand.
CAUTION
The lockout protection may not func-
tion under the following conditions:
• When the Intelligent Key is placed on
top of the instrument panel.
• When the Intelligent Key is placed on
top of the rear parcel shelf.
• When the Intelligent Key is placed in-
side the glove box or a storage bin.
• When the Intelligent Key is placed in-
side the door pockets.
• When the Intelligent Key is placed on
or under the spare tire area.
• When the Intelligent Key is placed in-
side or near metallic materials.
• When the Intelligent Key battery is
discharged.
Unlocking doors
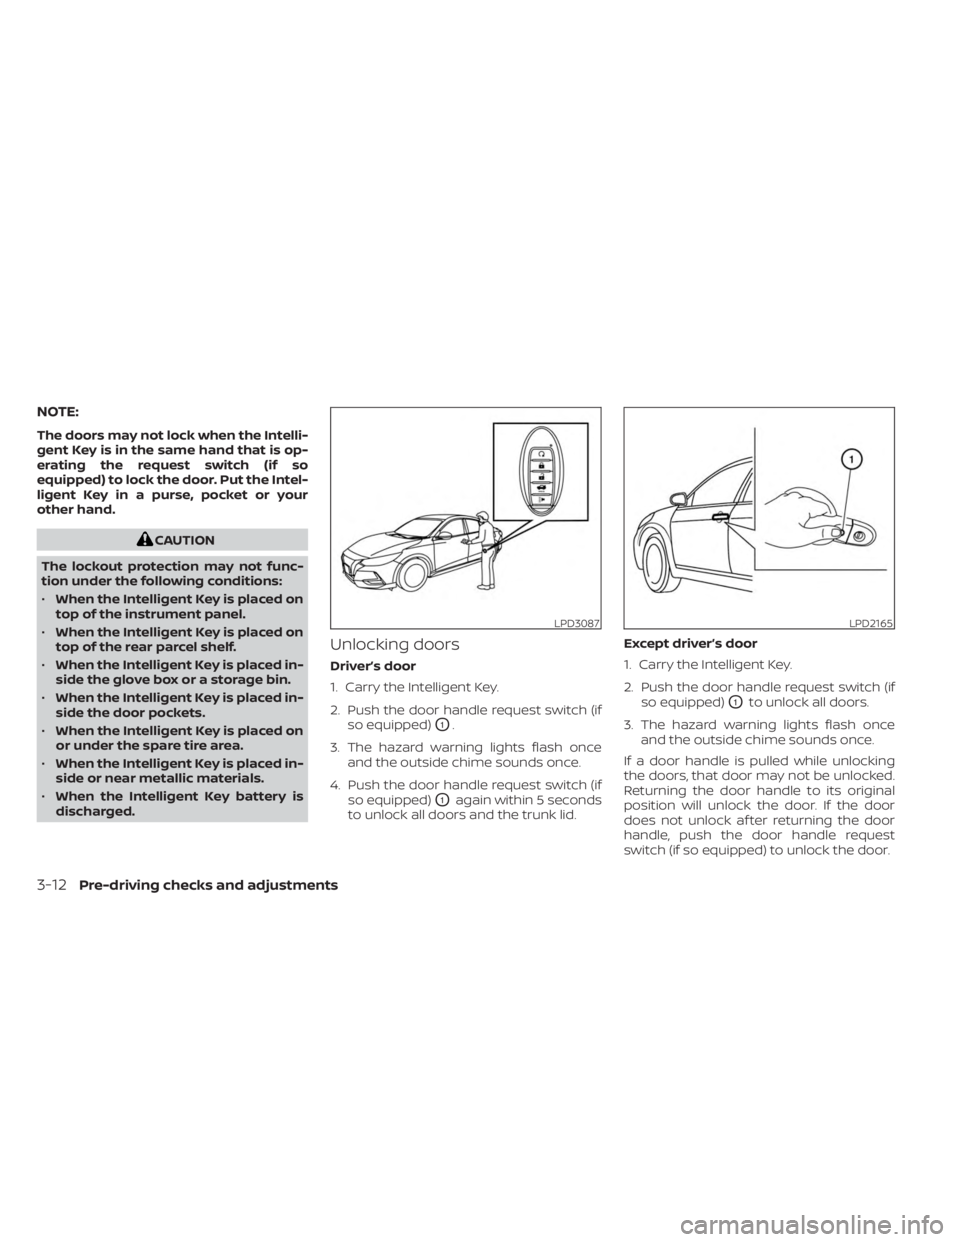
Driver’s door
1. Carry the Intelligent Key.
2. Push the door handle request switch (if so equipped)
O1.
3. The hazard warning lights flash once and the outside chime sounds once.
4. Push the door handle request switch (if so equipped)
O1again within 5 seconds
to unlock all doors and the trunk lid. Except driver’s door
1. Carry the Intelligent Key.
2. Push the door handle request switch (if
so equipped)
O1to unlock all doors.
3. The hazard warning lights flash once and the outside chime sounds once.
If a door handle is pulled while unlocking
the doors, that door may not be unlocked.
Returning the door handle to its original
position will unlock the door. If the door
does not unlock af ter returning the door
handle, push the door handle request
switch (if so equipped) to unlock the door.
LPD3087LPD2165
3-12Pre-driving checks and adjustments
Page 175 of 556
All doors and trunk lid will be locked auto-
matically unless one of the following op-
erations is performed within 30 seconds
af ter pushing the request switch (if so
equipped):
• Opening any door or the trunk lid.
• Pushing the ignition switch.
Using the interior lights
The interior lights illuminate for a period of
time when a door is unlocked and the inte-
rior lights switch is not in the OFF position.
The interior lights can be turned off without
waiting by performing one of the following
operations:
• Placing the ignition switch in the ONposition.
• Locking the doors with the request switch (if so equipped) or the Intelligent
Key.
• Switching the interior light switch to the OFF position.
For additional information, see “Interior
lights” (P. 2-74).
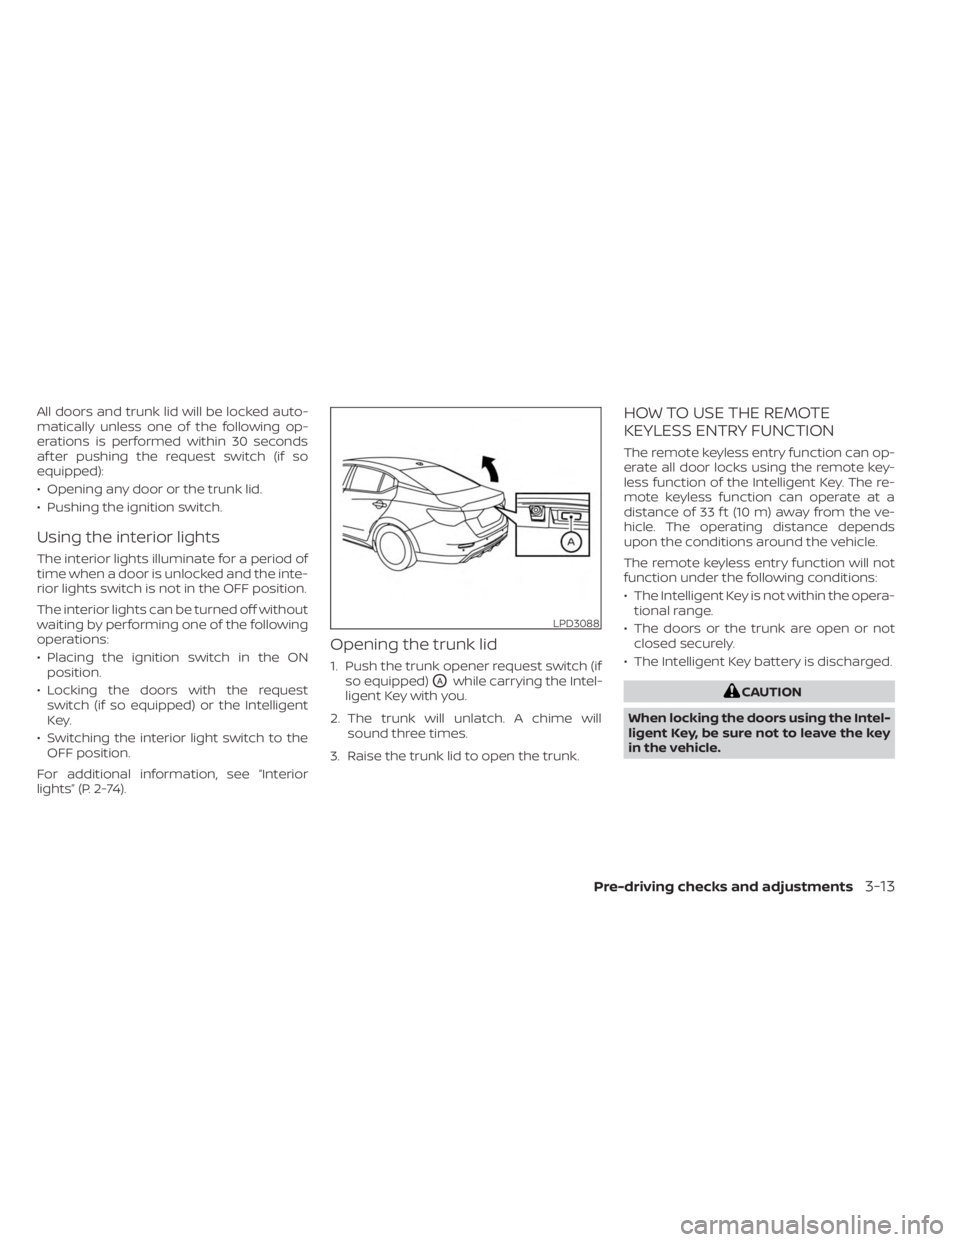
Opening the trunk lid
1. Push the trunk opener request switch (if so equipped)
OAwhile carrying the Intel-
ligent Key with you.
2. The trunk will unlatch. A chime will sound three times.
3. Raise the trunk lid to open the trunk.
HOW TO USE THE REMOTE
KEYLESS ENTRY FUNCTION
The remote keyless entry function can op-
erate all door locks using the remote key-
less function of the Intelligent Key. The re-
mote keyless function can operate at a
distance of 33 f t (10 m) away from the ve-
hicle. The operating distance depends
upon the conditions around the vehicle.
The remote keyless entry function will not
function under the following conditions:
• The Intelligent Key is not within the opera- tional range.
• The doors or the trunk are open or not closed securely.
• The Intelligent Key battery is discharged.
CAUTION
When locking the doors using the Intel-
ligent Key, be sure not to leave the key
in the vehicle.
LPD3088
Pre-driving checks and adjustments3-13