2023 NISSAN SENTRA language
[x] Cancel search: languagePage 105 of 556

SETTINGS
The setting mode allows you to change the
information displayed in the vehicle infor-
mation display:
• VDC Setting• Driver Assistance
• ECO Mode Setting
• TPMS Settings
• Clock
• Vehicle Settings• Maintenance
• Customize Display
• Unit
• Language
• Factory Reset
VDC Setting
The VDC Setting menu allows the user to enable or disable the Vehicle Dynamic Control (VDC) system.
Menu item
Explanation
System Allows the user turn the VDC system on or off. For additional information, see “Vehicle Dynamic Control (VDC)
system” (P. 5-131).
Driver Assistance
The driver assistance menu allows the user to change the settings for driving, parking, and braking aids.
Some menu items shown below may not be equipped on your vehicle.
Menu item Explanation
Emergency Brake Displays available emergency braking options.
Front Allows user to turn the front emergency braking system on or off. For additional information, see “Automatic
Emergency Braking (AEB) with Pedestrian Detection” (P. 5-92) and “Intelligent Forward Collision Warning (I-FCW)”
(P. 5-106).
Rear Allows user to turn the rear emergency braking system on or off. For additional information, see "Rear Automatic
Braking (RAB)” (P. 5-85).
Lane Displays available lane options.
Lane Departure Warning Allows user to turn the Lane Departure Warning (LDW) system on or off. For additional information, see “Lane De-
parture Warning (LDW)” (P. 5-29).
Instruments and controls2-19
Page 111 of 556

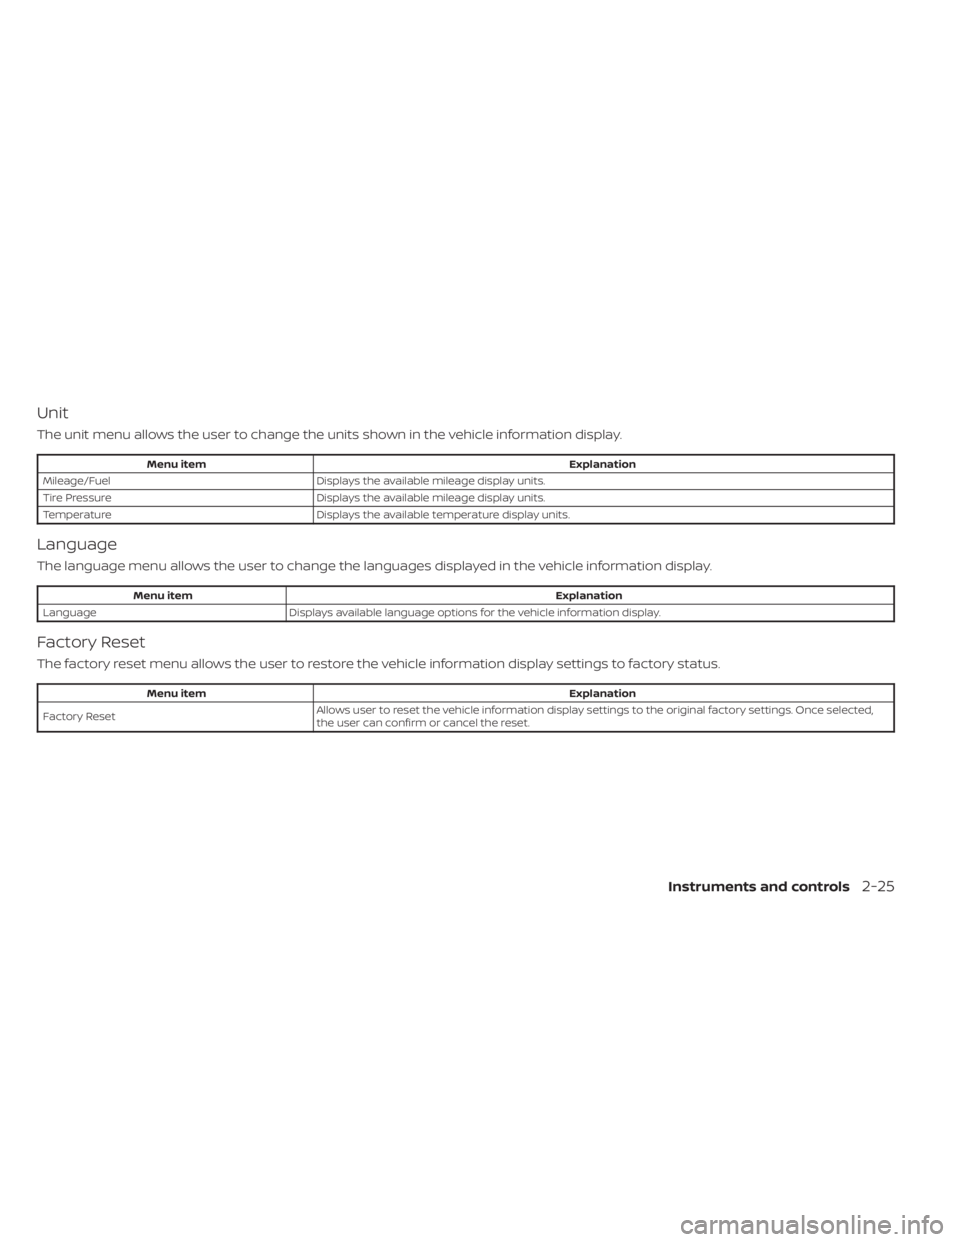
Unit
The unit menu allows the user to change the units shown in the vehicle information display.
Menu itemExplanation
Mileage/Fuel Displays the available mileage display units.
Tire Pressure Displays the available mileage display units.
Temperature Displays the available temperature display units.
Language
The language menu allows the user to change the languages displayed in the vehicle information display.
Menu item Explanation
Language Displays available language options for the vehicle information display.
Factory Reset
The factory reset menu allows the user to restore the vehicle information display settings to factory status.
Menu item Explanation
Factory Reset Allows user to reset the vehicle information display setti
ngs to the original factory settings. Once selected,
the user can confirm or cancel the reset.
Instruments and controls2-25
Page 120 of 556

• Digital speed and average speed
• Instant fuel economy/ average fueleconomy
• Tire Pressure
• Audio/telephone
• Intelligent Cruise Control (ICC)
• Speed Limit Sign
• Driving Aids
• Settings
• Warnings*
*Warnings will only display if there are any
present. For additional information, see
“Vehicle information display warnings and
indicators” (P. 2-41).
To control what items display in the vehicle
information display, see “How to use the
vehicle information display” (P. 2-33).RESETTING THE DRIVE COMPUTER
The drive computer is divided across three
screens:
• Average Speed
• Average Fuel Economy
• Trip Distance & Time
1. Press the
buttons
until you reach the desired drive com-
puter mode.
2. Press and hold the OK button for ap- proximately 1 second to reset the infor-
mation on the currently displayed
screen.
NOTE:
If you wish to reset all drive computer
values at once, press and hold the OK
button for approximately 3 seconds until
a reset menu appears; and follow the
instructions.
SETTINGS
The setting mode allows you to change the
information displayed in the vehicle infor-
mation display. It also allows you to change
vehicle functions:
• VDC Setting
• Driver Assistance
• ECO Mode Setting
• TPMS Setting
• Clock
• Vehicle Settings
• Maintenance
• Customize Display
• Unit/Language
• Factory Reset
VDC Setting
The VDC Setting menu allows the user to enable or disable the Vehicle Dynamic Control (VDC) system.
Menu item Explanation
System Allows the user turn the VDC system on or off. For additional information, see “Vehicle Dynamic Control (VDC)
system” (P. 5-131).
2-34Instruments and controls
Page 126 of 556

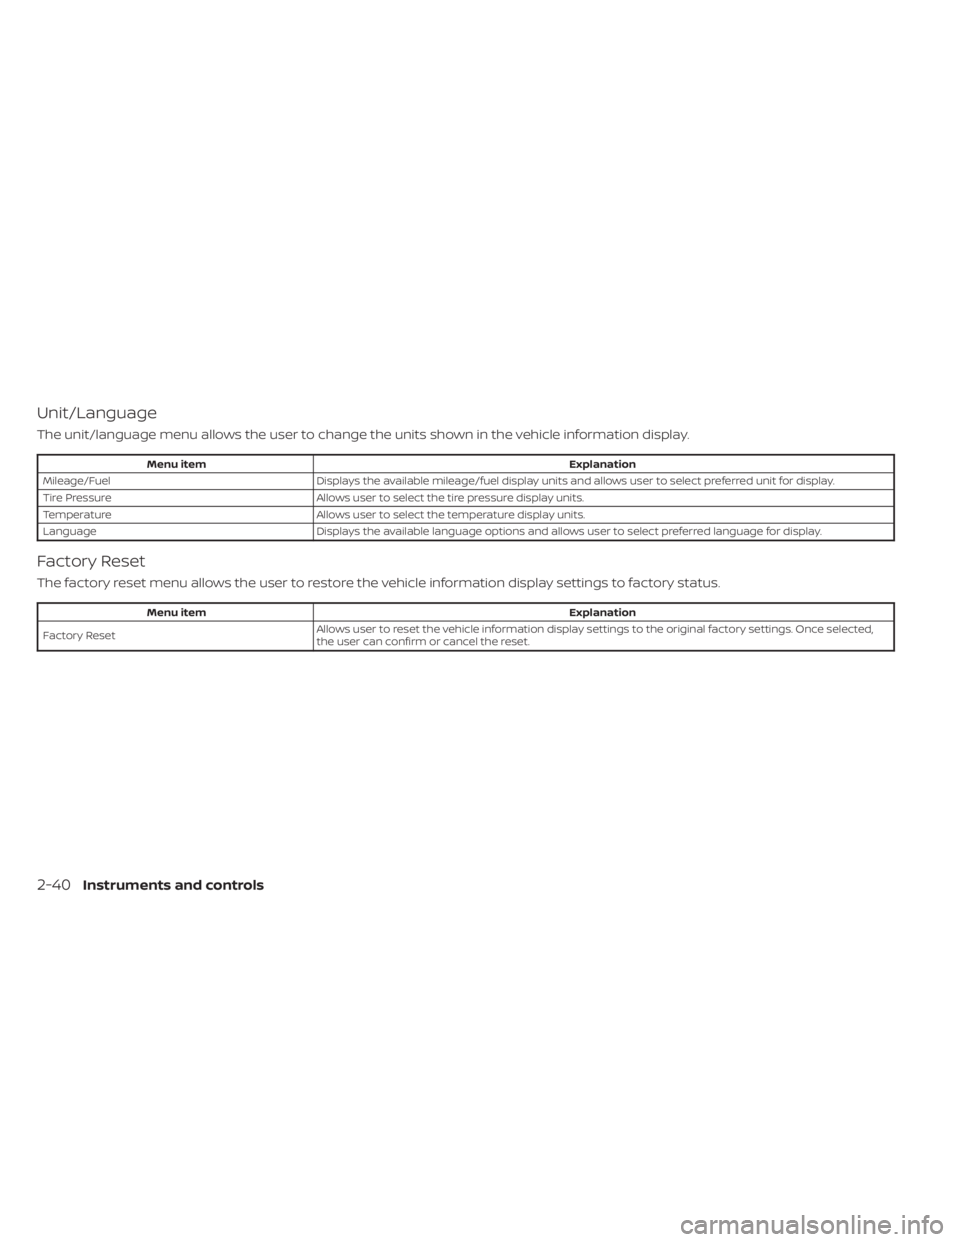
Unit/Language
The unit/language menu allows the user to change the units shown in the vehicle information display.
Menu itemExplanation
Mileage/Fuel Displays the available mileage/fuel display units and allows user to select preferred unit for display.
Tire Pressure Allows user to select the tire pressure display units.
Temperature Allows user to select the temperature display units.
Language Displays the available language options and allows user to select preferred language for display.
Factory Reset
The factory reset menu allows the user to restore the vehicle information display settings to factory status.
Menu item Explanation
Factory Reset Allows user to reset the vehicle information display setti
ngs to the original factory settings. Once selected,
the user can confirm or cancel the reset.
2-40Instruments and controls
Page 198 of 556

Menu itemResult
Settings Touch to change the following settings.
Connections Touch this key to select either Bluetooth® phone, Bluetooth® audio or USB audio options. For additional
information, see “USB connections screen” (P. 4-54) and “Bluetooth® connections screen” (P. 4-81).
Phone For additional information, see “Bluetooth® Hands-Free Phone System” (P. 4-66).
Sound For additional information, see “Audio system” (P. 4-44).
Volume & Beeps For additional information, see “Volume & beeps” (P. 4-84).
Clock Touch this key to adjust clock settings.
On-screen Clock Touch to toggle ON or OFF the clock display on the upper right corner of the display screen.
Clock Format Touch to set the clock to 12 hour or 24 hour formats.
Daylight Savings Time Touch to adjusts the daylight saving time to on or off.
Set Clock Manually Touch to adjust the clock manually; then touch to change between AM and PM, the hour and the minutes.
System Voice For additional information, see “Settings” (P. 4-75).
Camera Touch this key to change the camera settings.
Others Touch this key to select and/or adjust various functions of this system. A screen with additional options will
appear.
Display Touch this key to adjust the appearance of the display. For additional information, see “Adjusting the
screen” (P. 4-13).
Language Touch this key to change the language on the display.
OSS Licenses Touch this key to display sof tware licensing information.
Return All Settings to Default Touch this key to return all settings to default and to clear the memory.
4-6Monitor, climate, audio, phone and voice recognition systems
Page 238 of 556

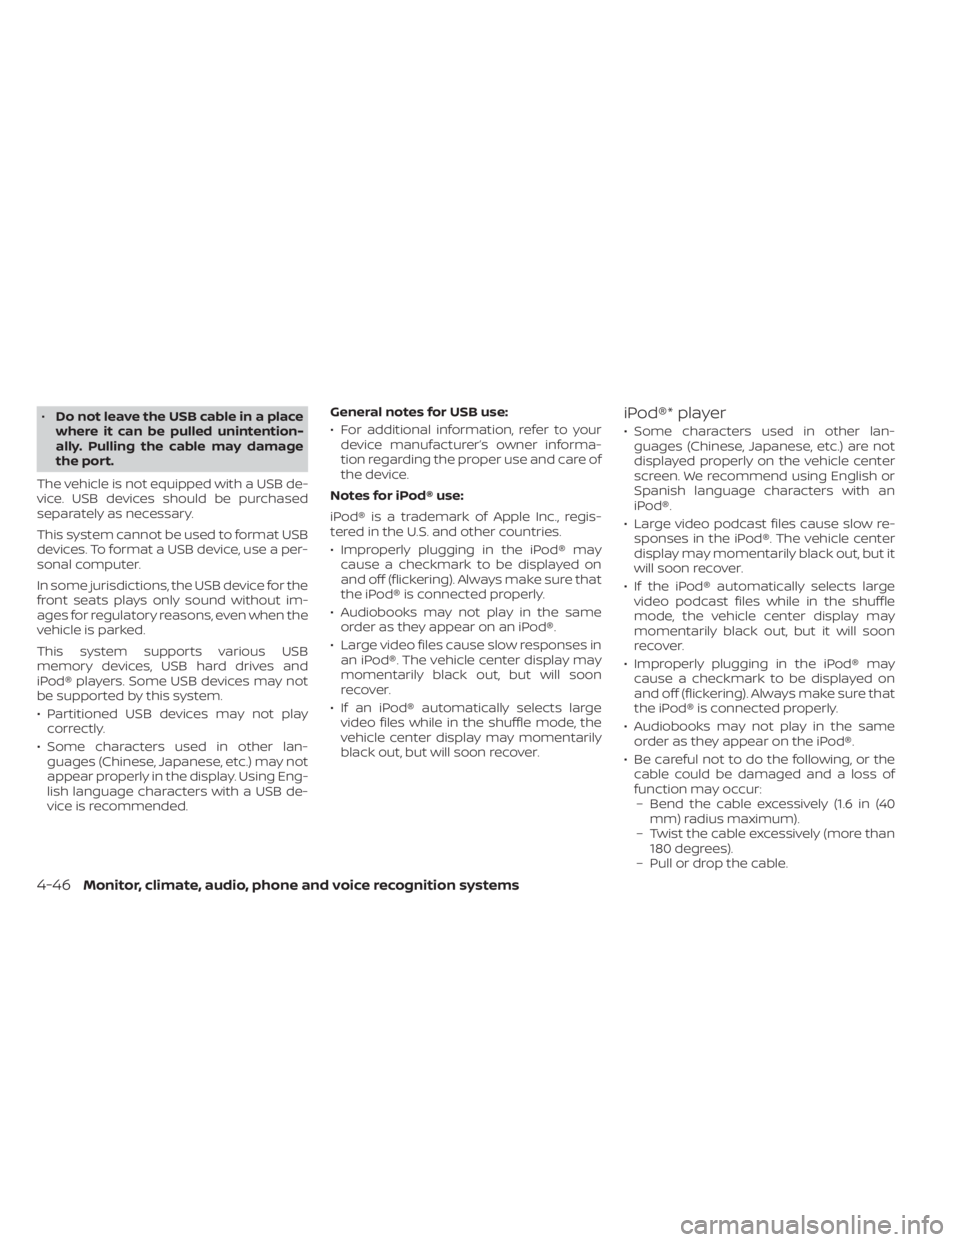
•Do not leave the USB cable in a place
where it can be pulled unintention-
ally. Pulling the cable may damage
the port.
The vehicle is not equipped with a USB de-
vice. USB devices should be purchased
separately as necessary.
This system cannot be used to format USB
devices. To format a USB device, use a per-
sonal computer.
In some jurisdictions, the USB device for the
front seats plays only sound without im-
ages for regulatory reasons, even when the
vehicle is parked.
This system supports various USB
memory devices, USB hard drives and
iPod® players. Some USB devices may not
be supported by this system.
• Partitioned USB devices may not play correctly.
• Some characters used in other lan- guages (Chinese, Japanese, etc.) may not
appear properly in the display. Using Eng-
lish language characters with a USB de-
vice is recommended. General notes for USB use:
• For additional information, refer to your
device manufacturer’s owner informa-
tion regarding the proper use and care of
the device.
Notes for iPod® use:
iPod® is a trademark of Apple Inc., regis-
tered in the U.S. and other countries.
• Improperly plugging in the iPod® may cause a checkmark to be displayed on
and off (flickering). Always make sure that
the iPod® is connected properly.
• Audiobooks may not play in the same order as they appear on an iPod®.
• Large video files cause slow responses in an iPod®. The vehicle center display may
momentarily black out, but will soon
recover.
• If an iPod® automatically selects large video files while in the shuffle mode, the
vehicle center display may momentarily
black out, but will soon recover.iPod®* player
• Some characters used in other lan-guages (Chinese, Japanese, etc.) are not
displayed properly on the vehicle center
screen. We recommend using English or
Spanish language characters with an
iPod®.
• Large video podcast files cause slow re- sponses in the iPod®. The vehicle center
display may momentarily black out, but it
will soon recover.
• If the iPod® automatically selects large video podcast files while in the shuffle
mode, the vehicle center display may
momentarily black out, but it will soon
recover.
• Improperly plugging in the iPod® may cause a checkmark to be displayed on
and off (flickering). Always make sure that
the iPod® is connected properly.
• Audiobooks may not play in the same order as they appear on the iPod®.
• Be careful not to do the following, or the cable could be damaged and a loss of
function may occur:– Bend the cable excessively (1.6 in (40 mm) radius maximum).
– Twist the cable excessively (more than 180 degrees).
– Pull or drop the cable.
4-46Monitor, climate, audio, phone and voice recognition systems