2023 NISSAN SENTRA parking brake
[x] Cancel search: parking brakePage 115 of 556
Rear seat belt reminder
This warning appears for 35 seconds af ter
the ignition is placed in the ON position and
the engine is started.
This warning message shows the status of
the three rear seat belts. When one of the
rear seat belts are buckled, the corre-
sponding rear seat belt indicator will ap-
pear grey. When one of the rear seat belts
are unbuckled, the corresponding rear seat
belt indicator will appear red.
Af ter a change in buckle status, a chime will
sound and the warning will appear for an-
other 35 seconds.
Release Parking Brake
This warning appears when the parking
brake is set and the vehicle is driven.
Reminder: Turn OFF
Headlights
This warning appears when the headlights
are lef t in the ON position when exiting the
vehicle. Place the headlight switch in the
OFF or AUTO position. For additional infor-
mation, see “Headlight and turn signal
switch” (P. 2-52).
Shif t to Park
This warning appears when the ignition
switch is in the AUTO ACC or OFF position
and the shif t lever is not in the P (Park)
position. Also, a chime sounds when the
ignition switch is in the AUTO ACC or OFF
position.
If this warning appears, move the shif t lever
to the P (Park) position and start the engine.
Shipping Mode On Push Storage Fuse
This warning may appear if the extended
storage switch is not pushed in. When this
warning appears, push in the extended
storage switch to turn off the warning. For
additional information, see “Extended stor-
age switch” (P. 2-65), and/or “Fuses” (P. 8-20).
Tire Pressure Low - Add Air
This warning appears when the low tire
pressure warning light in the meter illumi-
nates and low tire pressure is detected. The
warning appears each time the ignition
switch is placed in the ON position as long
as the low tire pressure warning light re-
mains illuminated. If this warning appears,
stop the vehicle and adjust the tire pres-
sures of all four tires to the recommended
COLD tire pressure shown on the Tire andLoading Information label. For additional
information, see “Low tire pressure warning
light” (P. 2-13) and “Tire Pressure Monitoring
System (TPMS)” (P. 5-5).
TPMS Error: See Owner’s Manual
This warning appears when there is an er-
ror with your TPMS. If this warning comes
on, have the system checked. It is recom-
mended that you visit a NISSAN dealer for
this service.
Transmission Shif t Position
indicator
This indicator shows the transmission shif t
position.
CVT (AT) hot Power reduced
This transmission has a high fluid tem-
perature protection mode. If the fluid tem-
perature becomes too high (for example,
climbing steep grades in high tempera-
tures with heavy loads, such as when tow-
ing a trailer), engine power and, under
some conditions, vehicle speed will be de-
creased automatically to reduce the
chance of transmission damage. Vehicle
speed can be controlled with the accelera-
tor pedal, but the engine and vehicle speed
may be reduced.
Instruments and controls2-29
Page 121 of 556
Driver Assistance
The driver assistance menu allows the user to change the settings for driving, parking, and braking aids.
Some menu items shown below may not be equipped on your vehicle.
Menu itemExplanation
Lane Displays available lane options.
Lane Departure Warning Allows user to turn the Lane Departure Warning (LDW) system on or off. For additional information, see “Lane Departure Warning (LDW)” (P. 5-29).
Blind Spot Displays available blind spot options.
Blind Spot Warning Allows user to turn the Blind Spot Warning (BSW) system on or off. For additional information, see “Blind Spot Warning (BSW)” (P. 5-36).
Emergency Brake Displays available emergency braking options.
Front Allows user to turn the front emergency braking system on or off. For additional information, see “Automatic Emergency
Braking (AEB) with Pedestrian Detection” (P. 5-92) and “Intelligent Forward Collision Warning (I-FCW)”
(P. 5-106).
Rear Allows user to turn the rear emergency braking system on or off. For additional information, see "Rear Automatic Braking
(RAB)” (P. 5-85).
Speed Limit Sign Allows user to turn the Traffic Sign Recognition (TSR) system on or off. For additional information, see “Traffic Sign Recognition
(TSR)” (P. 5-25).
Parking Aids Displays available parking aids.
Auto Show Sonar Allows user to auto display the sonar. For additional information, see “Rear Sonar System (RSS)” (P. 5-135).
Rear Allows user to turn the rear sonar on or off.
Distance Allows user to set the distance sensor range to Long/Medium/Short.
Volume Allows the user to set the parking sensor volume to High/Medium/Low.
Rear Cross Traffic Alert Allows user to turn the Rear Cross Traffic Alert (RCTA) system on or off. For additional information, see “Rear Cross Traffic A lert
(RCTA)” (P. 5-48).
Driver Attention Alert Allows user to turn the Intelligent Driver Alertness (I-DA) on or off. For additional information, see “Intelligent Driver Al ertness
(I-DA)” (P. 5-121).
Timer Alert Allows user to set the timer alert.
Low Temperature Alert Allows user to turn the low temperature alert on or off.
Chassis Control Displays available chassis control options.
Instruments and controls2-35
Page 129 of 556
Low Fuel
This warning appears when the fuel level in
the fuel tank is getting low. Refuel as soon
as it is convenient, preferably before the
fuel gauge reaches 0 (Empty).There will be
a small reserve of fuel in the tank when
the fuel gauge needle reaches 0 (Empty).
Low Outside Temperature
This warning appears if the outside tem-
perature is below 37°F (3°C). The tempera-
ture can be changed to display in Celsius or
Fahrenheit. For additional information, see
“Settings” (P. 2-34).
Low Washer Fluid
This warning appears when the
windshield-washer fluid is at a low level.
Add windshield-washer fluid as necessary.
For additional information, see
“Windshield-washer fluid” (P. 8-11).
Power turned off to save the battery
This message appears af ter the ignition
switch is automatically turned off. For addi-
tional information, see “Push-button igni-
tion switch positions” (P. 5-12).
Power will turn off to save the battery
This message appears in the vehicle infor-
mation display af ter a period of time if the
ignition switch is in the AUTO ACC or the ON
position and if the vehicle is in P (Park). For
additional information, see “Push-button
ignition switch positions” (P. 5-12).
Push brake and start
switch to drive
This indicator appears when the shif t lever
is in the P (Park) position.
This indicator also appears when the ve-
hicle has been started using the Remote
Engine Start (if so equipped) function.
This indicator means that the engine will
start by pushing the ignition switch with
the brake pedal depressed. You can start
the engine from any position of the ignition
switch.
Push Ignition to OFF
Af ter the Push Ignition to OFF warning ap-
pears, the warning will appear if the ignition
switch is placed in the AUTO ACC position
when the shif t lever is moved to the P (Park)
position. To turn off the Push warning, place the ig-
nition switch in the ON position and then in
the LOCK position.
Rear seat belt reminder
This warning appears for 35 seconds af ter
the ignition is placed in the ON position and
the engine is started.
This warning message shows the status of
the three rear seat belts. When one of the
rear seat belts are buckled, the corre-
sponding rear seat belt indicator will ap-
pear grey. When one of the rear seat belts
are unbuckled, the corresponding rear seat
belt indicator will appear red.
Af ter a change in buckle status, a chime will
sound and the warning will appear for an-
other 35 seconds.
Release Parking Brake
This warning appears when the parking
brake is set and the vehicle is driven.
Reminder: Turn
OFF Headlights
This warning appears when the headlights
are lef t in the ON position when exiting the
vehicle. Place the headlight switch in the
Instruments and controls2-43
Page 143 of 556
If the ambient image sensor is damaged
due to an accident, it is recommended that
you visit a NISSAN dealer.
Battery saver system
The light reminder chime will sound if the
headlight switch is in either theorposition and when the driver’s door is
opened with the ignition switch in the OFF
or LOCK position.
If the ignition switch is placed in the OFF or
LOCK position while the headlight switch is
in the
orposition, the battery
saver function will turn off the lights af ter a
period of time to prevent the battery from
being discharged.
Be sure to turn the headlight switch to the
OFF or AUTO position when you leave the
vehicle.
CAUTION
Do not leave the lights on when the en-
gine is not running for extended peri-
ods of time to prevent the battery from
being discharged.
LED DAYTIME RUNNING LIGHTS
(DRL) SYSTEM (if so equipped)
The LED DRL automatically illuminate at
100% intensity when the engine is started
and the parking brake released. The LED
DRL operate with the headlight switch in
the OFF (if so equipped), or AUTO position
during day conditions. For CAN:the LED
DRL can turn on when headlight is in the
position during day conditions (rear
position lights will turn on as well). When
you turn the headlight switch to the
position for full illumination, the LED lights
switch from LED DRL to the park function.
If the parking brake is applied before the
engine is started, the LED DRL do not illumi-
nate. The LED DRL illuminate when the
parking brake is released. The LED DRL will
remain on until the ignition switch is placed
in the OFF position.
It is necessary at dusk to turn the headlight
switch on for interior controls and switches
to illuminate, as those remain off while the
switch is in the OFF or AUTO position.
WARNING
When the LED DRL system is active, tail
lights on your vehicle are not on. It is
necessary at dusk to turn on your
headlights. Failure to do so could cause
an accident injuring yourself and
others.
Instruments and controls2-57
Page 173 of 556
1. Move the shif t lever to the P (Park) posi-tion (Continuously Variable Transmis-
sion only) or the N (Neutral) position and
apply the parking brake (manual trans-
mission only), place the ignition switch in
the LOCK position and make sure you
carry the Intelligent Key with you.
2. Close all doors.
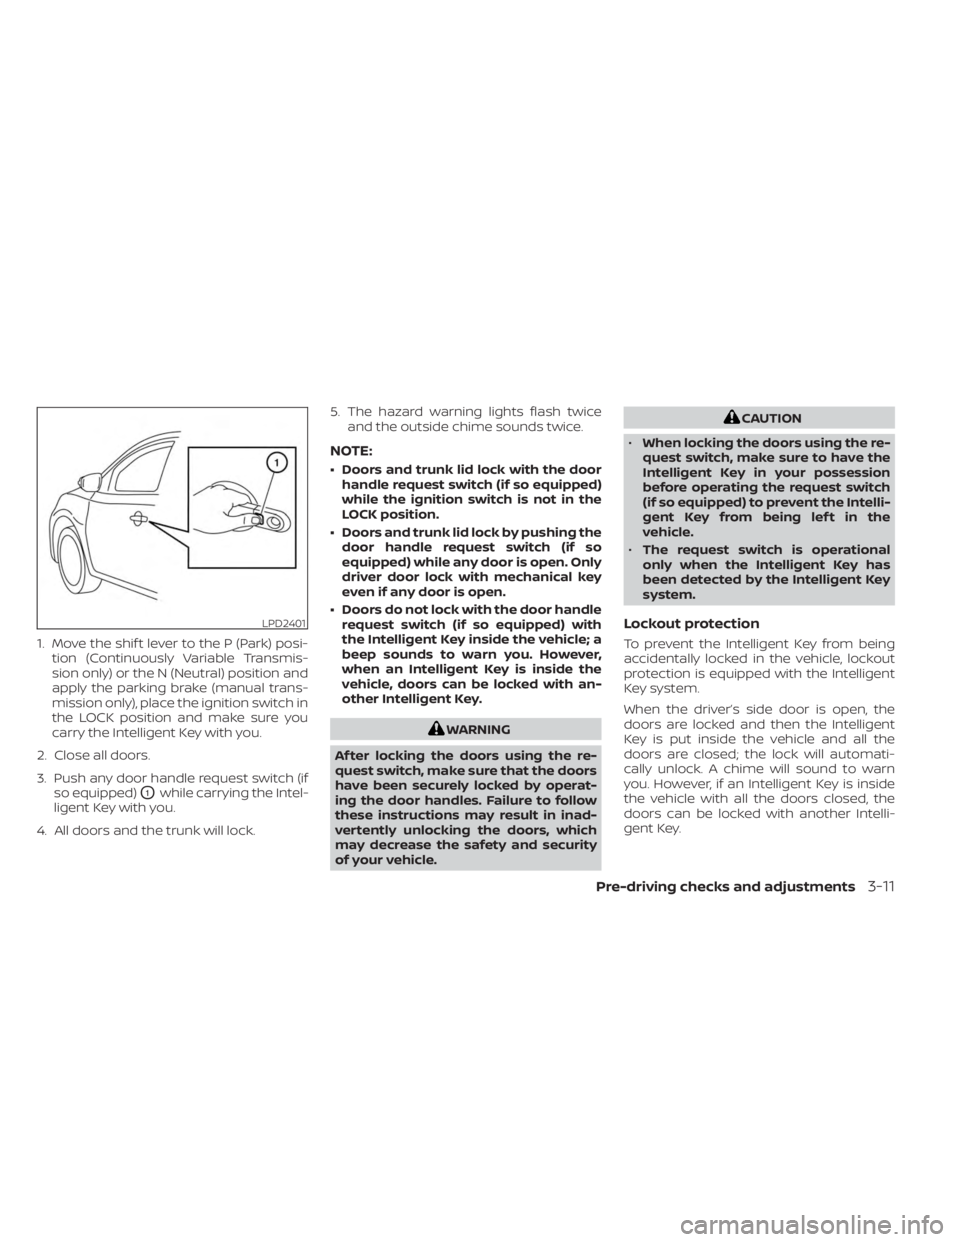
3. Push any door handle request switch (if so equipped)
O1while carrying the Intel-
ligent Key with you.
4. All doors and the trunk will lock. 5. The hazard warning lights flash twice
and the outside chime sounds twice.
NOTE:
• Doors and trunk lid lock with the doorhandle request switch (if so equipped)
while the ignition switch is not in the
LOCK position.
• Doors and trunk lid lock by pushing the door handle request switch (if so
equipped) while any door is open. Only
driver door lock with mechanical key
even if any door is open.
• Doors do not lock with the door handle request switch (if so equipped) with
the Intelligent Key inside the vehicle; a
beep sounds to warn you. However,
when an Intelligent Key is inside the
vehicle, doors can be locked with an-
other Intelligent Key.
WARNING
Af ter locking the doors using the re-
quest switch, make sure that the doors
have been securely locked by operat-
ing the door handles. Failure to follow
these instructions may result in inad-
vertently unlocking the doors, which
may decrease the safety and security
of your vehicle.
CAUTION
• When locking the doors using the re-
quest switch, make sure to have the
Intelligent Key in your possession
before operating the request switch
(if so equipped) to prevent the Intelli-
gent Key from being lef t in the
vehicle.
• The request switch is operational
only when the Intelligent Key has
been detected by the Intelligent Key
system.
Lockout protection
To prevent the Intelligent Key from being
accidentally locked in the vehicle, lockout
protection is equipped with the Intelligent
Key system.
When the driver’s side door is open, the
doors are locked and then the Intelligent
Key is put inside the vehicle and all the
doors are closed; the lock will automati-
cally unlock. A chime will sound to warn
you. However, if an Intelligent Key is inside
the vehicle with all the doors closed, the
doors can be locked with another Intelli-
gent Key.
LPD2401
Pre-driving checks and adjustments3-11
Page 179 of 556
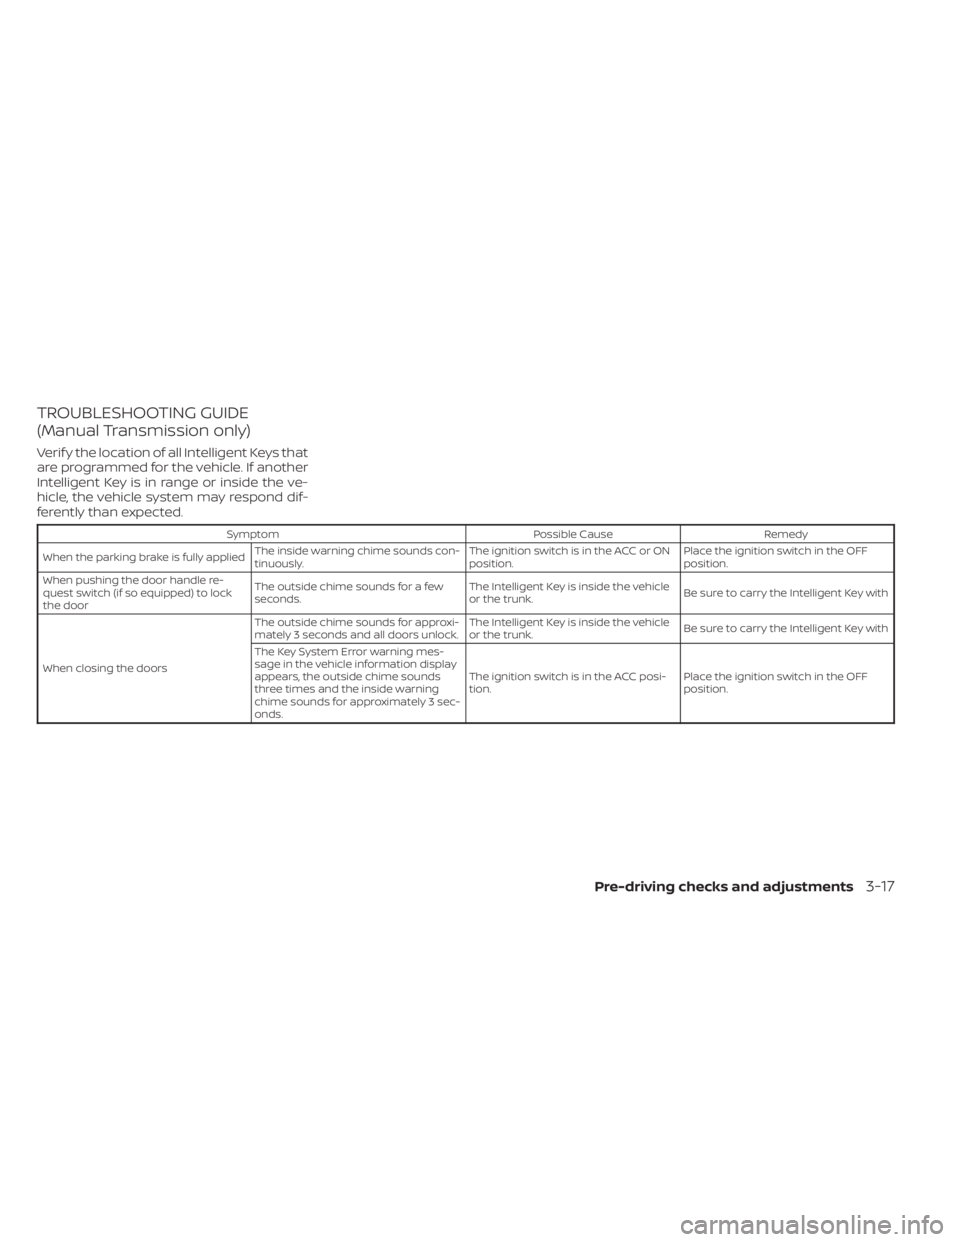
TROUBLESHOOTING GUIDE
(Manual Transmission only)
Verif y the location of all Intelligent Keys that
are programmed for the vehicle. If another
Intelligent Key is in range or inside the ve-
hicle, the vehicle system may respond dif-
ferently than expected.
SymptomPossible CauseRemedy
When the parking brake is fully applied The inside warning chime sounds con-
tinuously. The ignition switch is in the ACC or ON
position.Place the ignition switch in the OFF
position.
When pushing the door handle re-
quest switch (if so equipped) to lock
the door The outside chime sounds for a few
seconds.
The Intelligent Key is inside the vehicle
or the trunk.
Be sure to carry the Intelligent Key with
When closing the doors The outside chime sounds for approxi-
mately 3 seconds and all doors unlock.
The Intelligent Key is inside the vehicle
or the trunk.
Be sure to carry the Intelligent Key with
The Key System Error warning mes-
sage in the vehicle information display
appears, the outside chime sounds
three times and the inside warning
chime sounds for approximately 3 sec-
onds. The ignition switch is in the ACC posi-
tion.
Place the ignition switch in the OFF
position.
Pre-driving checks and adjustments3-17
Page 181 of 556
CAUTION
When the Intelligent Key battery is dis-
charged or other strong radio wave
sources are present near the operating
location, the Intelligent Key operating
range becomes narrower, and the Intel-
ligent Key may not function properly.
The Remote Engine Start function can only
be used when the Intelligent Key is within
the specified operating range from the
vehicle.
The Remote Engine Start operating range
is approximately 197 f t (60 m) from the
vehicle.
REMOTE STARTING THE VEHICLE
To use the Remote Engine Start feature to
start the engine perform the following:
1. Aim the Intelligent Key at the vehicle.
2. Press the
button to lock all doors.
3. Within 5 seconds press and hold the
button until the turn signal lights
flash and the tail lamps turn on. If the
vehicle is not within view press and hold
the
button for at least 2 seconds. The following events will occur when the
engine starts:
• The parking lights will turn on and remain
on as long as the engine is running.
• The doors will be locked and the climate control system may come on.
• The engine will continue to run for 10 min- utes. Repeat the steps to extend the time
for an additional 10 minutes. For addi-
tional information, see “Extending engine
run time” (P. 3-19).
Press and hold the brake then push the
push-button ignition switch to the ON po-
sition before driving. For additional infor-
mation, see “Driving the vehicle” (P. 5-16).
EXTENDING ENGINE RUN TIME
The Remote Engine Start feature can be
extended one time by performing the
steps listed in “Remote starting the vehicle”
(P. 3-19). Run time will be calculated as
follows:
• The first 10-minute run time will start when the Remote Engine Start function is
performed. • The second 10 minutes will start af ter the
first Remote Engine Start request ends.
For example, if the engine has been run-
ning for 5 minutes, and 10 minutes are
added, the engine will run for a total of 20
minutes.
• Extending engine run time will bring you to the two Remote Engine Start limit.
A maximum of two Remote Engine Starts,
or a single start with an extension, are al-
lowed between ignition cycles.
The vehicle needs to be driven at speeds of
4 mph (7 km/h) before the Remote Engine
Start procedure can be used again.
CANCELING A REMOTE ENGINE
START
To cancel a Remote Engine Start, perform
one of the following:
• Aim the Intelligent Key at the vehicle and press
until the parking lights turn off.
• Turn on the hazard warning flashers.
• Cycle the ignition switch on and then off.
• The extended engine run time has expired.
• The first 10 minute timer has expired.
• The engine hood has been opened.
• The shif t lever is moved out of park.
Pre-driving checks and adjustments3-19
Page 205 of 556
4. Maneuver the steering wheel to makethe vehicle width guide lines
ODparallel
to the parking space
OCwhile referring
to the predicted course lines.
5. When the vehicle is parked in the space completely, move the shif t lever to the P
(Park) position and apply the parking
brake.
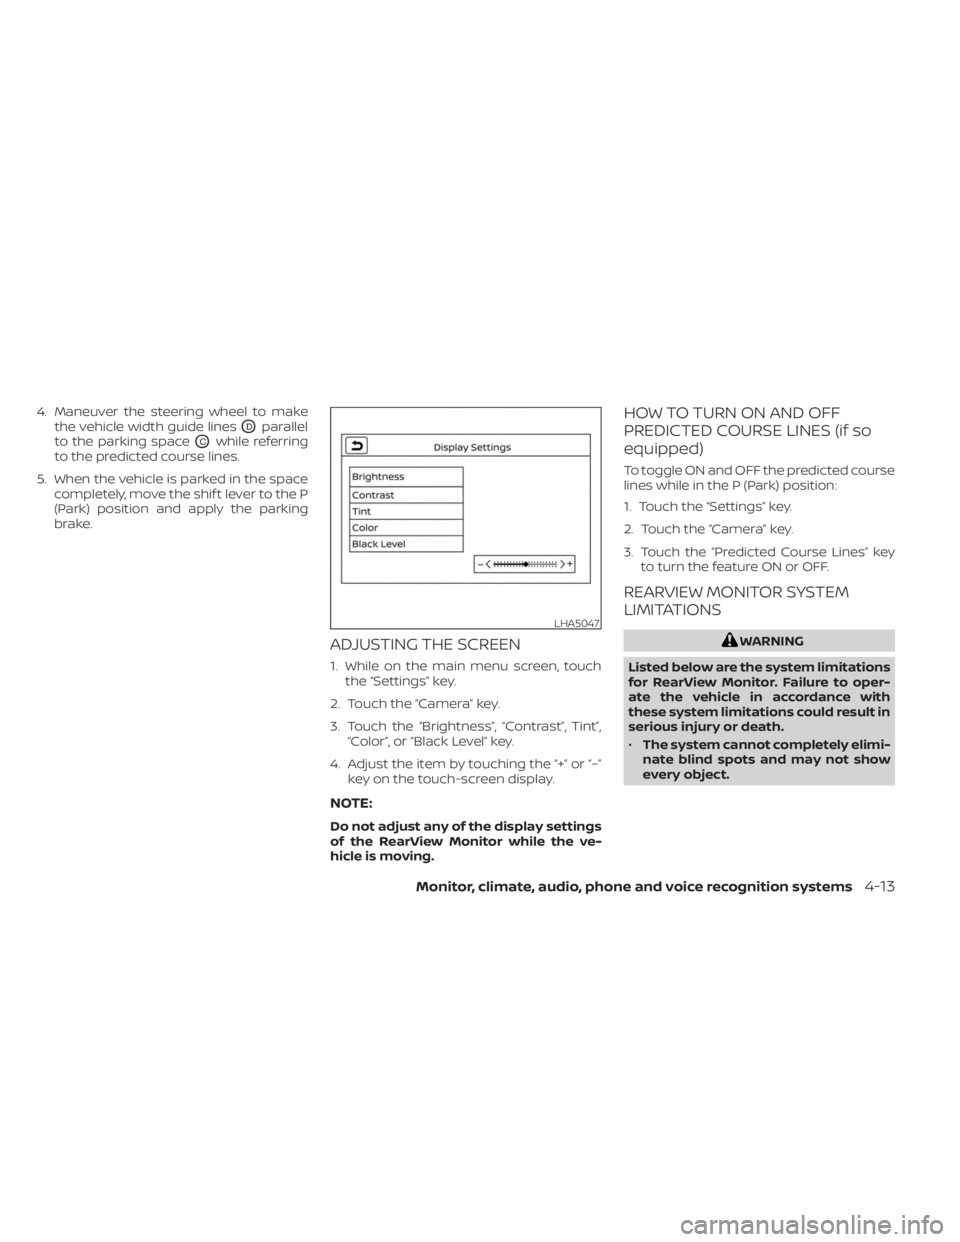
ADJUSTING THE SCREEN
1. While on the main menu screen, touchthe “Settings” key.
2. Touch the “Camera” key.
3. Touch the “Brightness”, “Contrast”, Tint”, “Color”, or “Black Level” key.
4. Adjust the item by touching the “+” or “–” key on the touch-screen display.
NOTE:
Do not adjust any of the display settings
of the RearView Monitor while the ve-
hicle is moving.
HOW TO TURN ON AND OFF
PREDICTED COURSE LINES (if so
equipped)
To toggle ON and OFF the predicted course
lines while in the P (Park) position:
1. Touch the “Settings” key.
2. Touch the “Camera” key.
3. Touch the “Predicted Course Lines” keyto turn the feature ON or OFF.
REARVIEW MONITOR SYSTEM
LIMITATIONS
WARNING
Listed below are the system limitations
for RearView Monitor. Failure to oper-
ate the vehicle in accordance with
these system limitations could result in
serious injury or death.
• The system cannot completely elimi-
nate blind spots and may not show
every object.
LHA5047
Monitor, climate, audio, phone and voice recognition systems4-13