2023 NISSAN ARMADA mirror controls
[x] Cancel search: mirror controlsPage 184 of 604

2-90Instruments and controls
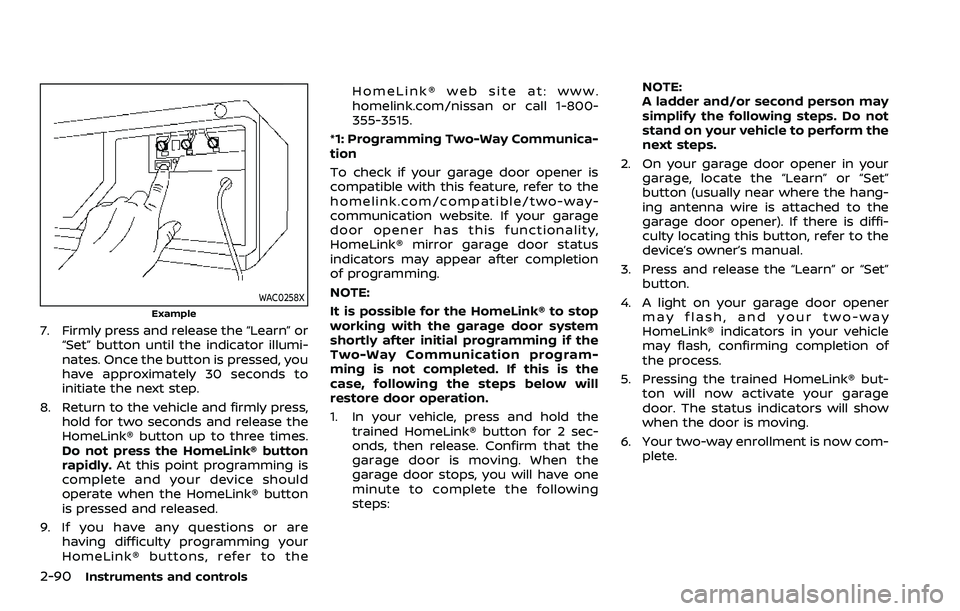
WAC0258X
Example
7. Firmly press and release the “Learn” or“Set” button until the indicator illumi-
nates. Once the button is pressed, you
have approximately 30 seconds to
initiate the next step.
8. Return to the vehicle and firmly press, hold for two seconds and release the
HomeLink® button up to three times.
Do not press the HomeLink® button
rapidly. At this point programming is
complete and your device should
operate when the HomeLink® button
is pressed and released.
9. If you have any questions or are having difficulty programming your
HomeLink® buttons, refer to the HomeLink® web site at: www.
homelink.com/nissan or call 1-800-
355-3515.
*1: Programming Two-Way Communica-
tion
To check if your garage door opener is
compatible with this feature, refer to the
homelink.com/compatible/two-way-
communication website. If your garage
door opener has this functionality,
HomeLink® mirror garage door status
indicators may appear after completion
of programming.
NOTE:
It is possible for the HomeLink® to stop
working with the garage door system
shortly after initial programming if the
Two-Way Communication program-
ming is not completed. If this is the
case, following the steps below will
restore door operation.
1. In your vehicle, press and hold the trained HomeLink® button for 2 sec-
onds, then release. Confirm that the
garage door is moving. When the
garage door stops, you will have one
minute to complete the following
steps: NOTE:
A ladder and/or second person may
simplify the following steps. Do not
stand on your vehicle to perform the
next steps.
2. On your garage door opener in your garage, locate the “Learn” or “Set”
button (usually near where the hang-
ing antenna wire is attached to the
garage door opener). If there is diffi-
culty locating this button, refer to the
device’s owner’s manual.
3. Press and release the “Learn” or “Set” button.
4. A light on your garage door opener may flash, and your two-way
HomeLink® indicators in your vehicle
may flash, confirming completion of
the process.
5. Pressing the trained HomeLink® but- ton will now activate your garage
door. The status indicators will show
when the door is moving.
6. Your two-way enrollment is now com- plete.
Page 186 of 604

2-92Instruments and controls
light is flashing in orange, press and
release (“cycling”) the hand-held transmit-
ter button every 2 seconds. Continue to
press and release the hand-held trans-
mitter button until the HomeLink® indi-
cator light changes from orange to green.
When the indicator light illuminates in
green, hand-held transmitter button may
be released.
Proceed with “Programming HomeLink®”
step 4 to complete.
Remember to plug the device back in
when programming is completed.
OPERATING THE HomeLink® UNI-
VERSAL TRANSCEIVER
The HomeLink® Universal Transceiver,
after it is programmed, can be used to
activate the programmed device. To op-
erate, firmly press the appropriate pro-
grammed HomeLink® button. The
indicator light will illuminate in green with
three parenthesis
on the mirror
while the signal is being transmitted.
PROGRAMMING TROUBLESHOOT-
ING
If the HomeLink® does not quickly learn
the hand-held transmitter information:
. replace the hand-held transmitter
batteries with new batteries. .
position the hand-held transmitter
with its battery area facing away from
the HomeLink® button.
. press and hold the HomeLink® button
and hand-held transmitter button in
each step without interruption.
. position the hand-held transmitter 1
to 3 in (2 to 8 cm) away from the
HomeLink® button. Hold the transmit-
ter in that position for up to 15
seconds. If HomeLink® is not pro-
grammed within that time, try holding
the transmitter in another position -
for example, 6 to 12 in (15 to 30 cm)
away, keeping the HomeLink® button
in view at all times.
If you have any questions or are having
difficulty programming your HomeLink®
buttons, refer to the HomeLink® web site
at: www.homelink.com/nissan or 1-800-
355-3515.
CLEARING THE PROGRAMMED IN-
FORMATION
The following procedure clears the pro-
grammed information from three but-
tons. Individual buttons cannot be
cleared. However, individual buttons can
be reprogrammed, see “Reprogramming
a single HomeLink® button” (P.2-92).
To clear all programming
1. Press and hold the two outer HomeLink® buttons until the indicator
light begins to flash in green and
“CLEARED” is displayed on the mirror,
in approximately 10 seconds. Do not
hold for longer than 20 seconds.
2. Release both buttons.
HomeLink® is now in the programming
mode and can be programmed at any
time beginning with “Programming
HomeLink®” - Step 1.
REPROGRAMMING A SINGLE
HomeLink® BUTTON
To reprogram a HomeLink® button, com-
plete the following.
1. Press and hold the desired HomeLink® button. DO NOT release the button.
2. The indicator light will illuminate in green, and after 20 seconds it will
begin to flash in orange and “TRAIN-
ING” is displayed on the mirror.
3. Release the HomeLink® button and proceed with “Programming
HomeLink®” — Step 3.
For questions or comments, contact
HomeLink® at: www.homelink.com/
nissan or 1-800-355-3515.
The HomeLink® button has now been
reprogrammed. The new device can be
Page 286 of 604

4-56Monitor, heater, air conditioner, audio, phone and voice recognition systems
Play videos, music, and images stored on
most SD cards.
Slingplayer®
Stream content wirelessly from a Sling-
box® (sold separately) to the RSI system.
*Requires external internet connection.
Miracast®
Stream content wirelessly from a Mira-
cast-enabled device to the RSI system.
NOTE: Miracast® works with Android OS
mobile devices only. This feature is not
supported on iOS devices.
SmartStream
Stream content wirelessly between mo-
bile devices and to the RSI system.
*Requires compatible UPnP application
to be installed on the mobile device. For
additional information, see “SmartStream”
(P.4-67).
NOTE: SmartStream works on both An-
droid and iOS devices using mobile app
(VOXX-RSI).
NOTE:
The top left corner of the screen in-
cludes a graphic representation that
shows the navigational path of the
current menu. For example: Home >
Source > HDMI.
WAE0721X
VIDEO OPERATION
Volume control
Volume level can be adjusted by pressingorany time video is playing, or
by selecting the volume icon in the play-
back controls menu.
NOTE:
For hearing protection, there is a max-
imum volume setting to limit the audio
output of the front panel 3.5mm head-
phone output. Using the directional pad
on the remote navigate to “SETTINGS”
then “AUDIO” then “HEADPHONES” to
adjust the maximum volume. Once set,
the maximum volume is limited to this setting.
Mirroring content
To mirror the content of the opposite
monitor, using the directional pad on the
remote, select “MIRROR” from the Home
Screen. This will allow the identical con-
tent to play on both monitors.
Multicast
Multicast (Off/On) provides the ability to
watch a video over the built-in Wi-Fi
network using an application installed
on a mobile device. When turned on, the
video content will be "cast" over the
network to allow users with multiple
mobile devices to enjoy the same movie.
*Requires application to be installed on
the mobile device.
Bluetooth
Selecting “BLUETOOTH” allows the Blue-
tooth® feature to be turned off/on, audio
source selection, and lip-sync adjust-
ments. For additional information, see
“Bluetooth® streaming” (P.4-74) and “Lip-
Sync adjustment” (P.4-75).
Page 339 of 604

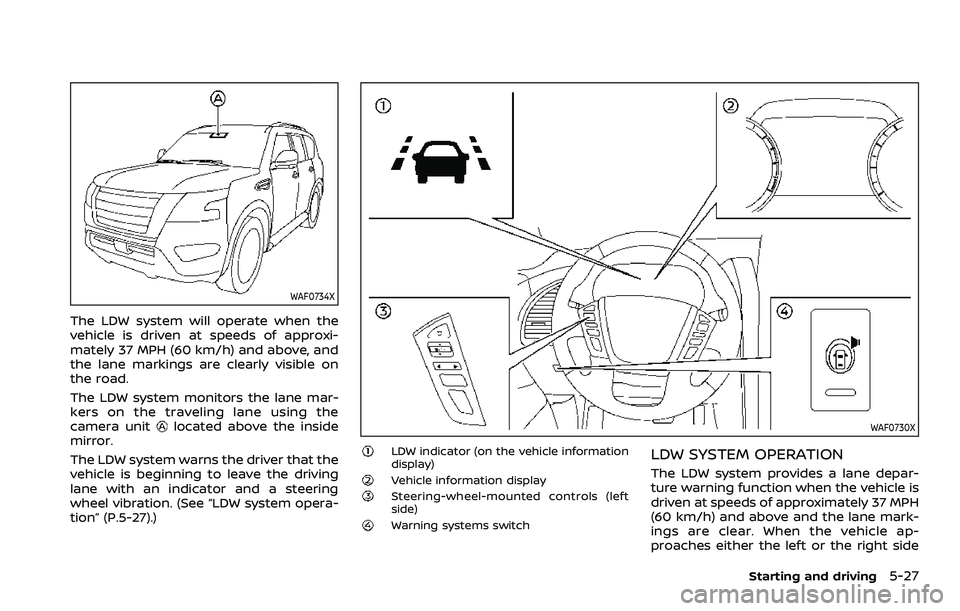
WAF0734X
The LDW system will operate when the
vehicle is driven at speeds of approxi-
mately 37 MPH (60 km/h) and above, and
the lane markings are clearly visible on
the road.
The LDW system monitors the lane mar-
kers on the traveling lane using the
camera unit
located above the inside
mirror.
The LDW system warns the driver that the
vehicle is beginning to leave the driving
lane with an indicator and a steering
wheel vibration. (See “LDW system opera-
tion” (P.5-27).)WAF0730X
LDW indicator (on the vehicle information
display)
Vehicle information displaySteering-wheel-mounted controls (left
side)
Warning systems switch
LDW SYSTEM OPERATION
The LDW system provides a lane depar-
ture warning function when the vehicle is
driven at speeds of approximately 37 MPH
(60 km/h) and above and the lane mark-
ings are clear. When the vehicle ap-
proaches either the left or the right side
Starting and driving5-27
Page 369 of 604

WARNING
Failure to follow the warnings and
instructions for proper use of the
RCTA system could result in serious
injury or death.
.The RCTA system is not a replace-
ment for proper driving proce-
dures and is not designed to
prevent contact with vehicles or
objects. When backing out of a
parking space, always use the
side and rear mirrors and turn
and look in the direction your
vehicle will move. Never rely so-
lely on the RCTA system.
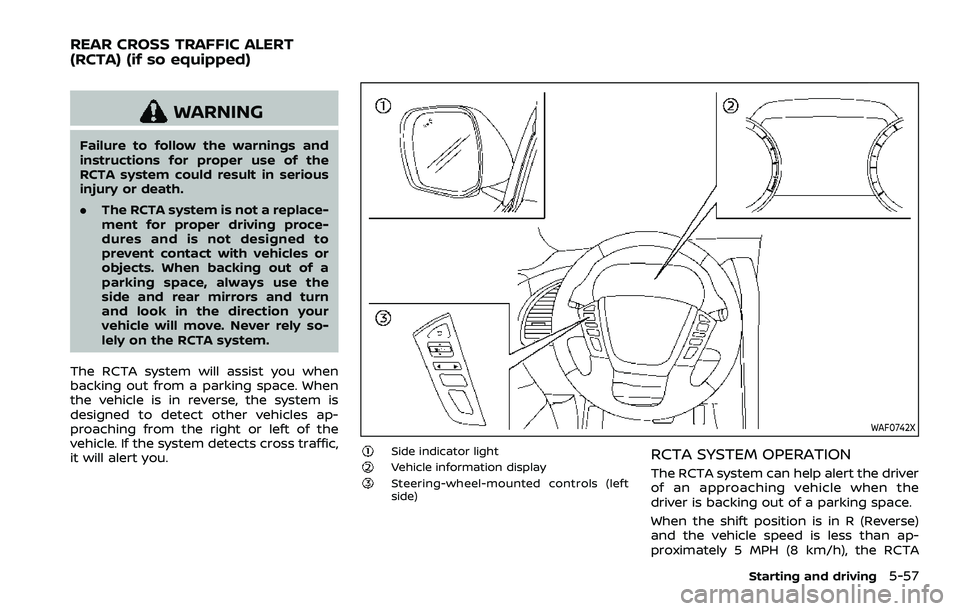
The RCTA system will assist you when
backing out from a parking space. When
the vehicle is in reverse, the system is
designed to detect other vehicles ap-
proaching from the right or left of the
vehicle. If the system detects cross traffic,
it will alert you.
WAF0742X
Side indicator lightVehicle information displaySteering-wheel-mounted controls (left
side)
RCTA SYSTEM OPERATION
The RCTA system can help alert the driver
of an approaching vehicle when the
driver is backing out of a parking space.
When the shift position is in R (Reverse)
and the vehicle speed is less than ap-
proximately 5 MPH (8 km/h), the RCTA
Starting and driving5-57
REAR CROSS TRAFFIC ALERT
(RCTA) (if so equipped)