2023 NISSAN ARMADA License plate
[x] Cancel search: License platePage 113 of 604
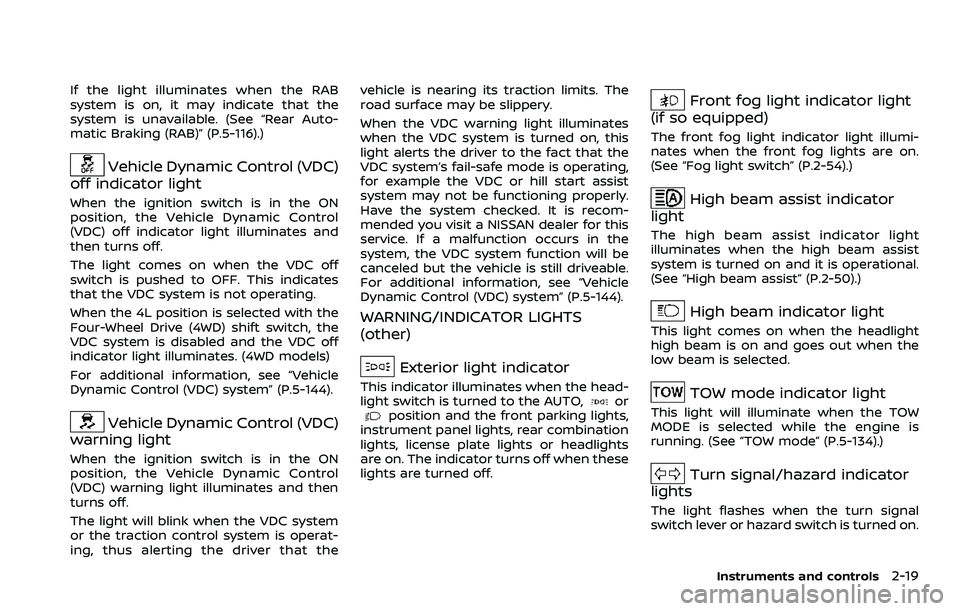
If the light illuminates when the RAB
system is on, it may indicate that the
system is unavailable. (See “Rear Auto-
matic Braking (RAB)” (P.5-116).)
Vehicle Dynamic Control (VDC)
off indicator light
When the ignition switch is in the ON
position, the Vehicle Dynamic Control
(VDC) off indicator light illuminates and
then turns off.
The light comes on when the VDC off
switch is pushed to OFF. This indicates
that the VDC system is not operating.
When the 4L position is selected with the
Four-Wheel Drive (4WD) shift switch, the
VDC system is disabled and the VDC off
indicator light illuminates. (4WD models)
For additional information, see “Vehicle
Dynamic Control (VDC) system” (P.5-144).
Vehicle Dynamic Control (VDC)
warning light
When the ignition switch is in the ON
position, the Vehicle Dynamic Control
(VDC) warning light illuminates and then
turns off.
The light will blink when the VDC system
or the traction control system is operat-
ing, thus alerting the driver that the vehicle is nearing its traction limits. The
road surface may be slippery.
When the VDC warning light illuminates
when the VDC system is turned on, this
light alerts the driver to the fact that the
VDC system’s fail-safe mode is operating,
for example the VDC or hill start assist
system may not be functioning properly.
Have the system checked. It is recom-
mended you visit a NISSAN dealer for this
service. If a malfunction occurs in the
system, the VDC system function will be
canceled but the vehicle is still driveable.
For additional information, see “Vehicle
Dynamic Control (VDC) system” (P.5-144).
WARNING/INDICATOR LIGHTS
(other)
Exterior light indicator
This indicator illuminates when the head-
light switch is turned to the AUTO,orposition and the front parking lights,
instrument panel lights, rear combination
lights, license plate lights or headlights
are on. The indicator turns off when these
lights are turned off.
Front fog light indicator light
(if so equipped)
The front fog light indicator light illumi-
nates when the front fog lights are on.
(See “Fog light switch” (P.2-54).)
High beam assist indicator
light
The high beam assist indicator light
illuminates when the high beam assist
system is turned on and it is operational.
(See “High beam assist” (P.2-50).)
High beam indicator light
This light comes on when the headlight
high beam is on and goes out when the
low beam is selected.
TOW mode indicator light
This light will illuminate when the TOW
MODE is selected while the engine is
running. (See “TOW mode” (P.5-134).)
Turn signal/hazard indicator
lights
The light flashes when the turn signal
switch lever or hazard switch is turned on.
Instruments and controls2-19
Page 141 of 604
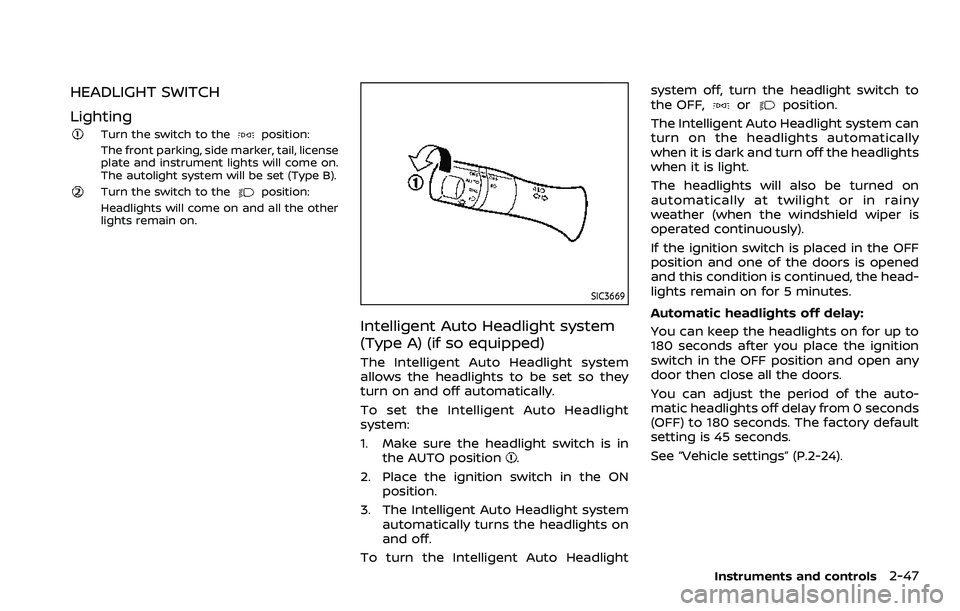
HEADLIGHT SWITCH
Lighting
Turn the switch to theposition:
The front parking, side marker, tail, license
plate and instrument lights will come on.
The autolight system will be set (Type B).
Turn the switch to theposition:
Headlights will come on and all the other
lights remain on.
SIC3669
Intelligent Auto Headlight system
(Type A) (if so equipped)
The Intelligent Auto Headlight system
allows the headlights to be set so they
turn on and off automatically.
To set the Intelligent Auto Headlight
system:
1. Make sure the headlight switch is in the AUTO position
.
2. Place the ignition switch in the ON position.
3. The Intelligent Auto Headlight system automatically turns the headlights on
and off.
To turn the Intelligent Auto Headlight system off, turn the headlight switch to
the OFF,
orposition.
The Intelligent Auto Headlight system can
turn on the headlights automatically
when it is dark and turn off the headlights
when it is light.
The headlights will also be turned on
automatically at twilight or in rainy
weather (when the windshield wiper is
operated continuously).
If the ignition switch is placed in the OFF
position and one of the doors is opened
and this condition is continued, the head-
lights remain on for 5 minutes.
Automatic headlights off delay:
You can keep the headlights on for up to
180 seconds after you place the ignition
switch in the OFF position and open any
door then close all the doors.
You can adjust the period of the auto-
matic headlights off delay from 0 seconds
(OFF) to 180 seconds. The factory default
setting is 45 seconds.
See “Vehicle settings” (P.2-24).
Instruments and controls2-47
Page 142 of 604

2-48Instruments and controls
SIC3784A
Be sure not to put anything on top of
the photo sensorlocated on the top
of the instrument panel. The photo
sensor controls the Intelligent Auto
Headlight system; if it is covered, the
photo sensor reacts as if it is dark and
the headlights will illuminate.
WAC0731X
Autolight system (Type B) (if so
equipped)
The autolight system allows the head-
lights to be set so they turn on and off
automatically.
To set the autolight system:
1. Make sure the headlight switch is in the AUTO position
orposition.
2. Place the ignition switch in the ON position.
3. The autolight system automatically turns the headlights on and off.
To turn the autolight system off, turn the
switch to the
position. The autolight system can turn on the
headlights automatically when it is dark
and turn off the headlights when it is
light.
If the ignition switch is turned to the ON
position when the parking brake is ap-
plied, the headlights remain off.
With the
position selected, the head-
lights turn off when the ignition switch is
placed in the OFF position, the shift lever
is in the P (Park) position, or the parking
brake is applied. (The front parking, tail,
license plate, and instrument lights are
on.)
How to turn off all lights:
With the AUTO position selected, all lights
turn off when the engine is restarted after
the parking brake is applied.
NOTE:
When driving at night, the headlights
remain on and cannot be turned off.
When the vehicle is stopped, the head-
lights can be turned off when the head-
light switch is in the
position.
With the AUTO position selected (head-
lights are on), the headlights will remain
on for 5 minutes when the ignition switch
is placed in the OFF position and one of
the doors is opened.
Page 199 of 604
When you carry the Intelligent Key with
you, you can lock or unlock all doors by
pushing the door handle request switch
(driver’s or front passenger’s)
or the
liftgate request switchwithin the range
of operation.
When you lock or unlock the doors or the
liftgate, the hazard indicator will flash and
the horn (or the outside chime) will sound
as a confirmation. For details, see “Setting
hazard indicator and horn mode” (P.3-17).
Welcome light and farewell light
function
When you lock or unlock the doors
including the liftgate, the parking lights,
tail lights, side marker light and the
license plate light will illuminate for a
period of time. The welcome light and
farewell light function can be disabled.
For information about disabling the wel-
come light and farewell light function, it is
recommended you see a NISSAN dealer.
Locking doors
1. Move the shift lever to the P (Park) position, push the ignition switch to
the OFF position and make sure you
carry the Intelligent Key with you.*1
2. Close all the doors.*2 3. Push the door handle request switch
(driver’s or front passenger’s)
or the
liftgate request switchwhile carry-
ing the Intelligent Key with you.*3
4. All the doors will lock.
5. The hazard indicator flashes twice and the outside chime sounds twice.
*1: Doors will lock with the Intelligent Key
while the ignition switch is in the ACC or
ON position.
*2: Doors will not lock with the Intelligent
Key while any door is open.
*3: Doors will not lock by pushing the door
handle request switch with the Intelligent
Key inside the vehicle.
However, when an Intelligent Key is inside
the vehicle, doors can be locked with
another registered Intelligent Key.
NOTE:
Request switches for all doors can be
deactivated when the “Ext. Door Switch”
is turned off in the Vehicle Settings of
the vehicle information display. See
“Vehicle settings” (P.2-24).
CAUTION
. After locking the doors using the
request switch, make sure that
the doors have been securely locked by operating the door
handles.
. When locking the doors using the
request switch, make sure to
have the Intelligent Key in your
possession before operating the
request switch to prevent the
Intelligent Key from being left in
the vehicle.
. The request switch is operational
only when the Intelligent Key has
been detected by the Intelligent
Key system.
Lockout protection:
To prevent the Intelligent Key from being
accidentally locked in the vehicle, lockout
protection is equipped with the Intelligent
Key system.
When the driver’s side door is open, the
doors are locked, and then the Intelligent
Key is put inside the vehicle and all the
doors are closed; the lock will automati-
cally unlock and the door buzzer sounds.
NOTE:
The doors may not lock when the
Intelligent Key is in the same hand that
is operating the request switch to lock
the door. Put the Intelligent Key in a
purse, pocket or your other hand.
Pre-driving checks and adjustments3-11
Page 235 of 604
cally shows a rear view of the vehicle
when the shift lever is placed in the R
(Reverse) position.
The radio can still be heard while the
RearView Monitor is active.
WAE0645X
To display the rear view, the RearView
Monitor system uses a cameralocated
just above the vehicle’s license plate.
REARVIEW MONITOR SYSTEM OP-
ERATION
When the ignition switch is placed in the
ON position, move the shift lever to the R
(Reverse) position to operate the Rear-
View Monitor.
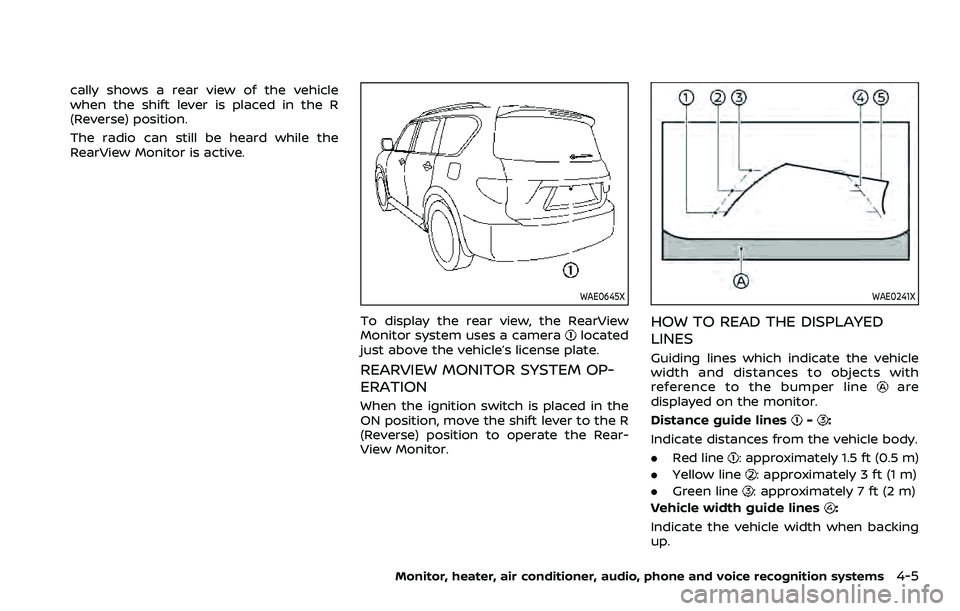
WAE0241X
HOW TO READ THE DISPLAYED
LINES
Guiding lines which indicate the vehicle
width and distances to objects with
reference to the bumper line
are
displayed on the monitor.
Distance guide lines
-:
Indicate distances from the vehicle body.
. Red line
: approximately 1.5 ft (0.5 m)
. Yellow line
: approximately 3 ft (1 m)
. Green line
: approximately 7 ft (2 m)
Vehicle width guide lines
:
Indicate the vehicle width when backing
up.
Monitor, heater, air conditioner, audio, phone and voice recognition systems4-5
Page 240 of 604
4-10Monitor, heater, air conditioner, audio, phone and voice recognition systems
REARVIEW MONITOR SYSTEM LIM-
ITATIONS
WARNING
Listed below are the system limita-
tions for RearView Monitor. Failure to
operate the vehicle in accordance
with these system limitations could
result in serious injury or death.
.The system cannot completely
eliminate blind spots and may
not show every object.
. Underneath the bumper and the
corner areas of the bumper can-
not be viewed on the RearView
Monitor because of its monitoring
range limitation. The system will
not show small objects below the
bumper, and may not show ob-
jects close to the bumper or on
the ground.
. Objects viewed in the RearView
Monitor differ from actual dis-
tance because a wide-angle lens
is used.
. Objects in the RearView Monitor
will appear visually opposite
compared to when viewed in the
rearview and outside mirrors. .
Use the displayed lines as a re-
ference. The lines are highly af-
fected by the number of
occupants, fuel level, vehicle po-
sition, road conditions and road
grade.
. Make sure that the liftgate is
securely closed when backing up.
. Do not put anything on the rear-
view camera. The rearview cam-
era is installed above the license
plate.
. When washing the vehicle with
high-pressure water, be sure not
to spray it around the camera.
Otherwise, water may enter the
camera unit causing water con-
densation on the lens, a malfunc-
tion, fire or an electric shock.
. Do not strike the camera. It is a
precision instrument. Otherwise,
it may malfunction or cause da-
mage resulting in a fire or an
electric shock.
The following are operating limitations
and do not represent a system malfunc-
tion:
. When the temperature is extremely
high or low, the screen may not clearly
display objects. .
When strong light directly shines on
the camera, objects may not be dis-
played clearly.
. Vertical lines may be seen in objects
on the screen. This is due to strong
reflected light from the bumper.
. The screen may flicker under fluores-
cent light.
. The colors of objects on the RearView
Monitor may differ somewhat from
the actual color of objects.
. Objects on the monitor may not be
clear in a dark environment.
. There may be a delay when switching
between views.
. If dirt, rain or snow accumulates on
the camera, the RearView Monitor
may not display objects clearly. Clean
the camera.
. Do not use wax on the camera lens.
Wipe off any wax with a clean cloth
dampened with a diluted mild clean-
ing agent, then wipe with a dry cloth.
Page 243 of 604

parallel parking.
The monitor displays various views of the
position of the vehicle in a split screen
format. All views are not available at all
times.
Available views:
.Front view
An approximately 150-degree view of
the front of the vehicle.
. Rear view
An approximately 150-degree view of
the rear of the vehicle.
. Bird’s-eye view
The surrounding view of the vehicle
from above.
. Front-side view
The view around and ahead of the
front passenger’s side wheel.
. Front-wide view
An approximately 180-degree view of
the front of the vehicle.
. Rear-wide view
An approximately 180-degree view of
the rear of the vehicle.
WAE0656X
To display the multiple views, the Intelli-
gent Around View® Monitor system uses
cameras
located in the front grill, on the
vehicle’s outside mirrors and one just
above the vehicle’s license plate.
INTELLIGENT AROUND VIEW®
MONITOR SYSTEM OPERATION
With the ignition switch in the ON posi-
tion, move the shift lever to the R
(Reverse) position or push the CAMERA
button to operate the Intelligent Around
View® Monitor.
The screen displayed on the Intelligent
Around View® Monitor will automatically
return to the previous screen 3 minutes
after the CAMERA button has been
pushed with the shift lever in a position
other than the R (Reverse) position.
Available views
WARNING
. The distance guide line and the
vehicle width line should be used
as a reference only when the
vehicle is on a paved, level sur-
face. The distance viewed on the
monitor is for reference only and
may be different than the actual
distance between the vehicle and
displayed objects.
. Use the displayed lines and the
bird’s-eye view as a reference.
The lines and the bird’s-eye view
are greatly affected by the num-
Monitor, heater, air conditioner, audio, phone and voice recognition systems4-13
Page 253 of 604
INTELLIGENT AROUND VIEW®
MONITOR SYSTEM LIMITATIONS
WARNING
Listed below are the system limita-
tions for the Intelligent Around View®
Monitor. Failure to operate the vehi-
cle in accordance with these system
limitations could result in serious
injury or death.
.Do not use the Intelligent Around
View® Monitor with the outside
mirrors in the stored position,
and make sure that the liftgate
is securely closed when operating
the vehicle using the Intelligent
Around View® Monitor.
. The apparent distance between
objects viewed on the Intelligent
Around View® Monitor differs
from the actual distance.
. The cameras are installed on the
front grille, the outside mirrors
and above the rear license plate.
Do not put anything on the vehi-
cle that covers the cameras.
. When washing the vehicle with
high pressure water, be sure not
to spray it around the cameras. Otherwise, water may enter the
camera unit causing water con-
densation on the lens, a malfunc-
tion, fire or an electric shock.
. Do not strike the cameras. They
are precision instruments. Doing
so could cause a malfunction or
cause damage resulting in a fire
or an electric shock.
WAE0658X
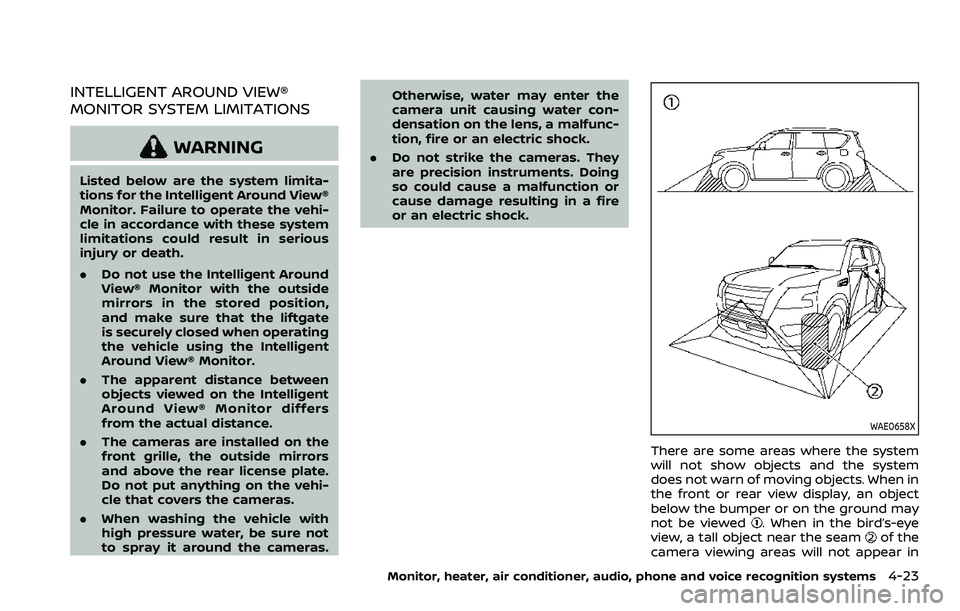
There are some areas where the system
will not show objects and the system
does not warn of moving objects. When in
the front or rear view display, an object
below the bumper or on the ground may
not be viewed
. When in the bird’s-eye
view, a tall object near the seamof the
camera viewing areas will not appear in
Monitor, heater, air conditioner, audio, phone and voice recognition systems4-23