Page 192 of 644

To deactivate:
Press and hold theandbut-
tons for at least 4 seconds. The hazard
indicator lights will flash three times to con-
firm that the answer back horn feature has
been deactivated.
To activate:
Press and hold the
andbut-
tons for at least 4 seconds once more.
The hazard indicator lights will flash once
and the horn will sound once to confirm
that the horn beep feature has been
reactivated.
Deactivating the horn beep feature does
not silence the horn if the alarm is
triggered.
Intelligent Key button operation
light
The light blinks only when you press any
button on the Intelligent Key. The light illu-
mination only signifies that the key fob has
transmitted a signal. You may look and/or
listen to verif y that the vehicle has per-
formed the intended operation.
If the light does not blink, your battery may
be too weak to communicate to the ve-
hicle. If this occurs, the battery may need to
be replaced. For additional information re-
garding the replacement of a battery, see
“Battery replacement” (P. 8-23).
WARNING SIGNALS
To help prevent the vehicle from moving
unexpectedly by erroneous operation of
the Intelligent Key or to help prevent the
vehicle from being stolen, a chime or
buzzer sounds from inside and outside the
vehicle and a warning is displayed in the
instrument panel.
When a chime or beep sounds or a warning
is displayed, be sure to check the vehicle
and the Intelligent Key.
For additional information, see “Trouble-
shooting guide” (P. 3-16) and “Vehicle infor-
mation display - 5 inch (13 cm) Type A (if so
equipped)” (P. 2-18) or “Vehicle information
display - 7 inch (18 cm) Type B (if so
equipped)” (P. 2-34).
TROUBLESHOOTING GUIDE
Verif y the location of all Intelligent Keys that
are programmed for the vehicle. If another
Intelligent Key is in range or inside the ve-
hicle, the vehicle system may respond dif-
ferently than expected.
LPD2836
3-16Pre-driving checks and adjustments
Page 198 of 644

1. Pull the hood lock release handleO1lo-
cated below the driver's side instrument
panel; the hood springs up slightly.
2. To open the hood, push the lever
O2un-
derneath the front of the hood upwards
with your fingertips as illustrated and
raise the hood.
3. Remove the support rod from the clamp
O3.
4. Insert the support rod
O4into the slot on
the passenger side of the hood.
5. When closing the hood, return the sup- port rod to its original position, lower the hood to approximately 12 in (30 cm)
above the latch and release it. This al-
lows proper engagement of the hood
latch.
WARNING
• Make sure the hood is completely
closed and latched before driving.
The vehicle should only ever be oper-
ated with the hood securely closed.
• If you see steam or smoke coming
from the engine compartment, to
avoid injury do not open the hood.
OPENER OPERATION
WARNING
• Do not drive with the trunk lid open.
This could allow dangerous exhaust
gases to be drawn into the vehicle.
For additional information, see “Ex-
haust gas (carbon monoxide)”
(P. 5-4).
LPD3011LPD3289
Instrument panel
HOOD TRUNK LID
3-22Pre-driving checks and adjustments
Page 199 of 644

•Closely supervise children when they
are around cars to prevent them
from playing and becoming locked in
the trunk where they could be seri-
ously injured. Keep the car locked,
with the rear seatback and trunk lid
securely latched when not in use, and
prevent children's access to car keys. To open the trunk lid perform one of the
following af ter unlocking all doors:
• Press the button on the instrument
panel.
• Press the button on the Intelligent Key.
• Push the trunk opener switch
OA.
To close the trunk lid, lower and push the
trunk lid down securely.
NOTE:
Request switches for all doors and trunk
can be deactivated when the Ext Door
Switch or I-Key Door Lock feature is
switched to OFF in the “Vehicle Settings”
of the vehicle information display. For
additional information, see “Vehicle in-
formation display - 5 inch (13 cm) Type A
(if so equipped)” (P. 2-18) or “Vehicle in-
formation display - 7 inch (18 cm) Type B
(if so equipped)” (P. 2-34).
WPD0364
Intelligent Key
LPD2866
Trunk opener switch
Pre-driving checks and adjustments3-23
Page 201 of 644

OPENER OPERATION
The fuel-filler door release is located below
the instrument panel. To open the fuel-filler
door, pull the release. To lock, close the fuel-
filler door securely.
FUEL-FILLER CAP
WARNING
• Gasoline is extremely flammable and
highly explosive under certain condi-
tions. You could be burned or seri-
ously injured if it is misused or mis-
handled. Always stop the engine and
do not smoke or allow open flames or
sparks near the vehicle when
refueling.
• Do not attempt to top off the fuel
tank af ter the fuel pump nozzle
shuts off automatically. Continued
refueling may cause fuel overflow,
resulting in fuel spray and possibly a
fire.
• Use only an original equipment type
fuel-filler cap as a replacement. It has
a built-in safety valve needed for
proper operation of the fuel system
and emission control system. An in-
correct cap can result in a serious
malfunction and possible injury. It
could also cause the
Malfunc-
tion Indicator Light (MIL) to come on.
• Never pour fuel into the throttle body
to attempt to start your vehicle. •
Do not fill a portable fuel container in
the vehicle or trailer. Static electricity
can cause an explosion of flammable
liquid, vapor or gas in any vehicle or
trailer. To reduce the risk of serious
injury or death when filling portable
fuel containers:
– Always place the container on the
ground when filling.
– Do not use electronic devices
when filling.
– Keep the pump nozzle in contact
with the container while you are
filling it.
– Use only approved portable fuel
containers for flammable liquid.
CAUTION
• Do not use a fuel that contains more
than 15% ethanol in your vehicle. For
additional information, see “Fuel rec-
ommendation” (P. 10-4).
LPD2869
FUEL-FILLER DOOR
Pre-driving checks and adjustments3-25
Page 253 of 644

Synchronize climate settings
Press the SYNC button to synchronize cli-
mate settings. The sync indicator will turn
on.
Pressing SYNC will synchronize driver's and
front passenger's climate settings.
To change climate settings when SYNC is
active (the SYNC indicator is on):
• The driver's side temperature control dialwill control the driver and front passenger
temperatures.
• The fan speed control dial will control the fan speeds.
To exit SYNC:
• To remove the front passenger from SYNC, turn the passenger's side tem-
perature control dial.
• Pressing SYNC multiple times will re- activate SYNC.
To turn system off
Press the ON-OFF button.
Rear window and outside mirror
defroster switch
For additional information, see “Rear win-
dow and outside mirror (if so equipped)
defroster switch” (P. 2-56).
Heated seat switches
For additional information, see “Heated
seat switches” (P. 2-64).
Heated steering wheel switch
For additional information, see “Heated
steering wheel switch” (P. 2-65).OPERATING TIPS
The sunload sensor, located on the top
center of the instrument panel, helps the
system maintain a constant temperature.
Do not put anything on or around this
sensor.
LHA4943
Monitor, climate, audio, phone and voice recognition systems4-43
Page 319 of 644

To move the shif t lever, complete the fol-
lowing procedure:
1. Push the ignition switch to the LOCKposition.
2. Apply the parking brake.
3. Using a protective cloth on the tip of a 3 mm screwdriver, remove the shif t lock
release cover.
• If available, a plastic trim tool can also be used.
4. Insert the small screwdriver in the shif t lock release slot and push down.
5. Move the shif t lever to the N (Neutral) position while holding down the shif t
lock release.
If the shif t lever cannot be moved out of P
(Park), have the transmission checked as
soon as possible. It is recommended that
you visit a NISSAN dealer for this service.WARNING
If the shif t lever cannot be moved from
the P (Park) position while the engine is
running and the brake pedal is de-
pressed, the stop lights may not work.
Malfunctioning stop lights could cause
an accident injuring yourself and
others.
Drive sport mode switch
When the drive sport mode switch is
pushed with the shif t lever in the D (Drive)
position, the drive sport mode indicator in
the instrument panel illuminates. For addi-
tional information, see “Drive sport mode
indicator” (P. 2-29) or (P. 2-46)
Use the drive sport mode when you need
improved engine braking.
To turn off the drive sport mode, push the
drive sport mode switch again. The drive
sport mode indicator will turn off.
LSD3250
Drive sport mode
Starting and driving5-23
Page 331 of 644
The LDW system provides a lane departure
warning function when the vehicle is driven
at speeds of approximately 37 mph (60
km/h) and above and the lane markings
are clear. When the vehicle approaches ei-
ther the lef t or the right side of the traveling
lane, the steering wheel will vibrate and the
LDW indicator on the instrument panel will
blink to alert the driver.
The warning function will stop when the
vehicle returns inside of the lane markers.
LSD3902
For vehicles with the 5 inch (13 cm) display
Starting and driving5-35
Page 337 of 644
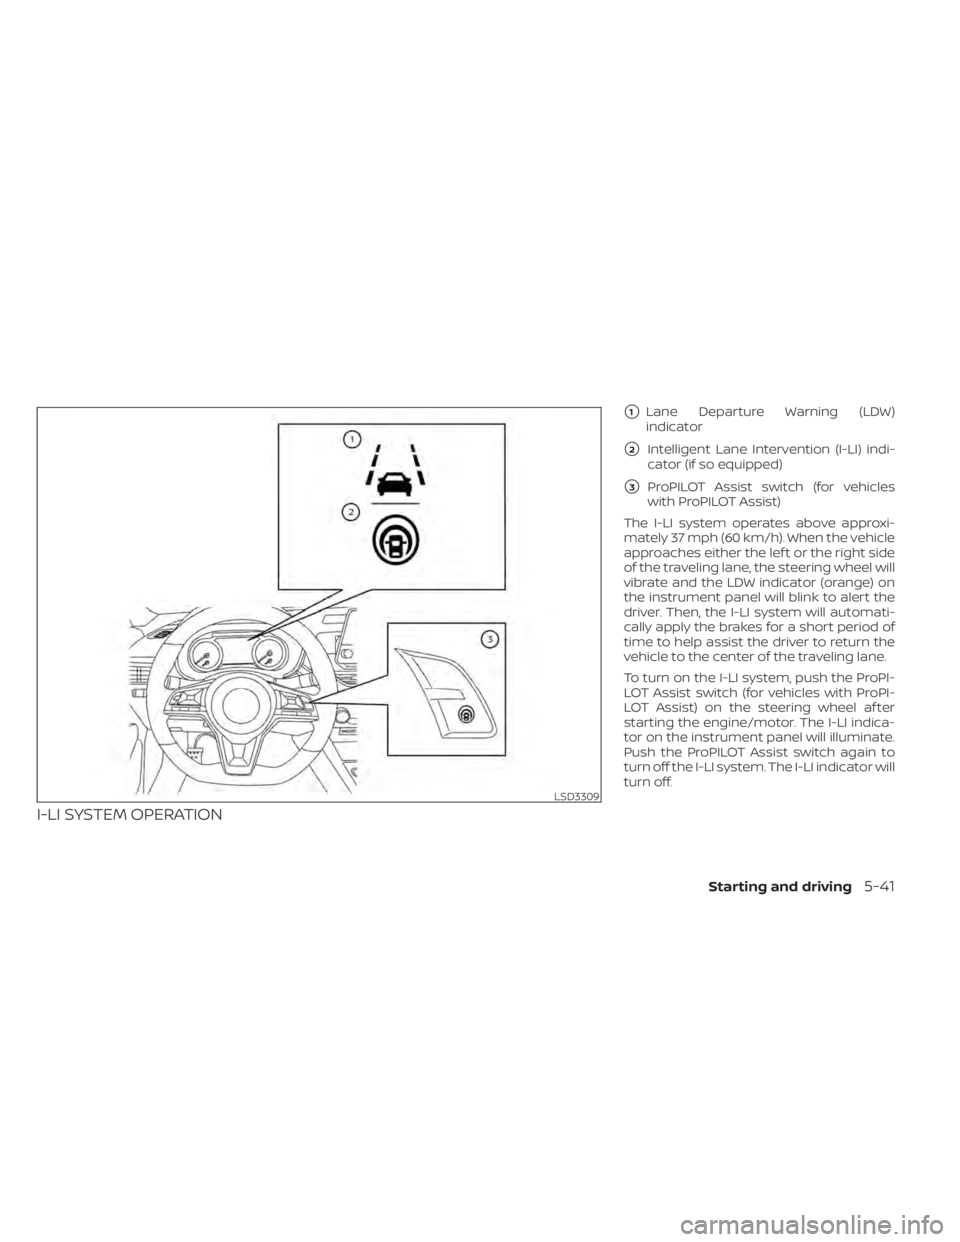
I-LI SYSTEM OPERATION
�1Lane Departure Warning (LDW)
indicator
�2Intelligent Lane Intervention (I-LI) indi-
cator (if so equipped)
�3ProPILOT Assist switch (for vehicles
with ProPILOT Assist)
The I-LI system operates above approxi-
mately 37 mph (60 km/h). When the vehicle
approaches either the lef t or the right side
of the traveling lane, the steering wheel will
vibrate and the LDW indicator (orange) on
the instrument panel will blink to alert the
driver. Then, the I-LI system will automati-
cally apply the brakes for a short period of
time to help assist the driver to return the
vehicle to the center of the traveling lane.
To turn on the I-LI system, push the ProPI-
LOT Assist switch (for vehicles with ProPI-
LOT Assist) on the steering wheel af ter
starting the engine/motor. The I-LI indica-
tor on the instrument panel will illuminate.
Push the ProPILOT Assist switch again to
turn off the I-LI system. The I-LI indicator will
turn off.
LSD3309
Starting and driving5-41
 and above and the lane markings
are clear. When the vehicle approaches")