2023 NISSAN ALTIMA spare wheel
[x] Cancel search: spare wheelPage 487 of 644
TIRE PRESSURE MONITORING
SYSTEM (TPMS)
This vehicle is equipped with the Tire Pres-
sure Monitoring system (TPMS). It monitors
tire pressure of all tires except the spare.
When the low tire pressure warning light is
lit, and the “Tire Pressure Low - Add Air”
warning appears in the vehicle information
display, one or more of your tires is signifi-
cantly under-inflated. If equipped, the sys-
tem also displays pressure of all tires (ex-
cept the spare tire) on the display screen by
sending a signal from a sensor that is in-
stalled in each wheel. If the vehicle is being
driven with low tire pressure, the TPMS will
activate and warn you of it by the low tire
pressure warning light. This system will ac-
tivate only when the vehicle is driven at
speeds above 16 mph (25 km/h). For addi-
tional information, see “Warning lights, indi-
cator lights and audible reminders” (P. 2-9)
and “Tire Pressure Monitoring System
(TPMS)” (P. 5-5).
WARNING
• Radio waves could adversely affect
electric medical equipment. Those
who use a pacemaker should contact
the electric medical equipment
manufacturer for the possible influ-
ences before use.
• If the low tire pressure warning light
illuminates while driving, avoid sud-
den steering maneuvers or abrupt
braking, reduce vehicle speed, pull
off the road to a safe location and
stop the vehicle as soon as possible.
Driving with under-inflated tires may
permanently damage the tires and
increase the likelihood of tire failure.
Serious vehicle damage could occur
and may lead to an accident and
could result in serious personal in-
jury. Check the tire pressure for all
four tires. Adjust the tire pressure to
the recommended COLD tire pres-
sure shown on the Tire and Loading
Information label to turn the low tire
pressure warning light OFF. If the
light still illuminates while driving af-
ter adjusting the tire pressure, a tire
may be flat or the TPMS may be mal-
functioning. If you have a flat tire, re-
place it with a spare tire as soon as possible. If no tire is flat and all tires
are properly inflated, have the ve-
hicle checked. It is recommended
that you visit a NISSAN dealer for this
service.
• When using a wheel without the
TPMS such as the spare tire, the TPMS
will not function and the low tire
pressure warning light will flash for
approximately one minute. Have
your tires replaced and/or TPMS sys-
tem reset as soon as possible. It is
recommended that you visit a
NISSAN dealer for these services.
• Replacing tires with those not origi-
nally specified by NISSAN could af-
fect the proper operation of the
TPMS.
• The Genuine NISSAN Emergency Tire
Repair Sealant or equivalent can be
used for temporarily repairing a tire.
Do not inject any other tire liquid or
aerosol tire sealant into the tires, as
this may cause a malfunction of tire
pressure sensors.
FLAT TIRE
In case of emergency6-3
Page 488 of 644
CHANGING A FLAT TIRE (for
models with spare tire)
If you have a flat tire, follow the instructions
below:
NOTE:
For models with the emergency tire
puncture repair kit, a spare tire, jack
and rod are not equipped as stan-
dard.
Stopping the vehicle
1. Safely move the vehicle off the road andaway from traffic.
2. Turn on the hazard warning flashers.
3. Park on a level surface and apply the parking brake. Move the shif t lever to P
(Park).
4. Turn off the engine.
5. Raise the hood to warn other traffic and to signal professional road assistance
personnel that you need assistance.
6. Have all passengers get out of the ve- hicle and stand in a safe place, away
from traffic and clear of the vehicle.
WARNING
• Make sure the parking brake is se-
curely applied and the Continuously
Variable Transmission (CVT) is
shif ted into P (Park).
• Never change tires when the vehicle
is on a slope, ice or slippery areas.
This is hazardous.
• Never change tires if oncoming traf-
fic is close to your vehicle. Wait for
professional road assistance.
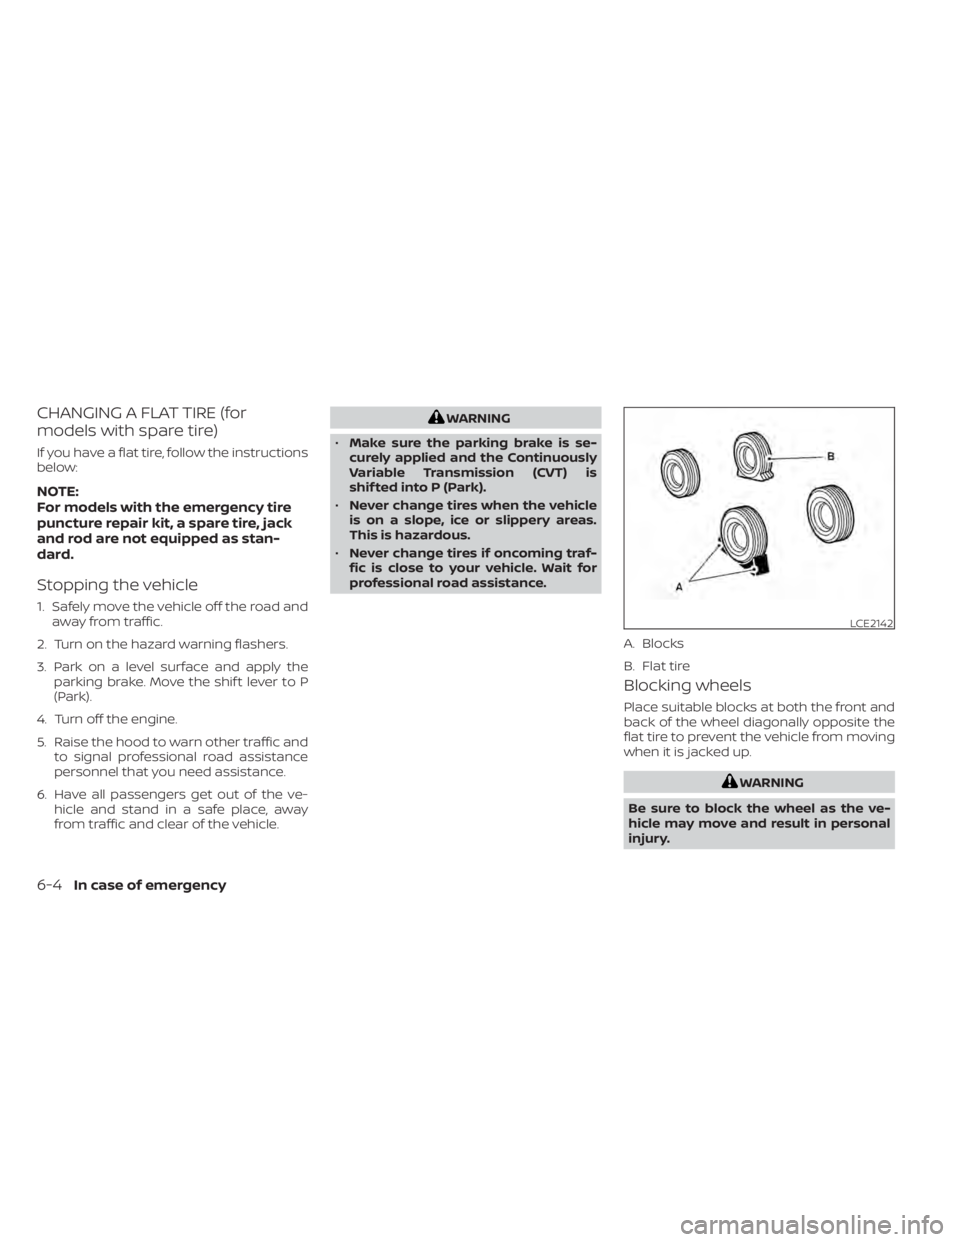
Blocking wheels
Place suitable blocks at both the front and
back of the wheel diagonally opposite the
flat tire to prevent the vehicle from moving
when it is jacked up.
WARNING
Be sure to block the wheel as the ve-
hicle may move and result in personal
injury.
LCE2142
A. Blocks
B. Flat tire
6-4In case of emergency
Page 489 of 644
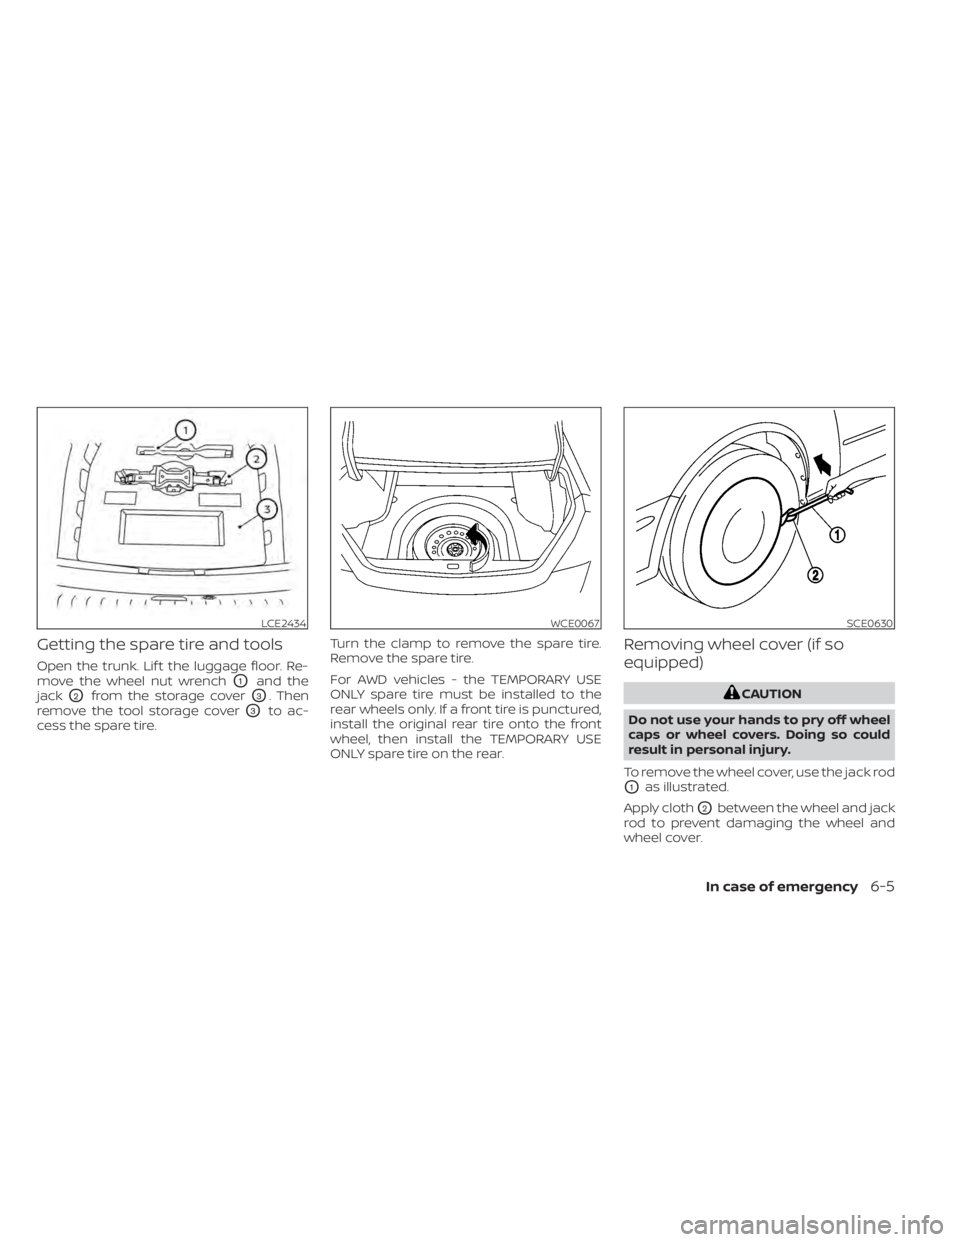
Getting the spare tire and tools
Open the trunk. Lif t the luggage floor. Re-
move the wheel nut wrench
O1and the
jack
O2from the storage coverO3. Then
remove the tool storage cover
O3to ac-
cess the spare tire. Turn the clamp to remove the spare tire.
Remove the spare tire.
For AWD vehicles - the TEMPORARY USE
ONLY spare tire must be installed to the
rear wheels only. If a front tire is punctured,
install the original rear tire onto the front
wheel, then install the TEMPORARY USE
ONLY spare tire on the rear.
Removing wheel cover (if so
equipped)
CAUTION
Do not use your hands to pry off wheel
caps or wheel covers. Doing so could
result in personal injury.
To remove the wheel cover, use the jack rod
O1as illustrated.
Apply cloth
O2between the wheel and jack
rod to prevent damaging the wheel and
wheel cover.
LCE2434WCE0067SCE0630
In case of emergency6-5
Page 492 of 644
Jacking up vehicle and replacing
the damaged tire (AWD models)
WARNING
For AWD vehicles - the TEMPORARY USE
ONLY spare tire must be installed to the
rear wheels only. If a front tire is punc-
tured, install the original rear tire onto
the front wheel, then install the TEMPO-
RARY USE ONLY spare tire on the rear.
Failure to do so could cause overheat-
ing to the AWD system
WARNING
• Never get under the vehicle while it is
supported only by the jack. If it is nec-
essary to work under the vehicle,
support it with safety stands.
• Use only the jack provided with your
vehicle to lif t the vehicle. Do not use
the jack provided with your vehicle
on other vehicles. The jack is de-
signed for lif ting only your vehicle
during a tire change.
• Use the correct jack-up points. Never
use any other part of the vehicle for
jack support.
• Never jack up the vehicle more than
necessary.
• Never use blocks on or under the
jack.
• Do not start or run the engine while
vehicle is on the jack. It may cause
the vehicle to move. This is especially
true for vehicles with limited slip
differentials. •
Do not allow passengers to stay in
the vehicle while it is on the jack.
• Never run the engine with a wheel(s)
off the ground. It may cause the ve-
hicle to move.
LCE2435
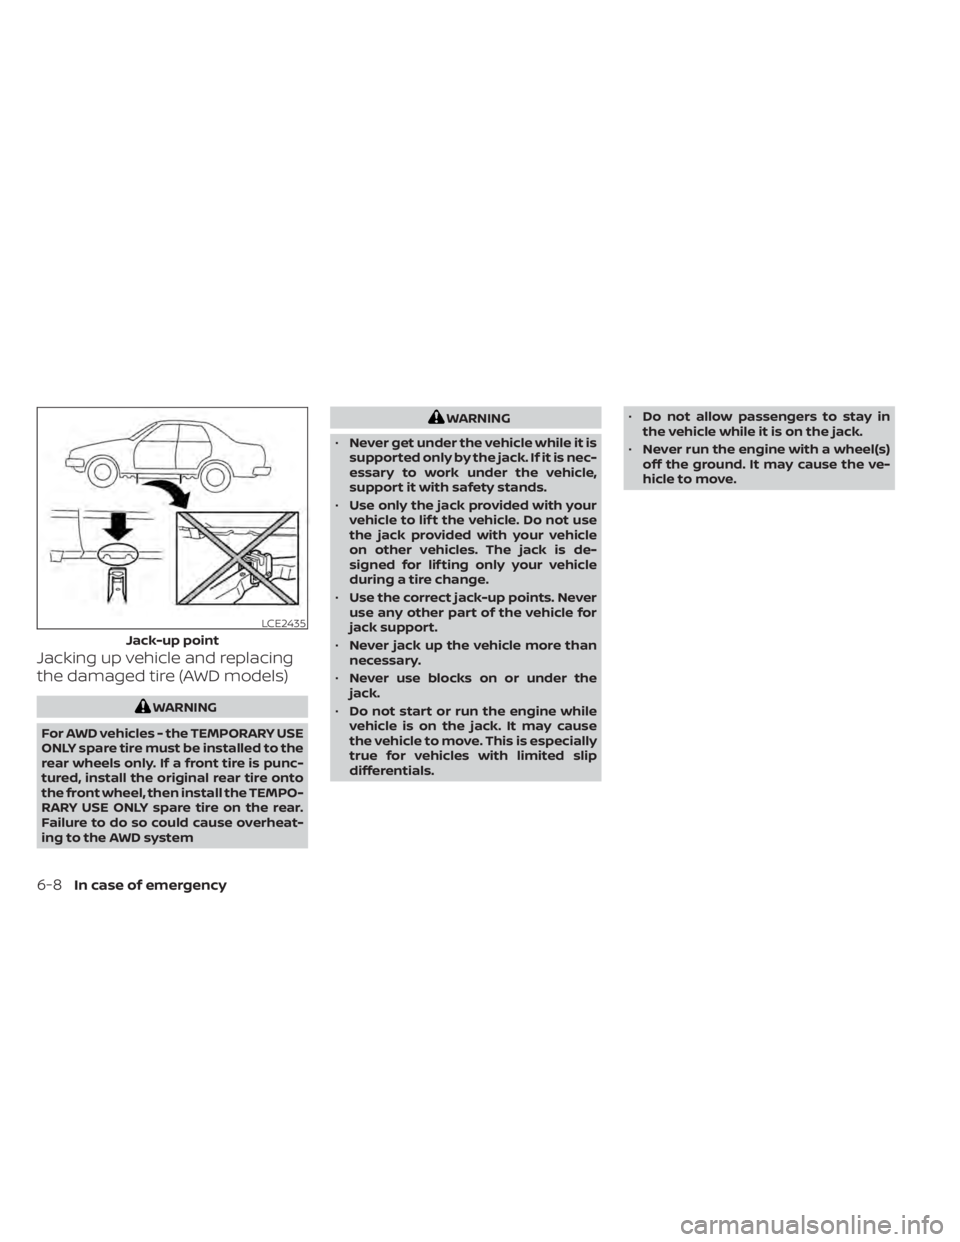
Jack-up point
6-8In case of emergency
Page 493 of 644
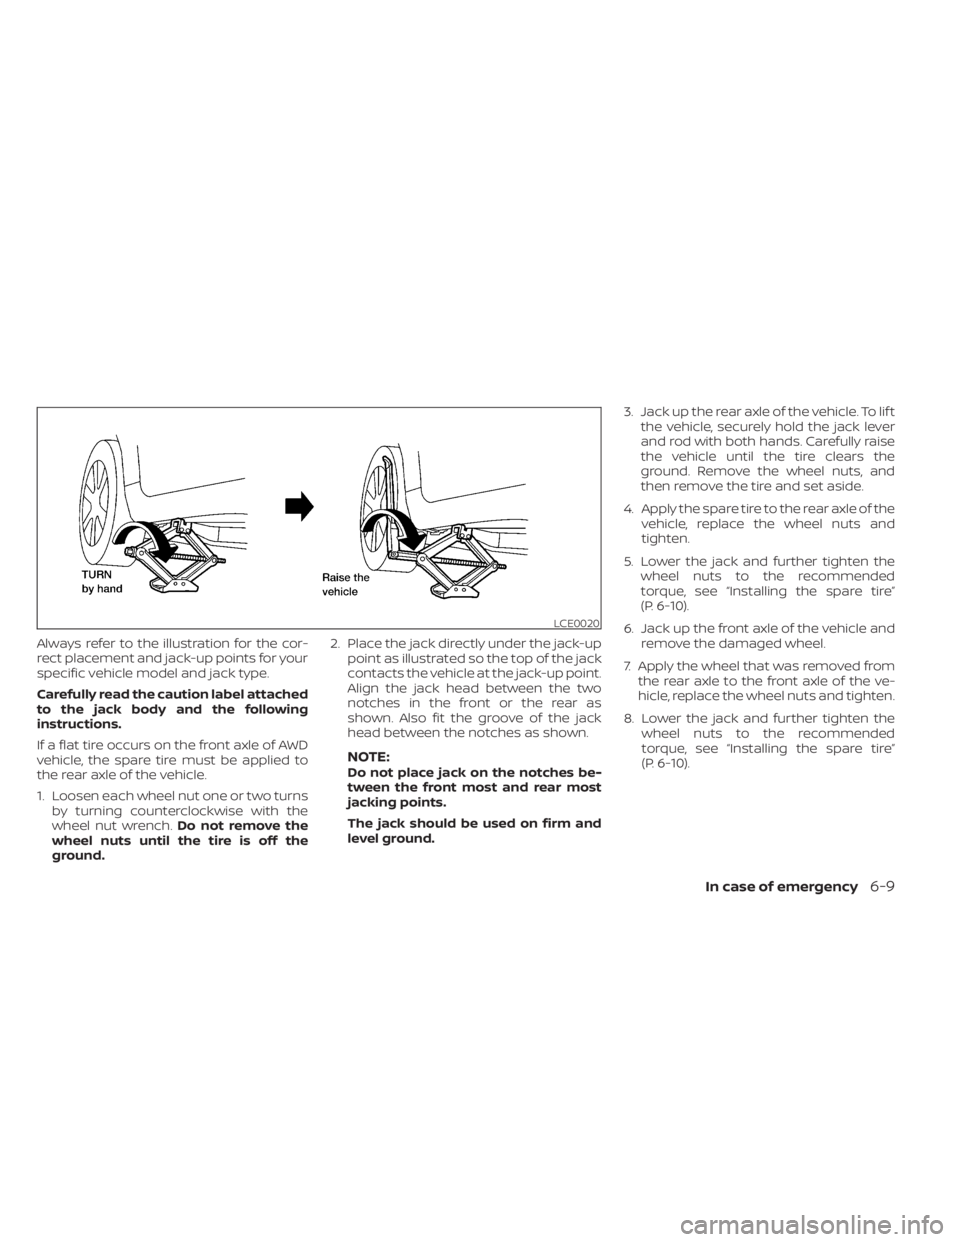
Always refer to the illustration for the cor-
rect placement and jack-up points for your
specific vehicle model and jack type.
Carefully read the caution label attached
to the jack body and the following
instructions.
If a flat tire occurs on the front axle of AWD
vehicle, the spare tire must be applied to
the rear axle of the vehicle.
1. Loosen each wheel nut one or two turnsby turning counterclockwise with the
wheel nut wrench. Do not remove the
wheel nuts until the tire is off the
ground. 2. Place the jack directly under the jack-up
point as illustrated so the top of the jack
contacts the vehicle at the jack-up point.
Align the jack head between the two
notches in the front or the rear as
shown. Also fit the groove of the jack
head between the notches as shown.
NOTE:Do not place jack on the notches be-
tween the front most and rear most
jacking points.
The jack should be used on firm and
level ground. 3. Jack up the rear axle of the vehicle. To lif t
the vehicle, securely hold the jack lever
and rod with both hands. Carefully raise
the vehicle until the tire clears the
ground. Remove the wheel nuts, and
then remove the tire and set aside.
4. Apply the spare tire to the rear axle of the vehicle, replace the wheel nuts and
tighten.
5. Lower the jack and further tighten the wheel nuts to the recommended
torque, see “Installing the spare tire”
(P. 6-10).
6. Jack up the front axle of the vehicle and remove the damaged wheel.
7. Apply the wheel that was removed from the rear axle to the front axle of the ve-
hicle, replace the wheel nuts and tighten.
8. Lower the jack and further tighten the wheel nuts to the recommended
torque, see “Installing the spare tire”
(P. 6-10).
LCE0020
In case of emergency6-9
Page 494 of 644
Installing the spare tire
WARNING
For AWD vehicles - the TEMPORARY USE
ONLY spare tire must be installed to the
rear wheels only. If a front tire is punc-
tured, install the original rear tire onto
the front wheel, then install the TEMPO-
RARY USE ONLY spare tire on the rear.
Failure to do so could cause overheat-
ing to the AWD system
The spare tire is designed for emergency
use. For additional information, see
“Wheels and tires” (P. 8-29). 1. Clean any mud or dirt from the surface
between the wheel and hub.
2. Carefully put the spare tire on and tighten the wheel nuts finger tight.
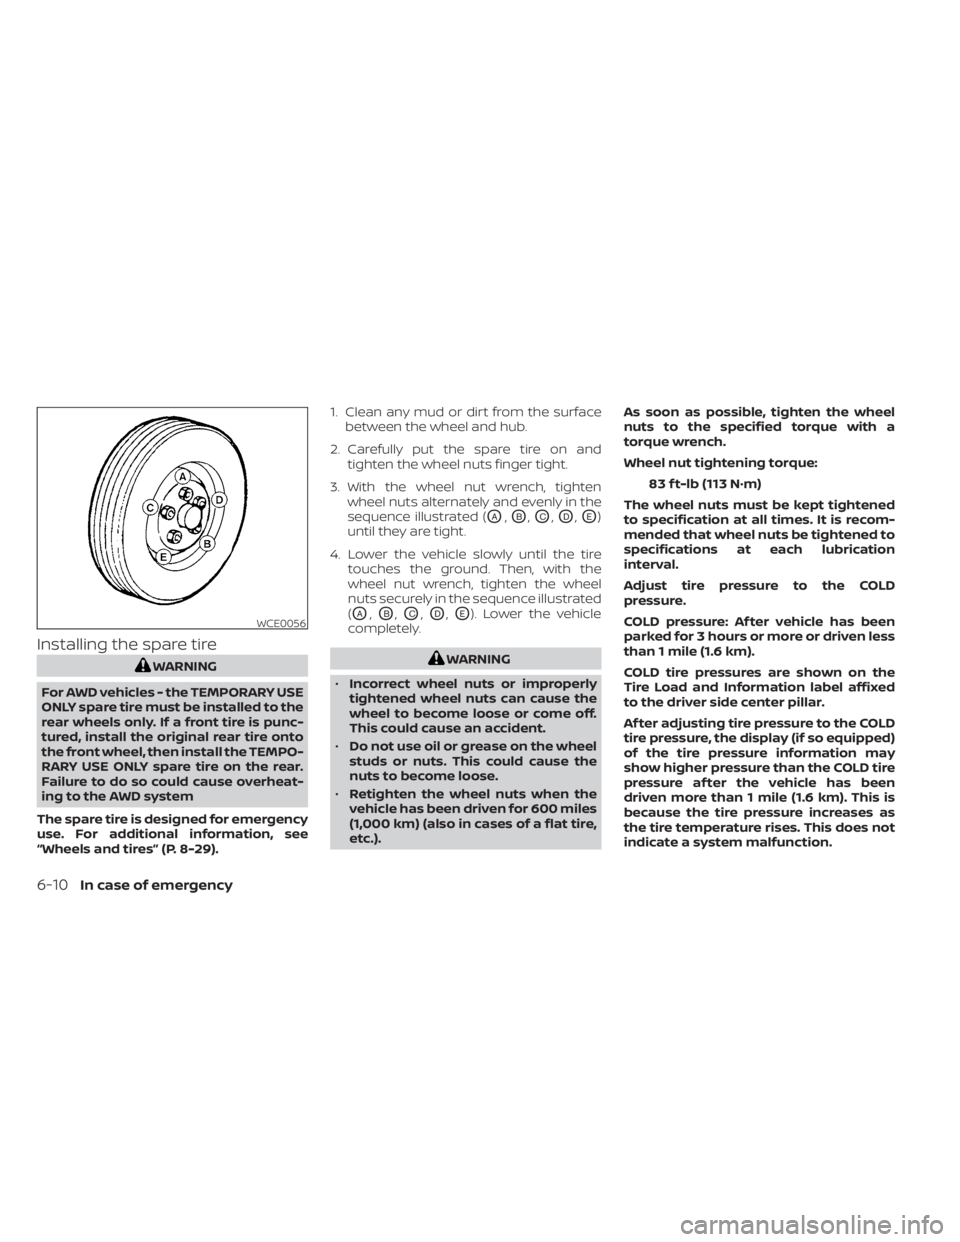
3. With the wheel nut wrench, tighten wheel nuts alternately and evenly in the
sequence illustrated (
OA,OB,OC,OD,OE)
until they are tight.
4. Lower the vehicle slowly until the tire touches the ground. Then, with the
wheel nut wrench, tighten the wheel
nuts securely in the sequence illustrated
(
OA,OB,OC,OD,OE). Lower the vehicle
completely.
WARNING
• Incorrect wheel nuts or improperly
tightened wheel nuts can cause the
wheel to become loose or come off.
This could cause an accident.
• Do not use oil or grease on the wheel
studs or nuts. This could cause the
nuts to become loose.
• Retighten the wheel nuts when the
vehicle has been driven for 600 miles
(1,000 km) (also in cases of a flat tire,
etc.). As soon as possible, tighten the wheel
nuts to the specified torque with a
torque wrench.
Wheel nut tightening torque:
83 f t-lb (113 N·m)
The wheel nuts must be kept tightened
to specification at all times. It is recom-
mended that wheel nuts be tightened to
specifications at each lubrication
interval.
Adjust tire pressure to the COLD
pressure.
COLD pressure: Af ter vehicle has been
parked for 3 hours or more or driven less
than 1 mile (1.6 km).
COLD tire pressures are shown on the
Tire Load and Information label affixed
to the driver side center pillar.
Af ter adjusting tire pressure to the COLD
tire pressure, the display (if so equipped)
of the tire pressure information may
show higher pressure than the COLD tire
pressure af ter the vehicle has been
driven more than 1 mile (1.6 km). This is
because the tire pressure increases as
the tire temperature rises. This does not
indicate a system malfunction.
WCE0056
6-10In case of emergency
Page 495 of 644
5. Securely store the flat tire in the tire welland jacking equipment in the vehicle.
NOTE:Remove the center wheel cap before
storing the flat tire.
6. Place the spare tire cover and the trunk floor carpeting over the damaged tire.
7. Close the trunk.
WARNING
• Always make sure that the spare tire
and jacking equipment are properly
secured af ter use. Such items can be-
come dangerous projectiles in an ac-
cident or sudden stop.
• The spare tire is designed for emer-
gency use. For additional informa-
tion, see “Wheels and tires” (P. 8-29).
REPAIRING FLAT TIRE (for models
with emergency tire puncture
repair kit)
WARNING
• Af ter using Genuine NISSAN Emer-
gency Tire Sealant to repair a minor
tire puncture, do not drive the vehicle
at speeds faster than 50 mph (80
km/h).
• Immediately af ter using the Genuine
NISSAN Emergency Tire Sealant to
repair a minor tire puncture, it is rec-
ommended that you visit a NISSAN
dealer. The Genuine NISSAN Emer-
gency Tire Sealant cannot perma-
nently seal a punctured tire. Continu-
ing operation of the vehicle without a
permanent tire repair can lead to a
crash.
• If you used the Genuine NISSAN
Emergency Tire Sealant to repair a
minor tire puncture, it is recom-
mended that you visit a NISSAN
dealer to replace the TPMS sensor in
addition to repairing or replacing the
tire. •
NISSAN recommends using only
Genuine NISSAN Emergency Tire
Sealant provided with your vehicle.
Other tire sealants may damage the
valve stem seal which can cause the
tire to lose air pressure.
This vehicle does not have a spare tire. The
emergency tire puncture repair kit
(Genuine NISSAN Emergency Tire Sealant)
is supplied with the vehicle instead of a
spare tire. It can be used to temporarily
repair minor tire punctures.
If possible, have the vehicle towed to a fa-
cility that can repair or replace the flat tire.
Using the emergency tire puncture repair
kit may cause a malfunction of the tire
pressure sensor and cause the low tire
pressure warning light to illuminate.
CAUTION
• To avoid the emergency tire puncture
kit being damaged during storage or
use:
– Only use the emergency tire punc-
ture repair kit on your vehicle. Do
not use it on other vehicles.
In case of emergency6-11
Page 545 of 644
If you have a flat tire, see “Flat tire”
(P. 6-3).
TIRE PRESSURE
Tire Pressure Monitoring System
(TPMS)
WARNING
Radio waves could adversely af-
fect electric medical equipment.
Those who use a pacemaker
should contact the electric medi-
cal equipment manufacturer for
the possible influences before
use.
This vehicle is equipped with the Tire
Pressure Monitoring System (TPMS).
It monitors tire pressure of all tires
except the spare. When the low tire
pressure warning light is lit and the
“Tire Pressure Low - Add Air” warning
appears in the vehicle information
display, one or more of your tires is
significantly under-inflated. The TPMS will activate only when the
vehicle is driven at speeds above 16
mph (25 km/h). Also, this system
may not detect a sudden drop in tire
pressure (for example a flat tire while
driving).
For additional information, see “Low
tire pressure warning light” (P. 2-13),
“Tire Pressure Monitoring System
(TPMS)” (P. 5-5), and “Flat tire” (P. 6-3).
Tire inflation pressure
Check the tire pressures (including
the spare) of ten and always prior to
long distance trips. The recom-
mended tire pressure specifications
are shown on the F.M.V.S.S./C.M.V.S.S.
certification label or the Tire and
Loading Information label under the
"Cold Tire Pressure" heading. The
Tire and Loading Information label is
affixed to the driver side center pillar.
Tire pressures should be checked
regularly because:
• Most tires naturally lose air over
time.
• Tires can lose air suddenly when driven over potholes or other ob-
jects or if the vehicle strikes a curb
while parking.
The tire pressures should be
checked when the tires are cold. The
tires are considered COLD af ter the
vehicle has been parked for 3 or
more hours, or driven less than 1 mile
(1.6 km) at moderate speeds.
The TPMS with Easy-Fill Tire Alert
provides visual and audible signals
outside the vehicle for inflating the
tires to the recommended COLD tire
pressure. For additional information,
see “TPMS with Easy-Fill Tire Alert”
(P. 5-8).
WHEELS AND TIRES
Do-it-yourself8-29