2023 NISSAN ALTIMA USB
[x] Cancel search: USBPage 14 of 644
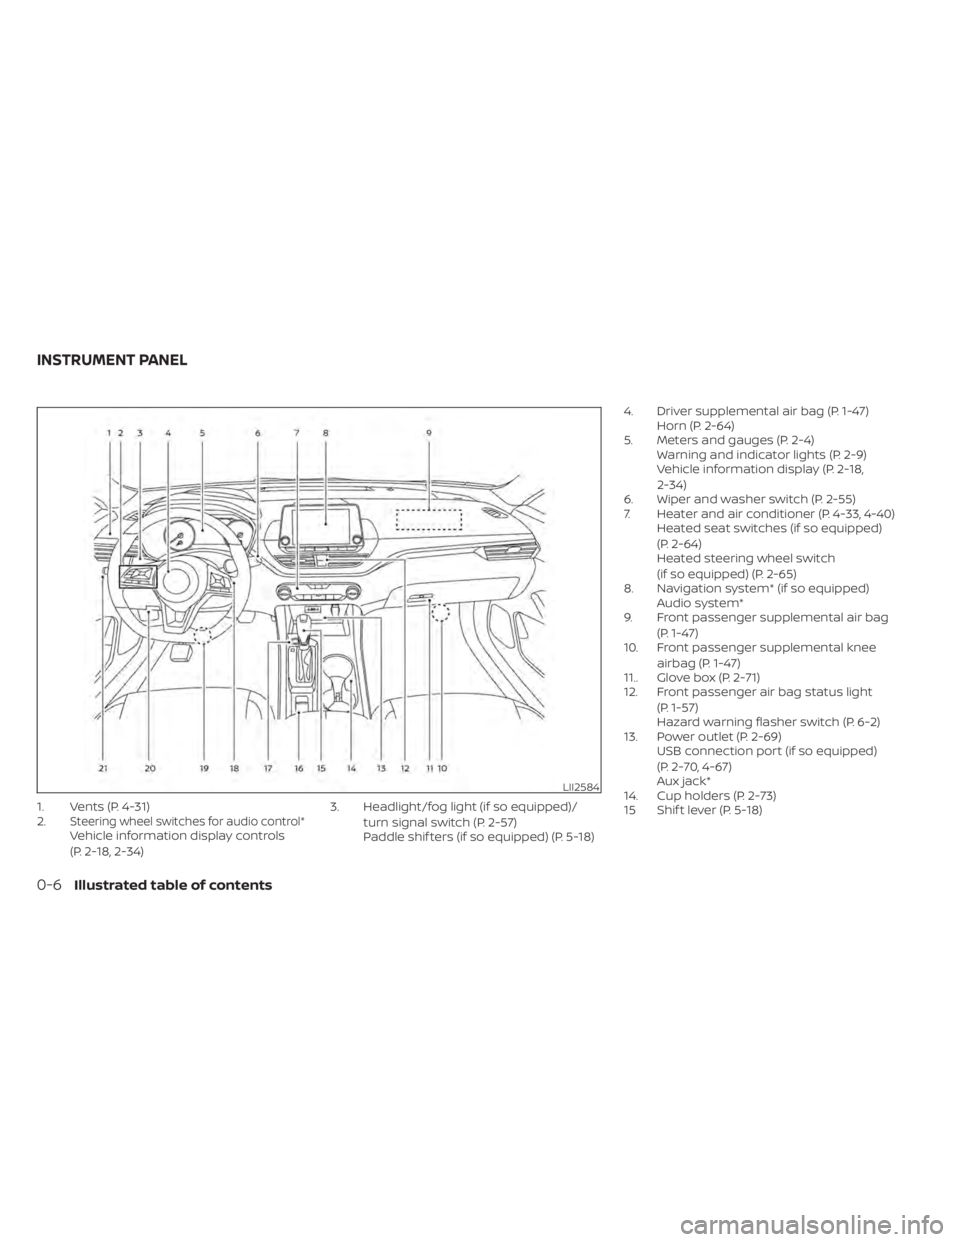
1. Vents (P. 4-31)
2.Steering wheel switches for audio control*Vehicle information display controls
(P. 2-18, 2-34)3. Headlight/fog light (if so equipped)/
turn signal switch (P. 2-57)
Paddle shif ters (if so equipped) (P. 5-18) 4. Driver supplemental air bag (P. 1-47)
Horn (P. 2-64)
5. Meters and gauges (P. 2-4) Warning and indicator lights (P. 2-9)
Vehicle information display (P. 2-18,
2-34)
6. Wiper and washer switch (P. 2-55)
7. Heater and air conditioner (P. 4-33, 4-40) Heated seat switches (if so equipped)
(P. 2-64)
Heated steering wheel switch
(if so equipped) (P. 2-65)
8. Navigation system* (if so equipped) Audio system*
9. Front passenger supplemental air bag
(P. 1-47)
10. Front passenger supplemental knee
airbag (P. 1-47)
11.. Glove box (P. 2-71)
12. Front passenger air bag status light
(P. 1-57)
Hazard warning flasher switch (P. 6-2)
13. Power outlet (P. 2-69) USB connection port (if so equipped)
(P. 2-70, 4-67)
Aux jack*
14. Cup holders (P. 2-73)
15 Shif t lever (P. 5-18)
LII2584
INSTRUMENT PANEL
0-6Illustrated table of contents
Page 91 of 644
Heated seat switches (if so equipped)..........2-64
Heated steering wheel switch (if so equipped) . . 2-65
Steering Assist switch (for vehicles with
ProPILOT Assist) (if so equipped) ................2-66
Emergency call (SOS) button (if so equipped) . . . 2-67
Rear Door Alert ................................. 2-67
Power outlet ................................... 2-69
USB/iPod® charging port (if so equipped) .......2-70
Extended storage switch .......................2-70
Storage ........................................ 2-71
Front-door pockets ......................... 2-71
Seatback pockets (if so equipped) ...........2-71
Glovebox ................................... 2-72
Console box ................................. 2-72
Overhead sunglasses storage ...............2-73
Cup holders ................................. 2-73
Windows ....................................... 2-75
Power windows ............................. 2-75Moonroof (if so equipped)
......................2-77
Power moonroof ............................ 2-77
Interior lights ................................... 2-79
Map lights ................................... 2-80
Personal lights .............................. 2-80
Trunk light ................................... 2-80
HomeLink® Universal Transceiver
(if so equipped) ................................. 2-81
Programming HomeLink® ...................2-81
Programming HomeLink® for Canadian
customers and gate openers ...............2-83
Operating the HomeLink® Universal
Transceiver .................................. 2-84
Programming trouble-diagnosis ............2-84
Clearing the programmed information ......2-84
Reprogramming a single HomeLink®
button ...................................... 2-84
If your vehicle is stolen ......................2-85
Page 92 of 644
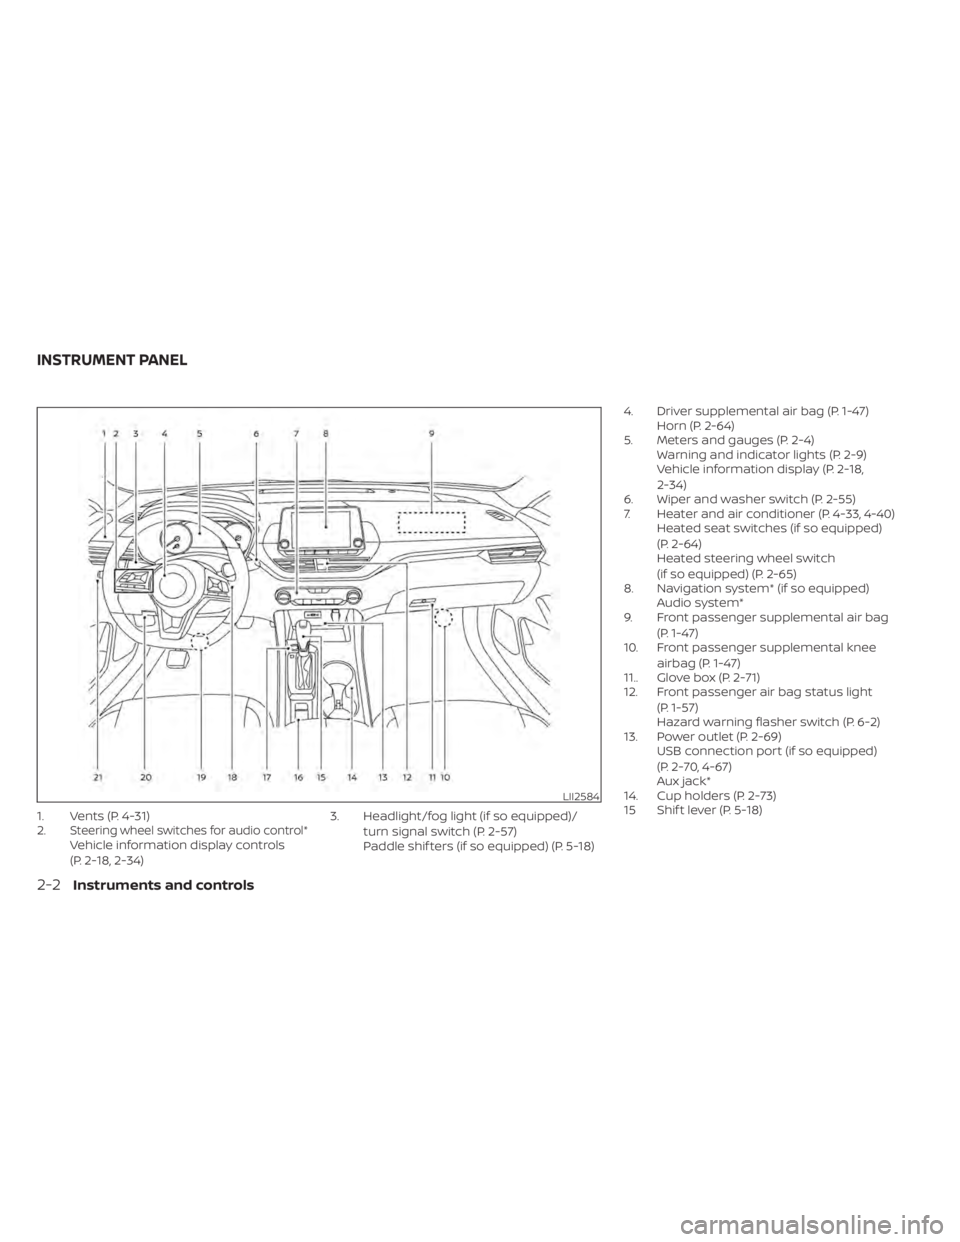
1. Vents (P. 4-31)
2.Steering wheel switches for audio control*Vehicle information display controls
(P. 2-18, 2-34)3. Headlight/fog light (if so equipped)/
turn signal switch (P. 2-57)
Paddle shif ters (if so equipped) (P. 5-18) 4. Driver supplemental air bag (P. 1-47)
Horn (P. 2-64)
5. Meters and gauges (P. 2-4) Warning and indicator lights (P. 2-9)
Vehicle information display (P. 2-18,
2-34)
6. Wiper and washer switch (P. 2-55)
7. Heater and air conditioner (P. 4-33, 4-40) Heated seat switches (if so equipped)
(P. 2-64)
Heated steering wheel switch
(if so equipped) (P. 2-65)
8. Navigation system* (if so equipped) Audio system*
9. Front passenger supplemental air bag
(P. 1-47)
10. Front passenger supplemental knee
airbag (P. 1-47)
11.. Glove box (P. 2-71)
12. Front passenger air bag status light
(P. 1-57)
Hazard warning flasher switch (P. 6-2)
13. Power outlet (P. 2-69) USB connection port (if so equipped)
(P. 2-70, 4-67)
Aux jack*
14. Cup holders (P. 2-73)
15 Shif t lever (P. 5-18)
LII2584
INSTRUMENT PANEL
2-2Instruments and controls
Page 160 of 644
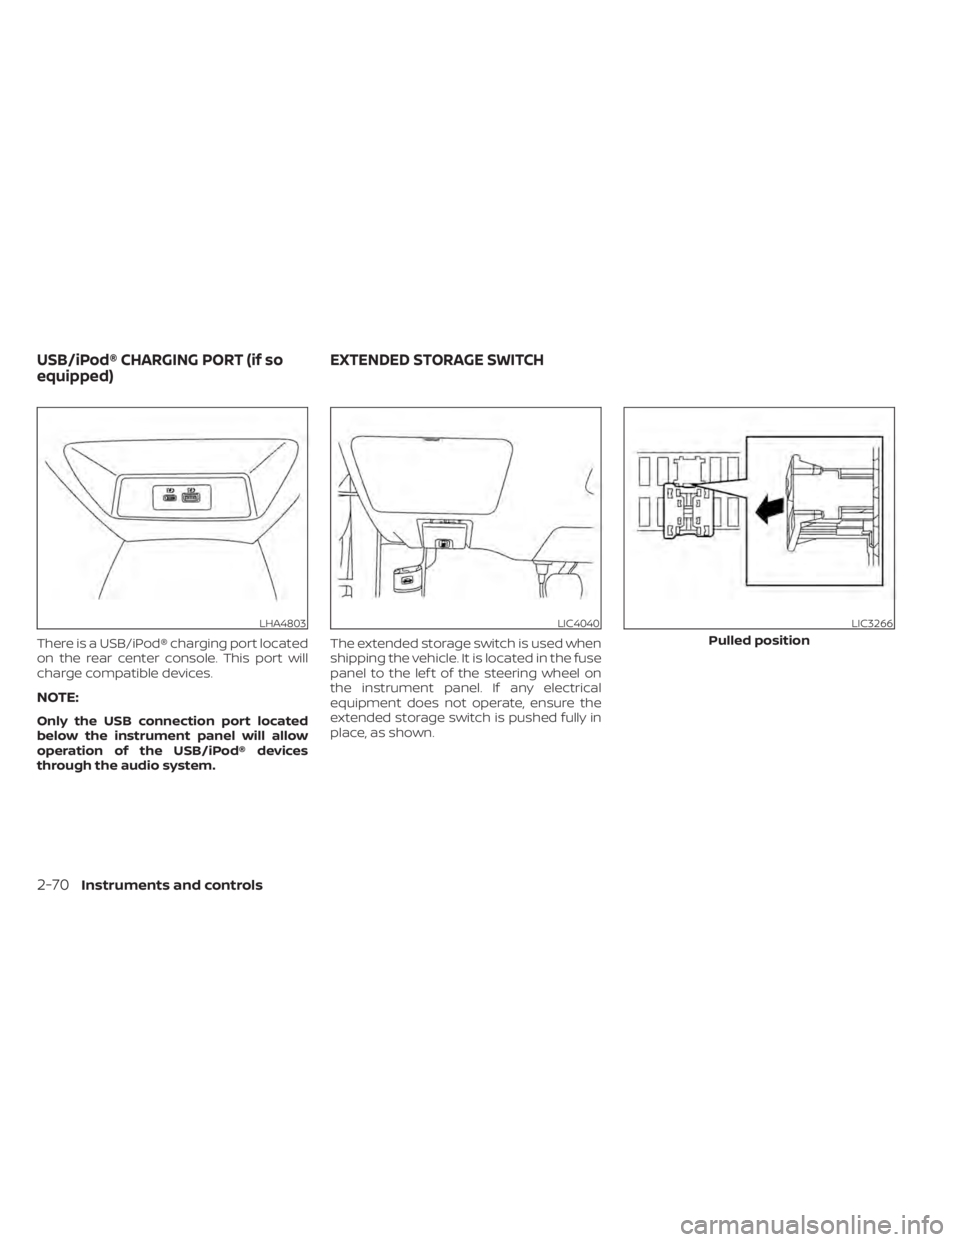
There is a USB/iPod® charging port located
on the rear center console. This port will
charge compatible devices.
NOTE:
Only the USB connection port located
below the instrument panel will allow
operation of the USB/iPod® devices
through the audio system.The extended storage switch is used when
shipping the vehicle. It is located in the fuse
panel to the lef t of the steering wheel on
the instrument panel. If any electrical
equipment does not operate, ensure the
extended storage switch is pushed fully in
place, as shown.
LHA4803LIC4040LIC3266
Pulled position
USB/iPod® CHARGING PORT (if so
equipped)
EXTENDED STORAGE SWITCH
2-70Instruments and controls
Page 211 of 644
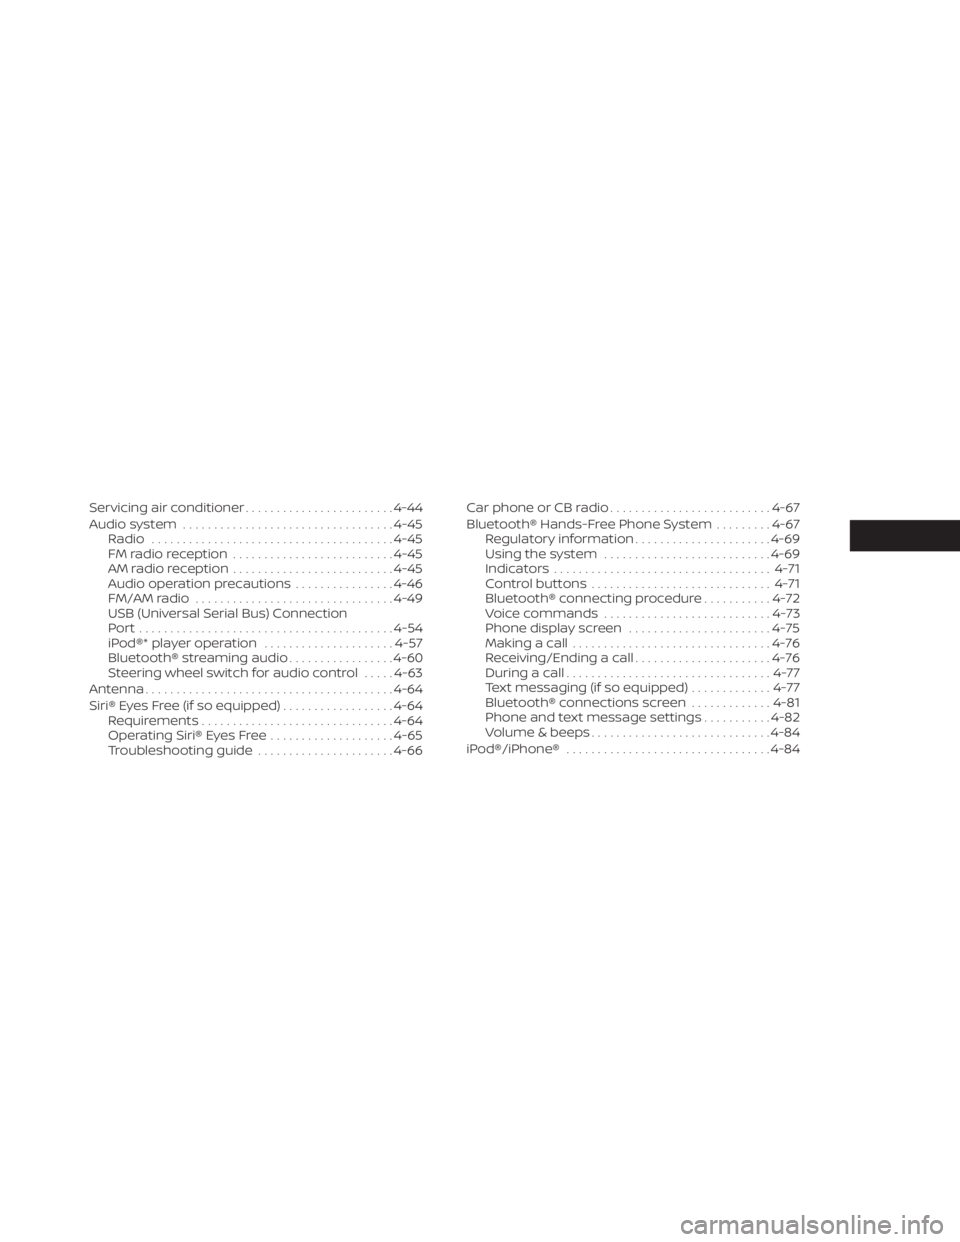
Servicing air conditioner........................4-44
Audio system .................................. 4-45
Radio ....................................... 4-45
FM radio reception .......................... 4-45
AM radio reception .......................... 4-45
Audio operation precautions ................4-46
FM/AM radio ................................ 4-49
USB (Universal Serial Bus) Connection
Port......................................... 4-54
iPod®* player operation .....................4-57
Bluetooth® streaming audio .................4-60
Steering wheel switch for audio control .....4-63
Antenna ........................................ 4-64
Siri® Eyes Free (if so equipped) ..................4-64
Requirements ............................... 4-64
Operating Siri® Eyes Free ....................4-65
Troubleshooting guide ......................4-66Car phone or CB radio
.......................... 4-67
Bluetooth® Hands-Free Phone System .........4-67
Regulatory information ......................4-69
Using the system ........................... 4-69
Indicators ................................... 4-71
Control buttons ............................. 4-71
Bluetooth® connecting procedure ...........4-72
Voice commands ........................... 4-73
Phone display screen .......................4-75
Making a call ................................ 4-76
Receiving/Ending a call ......................4-76
During a call ................................. 4-77
Text messaging (if so equipped) .............4-77
Bluetooth® connections screen .............4-81
Phone and text message settings ...........4-82
Volume & beeps ............................. 4-84
iPod®/iPhone® ................................. 4-84
Page 216 of 644
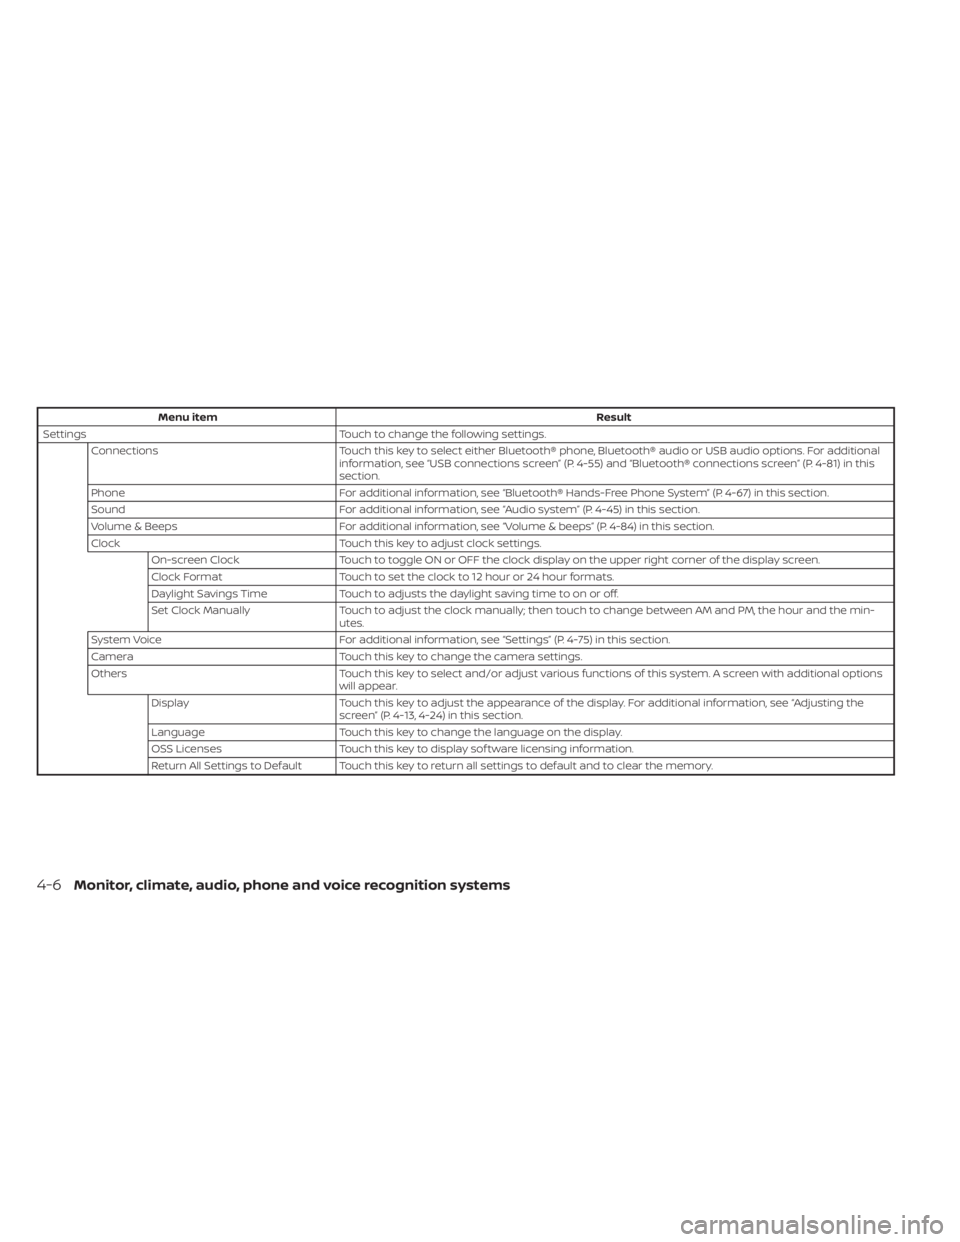
Menu itemResult
Settings Touch to change the following settings.
Connections Touch this key to select either Bluetooth® phone, Bluetooth® audio or USB audio options. For additional
information, see “USB connections screen” (P. 4-55) and “Bluetooth® connections screen” (P. 4-81) in this
section.
Phone For additional information, see “Bluetooth® Hands-Free Phone System” (P. 4-67) in this section.
Sound For additional information, see “Audio system” (P. 4-45) in this section.
Volume & Beeps For additional information, see “Volume & beeps” (P. 4-84) in this section.
Clock Touch this key to adjust clock settings.
On-screen Clock Touch to toggle ON or OFF the clock display on the upper right corner of the display screen.
Clock Format Touch to set the clock to 12 hour or 24 hour formats.
Daylight Savings Time Touch to adjusts the daylight saving time to on or off.
Set Clock Manually Touch to adjust the clock manually; then touch to change between AM and PM, the hour and the min-
utes.
System Voice For additional information, see “Settings” (P. 4-75) in this section.
Camera Touch this key to change the camera settings.
Others Touch this key to select and/or adjust various functions of this system. A screen with additional options
will appear.
Display Touch this key to adjust the appearance of the display. For additional information, see “Adjusting the
screen” (P. 4-13, 4-24) in this section.
Language Touch this key to change the language on the display.
OSS Licenses Touch this key to display sof tware licensing information.
Return All Settings to Default Touch this key to return all settings to default and to clear the memory.
4-6Monitor, climate, audio, phone and voice recognition systems
Page 217 of 644
(brightness control) BUTTON
To change the display brightness, press thebutton. Pressing the button again will
change the display to the day or the night
display.
Press and hold the
button for more
than 2 seconds to turn the display off. Press
and hold the button again to turn the dis-
play on.
HOW TO USE THE VOL (volume)
KNOB / PUSH
(power)
BUTTON
Press the PUSH(power) button to turn
audio function on and off. Turn the VOL
(volume) knob to adjust audio volume.
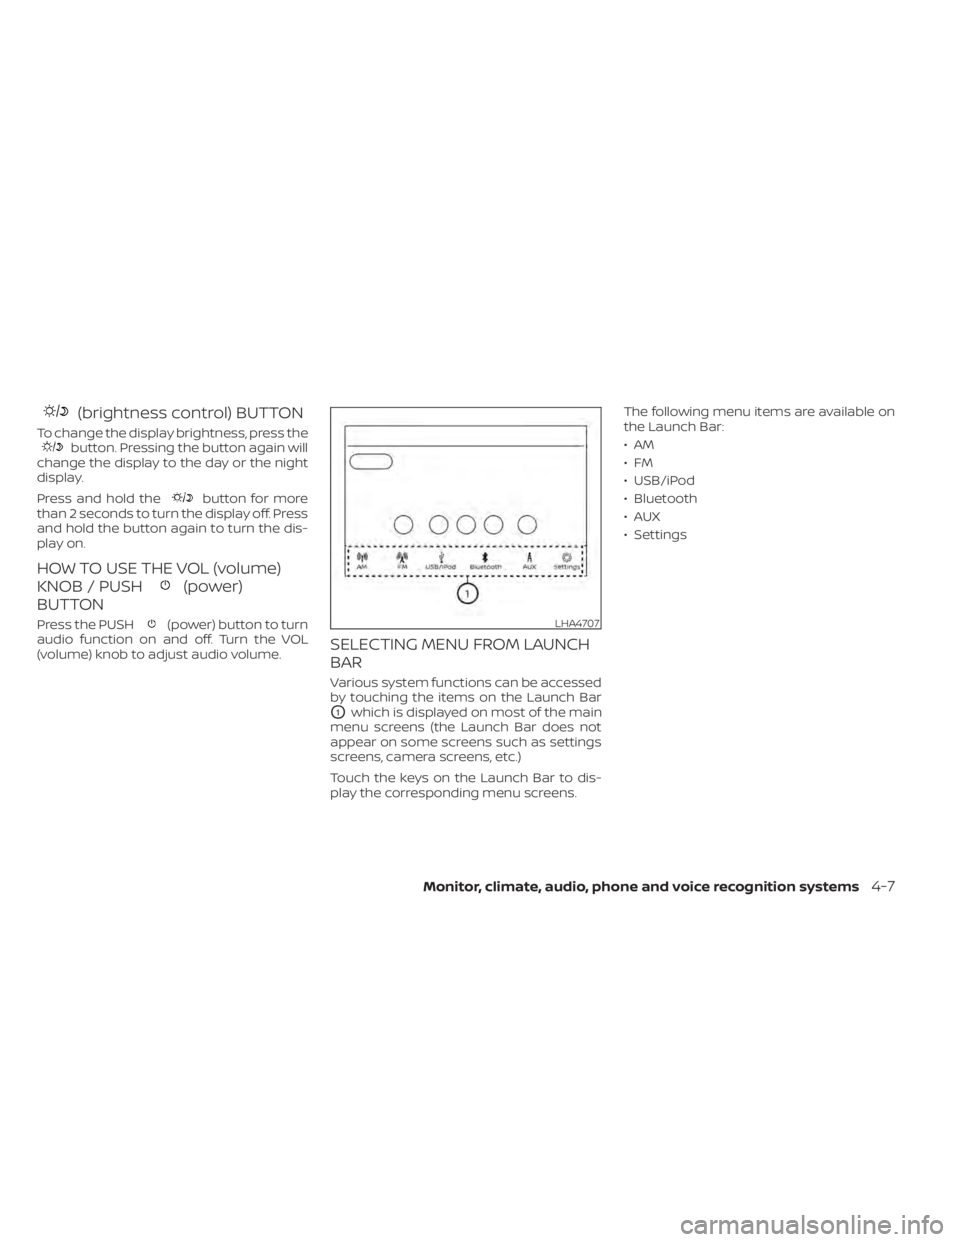
SELECTING MENU FROM LAUNCH
BAR
Various system functions can be accessed
by touching the items on the Launch Bar
O1which is displayed on most of the main
menu screens (the Launch Bar does not
appear on some screens such as settings
screens, camera screens, etc.)
Touch the keys on the Launch Bar to dis-
play the corresponding menu screens. The following menu items are available on
the Launch Bar:
•AM
•FM
• USB/iPod
• Bluetooth
•AUX
• Settings
LHA4707
Monitor, climate, audio, phone and voice recognition systems4-7
Page 256 of 644
for several seconds during ionospheric tur-
bulence even in areas where no obstacles
exist.
Static: Caused by thunderstorms, electrical
power lines, electric signs and even traffic
lights.
AUDIO OPERATION PRECAUTIONS
MP3 or WMA terms
•MP3 — MP3 is short for Moving Pictures
Experts Group Audio Layer 3. MP3 is the
most well-known compressed digital au-
dio file format. This format allows for near
“CD quality” sound, but at a fraction of the
size of normal audio files. MP3 conversion
of an audio track from CD-ROM can reduce
the file size by approximately a 10:1 ratio
with virtually no perceptible loss in quality.
MP3 compression removes the redundant
and irrelevant parts of a sound signal that
the human ear doesn’t hear.
• WMA — Windows Media Audio (WMA)* is a compressed audio format created by Mi-
crosof t as an alternative to MP3. The WMA
codec offers greater file compression
than the MP3 codec, enabling storage of
more digital audio tracks in the same
amount of space when compared to
MP3s at the same level of quality. • Bit rate — Bit rate denotes the number of
bits per second used by a digital music
file. The size and quality of a compressed
digital audio file is determined by the bit
rate used when encoding the file.
• Sampling frequency — Sampling fre- quency is the rate at which the samples
of a signal are converted from analog to
digital (A/D conversion) per second.
• Multisession — Multisession is one of the methods for writing data to media. Writ-
ing data once to the media is called a
single session, and writing more than
once is called a multisession.
• ID3/WMA Tag — The ID3/WMA tag is the part of the encoded MP3 or WMA file that
contains information about the digital
music file such as song title, artist, encod-
ing bit rate, track time duration, etc. ID3
tag information is displayed on the Artist/
song title line on the display.
* Windows® and Windows Media® are reg-
istered trademarks and trademarks in the
United States of America and other coun-
tries of Microsof t Corporation of the USA.
USB (Universal Serial Bus)
Connection Port
WARNING
• Do not connect, disconnect or oper-
ate the USB device while driving. Do-
ing so can be a distraction. If dis-
tracted you could lose control of your
vehicle and cause an accident or se-
rious injury.
CAUTION
• Do not force the USB device into the
USB port. Inserting the USB device
tilted or up-side-down into the port
may damage the port. Make sure
that the USB device is connected cor-
rectly into the USB port.
• Do not grab the USB port cover (if so
equipped) when pulling the USB de-
vice out of the port. This could dam-
age the port and the cover.
• Do not leave the USB cable in a place
where it can be pulled unintention-
ally. Pulling the cable may damage
the port.
4-46Monitor, climate, audio, phone and voice recognition systems