2023 LINCOLN CORSAIR clock
[x] Cancel search: clockPage 19 of 690
Fuel Tank Capacity - Excluding: Plug-InHybrid Electric Vehicle (PHEV)............505
Fuel Tank Capacity - Plug-In Hybrid ElectricVehicle (PHEV)........................................506
Air Conditioning System Capacity andSpecification - 2.0L EcoBoost™............507
Air Conditioning System Capacity andSpecification - 2.5L, Plug-In HybridElectric Vehicle (PHEV).........................509
Washer Fluid Specification........................510
Brake Fluid Specification............................511
Vehicle Identification
Vehicle Identification Number..................513
Connected Vehicle
What Is a Connected Vehicle....................514
Connected Vehicle Requirements...........514
Connected Vehicle Limitations.................514
Connecting the Vehicle to a MobileNetwork......................................................514
Connecting the Vehicle to a Wi-Fi Network.......................................................................514
Connected Vehicle – Troubleshooting.......................................................................515
Connected Vehicle Videos........................518
Vehicle Wi-Fi Hotspot
Creating a Vehicle Wi-Fi Hotspot.............519
Changing the Vehicle Wi-Fi Hotspot Nameor Password..............................................519
Vehicle Wi-Fi Hotspot – Troubleshooting......................................................................520
Audio System
Audio System Precautions........................521
Switching the Audio Unit On and Off......521
Selecting the Audio Source......................521
Playing or Pausing the Audio Source......521
Adjusting the Volume..................................521
Switching Shuffle Mode On and Off......522
Switching Repeat Mode On and Off......522
Setting a Memory Preset..........................522
Muting the Audio........................................522
Adjusting the Sound Settings..................522
Setting the Clock and Date......................523
AM/FM Radio................................................523
Switching the Display On and Off..........524
Digital Radio.................................................524
Satellite Radio..............................................525
Audio System – Troubleshooting...........528
Audio System Videos..................................531
Center Display Overview
Center Display Precautions......................532
Center Display Limitations........................532
Status Bar......................................................532
Home Screen...............................................533
Information On Demand Screen.............533
Rebooting the Center Display.................533
Center Display Overview Videos............533
Voice Interaction
Lincoln Personal Assistant........................534
Alexa Built-In
What is Alexa Built-In.................................536
Alexa Built-In Requirements.....................536
Signing Into Your Account........................536
Using Alexa Built-In....................................536
Alexa Built-In Settings................................536
15
2023 Corsair (CTF) Canada/United States of America, enUSA, Edition date: 202208, DOMTable of Contents
Page 52 of 690
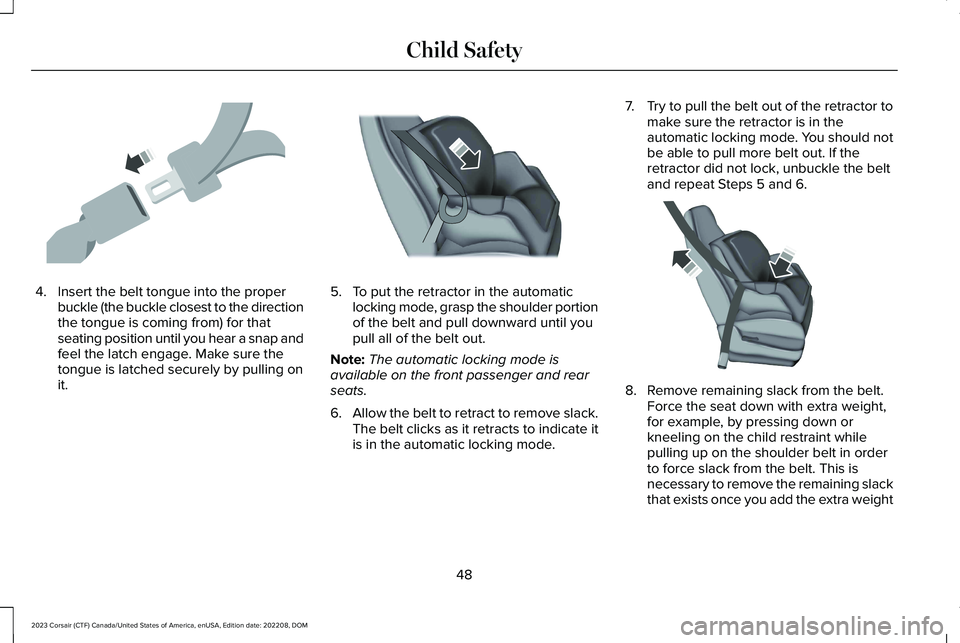
4.Insert the belt tongue into the properbuckle (the buckle closest to the directionthe tongue is coming from) for thatseating position until you hear a snap andfeel the latch engage. Make sure thetongue is latched securely by pulling onit.
5.To put the retractor in the automaticlocking mode, grasp the shoulder portionof the belt and pull downward until youpull all of the belt out.
Note:The automatic locking mode isavailable on the front passenger and rearseats.
6.Allow the belt to retract to remove slack.The belt clicks as it retracts to indicate itis in the automatic locking mode.
7.Try to pull the belt out of the retractor tomake sure the retractor is in theautomatic locking mode. You should notbe able to pull more belt out. If theretractor did not lock, unbuckle the beltand repeat Steps 5 and 6.
8.Remove remaining slack from the belt.Force the seat down with extra weight,for example, by pressing down orkneeling on the child restraint whilepulling up on the shoulder belt in orderto force slack from the belt. This isnecessary to remove the remaining slackthat exists once you add the extra weight
48
2023 Corsair (CTF) Canada/United States of America, enUSA, Edition date: 202208, DOMChild SafetyE142531 E142875 E142533
Page 59 of 690
If the booster seat slides on the vehicle seatupon which it is being used, placing arubberized mesh sold as shelf or carpet linerunder the booster seat may improve thiscondition. Do not use any item thicker thanthis under the booster seat. Check with thebooster seat manufacturer's instructions.
CHILD SAFETY LOCKS
WARNING: You cannot open the reardoors from inside if you have put the childsafety locks on.
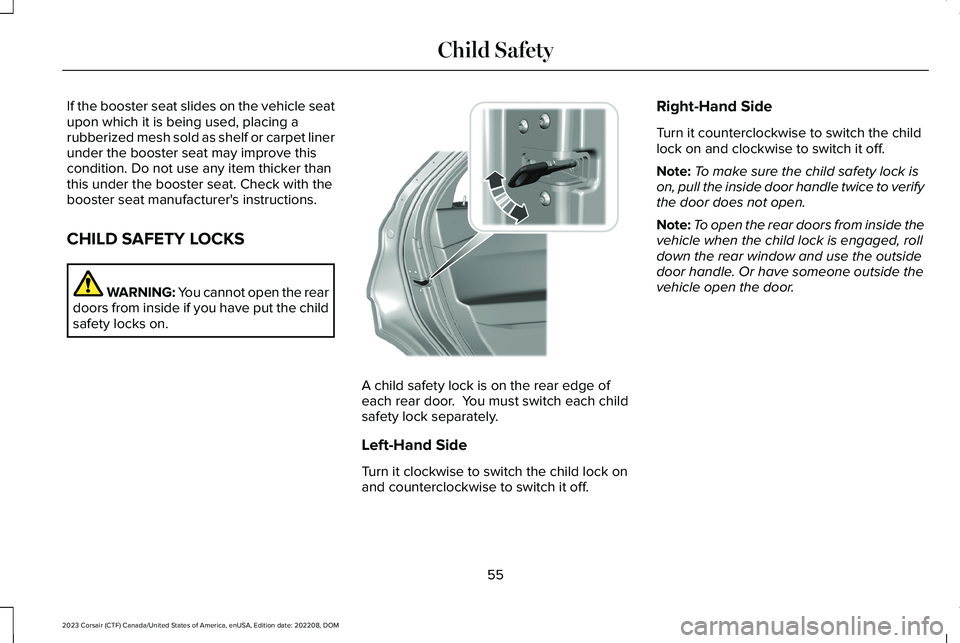
A child safety lock is on the rear edge ofeach rear door. You must switch each childsafety lock separately.
Left-Hand Side
Turn it clockwise to switch the child lock onand counterclockwise to switch it off.
Right-Hand Side
Turn it counterclockwise to switch the childlock on and clockwise to switch it off.
Note:To make sure the child safety lock ison, pull the inside door handle twice to verifythe door does not open.
Note:To open the rear doors from inside thevehicle when the child lock is engaged, rolldown the rear window and use the outsidedoor handle. Or have someone outside thevehicle open the door.
55
2023 Corsair (CTF) Canada/United States of America, enUSA, Edition date: 202208, DOMChild SafetyE300933
Page 61 of 690

The seatbelt system consists of:
•Lap and shoulder seatbelts.
•A shoulder seatbelt with automaticlocking mode, except driver seatbelt.
•Height adjusters at the front outermostseating positions.
•Seatbelt pretensioners at the frontoutermost and second row outermostseating positions.
•Belt tension sensor at the front outermostpassenger seating position.
A seatbelt warning light and tone.
Crash sensors and monitoringsystem with readiness indicator.
The seatbelt pretensioners are designed totighten the seatbelts when activated. Infrontal and near-frontal crashes, the seatbeltpretensioners may be activated alone or, ifthe crash is of sufficient severity, togetherwith the front airbags. The pretensioners mayalso activate when a Safety Canopy airbagdeploys.
FASTENING THE SEATBELTS
All seatbelts in your vehicle are a three-pointcombination lap and shoulder seatbelt.
Seatbelt tongue.A
Seatbelt buckle.B
1.Pull the seatbelt out steadily.
Note:It may lock if you pull it sharply or ifthe vehicle is on a slope.
2.Insert the tongue into the buckle.
3.Pull the seatbelt tight to remove anyslack.
Unfastening the Seatbelts
1.Press the red button on the buckle torelease the seatbelt.
2.Hold the seatbelt tongue and let it retractcompletely and smoothly to its stowedposition.
When in use, place the rear seatbelts in thebelt guides on the outermost seat backrests.
57
2023 Corsair (CTF) Canada/United States of America, enUSA, Edition date: 202208, DOMSeatbeltsE71880 E67017 BA E338014
Page 437 of 690
Do not use supplemental engine oil additivesbecause they are unnecessary and couldlead to engine damage that the vehiclewarranty may not cover.
1.Clean the area surrounding the engineoil filler cap before you remove it.
2.Remove the engine oil filler cap.
3.Add engine oil that meets ourspecifications. See Capacities andSpecifications (page 495).
4.Reinstall the engine oil filler cap. Turn itclockwise until you feel a strongresistance.
Note: Do not add oil further than themaximum mark. Oil levels above themaximum mark may cause engine damage.
Note:Immediately soak up any oil spillagewith an absorbent cloth.
INTELLIGENT OIL LIFE MONITOR
Under certain conditions the vehicle’sintelligent oil life monitor may determine youroil requires replacement prior to your generalservice. Should this occur it is recommendedyou replace your oil within two weeks or500 mi (800 km) of being alerted.
Your authorized dealer will be able to adviseyou whether only an engine oil and filterchange is recommended or whether youshould complete your general serviceinclusive of oil and oil Filter.
RESETTING THE INTELLIGENT OIL LIFEMONITOR
Use the information display controls on thesteering wheel to reset the oil changeindicator.
From the main menu scroll to:
Action and descriptionMessage
Press the right arrow button,then from this menu scroll tothe following message.
Settings
Press the right arrow button,then from this menu scroll tothe following message.
Vehicle
Press the right arrow button,then from this menu scroll tothe following message.
Oil Life
Press and hold the OK buttonuntil the instrument clusterdisplays the followingmessage.
Hold OK toReset
Reset Successful
When the oil change indicatorresets the instrument clusterdisplays 100%.
Remaining Life
{00}%
433
2023 Corsair (CTF) Canada/United States of America, enUSA, Edition date: 202208, DOMMaintenance
Page 443 of 690
If the coolant level is at or below theminimum mark, add prediluted coolantimmediately.
To top up the coolant level do the following:
1.Unscrew the cap slowly. Any pressureescapes as you unscrew the cap.
2.Add prediluted coolant approved to thecorrect specification. See Capacities andSpecifications (page 495).
3.Add enough prediluted coolant to reachthe correct level.
4.Replace the coolant reservoir cap. Turnthe cap clockwise until it contacts thehard stop.
5.Check the coolant level in the coolantreservoir the next few times you driveyour vehicle. If necessary, add enoughprediluted engine coolant to bring thecoolant level to the correct level.
If you have to add more than 1.1 qt (1 L) ofengine coolant per month, have your vehiclechecked as soon as possible. Operating anengine with a low level of coolant can resultin engine overheating and possible enginedamage.
In case of emergency, you can add a largeamount of water without engine coolant inorder to reach a vehicle service location.
Water alone, without engine coolant, cancause engine damage from corrosion,overheating or freezing.
Do not use the following as a coolantsubstitute:
•Alcohol.
•Methanol.
•Brine.
•Any coolant mixed with alcohol ormethanol antifreeze.
Alcohol and other liquids can cause enginedamage from overheating or freezing.
Do not add extra inhibitors or additives tothe coolant. These can be harmful andcompromise the corrosion protection of thecoolant.
CHANGING THE COOLANT
For coolant change, see your authorizeddealer.
Changing the coolant is necessary at specificmileage intervals listed in the scheduledmaintenance information.
MANAGING THE COOLANTTEMPERATURE
If you tow a trailer with your vehicle, theengine may temporarily reach a highertemperature during severe operatingconditions, for example ascending a long orsteep grade in high ambient temperatures.
At this time, you may notice the coolanttemperature gauge moves toward the redzone and a message may appear in theinformation display.
WARNING: To reduce the risk ofcrash and injury, be prepared that thevehicle speed may reduce and the vehiclemay not be able to accelerate with fullpower until the coolant temperaturereduces.
439
2023 Corsair (CTF) Canada/United States of America, enUSA, Edition date: 202208, DOMMaintenance
Page 448 of 690
Note:If you add electrical accessories orcomponents to the vehicle, it could adverselyaffect battery performance and durability.This could also affect the performance ofother electrical systems in the vehicle.
CHANGING THE 12V BATTERY
The battery is in the engine compartment.See Maintenance (page 426).
Your vehicle has a maintenance-free battery. It does not require additional water duringservice.
If the vehicle battery has a cover, make sureyou correctly install it after cleaning orreplacing the battery.
For longer, trouble-free operation, keep thetop of the battery clean and dry and thebattery cables tightly fastened to the batteryterminals. If any corrosion is present on thebattery or terminals, remove the cables fromthe terminals and clean with a wire brush. You can neutralize the acid with a solutionof baking soda and water.
We recommend that you disconnect thenegative battery cable terminal from thebattery if you plan to store your vehicle foran extended period.
Note:If you only disconnect the negativebattery cable terminal, make sure it isisolated or placed away from the batteryterminal to avoid unintended connection orarcing.
If you disconnect or replace the battery andyour vehicle has an automatic transmission,it must relearn its adaptive strategy. Becauseof this, the transmission may shift firmly whenfirst driven. This is normal operation whilethe transmission fully updates its operationto optimum shift feel.
Removing the Battery
1.Apply the parking brake and switch theignition off.
2.Switch all electrical equipment off, forexample lights and radio.
3.Wait a minimum of two minutes beforedisconnecting the battery.
Note:The engine management system hasa power hold function and remains poweredfor a period of time after you switch theignition off. This is to allow diagnostic andadaptive tables to be stored. Disconnectingthe battery without waiting can causedamage not covered by the vehicleWarranty.
4.Disconnect and isolate the negativebattery cable terminal.
5.Disconnect and isolate the positivebattery cable terminal.
6.Remove the battery securing clamp.
7.Remove the battery.
If you disconnect or replace the vehiclebattery, you must reset the followingfeatures:
•Window bounce-back. See WindowBounce-Back (page 131).
•Clock Settings.
•Pre-set radio stations.
444
2023 Corsair (CTF) Canada/United States of America, enUSA, Edition date: 202208, DOMMaintenance
Page 449 of 690
Replacing the Battery
Note:Before reconnecting the battery, makesure the ignition remains switched off.
You must replace the battery with one ofexactly the same specification.
To install, reverse the removal procedure.
Note:Make sure that you correctly installthe battery terminal covers, battery coverand battery cable terminals.
CHANGING THE 12V BATTERY - PLUG-IN HYBRID ELECTRIC VEHICLE (PHEV)
The battery is in the luggage compartment.
Your vehicle has a maintenance-free battery.It does not require additional water duringservice.
If the vehicle battery has a cover, make sureyou correctly install it after cleaning orreplacing the battery.
For longer, trouble-free operation, keep thetop of the battery clean and dry and thebattery cables tightly fastened to the batteryterminals. If any corrosion is present on thebattery or terminals, remove the cables fromthe terminals and clean with a wire brush.You can neutralize the acid with a solutionof baking soda and water.
Note:If you only disconnect the negativebattery cable terminal, make sure it isisolated or placed away from the batteryterminal to avoid unintended connection orarcing.
If you disconnect or replace the battery andyour vehicle has an automatic transmission,it must relearn its adaptive strategy. Becauseof this, the transmission may shift firmly whenfirst driven. This is normal operation whilethe transmission fully updates its operationto optimum shift feel.
Removing the Battery
1.Apply the parking brake and switch theignition off.
2.Switch all electrical equipment off, forexample lights and radio.
3.Wait a minimum of two minutes beforedisconnecting the battery.
Note:The engine management system hasa power hold function and remains poweredfor a period of time after you switch theignition off. This is to allow diagnostic andadaptive tables to be stored. Disconnectingthe battery without waiting can causedamage not covered by the vehicleWarranty.
4.Remove the battery securing clamp.
5.Disconnect and isolate the negativebattery cable terminal.
6.Disconnect and isolate the positivebattery cable terminal.
7.Remove the battery.
If you disconnect or replace the vehiclebattery, you must reset the followingfeatures:
•Window bounce-back. See What IsWindow Bounce-Back (page 131).
•Clock Settings.
•Pre-set radio stations.
445
2023 Corsair (CTF) Canada/United States of America, enUSA, Edition date: 202208, DOMMaintenance