2023 LINCOLN CORSAIR boot
[x] Cancel search: bootPage 19 of 690
Fuel Tank Capacity - Excluding: Plug-InHybrid Electric Vehicle (PHEV)............505
Fuel Tank Capacity - Plug-In Hybrid ElectricVehicle (PHEV)........................................506
Air Conditioning System Capacity andSpecification - 2.0L EcoBoost™............507
Air Conditioning System Capacity andSpecification - 2.5L, Plug-In HybridElectric Vehicle (PHEV).........................509
Washer Fluid Specification........................510
Brake Fluid Specification............................511
Vehicle Identification
Vehicle Identification Number..................513
Connected Vehicle
What Is a Connected Vehicle....................514
Connected Vehicle Requirements...........514
Connected Vehicle Limitations.................514
Connecting the Vehicle to a MobileNetwork......................................................514
Connecting the Vehicle to a Wi-Fi Network.......................................................................514
Connected Vehicle – Troubleshooting.......................................................................515
Connected Vehicle Videos........................518
Vehicle Wi-Fi Hotspot
Creating a Vehicle Wi-Fi Hotspot.............519
Changing the Vehicle Wi-Fi Hotspot Nameor Password..............................................519
Vehicle Wi-Fi Hotspot – Troubleshooting......................................................................520
Audio System
Audio System Precautions........................521
Switching the Audio Unit On and Off......521
Selecting the Audio Source......................521
Playing or Pausing the Audio Source......521
Adjusting the Volume..................................521
Switching Shuffle Mode On and Off......522
Switching Repeat Mode On and Off......522
Setting a Memory Preset..........................522
Muting the Audio........................................522
Adjusting the Sound Settings..................522
Setting the Clock and Date......................523
AM/FM Radio................................................523
Switching the Display On and Off..........524
Digital Radio.................................................524
Satellite Radio..............................................525
Audio System – Troubleshooting...........528
Audio System Videos..................................531
Center Display Overview
Center Display Precautions......................532
Center Display Limitations........................532
Status Bar......................................................532
Home Screen...............................................533
Information On Demand Screen.............533
Rebooting the Center Display.................533
Center Display Overview Videos............533
Voice Interaction
Lincoln Personal Assistant........................534
Alexa Built-In
What is Alexa Built-In.................................536
Alexa Built-In Requirements.....................536
Signing Into Your Account........................536
Using Alexa Built-In....................................536
Alexa Built-In Settings................................536
15
2023 Corsair (CTF) Canada/United States of America, enUSA, Edition date: 202208, DOMTable of Contents
Page 247 of 690
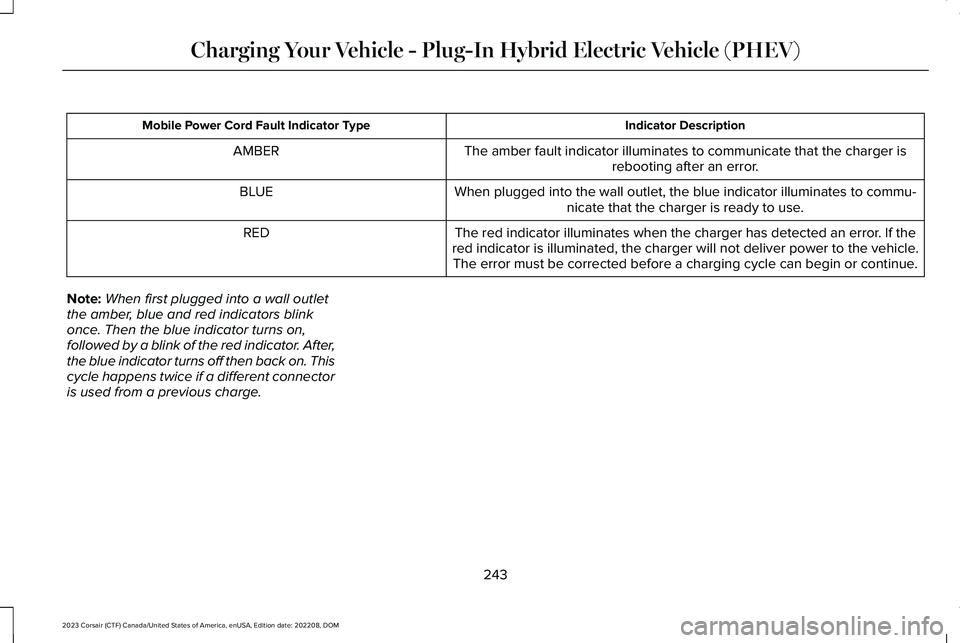
Indicator DescriptionMobile Power Cord Fault Indicator Type
The amber fault indicator illuminates to communicate that the charger isrebooting after an error.AMBER
When plugged into the wall outlet, the blue indicator illuminates to commu-nicate that the charger is ready to use.BLUE
The red indicator illuminates when the charger has detected an error. If thered indicator is illuminated, the charger will not deliver power to the vehicle.The error must be corrected before a charging cycle can begin or continue.
RED
Note:When first plugged into a wall outletthe amber, blue and red indicators blinkonce. Then the blue indicator turns on,followed by a blink of the red indicator. After,the blue indicator turns off then back on. Thiscycle happens twice if a different connectoris used from a previous charge.
243
2023 Corsair (CTF) Canada/United States of America, enUSA, Edition date: 202208, DOMCharging Your Vehicle - Plug-In Hybrid Electric Vehicle (PHEV)
Page 248 of 690
ACTIONMODEREDBLUEAMBER
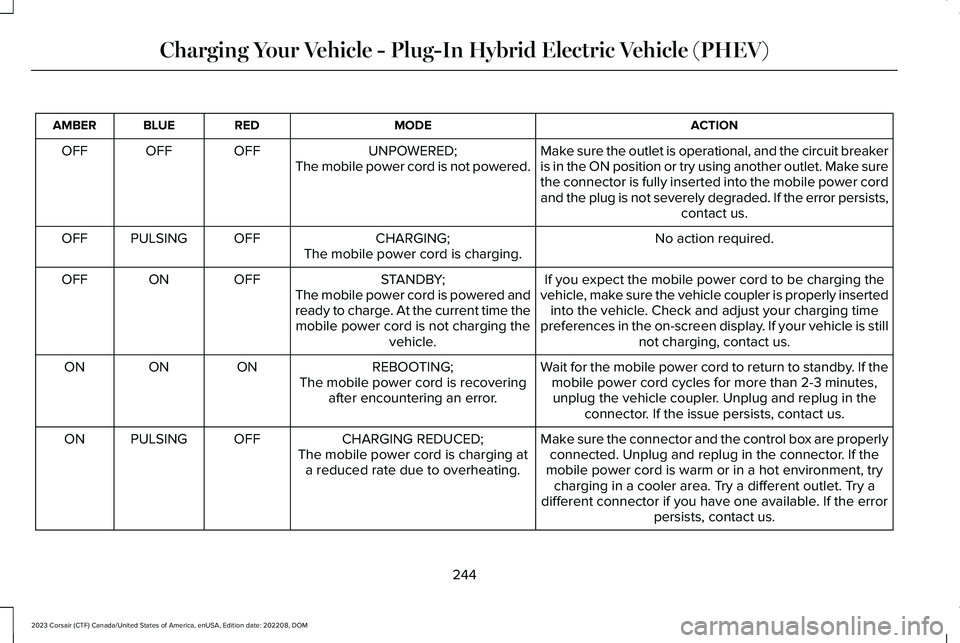
Make sure the outlet is operational, and the circuit breakeris in the ON position or try using another outlet. Make surethe connector is fully inserted into the mobile power cordand the plug is not severely degraded. If the error persists,contact us.
UNPOWERED;The mobile power cord is not powered.OFFOFFOFF
No action required.CHARGING;OFFPULSINGOFFThe mobile power cord is charging.
If you expect the mobile power cord to be charging thevehicle, make sure the vehicle coupler is properly insertedinto the vehicle. Check and adjust your charging timepreferences in the on-screen display. If your vehicle is stillnot charging, contact us.
STANDBY;The mobile power cord is powered andready to charge. At the current time themobile power cord is not charging thevehicle.
OFFONOFF
Wait for the mobile power cord to return to standby. If themobile power cord cycles for more than 2-3 minutes,unplug the vehicle coupler. Unplug and replug in theconnector. If the issue persists, contact us.
REBOOTING;The mobile power cord is recoveringafter encountering an error.
ONONON
Make sure the connector and the control box are properlyconnected. Unplug and replug in the connector. If themobile power cord is warm or in a hot environment, trycharging in a cooler area. Try a different outlet. Try adifferent connector if you have one available. If the errorpersists, contact us.
CHARGING REDUCED;The mobile power cord is charging ata reduced rate due to overheating.
OFFPULSINGON
244
2023 Corsair (CTF) Canada/United States of America, enUSA, Edition date: 202208, DOMCharging Your Vehicle - Plug-In Hybrid Electric Vehicle (PHEV)
Page 407 of 690
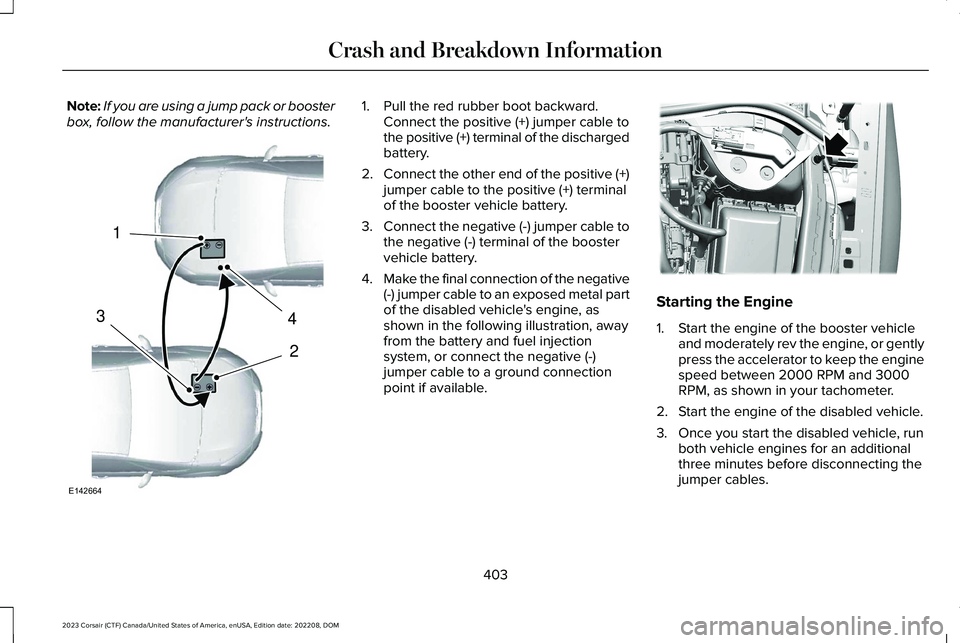
Note:If you are using a jump pack or boosterbox, follow the manufacturer's instructions.1.Pull the red rubber boot backward.Connect the positive (+) jumper cable tothe positive (+) terminal of the dischargedbattery.
2.Connect the other end of the positive (+)jumper cable to the positive (+) terminalof the booster vehicle battery.
3.Connect the negative (-) jumper cable tothe negative (-) terminal of the boostervehicle battery.
4.Make the final connection of the negative(-) jumper cable to an exposed metal partof the disabled vehicle's engine, asshown in the following illustration, awayfrom the battery and fuel injectionsystem, or connect the negative (-)jumper cable to a ground connectionpoint if available.
Starting the Engine
1.Start the engine of the booster vehicleand moderately rev the engine, or gentlypress the accelerator to keep the enginespeed between 2000 RPM and 3000RPM, as shown in your tachometer.
2.Start the engine of the disabled vehicle.
3.Once you start the disabled vehicle, runboth vehicle engines for an additionalthree minutes before disconnecting thejumper cables.
403
2023 Corsair (CTF) Canada/United States of America, enUSA, Edition date: 202208, DOMCrash and Breakdown Information4213E142664 E379441
Page 408 of 690
Removing the Jumper Cables
Remove the jumper cables in the reverseorder that they were connected.
Note:Do not switch the headlamps on whendisconnecting the cables. The peak voltagecould blow the bulbs.
JUMP STARTING THE VEHICLE -GASOLINE
Connecting the Jumper Cables
WARNING: Do not connect thenegative jumper cable to any other part ofyour vehicle. Use the ground point.
Note:If you are using a jump pack or boosterbox, follow the manufacturer's instructions.
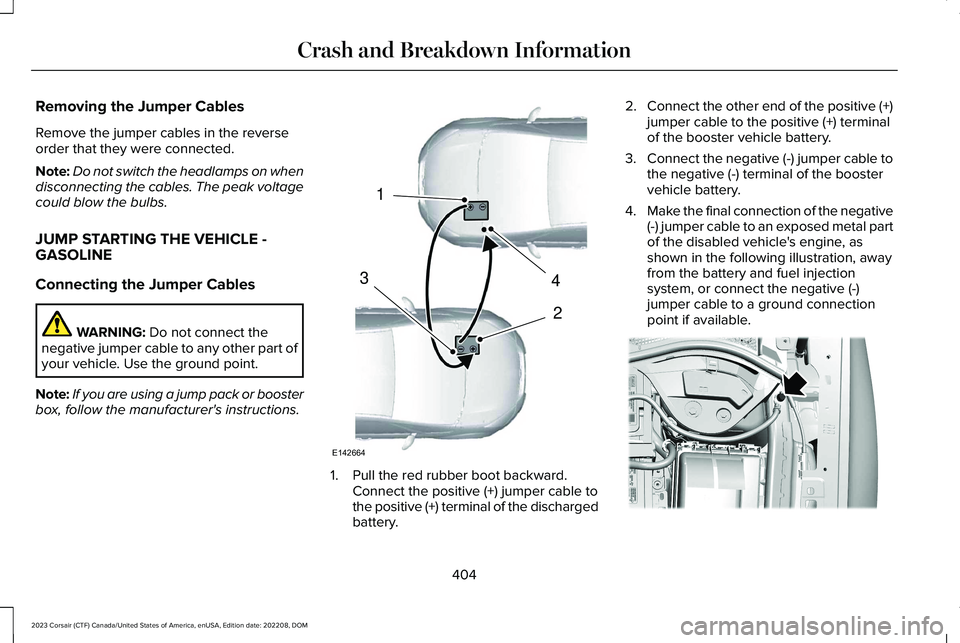
1.Pull the red rubber boot backward.Connect the positive (+) jumper cable tothe positive (+) terminal of the dischargedbattery.
2.Connect the other end of the positive (+)jumper cable to the positive (+) terminalof the booster vehicle battery.
3.Connect the negative (-) jumper cable tothe negative (-) terminal of the boostervehicle battery.
4.Make the final connection of the negative(-) jumper cable to an exposed metal partof the disabled vehicle's engine, asshown in the following illustration, awayfrom the battery and fuel injectionsystem, or connect the negative (-)jumper cable to a ground connectionpoint if available.
404
2023 Corsair (CTF) Canada/United States of America, enUSA, Edition date: 202208, DOMCrash and Breakdown Information4213E142664 E379440
Page 440 of 690
1.Loosen the clamp. See MaintenanceVideos (page 450).
2.Disconnect the connector.
3.Release the two clips securing the airboxcover to the housing.
4.Lift up on the airbox cover.
5.Remove the air filter element from thehousing.
6.Wipe any dirt or debris from the housing.
Note:Do not allow dirt or debris to enter theair filter housing and make sure you have agood seal.
7.Install the new air filter element.
Note:Be careful not to crimp the air filterelement edges between the housing andcover. This can cause filter damage andallow unfiltered air to enter the engine if notproperly seated.
8.Install the airbox cover back into thehousing. Make sure that all four coverfingers are seated in their correspondinghousing windows. Press down with yourright hand on the flexible tube, whilepulling back on the housing bracket withyour left hand.
9.Reverse Steps 3, 2 and 1. Make sure theclamp joint is fully seated.
CHANGING THE ENGINE AIR FILTER -PLUG-IN HYBRID ELECTRIC VEHICLE(PHEV)
WARNING: To reduce the risk ofvehicle damage and personal burn injuries,do not start your engine with the aircleaner removed and do not remove itwhile the engine is running.
When changing the air filter element, useonly parts that meet or exceed ourspecifications.
Change the air filter element at the properinterval. See Maintenance (page 426).
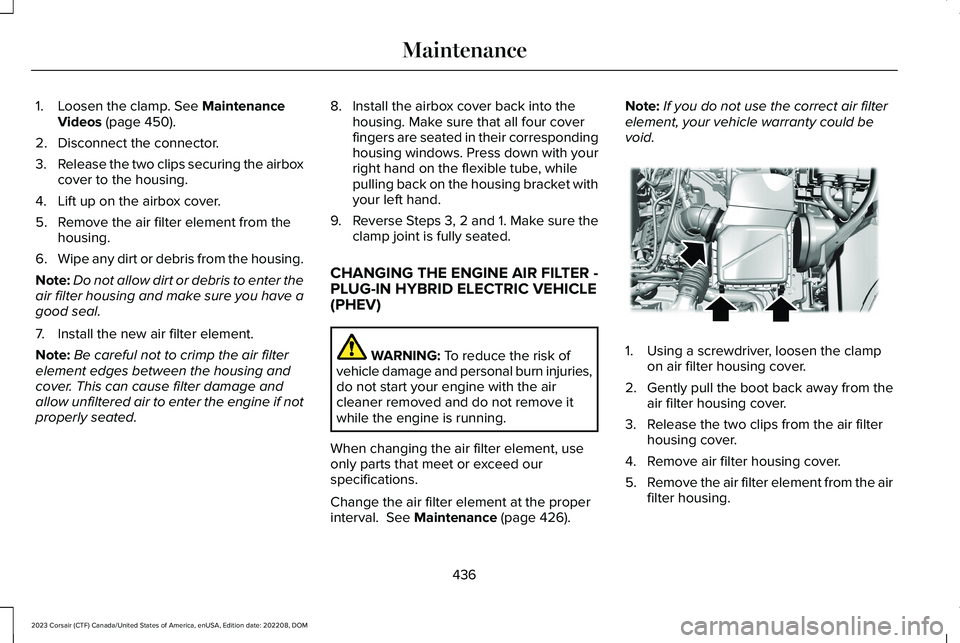
Note:If you do not use the correct air filterelement, your vehicle warranty could bevoid.
1.Using a screwdriver, loosen the clampon air filter housing cover.
2.Gently pull the boot back away from theair filter housing cover.
3.Release the two clips from the air filterhousing cover.
4.Remove air filter housing cover.
5.Remove the air filter element from the airfilter housing.
436
2023 Corsair (CTF) Canada/United States of America, enUSA, Edition date: 202208, DOMMaintenanceE299071
Page 441 of 690
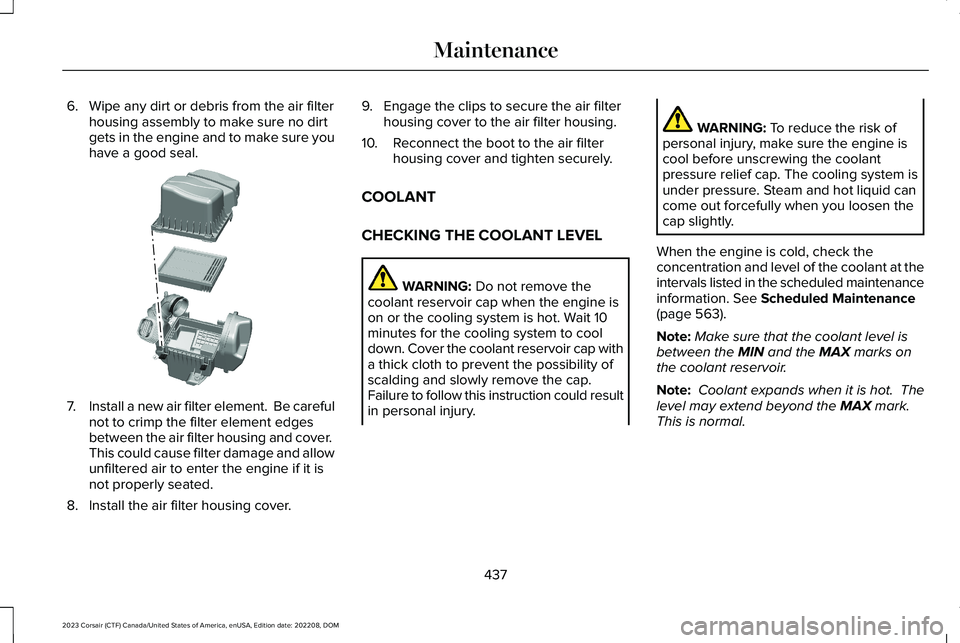
6.Wipe any dirt or debris from the air filterhousing assembly to make sure no dirtgets in the engine and to make sure youhave a good seal.
7.Install a new air filter element. Be carefulnot to crimp the filter element edgesbetween the air filter housing and cover. This could cause filter damage and allowunfiltered air to enter the engine if it isnot properly seated.
8.Install the air filter housing cover.
9.Engage the clips to secure the air filterhousing cover to the air filter housing.
10.Reconnect the boot to the air filterhousing cover and tighten securely.
COOLANT
CHECKING THE COOLANT LEVEL
WARNING: Do not remove thecoolant reservoir cap when the engine ison or the cooling system is hot. Wait 10minutes for the cooling system to cooldown. Cover the coolant reservoir cap witha thick cloth to prevent the possibility ofscalding and slowly remove the cap.Failure to follow this instruction could resultin personal injury.
WARNING: To reduce the risk ofpersonal injury, make sure the engine iscool before unscrewing the coolantpressure relief cap. The cooling system isunder pressure. Steam and hot liquid cancome out forcefully when you loosen thecap slightly.
When the engine is cold, check theconcentration and level of the coolant at theintervals listed in the scheduled maintenanceinformation. See Scheduled Maintenance(page 563).
Note:Make sure that the coolant level isbetween the MIN and the MAX marks onthe coolant reservoir.
Note: Coolant expands when it is hot. Thelevel may extend beyond the MAX mark. This is normal.
437
2023 Corsair (CTF) Canada/United States of America, enUSA, Edition date: 202208, DOMMaintenanceE299074
Page 537 of 690
Vehicle data sharing on.
Vehicle data sharing off.
Vehicle location sharing on.
Vehicle data and vehicle locationsharing on.
Vehicle Software Update
See Software Update Indicators (page 555).
Wireless Accessory Charger
Wireless accessory charger active.
HOME SCREEN
Features, such as navigation, audio andphone, are located in the main portion of thedisplay. The icons located on the side of thedisplay allow you to access other vehiclefeatures and settings.
Press to adjust system settings.
Press to view features.
Note:The icon may be different dependingon your vehicle.
Press to search for and usecompatible apps on your iOS orAndroid device.
INFORMATION ON DEMAND
SCREEN
The information on demand screen displayscards on the side of the display and allowsyou to see information from differentfeatures.
You can swipe up or down to view a differentcard.
You can swipe toward the main screen tomove the content into the main screen.
Note:This can only be done with someinformation on demand screens.
REBOOTING THE CENTER DISPLAY
You can reboot the center display using thecontrols on the steering wheel.
1.Simultaneously press and hold the seekforward and audio system power buttonfor 10 seconds.
CENTER DISPLAY OVERVIEW
VIDEOS
Lincoln SYNC 4 Basics Video Link
533
2023 Corsair (CTF) Canada/United States of America, enUSA, Edition date: 202208, DOMCenter Display Overview E335292 E353214 E280315 E335299 E353220