Page 49 of 78

47 *IF EQUIPPEDALWAYS CHECK THE OWNER ’S MANUAL FOR COMPLETE OPER ATING INFORMATION AND SAFET Y WARNINGS
INFOTAINMENT SYSTEMS
INFOTAINMENT SYSTEMS
Kia Access App Download
Go to an app marketplace to download the new Kia Access App Once you download, make sure you register your vehicle and set up an account (refer to Kia Connect Activation, page 36) Get to know your new Kia and the available convenient features on the app
The Kia Access App Features Guide is a helping you utilize the app to its full potential by detailing each feature and how to adjust various settings Below are some of the topics included:
•Remote Commands
•Set Climate
•Schedule Climate
•Schedule Charge
•Schedule Service
•Dealer Settings
•Manage Vehicles and Profiles
Kia Access App Features Guide
2020 SOULMILEAGE722 mi.
355 miEst. RangeDOOR LOCKSREMOTE STARTFind My Car
Kia Access App Screen for illustrative purposes only Actual App screen and functionalit y may var y
For fur ther Kia Connect operations, refer to the Car Infotainment System Quick Reference Guide
Kia Connect is currently unavailable for model year 2022 and later vehicles sold or purchased in Massachuset ts See Kia Connect Terms of Ser vice at owners kia com for more information on its availabilit y
•The smar tphone and vehicle need to be connected to a cellular net work with a good wireless signal strength in order to use Kia Connect If these conditions are not met, voice commands may fail or take a long time to execute
•To use Remote Star t or Remote Star t with Climate Control feature, all doors, hood and trunk/liftgate must be closed and locked
•Activate Remote Star t or Remote Star t with Climate Control feature at least 10 minutes before get ting into the vehicle, which will allow vehicle interior to reach a desired temperature If the driver does not enter the vehicle within the 10 minutes, the Remote Star t will turn off the engine
•The quickest way to obtain accurate vehicle status through the app is by pressing the refresh but ton on the app or refreshing the web page when using the customer web por tal
•In order to preser ve the vehicle bat ter y, Kia Connect will not turn on seven days after the last ignition was on You will need to restar t the vehicle with a key fob in order to use Kia Connect again
QUICK TIPS
Kia Access App Features Guide. Click this dynamic QR code to access the guide Some phone’s operating systems may need to be updated to scan dynamic QR codes
Download the Kia Access App by clicking this dynamic QR code Some phone’s operating systems may need to be updated to scan dynamic QR codes
QR CODES
Page 50 of 78

48†LEGAL DISCL AIMERS ON BACK INSIDE COVER | *IF EQUIPPED
INFOTAINMENT SYSTEMS
SPORTAGE HYBRID / PLUG-IN HYBRID FEATURES & FUNCTIONS GUIDE
INFOTAINMENT SYSTEMSYour vehicle’s audio system may differ from that in the illustration For more information, refer to the Car Infotainment System Quick Reference Guide For fur ther audio system operation, refer to pages 41-47
Kia Connect is currently unavailable for model year 2022 and later vehicles sold or purchased in Massachuset ts See Kia Connect Terms of Ser vice at owners kia com for more information on its availabilit y
Driving while distracted can result in a loss of vehicle control that may lead to an accident, severe personal injur y and death The driver ’s primar y responsibilit y is in the safe and legal operation of a vehicle, any handheld devices, other equipment or vehicle systems which take the driver ’s eyes, at tention and focus away from the safe operation of a vehicle or that are not permissible by law should never be used during operation of the vehicle
Kia Connect†1 with Smart Navigation*†8 — FM/AM/SiriusXM®†1 6/Media (USB, Bluetooth® Audio)
Infotainment System / Climate Control mode switching button A - Press to toggle bet ween Infotainment System and Climate Control Modes Press and hold the Climate Control but ton to set the default but ton display modeTo adjust the sound settings (Premium Sound, Position, Tone, Guidence, Road Noise, Driver Assistance) from any audio mode:1
Press the SETUP key on the audio control unit or the onscreen SETUP but ton 2
Select the onscreen SOUND but ton Select the menu item to change settings3
Use the onscreen but tons to adjust set tingsRadio Presets: To save a preset, press the star but ton H�����5�I�J�T���T�B�W�F�T���U�I�F���D�V�S�S�F�O�U���T�U�B�U�J�P�O���J�O���U�I�F���T�F�M�F�D�U�F�E���T�M�P�U
SiriusXM™ Smart Favorites: In Radio mode, choose SiriusXM™, then select any of the first ten favorites, and during song or program play, tap the Skip Backward icon to star t from the beginning of the song or program Tap the Play Live icon to return to the live broadcast Custom Key H – To program the Custom Key to one of the available features, press and hold the SETUP but ton, then press the Custom Key H�����4�F�M�F�D�U���P�O�F���P�G���U�I�F���B�W�B�J�M�B�C�M�F���G�F�B�U�V�S�F�T���Z�P�V���X�P�V�M�E���M�J�L�F���U�I�F���$�V�T�U�P�N���,�F�Z���U�P���P�Q�F�O��Map/software updates - To keep your map and soft ware up to date, Kia provides over-the-air updates, free of charge You can also visit the of ficial Kia update webpage at ht tps://update kia com Note, visiting a dealer for soft ware update may include an additional charge
Press briefly to do the following:•
FM/AM mode: Play the previous/next frequency• SiriusXM™ mode: Change the channel• MEDIA mode: Change the track, file or titlePress and hold to the do the following (over 0 8 seconds):•
FM/AM mode: Move quickly through all of the frequencies When released, the system seeks the next available frequency• MEDIA mode: Rewinds or fast for wards the track or file (except for Bluetooth® Audio)Press to Power ON/OFF Rotate to adjust VolumePress to select FM/AM/SiriusXM® modesPress to select Media modesPress to display Setup/Set tings modePress to go to Custom (Set) Menu
Press to select navigation modePress to display the MAP screen for the current position mode
In Radio/SiriusXM®/Media modes, rotate knob to search for stations/channels/tracks/songs/files Press the knob to receive the selected channel/track/song/fileMAP N AV SEEKTRACK RADIOMEDIASETUPPWRVOL
TUNEFILEAUTOCLIMATE
�3�F�G�F�S���U�P���U�I�F���J�O�T�J�E�F���G�S�P�O�U���D�P�W�F�S���G�P�S�����N�P�S�F���J�O�G�P�S�N�B�U�J�P�O���P�O���2�3���D�P�E�F�T
���X�X�X���Z�P�V�U�V�C�F ���D�P�N���,�J�B�'�F�B�U�V�S�F�7�J�E�F�P�T
Kia Connect with Smart Navigation Videos
Navigation System Updates Video
QR CODE
•The system can register or pair multiple Bluetooth® devices
•Volume level bet ween different audio modes:
-When switching bet ween audio modes (AM, FM, Bluetooth® Audio, etc ), the audio system saves the previous volume level you were listening to For example, if you were listening to FM radio at volume level 20 then switched to Bluetooth® Audio and adjusted the volume level to 30, the volume level will be at 20 when you switch back to FM radio
-When using Bluetooth® Audio, the overall volume is dependent on your device’s volume If the volume is turned down low on your device it will remain low even if the system volume is turned up
•Prolonged use of the audio system in ACC mode of the Engine Star t/Stop but ton may drain the vehicle’s battery
•A warning screen may appear periodically to remind users that the navigation system should be operated when the engine is running to prevent bat ter y discharge
QUICK TIPS
A
Page 51 of 78

CENTER PANEL
CENTERPANEL
Power Outlets A: Use")
49*IF EQUIPPEDALWAYS CHECK THE OWNER ’S MANUAL FOR COMPLETE OPER ATING INFORMATION AND SAFET Y WARNINGS
(Por ts on panel in front of gear shift knob)
CENTER PANEL
CENTERPANEL
Power Outlets A: Use the power outlets for mobile phones and other devices designed to operate on a 12V (180W max)
power outlet
Multimedia USB Port B: Use Multimedia USB port to connect USB audio devices and smartphones
USB-C Charger Port C: Devices can be recharged using a USB-C cable The Engine Start/Stop button needs to in the
ACC/ON/START position to operate the USB-C Charger Port
Digital Clock
Press the SETUP key on the audio head unit, then select General Press the onscreen Date/Time button
to enter the clock settings Then use the onscreen buttons to navigate through setup and return to exit
Multimedia USB Port, Power Outlets & USB Charger Port
For more information on the Aux/USB Por ts and Power Outlets, refer to section 5 in the Owner's Manual
For more information, refer to the Car Infotainment System Quick Reference Guide
REMINDERS:
•
Using the power outlets and the USB por ts for prolonged periods of time with the Engine Star t/Stop but ton in the ACC position (Engine OFF) could cause the bat ter y to discharge
•
Kia recommends that you only use USB cables made by your device’s manufacturer Third-par t y USB cables may cause damage to your device
•When needed, Daylight Savings must be enabled in the Clock Set tings screen
•To access manual date and time set ting, turn GPS time OFF in the Clock Set tings (Kia Connect with Smar t Navigation*)
QUICK TIPS
•The power outlets are inactive when ignition is in the OFF position
•The Multimedia USB data por t is located next to the Power Outlets The USB Charger Por t does not suppor t data transfer
•The Multimedia USB Por t in the center panel charges slower than the USB Charger Por ts throughout the vehicle
QUICK TIPS
12V180WUSB
ABCRefer to the inside front cover for more information on QR codes www youtube com/KiaFeatureVideos
Multimedia USB Port, Power Outlets & USB Charger Port Video
QR CODE
Page 52 of 78

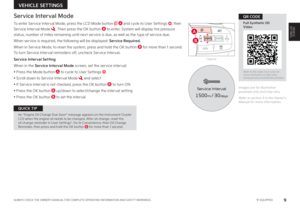
Charge a Qi Certifed smartphone wirelessly by placing it on the charging
pad A at the front of the console, near the Multimedia USB ports and the
charging indicator, while the ignition is on
1
Enable Wireless Charging in the User Settings* in the Instrument
Cluster LCD or the Vehicle Settings* in the infotainment system, select
Convenience then Wireless Charging System
2 All doors must be closed
3 Place a compatible smartphone on the center of the charging pad
4 Indicator light B may change to amber once wireless charging begins
5 Once charging is complete, the amber light may change to green
Wireless Smartphone Charging System*
50 *IF EQUIPPED
CENTER PANEL
SPORTAGE HYBRID / PLUG-IN HYBRID FEATURES & FUNCTIONS GUIDE
CENTERPANEL
(Wireless tray in front of gear shift knob)
Refer to the inside front cover for more information on QR codes www youtube com/KiaFeatureVideos
Wireless Smartphone Charging Video
QR CODE
REMINDERS:
•
T h e s m a r t p h o n e m u s t b e a c o m p a t i b l e p h o n e w i t h Q I f u n c t i o n av a i l a b l e; S o m e s m a r t p h o n e m o d e l s a r e n o t Q I c e r t i fi e d , w h i c h m ay e f f e c t t h e s p e e d o r p e r f o r m a n c e o f t h e w i r e l e s s c h a r g i n g
•
Avoid placing other metal items in the bin while charging as to not impede the charging area
•
This vehicle is equipped with wireless charging technology which allows for a device to be charged using inductive charging; however, device compatibilit y varies
•
Inductive charging systems are less ef ficient than conventional charging through cable As a result, higher device operating temperatures may be experienced during use
• Charging Performance: Your device’s position on the wireless charging system can affect charging per formance Other factors that may affect the charging rate include foreign objects, such as coins or pens, and phone case thickness
•If driver door is opened, charging will be disabled
•
The indicator light of some manufacturer ’s smar t phones may still be orange after the smar t phone is fully charged This is due to the par ticular characteristic of the smar tphone and not a malfunction of the wireless charging
•Do not place smar t key on the wireless charging pad It may cause smar t key bat ter y discharge
•For wireless charging to occur, all doors (excluding rear hatch) must be closed and the Smar t Key Fob must be detected inside the vehicle
•For best results, place smar t-phone on the center of the charging pad
•If wireless charging does not work, move smar tphone around the pad until the charging indicator turns amber
•Avoid placing other metal items in the bin while charging as to not impede the charging area
QUICK TIPS
12V180WUSB
A
B
Refer to section 5 in the Owner ’s Manual for more information
Page 53 of 78

51†LEGAL DISCL AIMERS ON BACK INSIDE COVER | *IF EQUIPPEDALWAYS CHECK THE OWNER ’S MANUAL FOR COMPLETE OPER ATING INFORMATION AND SAFET Y WARNINGS
CENTER PANEL
CENTERPANEL
Rotary Dial Shifter†2
P: Park - Press to place in Park
R: Reverse
N: Neutral
D: Drive
Refer to section 6 in the Owner ’s Manual for more information
Refer to the inside front cover for more information on QR codes www youtube com/KiaFeatureVideos
Rotary Dial ShifterVideo
QR CODE
REMINDERS:
•
When in P (Park), if the brake pedal is not pressed while shifting, the transmission does not shift
•
If going through a car wash, remind the at tendant to keep the vehicle in Neutral (N) and keep the engine running Also, disable the power liftgate lid control, turn off the auto rain sensing wipers and fold in the mirrors
•Press brake pedal and depress release but ton to move gear shift from N to P, N to R or from P to any gear
•Manual mode downshifts are made automatically when the vehicle slows down When the vehicle stops, 1st gear is automatically selected
QUICK TIPS
P
(Steering Wheel)
(Center Console)
Paddle Shifters*
Paddle Shifters are operable when the shift lever is in the Drive (D) position
Paddle Shifting: Pull the [+] or [-] paddle shifter A once to shift up or down one gear
[+]: Manual Mode Upshift
[–] : Manual Mode Downshift
To change back to automatic shift mode, pull and hold the [+] paddle shifter for at least one second
Automatic shift mode also activates when gently pressing the accelerator for more than approximately six seconds, or when the vehicle speed is slower than 2mph
AA
For illustrative purposes only Your actual steering wheel and/or paddle shifters may var y
Page 54 of 78

52 *IF EQUIPPED
CENTER PANEL
SPORTAGE HYBRID / PLUG-IN HYBRID FEATURES & FUNCTIONS GUIDE
CENTERPANEL
Driver’s temperature control knobPassenger ’s temperature control knob
Automatic Climate Control but ton
Front windshield defroster but tonMode selection but tonAir conditioning but ton*
SYNC but tonRear window defroster but tonInfotainment/climate control mode switching but ton
Air intake control but ton
Fan speed control but tons
375°F76°FAUTOPWRAUTOCLIMATEA/CSYNCMEDIUMYour Automatic Climate Control system may differ from the illustration
(Type B shown; panel located above center console)
Automatic Climate Control*
Infotainment System / Climate Control mode switching button A - Press to toggle between Infotainment System and Climate Control Modes Press and hold to set the default mode
Climate Control Auto Function
1 Press AUTO to select Full Auto Operation - The Auto setting automatically controls the air flow modes, fan speeds, air intake and air conditioning according to the temperature setting selected and the ambient condition
2 Set desired Temperature
3
Press SYNC to sync the left and right temperature control
Defrost Outside Windshield:
1
Set Temperature to Hot
2
Press the Front Defrost button Defog Inside Windshield:
1
Set Fan Speed to highest position
2
Set Temperature to highest position
3
Press the Front Defrost button Air Flow Modes
To select Air Flow Modes, press the mode selection button to cycle to the desired mode:
Auto Defogging System (ADS):
Auto defogging is designed to reduce the fogging up of the inside of the windshield by automatically sensing the moisture of the inside of the windshield The system will automatically change to
defrost mode when needed
Auto Defogging is set ON by default and will operate when the Climate Control system is ON To cancel Auto Defogging, press the Front Defrost button for three seconds, when the ignition is in on (ADS OFF icon will illuminate) To turn Auto Defogging on again, press the Front Defrost button for three seconds
Face-Level
Bi-Level
Floor-Level
Floor/Defrost-Level
Refer to the inside front cover for more information on QR codes www youtube com/KiaFeatureVideos
Automatic Climate Control: Touch-Sensitive Control Panel Video
Auto Defogging System (ADS) Video
QR CODE
REMINDERS:
•
Continuous use of the climate control system in the recirculated air position may allow humidit y to increase inside the vehicle which may fog the glass and obscure visibilit y
•
When in AUTO mode, Air Flow mode and Fan Speed do not display on the Climate Control Display
•
Cold or warm ambient air may flow in through vents if Recirculated Air but ton is not pressed ON (LED lit)
•
Pressing any but ton during AUTO operation will deactivate the AUTO function and switch to manual mode, except for Temperature Control or SYNC Temperature Control
•Defrost mode activates A /C and opens Fresh Air vent to help dehumidify the air and improve Defroster per formance
•During Auto Operation, the A /C indicator may NOT illuminate The fan speed, air intake, air flow and air conditioning may automatically be engaged at any time to reach desired temperature and reduce humidity
•Keep inside glass as clean as possible to reduce window fogging
QUICK TIPS
Refer to section 5 in the Owner ’s Manual for more information
A
Page 55 of 78

Manual Climate Control*
Defro")
53 *IF EQUIPPEDALWAYS CHECK THE OWNER ’S MANUAL FOR COMPLETE OPER ATING INFORMATION AND SAFET Y WARNINGS
CENTER PANEL
CENTERPANEL
(Panel located above center console)
Manual Climate Control*
Defrost Outside Windshield:
1 Set Fan Speed to the highest position
2 Set Temperature to Hot
3 Press the Front Defrost button
Defog Inside Windshield:
1 Set Fan Speed to desired position
2 Set Temperature to desired position
3 Press the Front Defrost button
Air Flow Modes
To select Air Flow modes, press the Mode
selection buttons:
Face-Level
Bi-Level
Floor-Level
Floor/Defrost-Level
REMINDERS:
•
Continuous use of the climate control system in the recirculated air position may allow humidit y to increase inside the vehicle which may fog the glass and obscure visibilit y
•Warm air may flow in through vents if Recirculated Air but ton is not pressed ON (LED lit)
Your Manual Climate Control system may differ from those in the illustrations See section 5 in the Owner ’s Manual for more details
•Set the mode to the desired position To defrost mode activates A /C and opens Fresh Air vent to help dehumidify the air and improve Defroster per formance
•MA X A /C mode automatically engages Recirculated Air
•Keep inside glass as clean as possible to reduce window fogging
QUICK TIPS
0+MAXA/CFan speed control knob
Front windshield defroster buttonAir conditioning ON/OFF but ton*
Recirculated/fresh air but ton
Rear window defroster but ton
Temperature control knob PUSH for Max A /C
Air flow mode but tons
Page 56 of 78
 system utilizes an electric motor to engage the parking brake
A")
54*IF EQUIPPED
CENTER PANEL
SPORTAGE HYBRID / PLUG-IN HYBRID FEATURES & FUNCTIONS GUIDE
CENTERPANEL
The Electronic Parking Brake (EPB) system utilizes an electric motor to engage the parking brake
Applying the Parking Brake
Depress the brake pedal and pull up the EPB switch A Ensure that the indicator light is illuminated on the instrument cluster
If parked on a steep incline/decline, pull up the EPB switch for more than 3 seconds for a firmer EPB application
Releasing the Parking Brake
The EPB will automatically release when the brake pedal is engaged and shifter is shifted out of P (Park) to R (Reverse)
or shifted out of N (Neutral) to Reverse or D (Drive) To release EPB manually, depress the brake pedal, then press the EPB switch A, with the ignition switch in the ON position Ensure that the indicator light is OFF
Auto Hold*
Auto Hold temporarily maintains the vehicle at a standstill even though the brake pedal is not depressed after the driver brings the vehicle to a complete stop by depressing the brake pedal Auto Hold can be turned On/Off using the AUTO HOLD button B on the center panel below the gear shift Before Auto Hold will operate, the driver ’s door, engine hood, and liftgate (trunk) must be closed
The AUTO HOLD indicator on the Instrument Cluster has four states:
White: Standby - With vehicle at a standstill and AUTO HOLD button B pressed ON, the indicator will illuminate white While driving the vehicle (vehicle is not at a standstill), the Auto Hold indicator will remain white
Green: Engaged - When coming to a complete stop by depressing the brake pedal, the Auto Hold indicator changes from white to green
Off (not illuminated) - The indicator will turn off when the AUTO HOLD button B is manually pressed off
Yellow: Malfunction - When the indicator is illuminated yellow, there may be a system malfunction Take your vehicle to a local Kia dealer
Electronic Parking Brake (EPB)*
Refer to the inside front cover for more information on QR codes www youtube com/KiaFeatureVideos
Electric Parking Brake (EPB) / Auto Hold Video
QR CODE
REMINDERS:
•
To reduce the risk of an accident, do not activate Auto Hold while driving downhill, backing up or parking your vehicle
•
Do not solely rely on the Auto Hold system to keep the vehicle stopped Always pay at tention to traf fic and road conditions, and be prepared to depress the brakes
REMINDERS:
•
As a bulb check, the EPB malfunction indicator will illuminate for approximately 3 seconds when the ignition switch is turned ON
•
If the warning light does not illuminate temporarily, or continues to remain lit, take your vehicle to an authorized Kia dealer and have the system checked
•The EPB should not be operated while the vehicle is moving
•
A click or electric brake motor sound may be heard while operating or releasing the EPB, but these conditions are normal and indicate that the EPB is functioning properly
Refer to section 5 in the Owner ’s Manual for more information
•When leaving your keys with parking lot at tendants or valet, make sure to inform them how to operate the EPB
•Pull up and hold EPB switch a second time to increase brake pressure if parked on a decline or incline
QUICK TIPS
Refer to page 5 for location of Instrument Cluster indicators
Refer to section 6 in the Owner ’s Manual for more information
AUTO
HOLDOFF
DRIVE MODE
B
HOLD
HOLD�"
(Center Console)(Driver ’s Panel)