Page 9 of 78

7 *IF EQUIPPEDALWAYS CHECK THE OWNER ’S MANUAL FOR COMPLETE OPER ATING INFORMATION AND SAFET Y WARNINGS
VEHICLE SETTINGS
VEHICLESETTINGSThe Trip Computer is a driver information system that
displays information related to driving The ignition
switch or the Engine Start/Stop button must be in the
ON position for the information to display
To cycle through the different LCD Instrument Cluster
modes, press the LCD Mode button A
When in Trip Computer mode , press the OK
button B up/down to cycle through the screens C
When displaying trip information or the fuel economy screens,
press and hold the OK button B to reset the Trip distance to zero
REMINDERS:
•
Appearance of Trip Computer display may differ, as equipped
•
All stored driving information (except Odometer and Range) is reset if the bat ter y is disconnected
Trip Modes / Trip Computer LCD Instrument Cluster Modes
Press the LCD Mode button A to cycle through different LCD Instrument Cluster Modes:
Your vehicle’s steering wheel but tons may differ from those in the illustrations
Refer to section 4 in the Owner ’s Manual for more information
Driving while distracted is dangerous and should be avoided Drivers should remain at tentive to driving and always exercise caution when using the steering-wheel-mounted controls while driving
Refer to section 5 in the Owner ’s Manual for more information
Refer to section 5 in the Owner ’s Manual for more information
Average/Instant Fuel Economy
This information is always displayed at the bottom center of the Instrument Cluster LCD The average fuel economy is calculated by the total driving distance and fuel consumption, since the last reset Instant fuel economy displays the fuel economy during the last few seconds, when the vehicle speed is faster than approximately 6 mph
REMINDER: If the vehicle speed exceeds 6 2 mph after being refueled with more than 1 6 gallons, the average fuel economy will be reset to zero (----)
DRIVE INFO:• Tripmeter• Average Fuel Economy• Timer
SINCE REFUELING• Tripmeter• Average Fuel Economy• Timer
ACCUMUL ATED INFO• Tripmeter • Average Fuel Economy • Timer
Digital Speedometer
AUTO STOP *
(Type B Cluster)
Trip Computer Mode: Displays driving information for fuel economy, accumulated info, etc
Driving Assist: Displays information for Forward Collision-Avoidance Assist, Lane Keeping Assist, Blind-Spot Collision-Avoidance Assist*, Smart Cruise Control*, Lane Following Assist, Driver Attention Warning
User Settings* Mode: Change settings of the Driver Assistance cluster, doors, lights, convenience, units, and other features
OK
MODE
MODE
OKOK
OK
OK
OK
OK
OK
OK OK
OK
OK
(Type A; Controls located on Steering Wheel)
Refer to the inside front cover for more information on QR codes www youtube com/KiaFeatureVideos
Instrument Cluster’s LCD Display Video
Steering Wheel Controls Video
QR CODE
A
B
CTurn-by-Turn Mode*: Displays information for the route guidance and destination
Information/Master Warning Mode: Informs of Drive Force Distribution and warning messages related to the vehicle, TPMS†, Driver Assist systems
Page 10 of 78

8 *IF EQUIPPED
VEHICLE SETTINGS
SPORTAGE HYBRID / PLUG-IN HYBRID FEATURES & FUNCTIONS GUIDE
VEHICLESETTINGS
User Settings* - Instrument Cluster
To enter the User Settings mode in the LCD Instrument Cluster Modes, ensure vehicle is at a stand still, shift lever is in
Park, and the Engine Start/Stop button or Key is in the ON position, and press the LCD Mode button A and press the
OK button B to enter
You can navigate the selections on the display by pressing the OK button B up or down Select the item by pressing the
OK button B
User Settings Modes:
Some set tings in cer tain models may be available through the infotainment system screen Refer to section 5 in the Owner ’s Manual for more information
Refer to the inside front cover for more information on QR codes www youtube com/KiaFeatureVideos
Vehicle & User Settings Video
QR CODE
Driving Assistance •Driving Convenience •Speed Limit* •Warning Timing •Warning Volume •Driver Attention Warning •Forward Safety •Lane Safety •Blind-Spot Safety •Parking Safety*
ECO Vehicle •Green Zone EV Drive •Coasting Guide •Start Coasting •Lock Charging Cable
Cluster •Theme selection
•Wiper/Lights display •Traffic Signs •Icy road warning •Welcome sound
Lights •Illumination •One-Touch turn signal •Headlamp delay •High Beam Assist
Door/Liftgate •Automatically Lock / Unlock •Two-Press Unlock •Horn feedback •Power Liftgate •Power Liftgate Opening Speed •Power Liftgate Opening Height •Smart Liftgate
Sound •Welcome Sound
Convenience •Seat Easy Access •Rear Occupant Alert •Service Interval Oil Change Reminder* •Welcome light •Welcome Mirror/Light •Wireless Charging System •Auto Rear Wiper (in Reverse)
Units •Speedometer unit •Temperature unit •Fuel economy unit •Tire pressure unit
Language* •
Choose the language
Reset: •All menus in the User Settings mode are reset back to factory settings, except language and service interval
OK
MODE
MODE
OKOK
OK
OK
OK
OK
OK
OK OK
OK
OK
(Type A; Controls located on Steering Wheel)
B
A
Page 11 of 78

9*IF EQUIPPEDALWAYS CHECK THE OWNER ’S MANUAL FOR COMPLETE OPER ATING INFORMATION AND SAFET Y WARNINGS
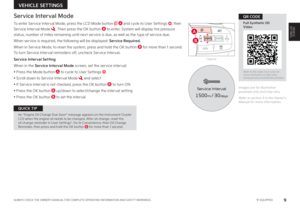
Service Interval Mode
To enter Service Interval Mode, press the LCD Mode button A and cycle to User Settings , then
Service Interval Mode Then press the OK button B to enter System will display tire pressure
status, number of miles remaining until next service is due, as well as the type of service due
When service is required, the following will be displayed: Service Required.
When in Service Mode, to reset the system, press and hold the OK button B for more than 1 second
To turn Service Interval reminders off, uncheck Service Interval
Service Interval Setting
When in the Service Interval Mode screen, set the service interval:
• Press the Mode button A to cycle to User Settings
• Scroll down to Service Interval Mode and select
• If Service Interval is not checked, press the OK button B to turn ON
• Press the OK button B up/down to select/change the interval setting
• Press the OK button B to set the interval
Images are for illustrative purposes only and may var y
Refer to section 5 in the Owner ’s Manual for more information
OK
MODE
MODE
OKOK
OK
OK
OK
OK
OK
OK OK
OK
OK
(Type A)
Refer to the inside front cover for more information on QR codes www youtube com/KiaFeatureVideos
Full Synthetic Oil Video
QR CODE
A
B
VEHICLE SETTINGS
An “Engine Oil Change Due Soon” message appears on the Instrument Cluster LCD when the engine oil needs to be changed After oil change, reset the oil change reminder in User Set tings* Go to Convenience, then Oil Change Reminder, then press and hold the OK but ton B for more than 1 second
QUICK TIP
VEHICLESETTINGS
1500mi/3 0days
Service Interval
Page 12 of 78

To enter the Vehicle")
10 *IF EQUIPPEDSPORTAGE HYBRID / PLUG-IN HYBRID FEATURES & FUNCTIONS GUIDE
VEHICLE SETTINGS
VEHICLESETTINGS
Vehicle Settings* - Infotainment System (Available on certain models)
To enter the Vehicle Settings mode in the infotainment system, press the SETUP key or the SETUP button onscreen Then press VEHICLE , which will take you to Vehicle Settings Use the touchscreen to navigate through the menus
Some set tings in cer tain models may be available through User Set tings in the Instrument Cluster LCD Refer to the Car Infotainment System Quick Reference Guide
Driving while distracted is dangerous and should be avoided Do not at tempt to change vehicle system set tings while driving
Refer to the inside front cover for more information on QR codes www youtube com/KiaFeatureVideos
Vehicle & User Settings Video
Ambient, Mood & Theme Lighting Video
QR CODES
•Driver Assistance: Warning Timing, Warning
Volume, Forward Safety, Lane Safety and other
driver assist systems
•Active Sound Design* - Adjust the motor sound
inside the cabin
•Cluster - Instrument Cluster settings including
Service interval reminders, illumination, etc
•Climate - Settings for recirculating air, automatic
ventilation and defrost/defog options
•Seat - Settings for seat access
•Lights - Settings for Ambient Light, One-touch turn
signal, headlight delay and High Beam Assist
•Door - Settings for Auto Lock/Unlock, Two-press
unlock, power liftgate
•Convenience - Turn on/off Rear Occupant Alert,
Wireless Charging System, Auto Rear Wiper and
settings for Welcome Light
Page 13 of 78

11 *IF EQUIPPEDALWAYS CHECK THE OWNER ’S MANUAL FOR COMPLETE OPER ATING INFORMATION AND SAFET Y WARNINGS
HYBRID / PLUG-IN HYBRID SYSTEM
The infotainment system screen provides information on economical operation and Plug-In Hybrid* system modes To enter the Plug-In Hybrid display mode, press the PHEV button on the infotainment system’s home screen Then select one of the menus: EV Range, Energy Information, Charge Management, ECO Driving, Energy Flow Some examples are below:
•Plug-In Hybrid System Home Screen - EV Range, Energy Info, Charge Management, ECO Driving, Energy Flow
•ECO Level - The more economically you drive, the more the ECO Level increases
•Energy Flow - Displays the current flow of power between the main powertrain components
•Fuel Economy - Displays the average fuel economy over the duration of a trip
EV Range
217 mi
Energy Information
85 %
Charge Management
Next Departure
Jan | Wed | 1:00 AM
On
ECO Driving
Energy Flow
Plug-In Hybrid
Hybrid Ready
Energy Flow
Wheels
Engine
Electric Motor Battery
Fuel Economy
History
Eco Level Eco Driving
Fuel Economy
Fuel Economy
History
Fuel EconomyHybrid Fuel Economy05-06-2019
05-04-2019
05-03-2019
05-02-2019
05-01-2019 27 mi
13.2 mpg
12.9 mpg
13.6 mpg
Driving dates, distances and
fuel economy for the past
30 drives in the History are
displayed.
12.3 mpg
13.6 mpg
22 mi
14 mi 7 mi
18 mi
75
50
25
MPGElectric Motor Use
75
50
25
MPGNow 510 15202530354045505560
EV Range
217 mi
Energy Information
85 %
Charge Management
Next Departure
Jan | Wed | 1:00 AM
On
ECO Driving
Energy Flow
Plug-In Hybrid
Hybrid Ready
Energy Flow
Wheels
Engine
Electric Motor Battery
Fuel Economy
History
Eco LevelEco Driving
Fuel Economy
Fuel Economy
History
Fuel Economy
Hybrid Fuel Economy05-06-2019
05-04-2019
05-03-2019
05-02-2019
05-01-2019 27 mi
13.2 mpg
12.9 mpg
13.6 mpg
Driving dates, distances and
fuel economy for the past
30 drives in the History are
displayed.
12.3 mpg
13.6 mpg
22 mi
14 mi 7 mi
18 mi
75
50
25
MPGElectric Motor Use
75
50
25
MPGNow 510 15202530354045505560
EV Range
217 mi
Energy Information
85 %
Charge Management
Next Departure
Jan | Wed | 1:00 AM
On
ECO Driving
Energy Flow
Plug-In Hybrid
Hybrid Ready
Energy Flow
Wheels
Engine
Electric Motor Battery
Fuel Economy
History
Eco Level Eco Driving
Fuel Economy
Fuel Economy
History
Fuel EconomyHybrid Fuel Economy05-06-2019
05-04-2019
05-03-2019
05-02-2019
05-01-2019 27 mi
13.2 mpg
12.9 mpg
13.6 mpg
Driving dates, distances and
fuel economy for the past
30 drives in the History are
displayed.
12.3 mpg
13.6 mpg
22 mi
14 mi 7 mi
18 mi
75
50
25
MPGElectric Motor Use
75
50
25
MPGNow 510 15202530354045505560
EV Range
217 mi
Energy Information
85 %
Charge Management
Next Departure
Jan | Wed | 1:00 AM
On
ECO Driving
Energy Flow
Plug-In Hybrid
Hybrid Ready
Energy Flow
Wheels
Engine
Electric Motor Battery
Fuel Economy
History
Eco LevelEco Driving
Fuel Economy
Fuel Economy
History
Fuel Economy
Hybrid Fuel Economy05-06-2019
05-04-2019
05-03-2019
05-02-2019
05-01-2019 27 mi
13.2 mpg
12.9 mpg
13.6 mpg
Driving dates, distances and
fuel economy for the past
30 drives in the History are
displayed.
12.3 mpg
13.6 mpg
22 mi
14 mi 7 mi
18 mi
75
50
25
MPGElectric Motor Use
75
50
25
MPGNow 510 15202530354045505560
The images shown are for illustrative purposes only Not all available displays are shown Screen content may var y
For more information, refer to section 1 in the Owner ’s Manual or the Car Infotainment System Quick Reference Guide
Plug-In Hybrid Display* (Navigation Infotainment System only)
HYBRID/PLUG-IN SYSTEM
Page 14 of 78

A
BC
DE
F
Charging Your EV
Level 1 Chargin")
12 *IF EQUIPPEDSPORTAGE HYBRID / PLUG-IN HYBRID FEATURES & FUNCTIONS GUIDE
HYBRID / PLUG-IN HYBRID SYSTEM
FA U LT
POWERCHARGE
0.0!
(Por table charger shown)
A
BC
DE
F
Charging Your EV
Level 1 Charging – AC Charge
A Level 1 or AC charger uses 120 volts of household electricity and takes up to 10 5 hours for a full charge
Portable Charger Indicators:
A 120V AC plug
B
Power – When the charger and AC plug is plugged in and functioning normally, the indicator will turn green Indicator is red if plug temperature sensor warning is present
C Charge – Indicates that the vehicle is charging
D Fault – Indicates charge failure
E Charge Level – Indicates the level of charge
F ICCB – In-Cable Control Box
Level 2 Charging – “Normal” Charge
A Level 2 or 240-volt AC charger is the recommended charging system for the Plug-In Hybrid This type of charger uses 240 volts of electricity and takes approximately 3 5+ hours for a full charge (Based on Kia Motors Corporation testing with SAE J1772 charger per formed at 3 3kW) This charger may be able to be installed at your home or found at a public charging station
REMINDERS:
•
Do not use an extension cord Plug trickle charger directly into wall socket Do not charge to a receptacle that is old, damaged, corroded or cracked
•
When using outdoors, be careful not to expose it to external environments such as rain, snow, and high temperatures
•When par t B lights up in red, check if it is exposed to the external environment and then charge it again
REMINDER: Kia does not recommend primarily charging with a DC charger because it can reduce the lifespan of the bat ter y Shape of charger and how to use the charger may be different for each manufacturer Please see Owner ’s Manual for more information
HYBRID/PLUG-IN SYSTEM
Refer to the inside front cover for more information on QR codes www youtube com/KiaFeatureVideos
Charging Your Electric Vehicle Video
Hybrid / Plug-In Hybrid Charging & Connector Video
QR CODE
The images are for illustrative purposes only and may not reflect actual feature or operation
For more information, refer to section 1 in the Owner ’s Manual
Page 15 of 78

13 *IF EQUIPPEDALWAYS CHECK THE OWNER ’S MANUAL FOR COMPLETE OPER ATING INFORMATION AND SAFET Y WARNINGS
HYBRID / PLUG-IN HYBRID SYSTEM
REMINDER: When the charging connector is connected and the scheduled charging is in standby mode, the charging indicator is turned off and the scheduled charge release but ton indicator is turned on The scheduled charge release but ton indicator will turn off after 3 minutes (refer to page 16 for more information on Schedule Charging)
OFF
OFF
OFF
� �-�P�D�B�U�F�E���P�O���S�F�B�S���Q�B�T�T�F�O�H�F�S �s�T���T�J�E�F���P�G���W�F�I�J�D�M�F�
��
G
G
I
K
H
J
Charging Your EV (Continued)
To charge the Plug-In Hybrid vehicle using an AC charger:
1 Ensure scheduled charging is not set on the infotainment system or the Kia Access App
2 Press the brake pedal and engage the parking brake
3 Turn off all switches, put the shift lever in P (Park), and turn off the vehicle
4 Open the charging door G by pressing the the rear center edge of charging door (Ensure doors are unlocked)
5 Remove any dust or water on the charging connector and charging inlet H
6 Remove the charging inlet cover I
7 Hold the charging connector handle J and connect it to the vehicle’s charging inlet H by pushing the connector until you hear a clicking sound
8 Charging begins automatically (Ensure the charge indicator light is illuminated near the charging inlet, indicating the vehicle is charging)
Checking the Charging Status
The charging status can be checked by viewing the charging status indicator K near the charging inlet (bottom indicator) The charging indicator will blink yellow when charging, and the charge is from 0-65% The charging indicator will blink green when charging and the charge is from 65-100% The indicator will turn off within 5 seconds when charging is completed When indicator is blinking red, there’s an error while trying to charge
HYBRID/PLUG-IN SYSTEM
The images are for illustrative purposes only and may not reflect actual feature or operation
For more information, refer to section 1 in the Owner ’s Manual
Page 16 of 78

14 *IF EQUIPPEDSPORTAGE HYBRID / PLUG-IN HYBRID FEATURES & FUNCTIONS GUIDE
HYBRID / PLUG-IN HYBRID SYSTEM
Hybrid/Plug-In’s instrument cluster LCD screen displays the following Hybrid/Plug-In system modes to inform the driver of its status To change modes, go to User Settings in the Instrument Cluster modes
Energy Flow - Instrument Cluster LCD*
Your vehicle’s instrument cluster display locations may differ from those in the illustrations For more information on the instrument cluster, please refer to section 1 in the Owner ’s Manual
These illustrations are for demonstration purposes only
�&�M�F�D�U�S�J�D���.�P�E�F
�)�Z�C�S�J�E���.�P�E�F
�&�O�H�J�O�F���.�P�E�F
�$�I�B�S�H�J�O�H
EV Propulsion - The electric motor is moving the vehicle Engine-Only Propulsion - The engine is moving the vehicle
Power Assist - Both the electric motor AND the engine are moving the vehicle Engine Generation - While the vehicle is stopped, the engine is charging the Hybrid/Plug-In battery
HYBRID/PLUG-IN SYSTEM