Page 17 of 78

15 *IF EQUIPPEDALWAYS CHECK THE OWNER ’S MANUAL FOR COMPLETE OPER ATING INFORMATION AND SAFET Y WARNINGS
HYBRID / PLUG-IN HYBRID SYSTEM
Hybrid/Plug-In’s instrument cluster LCD screen displays the following Hybrid/Plug-In system modes to inform the driver of its status To change modes, go to User Settings in the Instrument Cluster modes
Power Reserve - While the engine powers the vehicle, it is also recharging the Hybrid/Plug-In battery Engine Brake/Regeneration - The regenerative braking system is recharging the Hybrid/Plug-In battery
Vehicle Stop - The vehicle’s Hybrid/Plug-In system is standing by Engine Generation/Regeneration - The engine and the regenerative braking system are both recharging the Hybrid/Plug-In battery
�$�I�B�S�H�J�O�H
�*�E�M�F���.�P�E�F
�$�I�B�S�H�J�O�H
�$�I�B�S�H�J�O�H
Energy Flow - Instrument Cluster LCD (continued)
Your vehicle’s instrument cluster & indicator light locations may differ from those in the illustrations For more information on the instrument cluster, please refer to section 1 in the Owner ’s Manual
These illustrations are for demonstration purposes only Some indicators and warning lights may not appear in illustration On the vehicle, they may appear in the LCD
HYBRID/PLUG-IN SYSTEM
Page 18 of 78

Charging time can be set in the Plug-In Hybrid infot")
16 *IF EQUIPPEDSPORTAGE HYBRID / PLUG-IN HYBRID FEATURES & FUNCTIONS GUIDE
HYBRID / PLUG-IN HYBRID SYSTEM
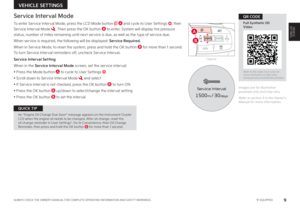
Scheduled Charging (Plug-In Hybrid Only)
Charging time can be set in the Plug-In Hybrid infotainment system, under charge management, or using the Kia Access app.
Charging with the Kia Connect Smartphone App:
The Kia Access app can help you find the nearest charging station and displays charging status and the Scheduled Charging information. On your Smartphone, go to an app store or marketplace to download the Kia Access app.
REMINDER: When Scheduled Charging is set and the charger is plugged in, charging will not begin until the set time & date are met to complete the charging. The green charge indicator, located on top of the dash, will temporar y flash ON/OFF to show that scheduled/reser ve charging is set.
Deactivate Scheduled Charging - Press the Deactivate Scheduled Charging button B OFF���U�P���E�J�T�B�C�M�F���U�I�F���T�D�I�F�E�V�M�F�E���D�I�B�S�H�J�O�H���G�F�B�U�V�S�F���X�I�F�O���J�N�N�F�E�J�B�U�F���D�I�B�S�H�J�O�H���J�T���S�F�R�V�J�S�F�E��
REMINDERS:
•
For more detail and/or subsequent steps in charging your vehicle, refer to section 1 in the Owner ’s Manual
•Scheduled charging may not be available at public chargers
When you press the Deactivate Scheduled Charging but ton* B OFF���U�I�F���S�F�T�F�S �W�F�E���D�I�B�S�H�J�O�H���T�F�U �U�J�O�H���X�J�M�M���U�F�N�Q�P�S�B�S�J�M�Z���E�J�T�B�C�M�F�
���B�O�E���T�U�B�S �U���J�N�N�F�E�J�B�U�F���D�I�B�S�H�J�O�H���N�P�E�F�����*�G���Z�P�V���O�F�F�E���U�P���D�P�N�Q�M�F�U�F�M�Z���E�F�B�D�U�J�W�B�U�F���U�I�F���T�D�I�F�E�V�M�F�E���D�I�B�S�H�F���T�F�U �U�J�O�H�
���D�I�B�O�H�F���U�I�F���T�F�U �U�J�O�H���G�S�P�N���U�I�F���J�O�G�P�U�B�J�O�N�F�O�U���T�Z�T�U�F�N��
QUICK TIP
HYBRID/PLUG-IN SYSTEM
OFF
OFF
B
Refer to the inside front cover for more information on QR codes.www.youtube.com/KiaFeatureVideos
Hybrid / Plug-In Hybrid Scheduled Charging Video
QR CODE
Page 19 of 78

The")
17*IF EQUIPPEDALWAYS CHECK THE OWNER ’S MANUAL FOR COMPLETE OPER ATING INFORMATION AND SAFET Y WARNINGS.
HYBRID / PLUG-IN HYBRID SYSTEM
Charging Connector Auto/Lock Mode
(Plug-In Hybrid Only)
The Charging Connector can be set to be locked or unlocked while in the charging inlet and charging. To select the locking mode, go to the Vehicle Settings mode in the Infotainment System. Press the Mode button A on the left side of the Steering Wheel or press the SETUP key on the infotainment system or the SETUP button on the screen. Select VEHICLE, then ECO VEHICLE. Select CHARGING CONNECTOR LOCK.
If the charging connector does not disconnect as needed, open the luggage board in the trunk area, remove the storage box and slightly pull the emergency cable to disconnect the charging connector.
For more information, refer to section 5 in the Owner ’s Manual.
To change the Plug-In Hybrid Mode, press the EV/HEV button A (PHEV only); switch between Automatic mode, Electric (EV) mode and Hybrid (HEV) mode each time the button is pressed. The LCD on the Instrument Cluster will display the mode selected:
•Automatic Mode
•EV Electric Mode - Charge Depleting: The high-voltage (hybrid) battery is being used to drive the vehicle.
•HEV Hybrid mode - Charge Sustaining: The high-voltage (hybrid) battery and gasoline engine are being used to drive the vehicle.
Plug-In Hybrid Modes
(Plug-In Hybrid only)
HYBRID/PLUG-IN SYSTEM
OK
MODE
MODE
OKOK
OK
OK
OK
OK
OK
OK OK
OK
OK
•If Charging Connector is in lock mode & the doors are unlocked, the charging connector unlocks, but if the charging cable is not disconnected within 10 seconds, the connector will automatically become locked again
•If the charging connector is unlocked but all the doors are locked again, immediately, the connector will automatically lock
•If charging does not work, disconnect the connector and tr y connecting again
QUICK TIPS
A
(Type B shown. Located below gear shift knob)
(Center Console)
EV
HEV
DRIVE MODE
A
Refer to the inside front cover for more information on QR codes.www.youtube.com/KiaFeatureVideos
Hybrid / Plug-In Hybrid Charging & Connector Video
QR CODE
Page 20 of 78

B
OK
MODE
MODE
OKOK
OK
OK
OK
OK
OK")
18†LEGAL DISCL AIMERS ON BACK INSIDE COVER | *IF EQUIPPEDSPORTAGE HYBRID / PLUG-IN HYBRID FEATURES & FUNCTIONS GUIDE
ADVANCED DRIVER ASSISTANCE SYSTEMS (ADAS)
B
OK
MODE
MODE
OKOK
OK
OK
OK
OK
OK
OK OK
OK
OK
C
A
D
Refer to the inside front cover for more information on QR codes www youtube com/KiaFeatureVideos
Blind-Spot Collision-Avoidance Assist (BCA) Video
QR CODEBlind-Spot Collision-Avoidance Assist (BCA)†3
REMINDERS:
•
BCA will not issue a warning if the vehicle speed is 6 mph or more above the surrounding vehicles
•
When BCA is ON and the ignition is turned off, then on again, BCA returns to its previous state
When engaged, BCA is a supplemental system Do not solely rely on this system and always pay at tention to the road and its conditions
Refer to section 6 in the Owner ’s Manual for more information
The images on this page are for illustrative purposes only and may not reflect actual feature or operation (But tons located on right side of steering wheel)
•The Warning Volume can be adjusted in User Set tings* in the Instrument Cluster or Vehicle Set tings* in the Infotainment System
•BCA warning will sound only if vehicle speed is faster than 12 mph
•BCA will activate when:
-The system is turned on
-
Other vehicles are detected on the rear sides of the vehicle
-Vehicle speed is above approximately 40 mph
QUICK TIPS
BCA uses a front view camera on the windshield and rear corner radar sensors in the rear bumper to monitor and warn the driver in certain situations if it detects an approaching vehicle in the driver ’s blind spot area and before changing lanes Initially, BCA provides Blind-Spot Collision Warning when it detects a potential collision with a vehicle, emitting an audible warning and visual alert on the outside rearview mirrors If the system detects that the collision risk has increased, Blind-Spot Collision-Avoidance Assist automatically applies the opposite side front brake to try and mitigate a potential collision
1st-stage: When another vehicle is detected within BCA warning boundary A, an indicator will illuminate on the outside rearview mirrors B
2nd-stage: When 1st stage warning is on and the driver activates a turn signal, a flashing indicator will illuminate on the outside rearview mirrors and the system will sound a warning
3rd-stage: When 1st stage warning is on and the 2nd stage warning has already occurred, and the collision risk has increased, braking is applied to the opposite side front wheel and a visual warning occurs
BCA User Settings:
•To enable BCA , go to User Settings* in the Instrument Cluster LCD or press and hold the LCD Mode button C on the right side of the Steering Wheel, or press the SETUP key/button on the Infotainment System Select the VEHICLE button to enter the Vehicle Settings* Select DRIVER ASSISTANCE and then BLIND-SPOT SAFET Y
•
To set BCA mode, select:
– Active Assist: BCA will provide a warning (audible & visual) and braking assist will be applied depending on the collision risk levels
– Warning Only: Vehicle will provide a warning only (audible & visual)
– Off: System is off, no warnings provided
•
To set the initial warning activation time, go to the User Settings or Vehicle Settings*, then Driver Assistance, then Warning Timing
Adjust the warning timing:
– Standard: Use under normal driving conditions If it feels too
sensitive, set the warning timing to Late.
– L a t e : The warning timing will be late
ADAS
Page 21 of 78

R")
19†LEGAL DISCL AIMERS ON BACK INSIDE COVER | *IF EQUIPPEDALWAYS CHECK THE OWNER ’S MANUAL FOR COMPLETE OPER ATING INFORMATION AND SAFET Y WARNINGS
ADVANCED DRIVER ASSISTANCE SYSTEMS (ADAS)
Refer to the inside front cover for more information on QR codes www youtube com/KiaFeatureVideos
Rear Cross-Traffic Collision-Avoidance Assist (RCCA) Video
QR CODERear Cross-Traffic Collision-Avoidance Assist (RCCA)*†3
When engaged, RCCA is a supplemental system Do not solely rely on this system and always pay at tention to the road and its conditions
Refer to section 6 in the Owner ’s Manual for more information
REMINDERS:
•
When vehicle power is turned off, then on again, RCCA will remain in the previous state
•
When a vehicle is approaching within the sensing range, and traveling faster than 3 mph, RCCA will show a warning
(But tons located on right side of steering wheel)
The Warning Volume can be adjusted in User Set tings* in the Instrument Cluster or Vehicle Set tings* in the Infotainment System
QUICK TIP
Rear Cross-Traffic Collision-Avoidance Assist (RCCA) is designed to warn the driver under certain conditions It may activate the Electronic Stability Control (ESC) and temporarily apply braking if it detects cross traffic approaching the vehicle when the vehicle is in reverse
When the RCCA rear-corner radar sensors detect approaching vehicles from the rear left or rear right side of the vehicle A, RCCA will sound a warning, the warning indicators on the outside rearview mirror will illuminate and a message will appear on the Instrument Cluster LCD B and the Infotainment System screen If RCCA detects that the collision risk has increased, RCCA automatically applies the brakes to reduce your speed, potentially helping to minimize the effects of a possible collision
RCCA is designed to operate under the following conditions:
•When the gear shift is in Reverse
•When the vehicle is moving slower than 5 mph
RCCA User Settings:
•To turn RCCA on, go to User Settings* in the Instrument Cluster LCD or press and hold the LCD Mode button C on the right side of the Steering Wheel, or press the SETUP key/button on the Infotainment System Select the VEHICLE button to enter the Vehicle Settings* Select DRIVER ASSISTANCE, PARKING SAFET Y, then REAR CROSS-TR AFFIC SAFET Y
•To set the warning timing, go to the Vehicle Settings, then go to DRIVER ASSISTANCE, then Warning Timing Select one of the settings:
- Standard: Use in a normal driving environment If FCA operates too sensitively, set the warning timing to Late
- Late: The warning timing will be slower
•The default Warning Timing is set to Standard If the Warning Timing is changed, the warning time of other Driver Assistance systems may also change
OK
MODE
MODE
OK OK
OK
OK
OK
OK
OK
OK OK
OK
OK
A
B
C
ADAS
Page 22 of 78

Refer to the inside front cover fo")
20†LEGAL DISCL AIMERS ON BACK INSIDE COVER | *IF EQUIPPEDSPORTAGE HYBRID / PLUG-IN HYBRID FEATURES & FUNCTIONS GUIDE
ADVANCED DRIVER ASSISTANCE SYSTEMS (ADAS)
Refer to the inside front cover for more information on QR codes www youtube com/KiaFeatureVideos
Lane Keeping Assist (LK A) Video
QR CODE
When engaged, Lane Keeping Assist is not a substitute for safe driving and may not always warn the driver if the vehicle is driven outside of its lane Always drive safely and use caution
For illustrative purposes only Your actual display, but tons and/ or features may var y
Actual Vehicle Set tings steps may var y by model Refer to section 6 in the Owner ’s Manual for more information
REMINDERS:
•
LK A will not issue a warning if the turn signals or hazard lights are activated
•
When the ignition is cycled, LK A will return to the previously set state
Lane Keeping Assist (LKA)†3
Lane Keeping Assist is designed to detect the lane markers on the road with a front view camera on the windshield, and may assist the driver ’s steering to potentially help keep the vehicle in the lane When turned on, the instrument cluster indicator will initially illuminate gray It will remain gray when the vehicle is traveling slower than 40 mph or when the system does not detect the lane markers When the system detects the lane markers and can assist the steering, the Lane Safety icon will illuminate green
If the vehicle begins to move outside of the lane and turn signal is not activated, LK A may provide steering inputs, trying to prevent the vehicle from moving outside its lane If LK A detects that the vehicle continues moving outside of the lane, LK A may give an audible warning and display a Lane Departure Warning on the instrument cluster
When enabled in vehicle settings*, press and hold the Lane Safety button A to turn on or off
LKA User Settings:
To enable LK A , go to User Settings* in the Instrument Cluster LCD or press and hold the LCD Mode button B on the right side of the Steering Wheel, or press the SETUP key/button on the Infotainment System Select the VEHICLE button to enter the Vehicle Settings* Select DRIVER ASSISTANCE then L ANE SAFET Y
•Assist: LK A will automatically assist the driver ’s steering when lane departure is detected to help prevent the vehicle from moving out of its lane
•Warning Only: LK A will warn the driver with an audible warning when lane departure is detected This mode does NOT provide any steering assist
•Off: LK A will turn off The indicator light will turn off on the cluster
When the front-view camera detects the lane traveled in, both lanes are illuminated
When the front-view camera does not detect the lane traveled in the lanes are not illuminated
When the front-view camera detects the vehicle moving outside of the lane being traveled in, a red indicator will illuminate either on the left or right lane (shown in both images above)
The Warning Volume can be adjusted in User Set tings* in the Instrument Cluster or Vehicle Set tings* in the Infotainment System
QUICK TIP
(But tons located on right side of steering wheel)
0 KMH
020 4060
202 m100 kWh/ 100m96%Lv 1READY66°F
2 72m
CHG
PWR
0 KMH
020 4060
202 m100 kWh/ 100m96%Lv 1READY66°F
2 72m
CHG
PWR
0 KMH
020 4060
202 m100 kWh/ 100m96%Lv 1READY66°F
2 72m
CHG
PWR
0 KMH
020 4060
202 m100 kWh/ 100m96%Lv 1READY66°F
2 72m
CHG
PWR
0 KMH
020 4060
202 m100 kWh/ 100m96%Lv 1READY66°F
2 72m
CHG
PWR
0 KMH
020 4060
202 m100 kWh/ 100m96%Lv 1READY66°F
2 72m
CHG
PWR
0 KMH
020 4060
202 m100 kWh/ 100m96%Lv 1READY66°F
2 72m
CHG
PWR
0 KMH
020 4060
202 m100 kWh/ 100m96%Lv 1READY66°F
2 72m
CHG
PWR
0 KMH
020 4060
202 m100 kWh/ 100m96%Lv 1READY66°F
2 72m
CHG
PWR
0 KMH
020 4060
202 m100 kWh/ 100m96%Lv 1READY66°F
2 72m
CHG
PWR
0 KMH
020 4060
202 m100 kWh/ 100m96%Lv 1READY66°F
2 72m
CHG
PWR
0 KMH
020 4060
202 m100 kWh/ 100m96%Lv 1READY66°F
2 72m
CHG
PWR
0 KMH
020 4060
202 m100 kWh/ 100m96%Lv 1READY66°F
2 72m
CHG
PWR
0 KMH
020 4060
202 m100 kWh/ 100m96%Lv 1READY66°F
2 72m
CHG
PWR
0 KMH
020 4060
202 m100 kWh/ 100m96%Lv 1READY66°F
2 72m
CHG
PWR
0 KMH
020 4060
202 m100 kWh/ 100m96%Lv 1READY66°F
2 72m
CHG
PWR
OK
MODE
MODE
OKOK
OKOK
OK
OK
OK
OK OK
OK
OK
A
B
ADAS
Page 23 of 78

B")
21†LEGAL DISCL AIMERS ON BACK INSIDE COVER | *IF EQUIPPEDALWAYS CHECK THE OWNER ’S MANUAL FOR COMPLETE OPER ATING INFORMATION AND SAFET Y WARNINGS
ADVANCED DRIVER ASSISTANCE SYSTEMS (ADAS)
Blind-Spot View Monitor (BVM)*†3
Blind-Spot View Monitor is designed to display the rear and side of the vehicle blind spot areas in the Instrument Cluster LCD A when the system is activated
To turn BVM on, press and hold the LCD Mode button B on the right side of the Steering Wheel to go to VEHICLE Settings* in the Infotainment System or press the SETUP key/button on the Infotainment System Select VEHICLE, DRIVER ASSISTANCE > Blind-Spot Safety > Blind-Spot View
When operating the turn signal C, BVM displays video of the blind-spot view for the direction indicated
BVM will not operate when the Power button is off, a turn signal
is deactivated or another warning screen comes up on the Instrument Cluster LCD
When engaged, these systems are not substitutes for safe driving and are not substitutes for safe driving and may not always detect objects or people around the vehicle
Images are for illustrative purposes only and may not reflect actual feature or operation See section 6 in the Owner ’s Manual for more information
Images are for illustrative purposes only and may not reflect actual feature or operation See section 6 in the Owner ’s Manual for more information
(LCD display showing right side of vehicle)
Safe Exit Warning (SEW)*†3
Safe Exit Warning can help prevent passengers from opening their door by displaying a warning message on the Instrument Cluster D and sounding an audible warning when a vehicle is detected E, approaching from behind, after your vehicle has stopped
To turn on SEW, go to User Settings* in the Instrument Cluster LCD or press and hold the Mode button B on the right side of the Steering Wheel to go to VEHICLE Settings* in the Infotainment System or press the SETUP key/button on the Infotainment System Select VEHICLE, then select DRIVER
ASSISTANCE, Blind-Spot Safety, and select Safe Exit Warning
Refer to the inside front cover for more information on QR codes www youtube com/KiaFeatureVideos
QR CODES
Blind-Spot View Monitor (BVM) Video
P0 KMHAttention Level
0 20 406096%Lv 166°F
High
Last Break
0:00
OFFAUTO
AUTO
OFFAUTO
AUTO
(But tons located on right side of steering wheel)
OK
MODE
MODE
OK OK
OK
OK
OK
OK
OK
OK OK
OK
OK
B
C
EA
(Message on Cluster Display)
D
The Warning Volume can be adjusted in User Set tings* in the Instrument Cluster or Vehicle Set tings* in the Infotainment System
QUICK TIP
ADAS
Page 24 of 78

OK
MODE
MODE
OKOK
OKOK
OK
OK
OK
OK")
22†LEGAL DISCL AIMERS ON BACK INSIDE COVER | *IF EQUIPPEDSPORTAGE HYBRID / PLUG-IN HYBRID FEATURES & FUNCTIONS GUIDE
ADVANCED DRIVER ASSISTANCE SYSTEMS (ADAS)
OK
MODE
MODE
OKOK
OKOK
OK
OK
OK
OK OK
OK
OK
D
C
REMINDER: LFA is not a substitute for safe and proper driving Always drive safely and use caution
Lane Following Assist (LFA) is designed to help the vehicle stay centered in its lane A by monitoring the detected lane markings ahead, vehicles on the road, and potentially providing steering inputs The instrument cluster indicator will initially illuminate gray when turned ON It will remain gray when the system does not detect the lane markers When the system detects the lane markers and can assist the steering, the LFA icon will illuminate green B Press the LFA button C to turn LFA on or off
Hands-off Warning - If the driver takes their hands off the Steering Wheel for several seconds, a warning message will appear on the Instrument Cluster, and an audible warning will sound If hands on the Steering Wheel is not detected, LFA will cancel
LFA will operate only when these conditions are met:
•LFA recognizes both sides of the lane markers the vehicle is traveling in
•
The vehicle is traveling slower than 110 mph
LFA User Settings*:
•To enable LFA , go to User Settings* in the Instrument Cluster LCD or press and hold the LCD Mode button D on the right side of the Steering Wheel, or press the SETUP key/button on the Infotainment System Select the VEHICLE button to enter the Vehicle Settings* Select DRIVER ASSISTANCE then L ANE SAFET Y
(But tons located on steering wheel)
Images are for illustrative purposes only and may not reflect actual feature or operation
LFA is supplemental Do not solely rely on this system and always pay at tention to the road and its conditions
Actual Vehicle Set tings steps may var y by model See section 6 in the Owner ’s Manual for more detailed information, limitations and conditions
When engaged, LFA is not a substitute for safe and proper driving Always drive safely and use caution LFA may not always aler t the driver when the vehicle is approaching another vehicle
Refer to the inside front cover for more information on QR codes www youtube com/KiaFeatureVideos
Lane Following Assist (LFA) Video
QR CODE
The Warning Volume can be adjusted in User Set tings* in the Instrument Cluster or Vehicle Set tings* in the Infotainment System
QUICK TIP
0 KMH
020 4060
202 m100 kWh/ 100m96%Lv 166°F
2 72m
CHG
PWR
0 KMH
020 4060
202 m100 kWh/ 100m96%Lv 166°F
2 72m
CHG
PWR
0 KMH
020 4060
202 m100 kWh/ 100m96%Lv 166°F
2 72m
CHG
PWR
0 KMH
202 m96%L
v 1
2 72m
CHG
PWR
�-�B�O�F���'�P�M�M�P�X�J�O�H���"�T�T�J�T�U��� �-�'�"�
†3
A
B
ADAS