2023 JEEP CHEROKEE brake light
[x] Cancel search: brake lightPage 97 of 276

STARTING AND OPERATING95
To Resume
If there is a set speed in memory, push the RES (resume)
button and remove your foot from the accelerator pedal.
The instrument cluster display will show the last set
speed.
Resume can be used at any speed above 20 mph
(32 km/h) when only Fixed Speed Cruise Control is being
used.
Resume can be used at any speed above 0 mph (0 km/h)
when ACC is active.
NOTE:
If your vehicle stays at a standstill for longer than two
seconds, then the driver will either have to push the
RES (resume) button, or apply the accelerator pedal to
reengage the Adaptive Cruise Control (ACC) to the
existing set speed.
ACC cannot be resumed if there is a stationary vehicle
in front of your vehicle in close proximity.
To Vary The Speed Setting
To Increase Or Decrease The Set Speed
After setting a speed, you can increase the set speed by
pushing the SET (+) button, or decrease speed by pushing
the SET (-) button.
U.S. Speed (mph)
Pushing the SET (+), or SET (-) button once will result in
a 1 mph speed adjustment. Each subsequent tap of
the button results in an adjustment of 1 mph.
If the button is continually pushed, the set speed will
continue to adjust in 5 mph increments until the button
is released. The new set speed is reflected in the instru -
ment cluster display.
Metric Speed (km/h)
Pushing the SET (+), or SET (-) button once will result in
a 1 km/h speed adjustment. Each subsequent tap of
the button results in an adjustment of 1 km/h.
If the button is continually pushed, the set speed will
continue to adjust in 10 km/h increments until the
button is released. The new set speed is reflected in
the instrument cluster display.
NOTE:When you override and push the SET (+) button or SET (-)
buttons, the new set speed will be the current speed of the
vehicle. When ACC Is Active
When you use the SET (-) button to decelerate, if the
engine’s braking power does not slow the vehicle suffi -
ciently to reach the set speed, the brake system will
automatically slow the vehicle.
The ACC system decelerates the vehicle to a full stop
when following a vehicle in front. If your vehicle follows
the vehicle in front to a standstill, after two seconds the
driver will either have to push the RES (resume) button,
or apply the accelerator pedal to reengage the ACC to
the existing set speed.
The ACC system maintains set speed when driving
uphill and downhill. However, a slight speed change on
moderate hills is normal. In addition, downshifting may
occur while climbing uphill or descending downhill. This
is normal operation and necessary to maintain set
speed. When driving uphill and downhill, the ACC
system will cancel if the braking temperature exceeds
normal range (overheated).
Setting The Following Distance In ACC
The specified following distance for ACC can be set by
varying the distance setting between four bars (longest),
three bars (long), two bars (medium) and one bar (short).
Using this distance setting and the vehicle speed, ACC
calculates and sets the distance to the vehicle ahead. This
distance setting appears in the instrument cluster display.WARNING!
The Resume function should only be used if traffic and
road conditions permit. Resuming a set speed that is
too high or too low for prevailing traffic and road
conditions could cause the vehicle to accelerate or
decelerate too sharply for safe operation. Failure to
follow these warnings can result in a collision and death
or serious personal injury.
4
23_KL_OM_EN_USC_t.book Page 95
Page 98 of 276

96STARTING AND OPERATING
Distance Settings
To increase the distance setting, push the Distance
Increase button and release. Each time the button is
pushed, the distance setting increases by one bar (longer).
To decrease the distance setting, push the Distance
Decrease button and release. Each time the button is
pushed, the distance setting decreases by one bar
(shorter).
If there is no vehicle ahead, the vehicle will maintain the
set speed. If a slower moving vehicle is detected in the
same lane, the instrument cluster display will show the
ACC Set With Target Detected Indicator Light, and the
system will adjust the vehicle speed automatically to
maintain the distance setting, regardless of the set speed. The vehicle will then maintain the set distance until:
The vehicle ahead accelerates to a speed above the
set speed.
The vehicle ahead moves out of your lane or view of the
sensor.
The distance setting is changed.
The system disengages
Úpage 94.
The maximum braking applied by ACC is limited; however,
the driver can always apply the brakes manually, if
necessary.
NOTE:The brake lights will illuminate whenever the ACC system
applies the brakes.
A Proximity Warning will alert the driver if ACC predicts that
its maximum braking level is not sufficient to maintain the
set distance. If this occurs, a visual alert “BRAKE!” will
flash in the instrument cluster display and a chime will
sound while ACC continues to apply its maximum braking
capacity.
NOTE:The “BRAKE!” screen in the instrument cluster display is a
warning for the driver to take action and does not neces -
sarily mean that the Forward Collision Warning system is
applying the brakes autonomously.
Overtake Aid
When driving with Adaptive Cruise Control (ACC) engaged
and following a vehicle, the system will provide an
additional acceleration up to the ACC set speed to assist
in passing the vehicle. This additional acceleration is
triggered when the driver utilizes the left turn signal and
will only be active when passing on the left hand side.
ACC Operation At Stop
In the event that the ACC system brings your vehicle to a
standstill while following the vehicle in front, if the vehicle
in front starts moving within two seconds of your vehicle
coming to a standstill, your vehicle will resume motion
without the need for any driver action.
If the vehicle in front does not start moving within two
seconds of your vehicle coming to a standstill, the driver
will either have to push the RES (resume) button, or apply
the accelerator pedal to reengage the ACC to the existing
set speed.
NOTE:After the ACC system holds your vehicle at a standstill for
approximately three consecutive minutes, the parking
brake will be activated, and the ACC system will be
canceled.
While ACC is holding your vehicle at a standstill, if the
driver seat belt is unbuckled or the driver door is opened,
the parking brake will be activated, and the ACC system
will be canceled.
1 — Longest Distance Setting (Four Bars)
2 — Medium Distance Setting (Two Bars)
3 — Long Distance Setting (Three Bars)
4 — Short Distance Setting (One Bar)
WARNING!
When the ACC system is resumed, the driver must
ensure that there are no pedestrians, vehicles or
objects in the path of the vehicle. Failure to follow these
warnings can result in a collision and death or serious
personal injury.
23_KL_OM_EN_USC_t.book Page 96
Page 120 of 276

118STARTING AND OPERATING
Towing Requirements — Tires
Do not attempt to tow a trailer while using a compact
spare tire.
Do not drive more than 50 mph (80 km/h) when towing
while using a full size spare tire.
Proper tire inflation pressures are essential to the safe
and satisfactory operation of your vehicle.
Check the trailer tires for proper tire inflation pressures
before trailer use.
Check for signs of tire wear or visible tire damage
before towing a trailer.
Replacing tires with a higher load carrying capacity will
not increase the vehicle's GVWR and GAWR limits.
Refer to Tires for further information
Úpage 235.
Towing Requirements — Trailer Brakes
Do not interconnect the hydraulic brake system or
vacuum system of your vehicle with that of the trailer.
This could cause inadequate braking and possible
personal injury.
An electronically actuated trailer brake controller is
required when towing a trailer with electronically actu -
ated brakes. When towing a trailer equipped with a
hydraulic surge actuated brake system, an electronic
brake controller is not required.
Trailer brakes are recommended for trailers over
1,000 lb (453 kg) and required for trailers in excess of
2,000 lb (907 kg).
Towing Requirements — Trailer Lights And
Wiring
Whenever you pull a trailer, regardless of the trailer size,
stop lights and turn signals on the trailer are required for
motoring safety.
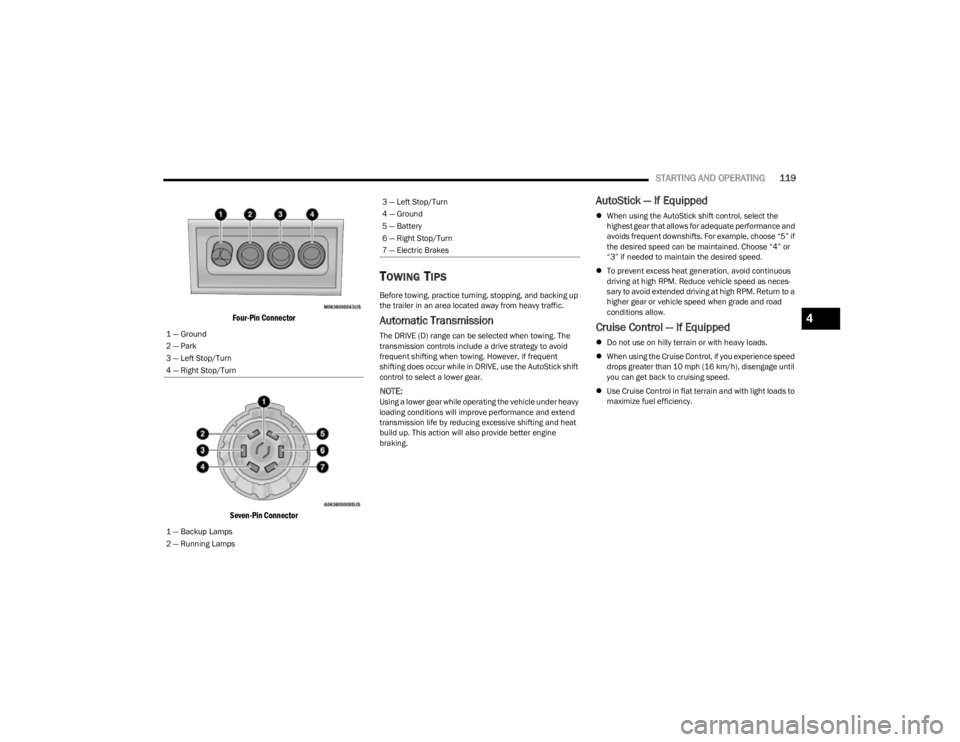
The Trailer Tow Package may include a four- and seven-pin
wiring harness. Use a factory approved trailer harness and
connector.
NOTE:Do not cut or splice wiring into the vehicle’s wiring
harness.
The electrical connections are all complete to the vehicle
but you must mate the harness to a trailer connector.
Refer to the following illustrations.
NOTE:
Disconnect the trailer wiring connector from the vehicle
(or any other device plugged into vehicle’s electrical
connectors) before launching a boat into water.
Be sure to reconnect once clear from water area.
CAUTION!
Do not tow a trailer at all during the first 500 miles
(805 km) the new vehicle is driven. The engine, axle
or other parts could be damaged.
Then, during the first 500 miles (805 km) that a
trailer is towed, do not drive over 50 mph (80 km/h)
and do not make starts at full throttle. This helps the
engine and other parts of the vehicle wear in at the
heavier loads.
WARNING!
Do not connect trailer brakes to your vehicle's
hydraulic brake lines. It can overload your brake
system and cause it to fail. You might not have
brakes when you need them and could have an acci -
dent.
Towing any trailer will increase your stopping
distance. When towing, you should allow for addi -
tional space between your vehicle and the vehicle in
front of you. Failure to do so could result in an acci -
dent.
CAUTION!
If the trailer weighs more than 1,000 lb (453 kg)
loaded, it should have its own brakes and they should
be of adequate capacity. Failure to do this could lead to
accelerated brake lining wear, higher brake pedal
effort, and longer stopping distances.
23_KL_OM_EN_USC_t.book Page 118
Page 121 of 276
STARTING AND OPERATING119
Four-Pin Connector
Seven-Pin Connector
TOWING TIPS
Before towing, practice turning, stopping, and backing up
the trailer in an area located away from heavy traffic.
Automatic Transmission
The DRIVE (D) range can be selected when towing. The
transmission controls include a drive strategy to avoid
frequent shifting when towing. However, if frequent
shifting does occur while in DRIVE, use the AutoStick shift
control to select a lower gear.
NOTE:Using a lower gear while operating the vehicle under heavy
loading conditions will improve performance and extend
transmission life by reducing excessive shifting and heat
build up. This action will also provide better engine
braking.
AutoStick — If Equipped
When using the AutoStick shift control, select the
highest gear that allows for adequate performance and
avoids frequent downshifts. For example, choose “5” if
the desired speed can be maintained. Choose “4” or
“3” if needed to maintain the desired speed.
To prevent excess heat generation, avoid continuous
driving at high RPM. Reduce vehicle speed as neces -
sary to avoid extended driving at high RPM. Return to a
higher gear or vehicle speed when grade and road
conditions allow.
Cruise Control — If Equipped
Do not use on hilly terrain or with heavy loads.
When using the Cruise Control, if you experience speed
drops greater than 10 mph (16 km/h), disengage until
you can get back to cruising speed.
Use Cruise Control in flat terrain and with light loads to
maximize fuel efficiency.
1 — Ground
2 — Park
3 — Left Stop/Turn
4 — Right Stop/Turn
1 — Backup Lamps
2 — Running Lamps
3 — Left Stop/Turn
4 — Ground
5 — Battery
6 — Right Stop/Turn
7 — Electric Brakes
4
23_KL_OM_EN_USC_t.book Page 119
Page 124 of 276

122STARTING AND OPERATING
Shifting Into N (NEUTRAL)
Use the following procedure to shift the 4WD system into
N (NEUTRAL).
1. Bring the vehicle to a complete stop on level ground,
and shift the transmission to PARK.
2. Turn the engine off.
3. Turn the ignition to the ON/RUN position, but do not start the engine.
4. Press and hold the brake pedal.
5. Shift the transmission into NEUTRAL. 6. Using a ballpoint pen or similar object, push and hold
the recessed N (NEUTRAL) button (located by the
selector switch) for four seconds. The light behind the
N symbol will blink, indicating shift in progress. The
light will stop blinking (stay on solid) when the shift to
N (NEUTRAL) is complete.
Neutral Button
7. After the shift is completed and the N (NEUTRAL) light stays on, release the N (NEUTRAL) button.
8. Start the engine.
9. Release the parking brake.
10. Shift the transmission into REVERSE.
11. Release the brake pedal for five seconds and ensure that there is no vehicle movement.
12. Shift the transmission to NEUTRAL.
13. Apply the parking brake.
14. Shift the transmission into PARK, turn the engine off, and remove the key fob. 15. Attach the vehicle to the tow vehicle using a suitable
tow bar.
16. Turn the ignition to the ON/RUN position, but do not start the engine.
17. Press and hold the brake pedal.
18. Release the parking brake.
19. Turn the ignition OFF, remove the key fob, and release the brake pedal.
NOTE:
When towing this vehicle behind another vehicle, the
parking brake must be released.
Steps 1 through 5 are requirements that must be met
before pushing the N (NEUTRAL) button, and must
continue to be met until the shift has been completed.
If any of these requirements are not met before
pushing the N (NEUTRAL) button or are no longer met
during the shift, then the N (NEUTRAL) indicator light
will flash continuously until all requirements are met or
until the N (NEUTRAL) button is released.
The ignition must be in the ON/RUN position for a shift
to take place and for the position indicator lights to be
operable. If the ignition is not in the ON/RUN position,
the shift will not take place and no position indicator
lights will be on or flashing.
A flashing N (NEUTRAL) position indicator light indi -
cates that shift requirements have not been met.
WARNING!
You or others could be injured or killed if you leave the
vehicle unattended with the power transfer unit in the N
(NEUTRAL) position without first fully engaging the
parking brake. The N (NEUTRAL) position disengages
both the front and rear driveshafts from the powertrain
and will allow the vehicle to roll, even if the
transmission is in PARK. The parking brake should
always be applied when the driver is not in the vehicle,
unless the vehicle is otherwise secured (for example,
when attached to the tow vehicle).
CAUTION!
It is necessary to follow these steps to be certain that
the power transfer unit is fully in N (NEUTRAL) before
recreational towing to prevent damage to internal parts.
23_KL_OM_EN_USC_t.book Page 122
Page 125 of 276
STARTING AND OPERATING123
Shifting Out Of N (NEUTRAL)
Use the following procedure to prepare your vehicle for
normal use.
1. Bring the vehicle to a complete stop, leaving it
connected to the tow vehicle.
2. Apply the parking brake.
3. Turn the ignition to the ON/RUN position, but do not start the engine.
4. Press and hold the brake pedal.
5. Shift the transmission into NEUTRAL.
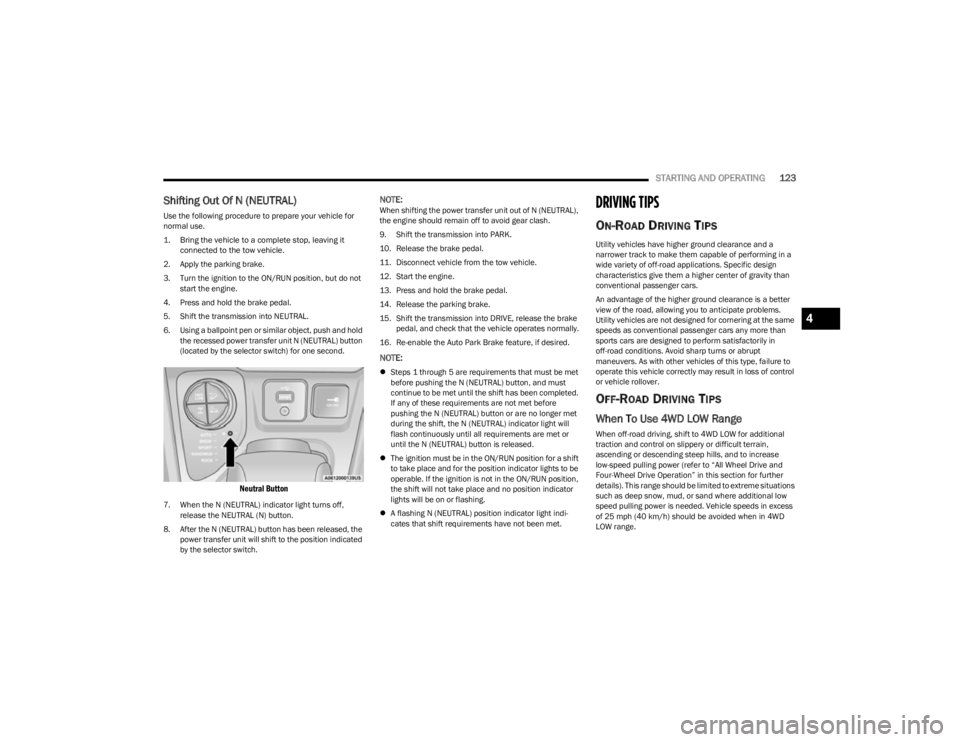
6. Using a ballpoint pen or similar object, push and hold the recessed power transfer unit N (NEUTRAL) button
(located by the selector switch) for one second.
Neutral Button
7. When the N (NEUTRAL) indicator light turns off, release the NEUTRAL (N) button.
8. After the N (NEUTRAL) button has been released, the power transfer unit will shift to the position indicated
by the selector switch.
NOTE:When shifting the power transfer unit out of N (NEUTRAL),
the engine should remain off to avoid gear clash.
9. Shift the transmission into PARK.
10. Release the brake pedal.
11. Disconnect vehicle from the tow vehicle.
12. Start the engine.
13. Press and hold the brake pedal.
14. Release the parking brake.
15. Shift the transmission into DRIVE, release the brake pedal, and check that the vehicle operates normally.
16. Re-enable the Auto Park Brake feature, if desired.
NOTE:
Steps 1 through 5 are requirements that must be met
before pushing the N (NEUTRAL) button, and must
continue to be met until the shift has been completed.
If any of these requirements are not met before
pushing the N (NEUTRAL) button or are no longer met
during the shift, the N (NEUTRAL) indicator light will
flash continuously until all requirements are met or
until the N (NEUTRAL) button is released.
The ignition must be in the ON/RUN position for a shift
to take place and for the position indicator lights to be
operable. If the ignition is not in the ON/RUN position,
the shift will not take place and no position indicator
lights will be on or flashing.
A flashing N (NEUTRAL) position indicator light indi -
cates that shift requirements have not been met.
DRIVING TIPS
ON-ROAD DRIVING TIPS
Utility vehicles have higher ground clearance and a
narrower track to make them capable of performing in a
wide variety of off-road applications. Specific design
characteristics give them a higher center of gravity than
conventional passenger cars.
An advantage of the higher ground clearance is a better
view of the road, allowing you to anticipate problems.
Utility vehicles are not designed for cornering at the same
speeds as conventional passenger cars any more than
sports cars are designed to perform satisfactorily in
off-road conditions. Avoid sharp turns or abrupt
maneuvers. As with other vehicles of this type, failure to
operate this vehicle correctly may result in loss of control
or vehicle rollover.
OFF-ROAD DRIVING TIPS
When To Use 4WD LOW Range
When off-road driving, shift to 4WD LOW for additional
traction and control on slippery or difficult terrain,
ascending or descending steep hills, and to increase
low-speed pulling power (refer to “All Wheel Drive and
Four-Wheel Drive Operation” in this section for further
details). This range should be limited to extreme situations
such as deep snow, mud, or sand where additional low
speed pulling power is needed. Vehicle speeds in excess
of 25 mph (40 km/h) should be avoided when in 4WD LOW range.
4
23_KL_OM_EN_USC_t.book Page 123
Page 126 of 276

124STARTING AND OPERATING
Driving Through Water
Although your vehicle is capable of driving through water,
there are a number of precautions that must be
considered before entering the water:
Driving through water more than a few inches/
centimeters deep will require extra caution to ensure
safety and prevent damage to your vehicle. If you must
drive through water, try to determine the depth and the
bottom condition (and location of any obstacles) prior to
entering. Proceed with caution and maintain a steady
controlled speed less than 5 mph (8 km/h) in deep water
to minimize wave effects.
Flowing Water
If the water is swift flowing and rising (as in storm run-off)
avoid crossing until the water level recedes and/or the
flow rate is reduced. If you must cross flowing-water, avoid
depths in excess of 9 inches (22 cm). The flowing water
can erode the streambed causing your vehicle to sink into
deeper water. Determine exit point(s) that are
downstream of your entry point to allow for drifting. Standing Water
Avoid driving in standing water deeper than 16 inches
(40.5 cm), and reduce speed appropriately to minimize
wave effects. Maximum speed in 16 inches (40.5 cm) of
water is less than 5 mph (8 km/h).
(Trailhawk only): Avoid driving in standing water deeper
than 19 inches (48 cm), and reduce speed appropriately
to minimize wave effects. Maximum speed in 19 inches
(48 cm) of water is less than 5 mph (8 km/h).
Maintenance
After driving through deep water, inspect your vehicle
fluids and lubricants (engine, transmission, Power
Transfer Unit, and Rear Drive Module) to ensure they have
not been contaminated. Contaminated fluids and
lubricants (milky, foamy in appearance) should be
flushed/changed as soon as possible to prevent
component damage.
Driving In Snow, Mud And Sand
In heavy snow, when pulling a load, or for additional
control at slower speeds, shift the transmission to a low
gear and shift the 4WD system to the appropriate terrain
mode, using 4WD LOW if necessary
Úpage 85. Only shift
into a lower gear to maintain forward motion. Over-revving
the engine can spin the wheels and traction will be lost.
Avoid abrupt downshifts on icy or slippery roads because
engine braking may cause skidding and loss of control.
Hill Climbing
NOTE:Before attempting to climb a hill, determine the conditions
at the crest and/or on the other side.
Before climbing a steep hill, shift the transmission to a
lower gear and shift the 4WD system to 4WD LOW. Use
FIRST gear and 4WD LOW for very steep hills.
NOTE:Brakes should be applied at increased slippage, but
before coming to a stop to avoid digging into the loose
surface and rendering the operator of the vehicle stuck/
immobile.
If you stall or begin to lose headway while climbing a steep
hill, allow your vehicle to come to a stop and immediately
apply the brakes. Once stopped, shift to REVERSE. Back
slowly down the hill allowing the compression braking of
the engine to help regulate your speed. If the brakes are
required to control vehicle speed, apply them lightly and
avoid locking or skidding the tires.
CAUTION!
When driving through water, do not exceed 5 mph
(8 km/h). Always check water depth before entering as
a precaution, and check all fluids afterward. Driving
through water may cause damage that may not be
covered by the New Vehicle Limited Warranty.
WARNING!
If the engine stalls or you lose headway or cannot make
it to the top of a steep hill or grade, never attempt to
turn around. To do so may result in tipping and rolling
the vehicle. Always back straight down a hill in
REVERSE gear carefully. Never back down a hill in
NEUTRAL using only the brake.
23_KL_OM_EN_USC_t.book Page 124
Page 134 of 276

132MULTIMEDIA
Brakes
Blind Spot Alert This setting will change the type of alert provided when an object is detected in a
vehicle’s blind spot. The “Off” setting will turn off Blind Spot Alert. The “Lights” setting will
activate the Blind Spot Alert lights on the outside mirrors. The “Lights & Chime” setting
will activate both the lights on the outside mirrors and an audible chime.
Hill Start Assist This setting will turn the Hill Start Assist system on or off.
Active ParkView Backup Camera Guidelines This setting will turn the Active ParkView Backup Camera Guidelines on or off.
ParkView Backup Camera Delay This setting will add a delay to the ParkView Backup Camera when shifting out of
REVERSE.
Fixed ParkView Backup Camera Guidelines This setting will turn the Fixed ParkView Backup Camera Guidelines on or off.
Rain Sensing Auto Wipers This setting will turn the Rain Sensing Auto Wipers on or off.
Side Distance Warning This setting will turn the Side Distance Warning on or off and set how the system will
communicate with the user. The “Off” setting will deactivate the system. The “Sound”
setting will provide an audible chime to the user. The “Sound And Display” setting will
provide both an audible chime and a visual display.
Side Distance Warning Volume This setting will adjust the warning for side distance. The available options are “Low”,
“Medium”, and “High”.
Tire Fill Assist This setting will turn the Tire Fill Assist on or off.
Setting NameDescription
When the Brakes button is pressed on the touchscreen, the system will display settings related to the vehicle’s brake system.
NOTE:Depending on the vehicle’s options, feature settings may vary.
Setting NameDescription
Auto Park Brake This setting will turn the Auto Park Brake on or off.
Brake Service This setting will allow you to set the brakes for service. When the setting is selected, a
pop-up will display with “Yes” and “No” options.
23_KL_OM_EN_USC_t.book Page 132