2023 JEEP CHEROKEE fold seats
[x] Cancel search: fold seatsPage 31 of 276
GETTING TO KNOW YOUR VEHICLE29
Manual Front Seat Recline Adjustment
To adjust the seatback, lift the lever located on the
outboard side of the seat, lean back to the desired
position and release the lever. To return the seatback, lift
the lever, lean forward and release the lever.
MANUAL ADJUSTMENT (REAR SEATS)
Rear Seat Recline Adjustment
The rear seatback also reclines for additional passenger
comfort.
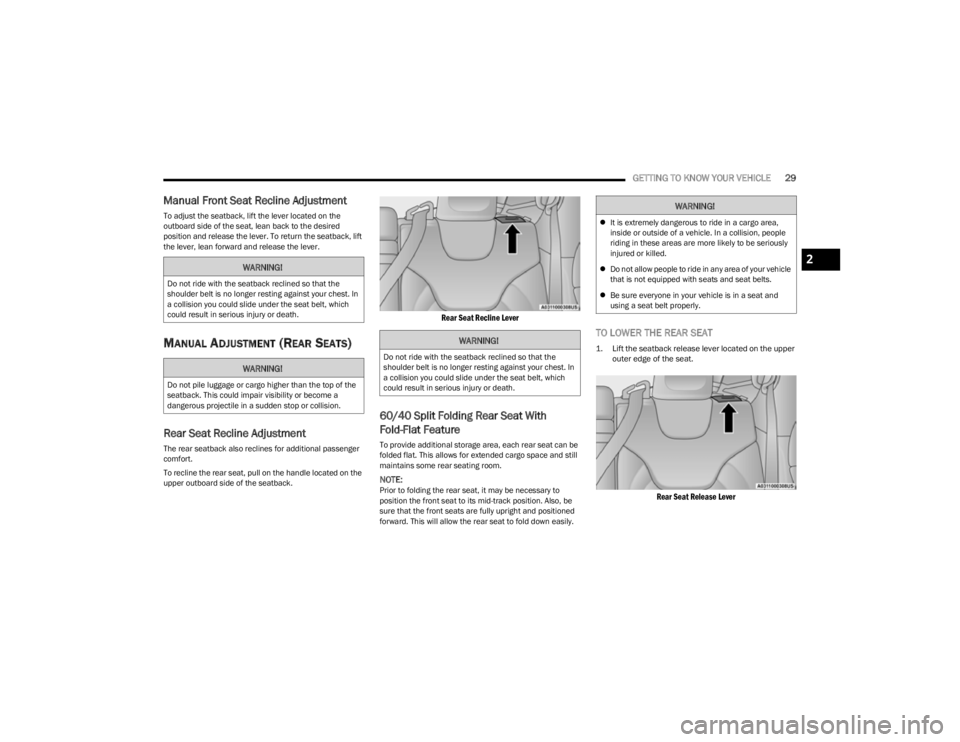
To recline the rear seat, pull on the handle located on the
upper outboard side of the seatback.
Rear Seat Recline Lever
60/40 Split Folding Rear Seat With
Fold-Flat Feature
To provide additional storage area, each rear seat can be
folded flat. This allows for extended cargo space and still
maintains some rear seating room.
NOTE:Prior to folding the rear seat, it may be necessary to
position the front seat to its mid-track position. Also, be
sure that the front seats are fully upright and positioned
forward. This will allow the rear seat to fold down easily.
TO LOWER THE REAR SEAT
1. Lift the seatback release lever located on the upper
outer edge of the seat.
Rear Seat Release Lever
WARNING!
Do not ride with the seatback reclined so that the
shoulder belt is no longer resting against your chest. In
a collision you could slide under the seat belt, which
could result in serious injury or death.
WARNING!
Do not pile luggage or cargo higher than the top of the
seatback. This could impair visibility or become a
dangerous projectile in a sudden stop or collision.
WARNING!
Do not ride with the seatback reclined so that the
shoulder belt is no longer resting against your chest. In
a collision you could slide under the seat belt, which
could result in serious injury or death.
WARNING!
It is extremely dangerous to ride in a cargo area,
inside or outside of a vehicle. In a collision, people
riding in these areas are more likely to be seriously
injured or killed.
Do not allow people to ride in any area of your vehicle
that is not equipped with seats and seat belts.
Be sure everyone in your vehicle is in a seat and
using a seat belt properly.
2
23_KL_OM_EN_USC_t.book Page 29
Page 32 of 276
30GETTING TO KNOW YOUR VEHICLE
2. Fold the rear seatback completely forward.
NOTE:You may experience deformation in the seat cushion from
the seat belt buckles if the seats are left folded for an
extended period of time. This is normal and by simply
unfolding the seats, over time the seat cushion will return
to its normal shape.
TO RAISE THE REAR SEAT
NOTE:If interference from the cargo area prevents the seatback
from fully locking, you will have difficulty returning the seat
to its proper position.
Raise the seatback and lock it into place.
POWER ADJUSTMENT (FRONT SEATS) —
I
F EQUIPPED
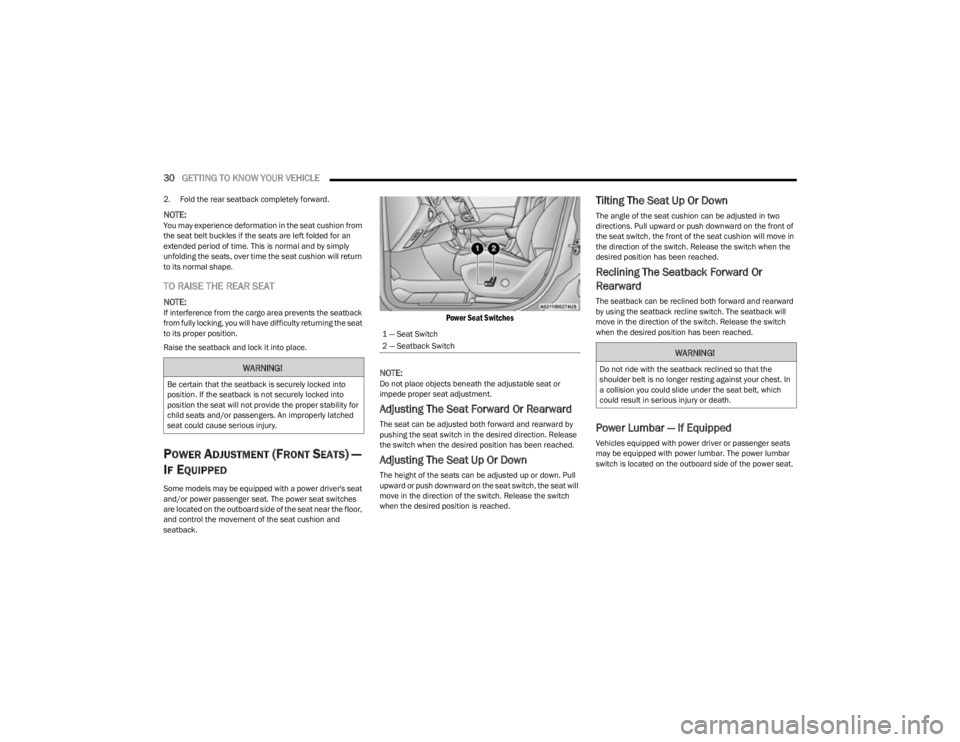
Some models may be equipped with a power driver's seat
and/or power passenger seat. The power seat switches
are located on the outboard side of the seat near the floor,
and control the movement of the seat cushion and
seatback.
Power Seat Switches
NOTE:
Do not place objects beneath the adjustable seat or
impede proper seat adjustment.
Adjusting The Seat Forward Or Rearward
The seat can be adjusted both forward and rearward by
pushing the seat switch in the desired direction. Release
the switch when the desired position has been reached.
Adjusting The Seat Up Or Down
The height of the seats can be adjusted up or down. Pull
upward or push downward on the seat switch, the seat will
move in the direction of the switch. Release the switch
when the desired position is reached.
Tilting The Seat Up Or Down
The angle of the seat cushion can be adjusted in two
directions. Pull upward or push downward on the front of
the seat switch, the front of the seat cushion will move in
the direction of the switch. Release the switch when the
desired position has been reached.
Reclining The Seatback Forward Or
Rearward
The seatback can be reclined both forward and rearward
by using the seatback recline switch. The seatback will
move in the direction of the switch. Release the switch
when the desired position has been reached.
Power Lumbar — If Equipped
Vehicles equipped with power driver or passenger seats
may be equipped with power lumbar. The power lumbar
switch is located on the outboard side of the power seat.
WARNING!
Be certain that the seatback is securely locked into
position. If the seatback is not securely locked into
position the seat will not provide the proper stability for
child seats and/or passengers. An improperly latched
seat could cause serious injury.
1 — Seat Switch
2 — Seatback Switch
WARNING!
Do not ride with the seatback reclined so that the
shoulder belt is no longer resting against your chest. In
a collision you could slide under the seat belt, which
could result in serious injury or death.
23_KL_OM_EN_USC_t.book Page 30
Page 61 of 276

GETTING TO KNOW YOUR VEHICLE59
There are pinch sensors attached to the side of the lift -
gate opening. Light pressure anywhere along these
strips will cause the liftgate to return to the open posi -
tion.
If the power liftgate encounters multiple obstructions
within the same cycle, the system will automatically
stop. If this occurs, the liftgate must be operated manu -
ally.
The power liftgate will release, but not power open, in
temperatures below −12°F (−24°C). Be sure to
remove any buildup of snow or ice from the liftgate
before opening the liftgate.
If the liftgate is left open for an extended period of time,
the liftgate may need to be closed manually to reset
power liftgate functionality.
Gas props support the liftgate in the open position.
However, because the gas pressure drops with
temperature, it may be necessary to assist the props when
opening the liftgate in cold weather.NOTE:Allow the power system to open the liftgate. Manually
pushing or pulling the liftgate may activate the liftgate
obstacle detection feature and stop the power operation
or reverse its direction.
CARGO AREA FEATURES
Cargo Load Floor
The cargo load floor system has a load capacity of 300 lb
(136 kg).
To provide additional storage area, each rear seat can be
folded flat. This allows for extended cargo space and still
maintains some rear seating room
Úpage 28.
Cargo Tie-Down Hooks And Loops
The tie-downs located on the cargo area floor should be
used to secure loads safely when the vehicle is moving.
Cargo tie-down loops are located on the trim panels.
WARNING!
Driving with the liftgate open can allow poisonous
exhaust gases into your vehicle. You and your
passengers could be injured by these fumes. Keep
the liftgate closed when you are operating the
vehicle.
If you are required to drive with the liftgate open,
make sure that all windows are closed, and the
climate control blower switch is set at high speed. Do
not use the recirculation mode.
WARNING!
During power operation, personal injury or cargo
damage may occur. Ensure the liftgate travel path is
clear. Make sure the liftgate is closed and latched
before driving away.
WARNING!
Cargo tie-downs are not safe anchors for a child seat
tether strap. In a sudden stop or accident, a tie-down
could pull loose and allow the child seat to come
loose. A child could be badly injured. Use only the
anchors provided for child seat tethers.
To help protect against personal injury, passengers
should not be seated in the rear cargo area. The rear
cargo space is intended for load carrying purposes
only, not for passengers, who should sit in seats and
use seat belts.
The weight and position of cargo and passengers can
change the vehicle center of gravity and vehicle
handling. To avoid loss of control resulting in personal
injury, follow these guidelines for loading your vehicle:
Do not carry loads that exceed the load limits
described on the label attached to the left door or left
door center pillar.
Always place cargo evenly on the cargo floor. Put
heavier objects as low and as far forward as possible.
Place as much cargo as possible in front of the rear
axle. Too much weight or improperly placed weight
over or behind the rear axle can cause the vehicle to
sway.
Do not pile luggage or cargo higher than the top of
the seatback. This could impair visibility or become a
dangerous projectile in a sudden stop or accident.
2
23_KL_OM_EN_USC_t.book Page 59
Page 162 of 276
160SAFETY
(Continued)
Initial Indication
If the driver is unbuckled when the ignition switch is first in
the START or ON/RUN position, a chime will signal for a
few seconds. If the driver or outboard front seat passenger
(if equipped with outboard front passenger seat BeltAlert)
is unbuckled when the ignition switch is first in the START
or ON/RUN position the Seat Belt Reminder Light will turn
on and remain on until both outboard front seat belts are
buckled. The outboard front passenger seat BeltAlert is
not active when an outboard front passenger seat is
unoccupied.
BeltAlert Warning Sequence
The BeltAlert warning sequence is activated when the
vehicle is moving above a specified vehicle speed range
and the driver or outboard front seat passenger is
unbuckled (if equipped with outboard front passenger
seat BeltAlert) (the outboard front passenger seat
BeltAlert is not active when the outboard front passenger
seat is unoccupied). The BeltAlert warning sequence
starts by blinking the Seat Belt Reminder Light and
sounding an intermittent chime. Once the BeltAlert
warning sequence has completed, the Seat Belt Reminder
Light will remain on until the seat belts are buckled. The
BeltAlert warning sequence may repeat based on vehicle
speed until the driver and occupied outboard front seat
passenger seat belts are buckled. The driver should
instruct all occupants to buckle their seat belts.
Change Of Status
If the driver or outboard front seat passenger (if equipped
with outboard front passenger seat BeltAlert) unbuckles
their seat belt while the vehicle is traveling, the BeltAlert
warning sequence will begin until the seat belts are
buckled again. The outboard front passenger seat BeltAlert is not active
when the outboard front passenger seat is unoccupied.
BeltAlert may be triggered when an animal or other items
are placed on the outboard front passenger seat or when
the seat is folded flat (if equipped). It is recommended that
pets be restrained in the rear seat (if equipped) in pet
harnesses or pet carriers that are secured by seat belts,
and cargo is properly stowed.
BeltAlert can be activated or deactivated by an authorized
dealer. FCA US LLC does not recommend deactivating
BeltAlert.
NOTE:If BeltAlert has been deactivated and the driver or
outboard front seat passenger (if equipped with outboard
front passenger seat BeltAlert) is unbuckled the Seat Belt
Reminder Light will turn on and remain on until the driver
and outboard front seat passenger seat belts are buckled.
Lap/Shoulder Belts
All seating positions in your vehicle are equipped with lap/
shoulder belts.
The seat belt webbing retractor will lock only during very
sudden stops or collisions. This feature allows the
shoulder part of the seat belt to move freely with you
under normal conditions. However, in a collision the seat
belt will lock and reduce your risk of striking the inside of
the vehicle or being thrown out of the vehicle.
WARNING!
Relying on the air bags alone could lead to more
severe injuries in a collision. The air bags work with
your seat belt to restrain you properly. In some colli -
sions, the air bags won’t deploy at all. Always wear
your seat belt even though you have air bags.
In a collision, you and your passengers can suffer
much greater injuries if you are not properly buckled
up. You can strike the interior of your vehicle or other
passengers, or you can be thrown out of the vehicle.
Always be sure you and others in your vehicle are
buckled up properly.
It is dangerous to ride in a cargo area, inside or
outside of a vehicle. In a collision, people riding in
these areas are more likely to be seriously injured or
killed.
Do not allow people to ride in any area of your vehicle
that is not equipped with seats and seat belts.
Be sure everyone in your vehicle is in a seat and
using a seat belt properly. Occupants, including the
driver, should always wear their seat belts whether or
not an air bag is also provided at their seating posi -
tion to minimize the risk of severe injury or death in
the event of a crash.
Wearing your seat belt incorrectly could make your
injuries in a collision much worse. You might suffer
internal injuries, or you could even slide out of the
seat belt. Follow these instructions to wear your seat
belt safely and to keep your passengers safe, too.
23_KL_OM_EN_USC_t.book Page 160
Page 164 of 276
162SAFETY
(Continued)
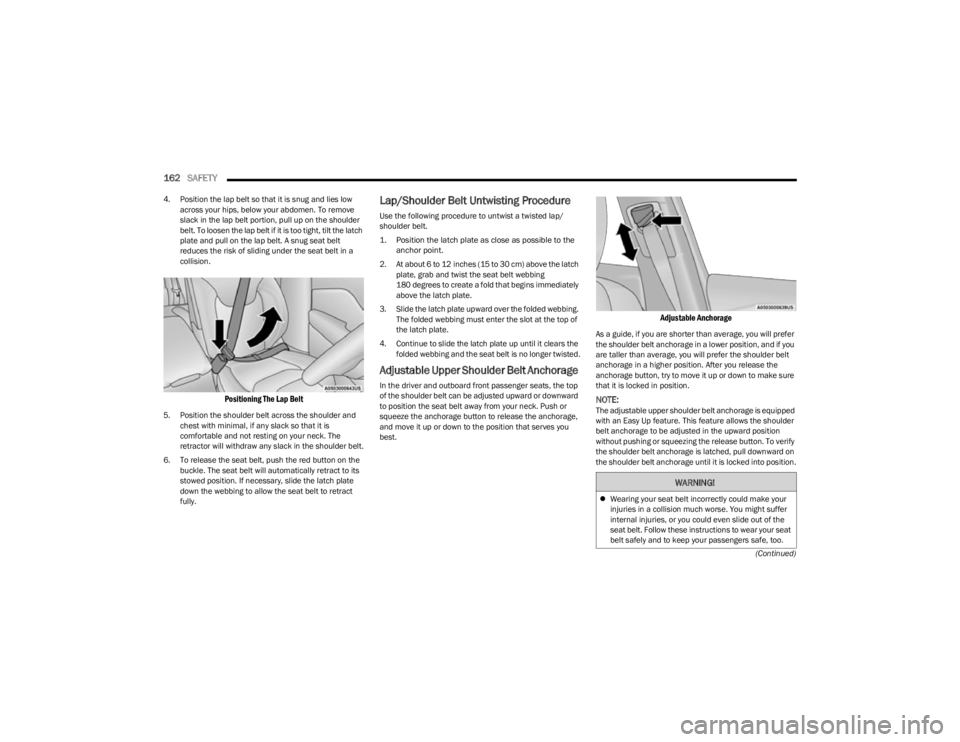
4. Position the lap belt so that it is snug and lies low
across your hips, below your abdomen. To remove
slack in the lap belt portion, pull up on the shoulder
belt. To loosen the lap belt if it is too tight, tilt the latch
plate and pull on the lap belt. A snug seat belt
reduces the risk of sliding under the seat belt in a
collision.
Positioning The Lap Belt
5. Position the shoulder belt across the shoulder and chest with minimal, if any slack so that it is
comfortable and not resting on your neck. The
retractor will withdraw any slack in the shoulder belt.
6. To release the seat belt, push the red button on the buckle. The seat belt will automatically retract to its
stowed position. If necessary, slide the latch plate
down the webbing to allow the seat belt to retract
fully.
Lap/Shoulder Belt Untwisting Procedure
Use the following procedure to untwist a twisted lap/
shoulder belt.
1. Position the latch plate as close as possible to the anchor point.
2. At about 6 to 12 inches (15 to 30 cm) above the latch plate, grab and twist the seat belt webbing
180 degrees to create a fold that begins immediately
above the latch plate.
3. Slide the latch plate upward over the folded webbing. The folded webbing must enter the slot at the top of
the latch plate.
4. Continue to slide the latch plate up until it clears the folded webbing and the seat belt is no longer twisted.
Adjustable Upper Shoulder Belt Anchorage
In the driver and outboard front passenger seats, the top
of the shoulder belt can be adjusted upward or downward
to position the seat belt away from your neck. Push or
squeeze the anchorage button to release the anchorage,
and move it up or down to the position that serves you
best.
Adjustable Anchorage
As a guide, if you are shorter than average, you will prefer
the shoulder belt anchorage in a lower position, and if you
are taller than average, you will prefer the shoulder belt
anchorage in a higher position. After you release the
anchorage button, try to move it up or down to make sure
that it is locked in position.
NOTE:The adjustable upper shoulder belt anchorage is equipped
with an Easy Up feature. This feature allows the shoulder
belt anchorage to be adjusted in the upward position
without pushing or squeezing the release button. To verify
the shoulder belt anchorage is latched, pull downward on
the shoulder belt anchorage until it is locked into position.
WARNING!
Wearing your seat belt incorrectly could make your
injuries in a collision much worse. You might suffer
internal injuries, or you could even slide out of the
seat belt. Follow these instructions to wear your seat
belt safely and to keep your passengers safe, too.
23_KL_OM_EN_USC_t.book Page 162
Page 165 of 276
SAFETY163
Second Row Center Seat Belt Operating
Instructions — Fixed Rear Seat
(If Equipped)
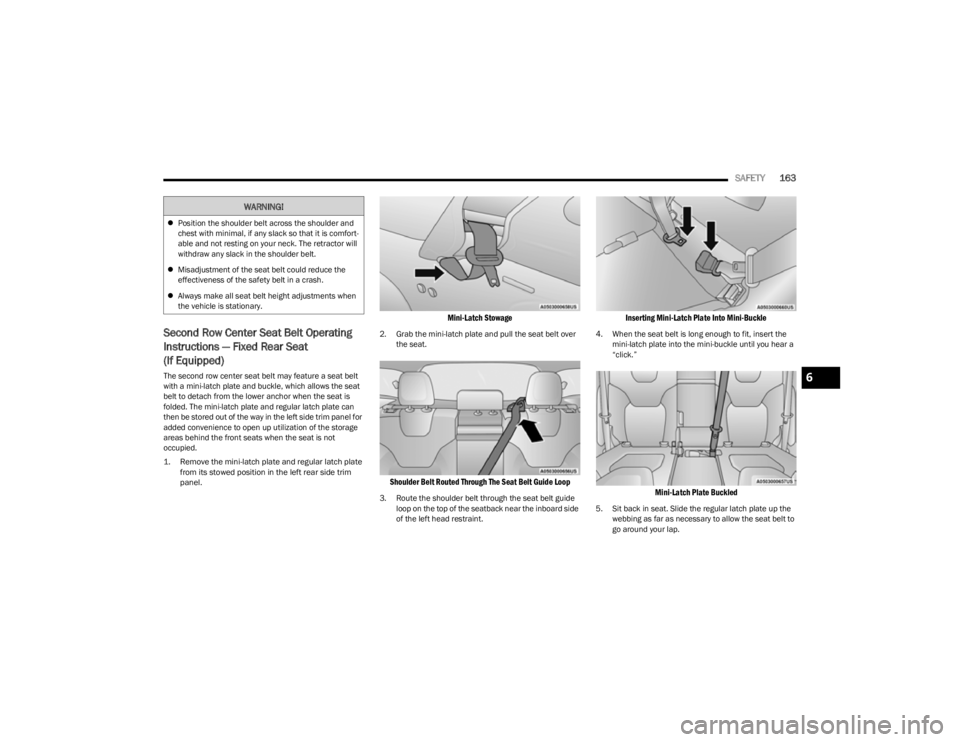
The second row center seat belt may feature a seat belt
with a mini-latch plate and buckle, which allows the seat
belt to detach from the lower anchor when the seat is
folded. The mini-latch plate and regular latch plate can
then be stored out of the way in the left side trim panel for
added convenience to open up utilization of the storage
areas behind the front seats when the seat is not
occupied.
1. Remove the mini-latch plate and regular latch plate
from its stowed position in the left rear side trim
panel.
Mini-Latch Stowage
2. Grab the mini-latch plate and pull the seat belt over the seat.
Shoulder Belt Routed Through The Seat Belt Guide Loop
3. Route the shoulder belt through the seat belt guide loop on the top of the seatback near the inboard side
of the left head restraint.
Inserting Mini-Latch Plate Into Mini-Buckle
4. When the seat belt is long enough to fit, insert the mini-latch plate into the mini-buckle until you hear a
“click.”
Mini-Latch Plate Buckled
5. Sit back in seat. Slide the regular latch plate up the webbing as far as necessary to allow the seat belt to
go around your lap.
Position the shoulder belt across the shoulder and
chest with minimal, if any slack so that it is comfort -
able and not resting on your neck. The retractor will
withdraw any slack in the shoulder belt.
Misadjustment of the seat belt could reduce the
effectiveness of the safety belt in a crash.
Always make all seat belt height adjustments when
the vehicle is stationary.
WARNING!
6
23_KL_OM_EN_USC_t.book Page 163
Page 267 of 276

265
Oil Selection ............................................................ 215
Oil Synthetic ............................................................ 215
Overheating ............................................................. 203
Engine Fluids And Lubricants...................................... 256
Enhanced Accident Response Feature ............. 175
, 207
Ethanol.......................................................................... 254
Exhaust Gas Cautions.................................................. 188
Exhaust System ............................................................ 222
Exterior Lights........................................................ 39
, 188
FFilters Air Cleaner ............................................................... 216Air Conditioning................................................ 48
, 218
Engine Oil ................................................................ 216 Engine Oil Disposal ................................................. 215
Flashers Hazard Warning ...................................................... 189
Turn Signals ..................................................... 74
, 188
Flash-To-Pass ..................................................................40
Flat Tire Changing ............................................... 235
, 244
Flat Tire Stowage ................................................ 235, 244
Flooded Engine Starting .................................................78
Fluid Capacities ............................................................ 256
Fluid Leaks ................................................................... 188
Fluid Level Checks Brake ....................................................................... 225Engine Oil ................................................................ 214
Fob, Key ...........................................................................13
Fog Lights ........................................................................41 Fold-Flat Seats ................................................................28Folding Rear Seats..........................................................29Forward Collision Warning ........................................... 154
Four Wheel Drive............................................................. 85 Freeing A Stuck Vehicle................................................ 204
Fuel
Additives...................................................................255Clean Air ...................................................................254Ethanol .....................................................................254
Light............................................................................ 71
Materials Added ...................................................... 255
Methanol .................................................................. 254
Tank Capacity .......................................................... 256
Fueling ...........................................................................113
Fuses .............................................................................226
GGarage Door Opener (HomeLink®) ............................... 35 Gasoline, Clean Air ....................................................... 254
Gasoline, Reformulated ............................................... 254
Gear Ranges ................................................................... 82Gear Selector Override ................................................. 203
Glass Cleaning .............................................................. 252
Gross Axle Weight Rating ............................................. 115
Gross Combination Weight Rating............................... 115
Gross Trailer Weight ..................................................... 115
Gross Vehicle Weight Rating ........................................ 114
GVWR.............................................................................113
HHazard Warning Flashers ............................................. 189
Head Restraint Removal ................................................ 32
Head Restraints .............................................................. 32
Head Rests...................................................................... 32
Headlights ....................................................................... 39 Automatic ................................................................... 40
Automatic High Beam ............................................... 40 Cleaning ................................................................... 250
High Beam .......................................................... 39
, 40
High Beam/Low Beam Select Switch ...................... 40
On With Wipers.......................................................... 41
Passing ............................................................... 39
, 40
Switch ........................................................................ 39
Time Delay ................................................................. 41
Heated Mirrors ............................................................... 35 Heated Seats .................................................................. 31
Heated Steering Wheel .................................................. 24
Hill Descent Control ..................................................... 146
Hill Descent Control Indicator...................................... 146
Hill Start Assist ............................................................. 148
Hitches Trailer Towing .......................................................... 116
HomeLink® (Garage Door Opener)............................... 35
Hood Prop ....................................................................... 56
Hood Release ................................................................. 56
IIgnition ............................................................................ 16 Switch ........................................................................ 16
Ignition Pak Interlock ..................................................... 81
Illuminated Entry ............................................................ 43
Indicator light Blue ............................................................................ 75
Green ......................................................................... 73
White .......................................................................... 74
Yellow......................................................................... 73
Inside Rearview Mirror .......................................... 34
, 189
Instrument Cluster Descriptions
S
.......................................... 61, 63, 74
Display ....................................................................... 63
Display Controls ........................................................ 6311
23_KL_OM_EN_USC_t.book Page 265
Page 269 of 276

267
Modifications/AlterationsVehicle .......................................................................... 8
Monitor, Tire Pressure System .................................... 155
Mopar Parts .................................................................. 260
MP3 Control ....................................................................50
Multi-Function Control Lever ..........................................39
NNew Vehicle Break-In Period ..........................................78
OOccupant Restraints .................................................... 159
Off Road Pages ............................................................ 141 Accessory Gauges................................................... 142
Drivetrain................................................................. 141
Pitch And Roll .......................................................... 142
Status Bar ............................................................... 141
Off-Road Pages Selec-Terrain ........................................................... 142
Oil Filter, Change .......................................................... 216
Oil Filter, Selection ....................................................... 216
Oil Life Reset — If Equipped
S
..................................... 64
Oil Pressure Light ............................................................69
Oil Reset ..........................................................................64
Oil, Engine..................................................................... 215 Capacity ................................................................... 256
Checking .................................................................. 214
Dipstick.................................................................... 214
Disposal................................................................... 215
Filter......................................................................... 216
Filter Disposal ......................................................... 215Identification Logo .................................................. 215Materials Added To................................................. 215Pressure Warning Light ............................................. 69 Recommendation ....................................................215
Synthetic .................................................................. 215
Onboard Diagnostic System........................................... 75
Operating Precautions.................................................... 75 Operator Manual Owner's Manual ....................................................... 261
Outside Rearview Mirrors............................................... 34
Overheating, Engine ..................................................... 203
PPaddle Shifters ............................................................... 84
Paint Care...................................................................... 250
Parking Brake ................................................................. 78
ParkSense Front And Rear........................................................... 99
ParkSense Active Park Assist ...................................... 106
ParkSense System, Rear................................................ 99
Passive Entry................................................................... 22 Pets ................................................................................ 186
Pinch Protection.............................................................. 56
Placard, Tire And Loading Information ........................ 238
Power Brakes ...................................................................... 253
Door Locks ................................................................. 21
Inverter ....................................................................... 52
Mirrors ........................................................................ 35
Outlet (Auxiliary Electrical Outlet) ............................. 51
Windows..................................................................... 53
Power Seats Down .......................................................................... 30
Forward ...................................................................... 30
Rearward.................................................................... 30
Up ............................................................................... 30
Pregnant Women And Seat Belts ................................ 165 Preparation For Jacking ............................................... 191
Pressure Washing ........................................................ 215
Pretensioners
Seat Belts ................................................................ 165
RRadial Ply Tires ............................................................. 242
Radiator Cap (Coolant Pressure Cap) ......................... 224
RadioOff-Road Pages ....................................................... 141
Radio Operation ........................................................... 140
Radio Remote Controls ................................................ 140
Rain Sensitive Wiper System......................................... 44 Rear Camera................................................................. 112
Rear Cross Path............................................................ 153
Rear ParkSense System ................................................ 99Rear Seats, Folding ........................................................ 29Rear Wiper/Washer ....................................................... 45Recreational Towing ..................................................... 120 Shifting Into Power Transfer Unit Neutral (N)........ 122
Shifting Into Transfer Case Neutral (N) ................. 122
Shifting Out Of Power Transfer Unit Neutral (N) ... 123
Shifting Out Of Transfer Case Neutral (N) ............. 123
Reformulated Gasoline ................................................ 254
Refrigerant .................................................................... 218
Release, Hood ................................................................ 56
Reminder, Lights On....................................................... 41 Reminder, Seat Belt ..................................................... 159
Remote Control Starting System ......................................................... 18
Remote Keyless Entry .................................................... 14 Arm The Alarm ........................................................... 20
Disarm The Alarm ..................................................... 20
Programming Additional Key Fobs ........................... 15
11
23_KL_OM_EN_USC_t.book Page 267