2023 HYUNDAI SONATA change time
[x] Cancel search: change timePage 1 of 555

OWNER’S MANUAL
Operation
MaintenanceSpecifications
All information in this Owner’s Manual is current at the time of
publication.
However, HYUNDAI Auto Canada Corp. reserves the right
to make changes at any time so that our policy of continual
product improvement may be carried out.
This manual applies to all HYUNDAI models and includes
descriptions and explanations of optional as well as standard
equipment. As a result, you may find material in this manual
that does not apply to your specific vehicle.
* Trademarks and tradenames owned or licensed in Canada by HYUNDAI Auto Canada Corp. which carries on business as
‘’HYUNDAI Auto Canada’’.
Page 35 of 555
Seats & Safety System
3-6
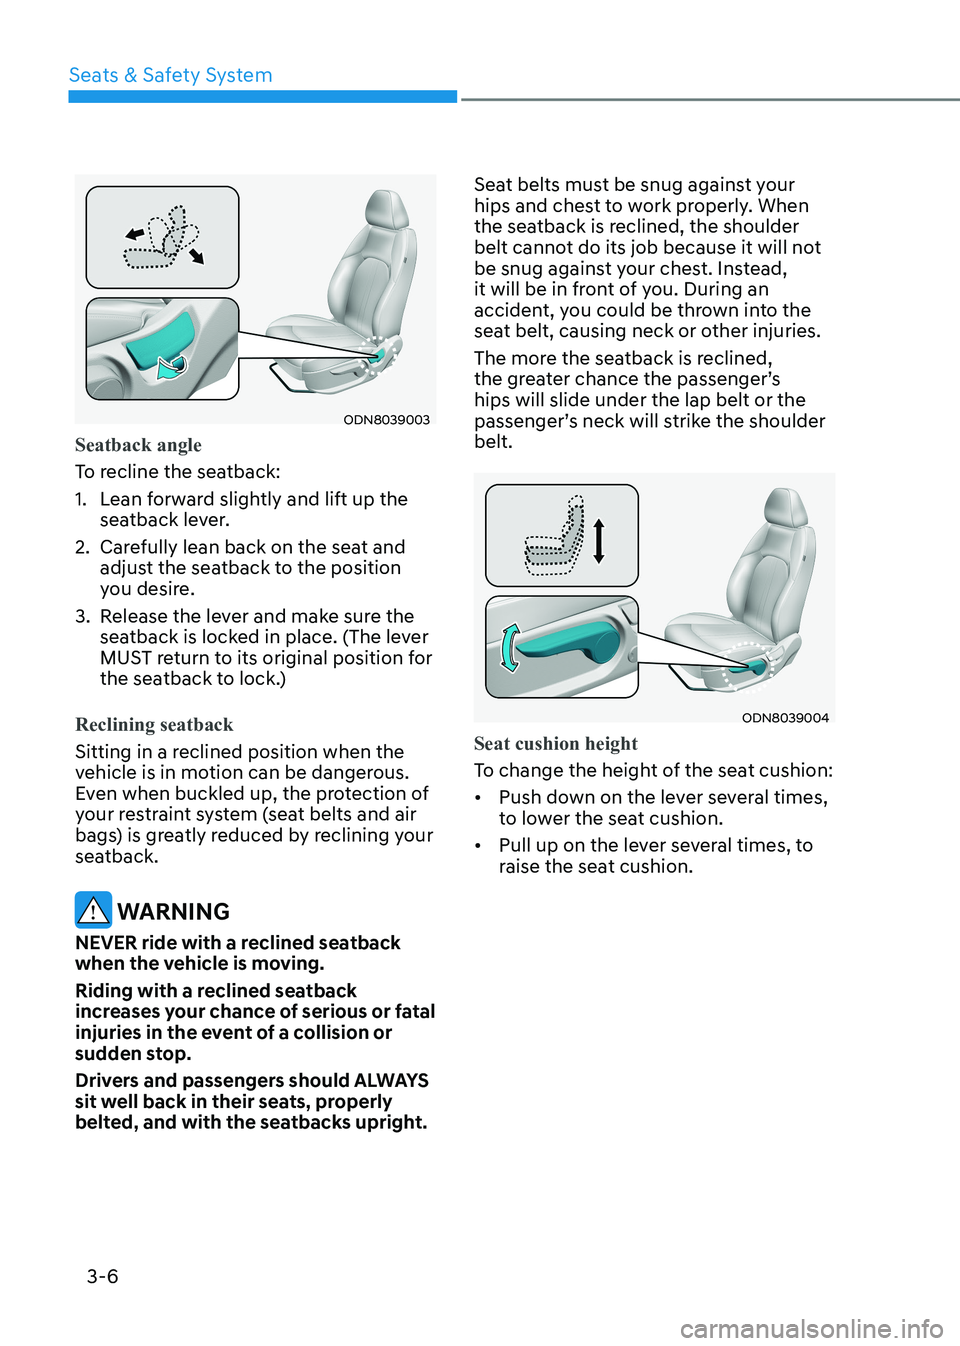
ODN8039003
Seatback angle
To recline the seatback:
1. Lean forward slightly and lift up the seatback lever.
2. Carefully lean back on the seat and adjust the seatback to the position
you desire.
3. Release the lever and make sure the seatback is locked in place. (The lever
MUST return to its original position for
the seatback to lock.)
Reclining seatback
Sitting in a reclined position when the
vehicle is in motion can be dangerous.
Even when buckled up, the protection of
your restraint system (seat belts and air
bags) is greatly reduced by reclining your
seatback.
WARNING
NEVER ride with a reclined seatback
when the vehicle is moving.
Riding with a reclined seatback
increases your chance of serious or fatal
injuries in the event of a collision or
sudden stop.
Drivers and passengers should ALWAYS
sit well back in their seats, properly
belted, and with the seatbacks upright. Seat belts must be snug against your
hips and chest to work properly. When
the seatback is reclined, the shoulder
belt cannot do its job because it will not
be snug against your chest. Instead,
it will be in front of you. During an
accident, you could be thrown into the
seat belt, causing neck or other injuries.
The more the seatback is reclined,
the greater chance the passenger’s hips will slide under the lap belt or the
passenger’s neck will strike the shoulder belt.
ODN8039004
Seat cushion height
To change the height of the seat cushion: •
Push down on the lever several times,
to lower the seat cushion.
• Pull up on the lever several times, to
raise the seat cushion.
Page 44 of 555
03
3-15
Seat Warmers and Air Ventilation
Seats
Seat warmers (if equipped)
Seat warmers are provided to warm the
seats during cold weather.
WARNING
The seat warmers can cause a SERIOUS
BURN, even at low temperatures and
especially if used for long periods of time.
Passengers must be able to feel if the
seat is becoming too warm so they can
turn it off, if needed.
People who cannot detect temperature
change or pain to the skin should
use extreme caution, especially the
following types of passengers: • Infants, children, elderly or disabled
persons, or hospital outpatients.
• People with sensitive skin or who
burn easily.
• Fatigued individuals.
• Intoxicated individuals.
• People taking medication that can
cause drowsiness or sleepiness.
WARNING
NEVER place anything on the seat
that insulates against heat when the
seat warmer is in operation, such as a
blanket or seat cushion. This may cause
the seat warmer to overheat, causing a
burn or damage to the seat.
NOTICE
To prevent damage to the seat warmers
and seats:
Never use a solvent such as paint
thinner, benzene, alcohol or gasoline to
clean the seats.
Do not place heavy or sharp objects on
seats equipped with seat warmers.
Do not change the seat cover. It
may damage the seat warmer or air
ventilation system.
Page 45 of 555
Seats & Safety System
3-16
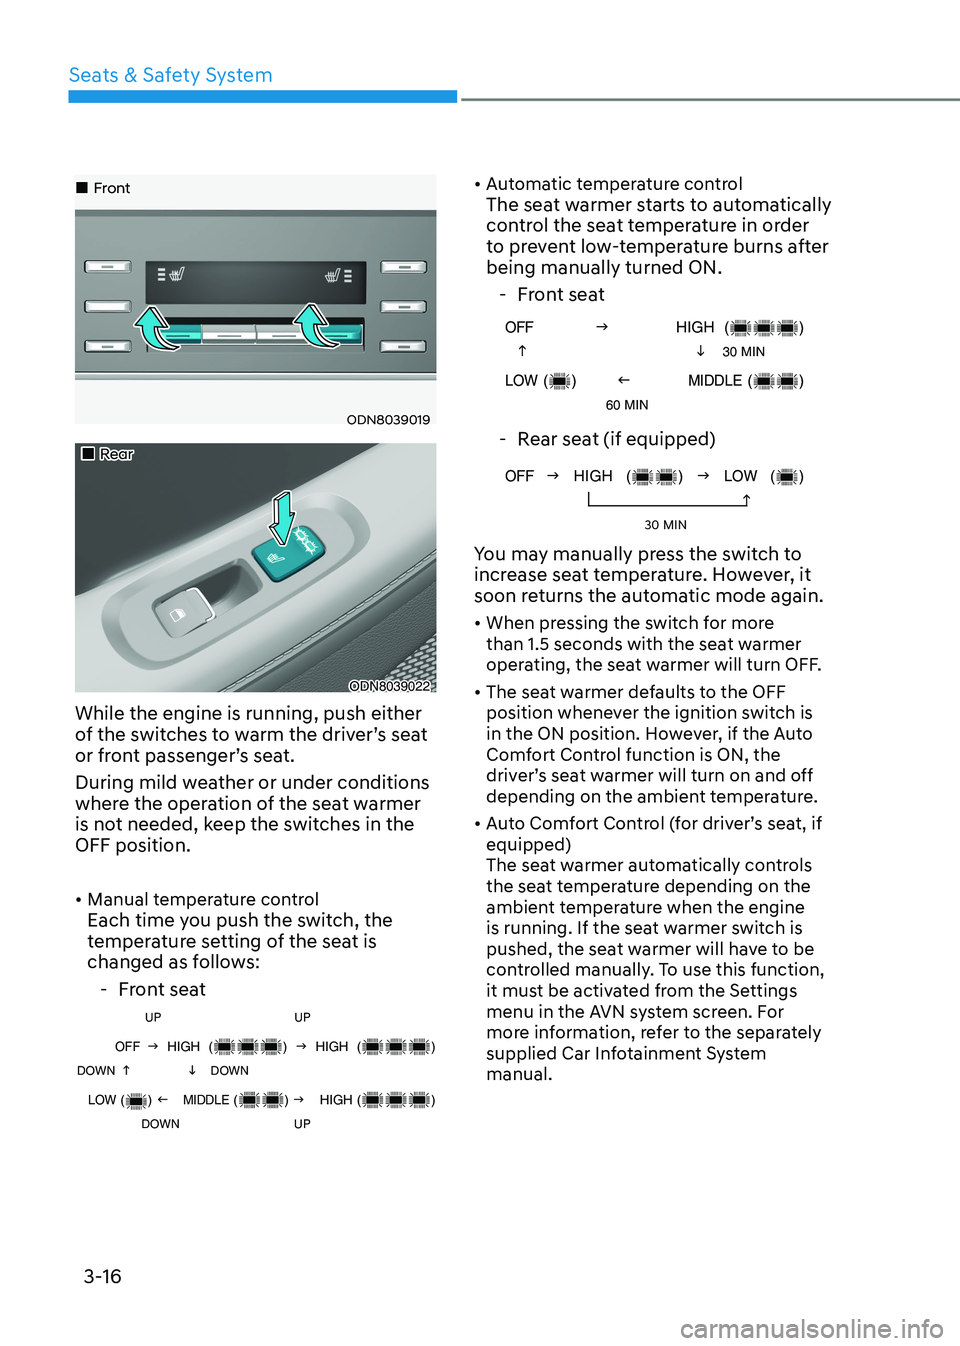
„„Front
ODN8039019
„„Rear
ODN8039022
While the engine is running, push either
of the switches to warm the driver’s seat
or front passenger’s seat.
During mild weather or under conditions
where the operation of the seat warmer
is not needed, keep the switches in the OFF position. • Manual temperature control
Each time you push the switch, the
temperature setting of the seat is
changed as follows:
- Front seat
UP UP
OFF
g HIGH () g HIGH ()
DOWN
h i DOWN
LOW () f MIDDLE () g HIGH ()
DOWN U
P
•
Automatic temperature control
The seat warmer starts to automatically
control the seat temperature in order
to prevent low-temperature burns after being manually turned ON.
- Front seat
OFF g HIGH ()
h i 30 MIN
LOW () f MIDDLE ()
60 MIN
- Rear seat (if equipped)
OFF g HIGH () g LOW ()
h
30 MIN
You may manually press the switch to
increase seat temperature. However, it
soon returns the automatic mode again. • When pressing the switch for more
than 1.5 seconds with the seat warmer
operating, the seat warmer will turn OFF.
• The seat warmer defaults to the OFF
position whenever the ignition switch is
in the ON position. However, if the Auto
Comfort Control function is ON, the
driver’s seat warmer will turn on and off
depending on the ambient temperature.
• Auto Comfort Control (for driver’s seat, if equipped)
The seat warmer automatically controls
the seat temperature depending on the
ambient temperature when the engine
is running. If the seat warmer switch is
pushed, the seat warmer will have to be
controlled manually. To use this function,
it must be activated from the Settings
menu in the AVN system screen. For
more information, refer to the separately
supplied Car Infotainment System manual.
Page 46 of 555
03
3-17
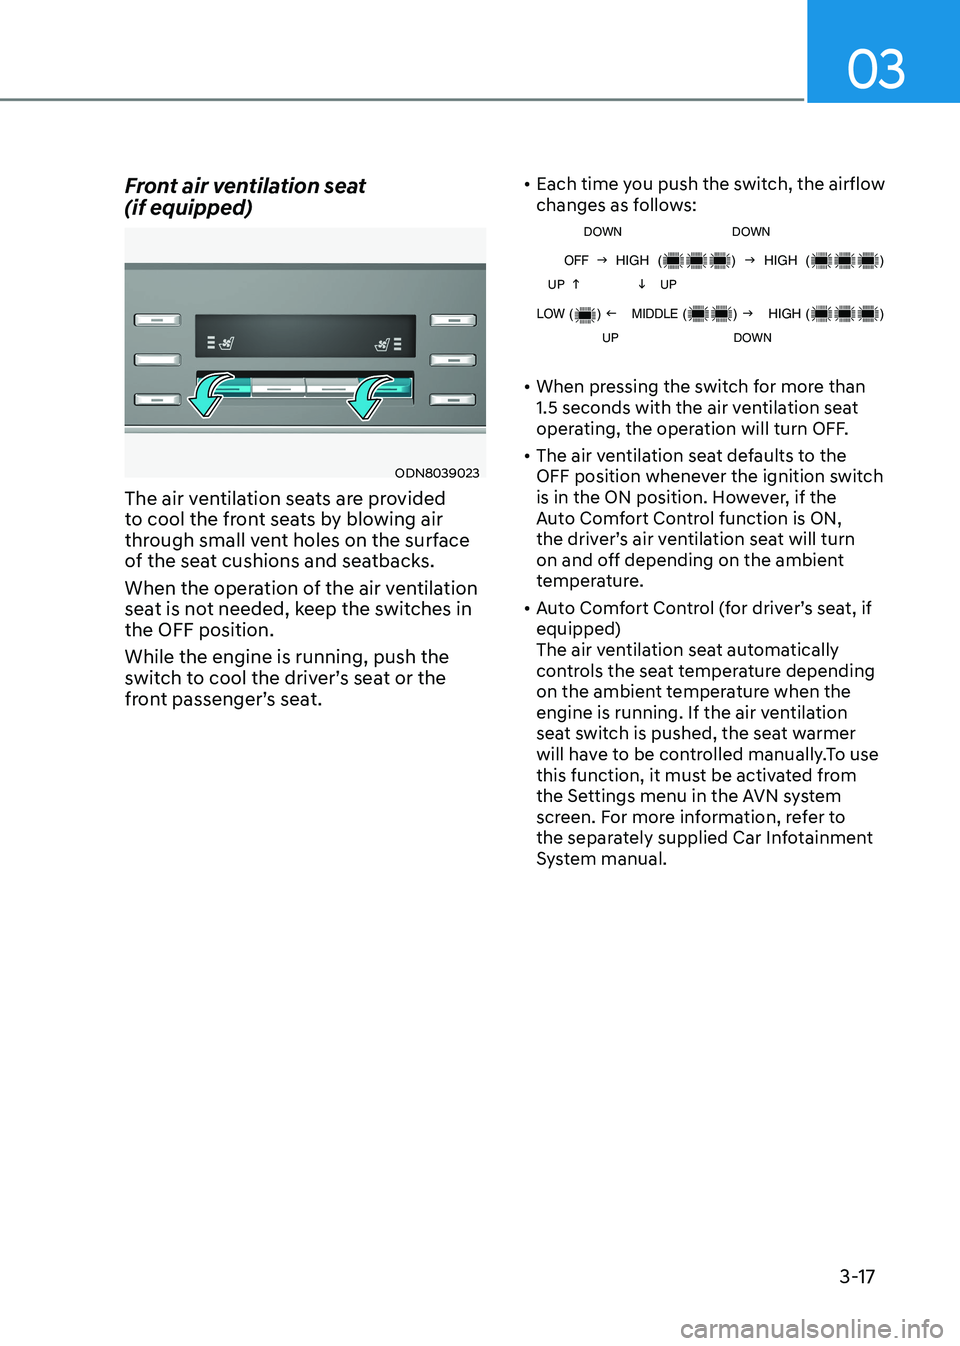
Front air ventilation seat (if equipped)
ODN8039023
The air ventilation seats are provided
to cool the front seats by blowing air
through small vent holes on the surface
of the seat cushions and seatbacks.
When the operation of the air ventilation
seat is not needed, keep the switches in the OFF position. While the engine is running, push the
switch to cool the driver’s seat or the
front passenger’s seat. •
Each time you push the switch, the airflow
changes as follows:
DOWN DOWN
OFF g HIGH () g HIGH ()
UP
h i UP
LOW () f MIDDLE () g HIGH ()
UP DOWN
• When pressing the switch for more than
1.5 seconds with the air ventilation seat
operating, the operation will turn OFF.
• The air ventilation seat defaults to the
OFF position whenever the ignition switch
is in the ON position. However, if the
Auto Comfort Control function is ON,
the driver’s air ventilation seat will turn
on and off depending on the ambient
temperature.
• Auto Comfort Control (for driver’s seat, if equipped)
The air ventilation seat automatically
controls the seat temperature depending
on the ambient temperature when the
engine is running. If the air ventilation
seat switch is pushed, the seat warmer
will have to be controlled manually.To use
this function, it must be activated from
the Settings menu in the AVN system
screen. For more information, refer to
the separately supplied Car Infotainment
System manual.
Page 47 of 555
Seats & Safety System
3-18
NOTICE
To prevent damage to the air ventilation
seat: • Use the air ventilation seat ONLY
when the climate control system
is on. Using the air ventilation seat
for prolonged periods of time with
the climate control system off could
cause the air ventilation seat to malfunction.
• NEVER use a solvent such as paint
thinner, benzene, alcohol or gasoline
to clean the seats.
• Avoid spilling liquids on the surface
of the front seats and seatbacks;
this may cause the air vent holes
to become blocked and not work
properly.
• Do not place materials such as
plastic bags or newspapers under
the seats. They may block the air
intake causing the air vents to not
work properly.
• Do not change the seat covers. It may
damage the air ventilation seat.
• If the air vents do not operate, restart
the vehicle. If there is no change,
have the vehicle inspected by an
authorized HYUNDAI dealer.
Page 105 of 555
04
4-19
LCD Display Messages
Shift to P or N to start engine
(for smart key system)
This warning message is displayed if
you try to start the engine with the shift
button not in the P (Park) or N (Neutral) position.
Information
You can start the engine with the shift
button in the N (Neutral) position. But, for
your safety, we recommend that you start
the engine with the shift button in the P (Park) position.
Shift to P (for smart key system)
This message is displayed if you try to
turn off the engine without the shift
button in P (Park) position.
If this occurs, the Engine Start/Stop
button turns to the ACC position (If you
press the Engine Start/Stop button once
more, it will turn to the ON position).
Low key battery
(for smart key system)
This warning message is displayed if the
battery of the smart key is discharged
while changing the Engine Start/Stop
button to the OFF position.
Press brake pedal to start engine
(for smart key system)
This warning message is displayed if the
Engine Start/Stop button changes to
the ACC position twice by pressing the
button repeatedly without depressing
the brake pedal.
You can start the vehicle by depressing
the brake pedal and then pressing the
Engine Start/Stop button. Key not in vehicle
(for smart key system)
This warning message is displayed if the
smart key is not in the vehicle when you
press the Engine Start/Stop button.
When attempting to start the vehicle,
always have the smart key with you.
Key not detected
(for smart key system)
This warning message is displayed if the
smart key is not detected when you press
the Engine Start/Stop button.
Press START button again
(for smart key system)
This message is displayed if you were
unable to start the vehicle when the
Engine Start/Stop button was pressed.
If this occurs, attempt to start the engine
by pressing the Engine Start/Stop button again.
If the warning message appears each
time you press the Engine Start/Stop
button, have your vehicle inspected by
an authorized HYUNDAI dealer.
Battery discharging due to external
electrical devices (if equipped)
This message is displayed if the battery
voltage is weak due to any non-factory
electrical accessories (ex. dashboard
camera) while parking. Be careful that
the battery is not discharged.
If the warning message appears after
removing the non-factory electrical
accessories, have the vehicle inspected
by an authorized HYUNDAI dealer.
Page 111 of 555
04
4-25
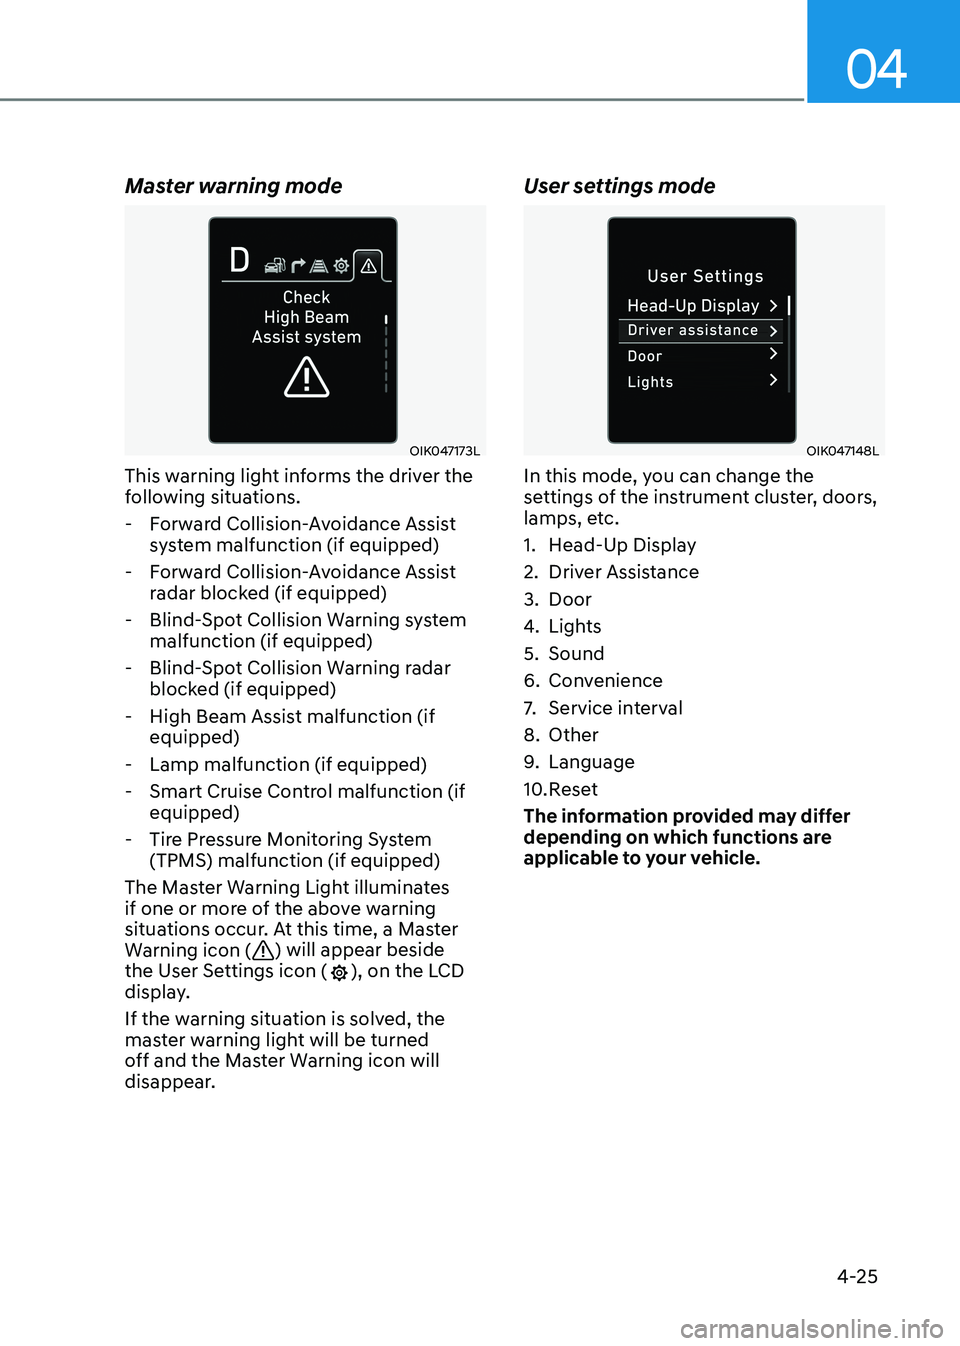
Master warning mode
OIK047173L
This warning light informs the driver the
following situations.
- Forward Collision-Avoidance Assist system malfunction (if equipped)
- Forward Collision-Avoidance Assist radar blocked (if equipped)
- Blind-Spot Collision Warning system malfunction (if equipped)
- Blind-Spot Collision Warning radar blocked (if equipped)
- High Beam Assist malfunction (if equipped)
- Lamp malfunction (if equipped)
- Smart Cruise Control malfunction (if equipped)
- Tire Pressure Monitoring System (TPMS) malfunction (if equipped)
The Master Warning Light illuminates
if one or more of the above warning
situations occur. At this time, a Master
Warning icon (
) will appear beside
the User Settings icon (), on the LCD
display.
If the warning situation is solved, the
master warning light will be turned
off and the Master Warning icon will
disappear. User settings mode
OIK047148L
In this mode, you can change the
settings of the instrument cluster, doors,
lamps, etc.
1. Head-Up Display
2. Driver Assistance
3. Door
4.
Lights
5. Sound
6. Convenience
7. Service interval
8. Other
9. Language
10. Reset
The information provided may differ
depending on which functions are
applicable to your vehicle.