2023 HYUNDAI NEXO warning
[x] Cancel search: warningPage 389 of 558
5-122
Driving your vehicle
The severe weather conditions of
winter quickly wear out tires and
cause other problems. To minimize
winter driving problems, you should
take the following suggestions:
Snow or Icy Conditions
You need to keep sufficient distance
between your vehicle and the vehicle
in front of you.
Apply the brakes gently. Speeding,
rapid acceleration, sudden brake
applications, and sharp turns are
potentially very hazardous practices.
During deceleration, use regenera-
tive braking to the fullest extent.
Sudden brake applications on snowy
or icy roads may cause the vehicle toskid.
To drive your vehicle in deep snow, it
may be necessary to use snow tires.
Always carry emergency equipment.
Some of the items you may want to
carry include, tow straps or chains, a
flashlight, emergency flares, sand, a
shovel, jumper cables, a window
scraper, gloves, ground cloth, cover-
alls, a blanket, etc.
Snow tires
If you mount snow tires on your vehi-
cle, make sure to use radial tires of
the same size and load range as the
original tires. Mount snow tires on all
four wheels to balance your vehicle’s
handling in all weather conditions.
The traction provided by snow tires
on dry roads may not be as high as
your vehicle's original equipment
tires. Check with the tire dealer for
maximum speed recommendations.Information
Do not install studded tires without
first checking local, country and
municipal regulations for possible
restrictions against their use.
Air cleaner filter (FCEV)
The snow may block the air cleaner
filter after driving the vehicle in heavy
snow when the ambient temperature
is below 10°C (50°F).
If a warning message "Air filter
blocked. Check filter or see user
manual" appears on LCD display
after turning off the vehicle, remove
the snow from the inside of the air
cleaner filter and turn on and off the
vehicle. If the warning message is
displayed again, the exhaust pipe
may be blocked. Then, move your
vehicle indoors and leave it inside
more than one day to defrost the
exhaust pipe.
If the warning message is displayed
again, have the vehicle checked by
an authorized HYUNDAI dealer.
i
WW IINN TTEERR DD RRIIVV IINN GG
Snow tires should be equivalent
in size and type to the vehicle's
standard tires. Otherwise, the
safety and handling of your
vehicle may be adversely affect-ed.
WARNING
Page 394 of 558
5-127
Driving your vehicle
5
Steps for determining correctload limit
1. Locate the statement "The com- bined weight of occupants and
cargo should never exceed XXX
kg or XXX lbs." on your vehicle'splacard.
2. Determine the combined weight of the driver and passengers that will
be riding in your vehicle.
3. Subtract the combined weight of the driver and passengers from
XXX kg or XXX lbs.
4. The resulting figure equals the available amount of cargo and lug-
gage load capacity. For example, ifthe "XXX" amount equals 635 kg
(1400 lbs.) and there will be five
68 kg (150 lb.) passengers in your
vehicle, the amount of availablecargo and luggage load capacity
is 295 kg (650 lbs.) (635 - 340 (5 x68) = 295 kg or (1400 - 750 (5 x
150) = 650 lbs.)) 5. Determine the combined weight of
luggage and cargo being loaded
on the vehicle. That weight may
not safely exceed the availablecargo and luggage load capacitycalculated in Step 4.
6. If your vehicle will be towing a trail- er, load from your trailer will be
transferred to your vehicle.
Consult this manual to determine
how this reduces the availablecargo and luggage load capacity
of your vehicle. Do not overload the vehicle asthere is a limit to the total
weight, or load limit, including
occupants and cargo, the vehi-
cle can carry. Overloading can
shorten the life of the vehicle. If
the GVWR or the GAWR is
exceeded, parts on the vehicle
can break, and it can change the
handling of your vehicle. These
could cause you to lose controland result in an accident.
WARNING
Page 396 of 558
5-129
Driving your vehicle
5
Certification label
The certification label is located on
the driver’s door sill at the center pil-
lar and shows the maximum allow-
able weight of the fully loaded vehi-
cle. This is called the GVWR (Gross
Vehicle Weight Rating). The GVWR
includes the weight of the vehicle, all
occupants, fuel and cargo.
This label also tells you the maxi-
mum weight that can be supported
by the front and rear axles, called
Gross Axle Weight Rating (GAWR).
The total weight of the vehicle,
including all occupants, accessories,
cargo, and trailer tongue load must
not exceed the Gross Vehicle WeightRating (GVWR) or the Gross Axle
Weight Rating (GAWR). To find out
the actual loads on your front and
rear axles, you need to go to a weigh
station and weigh your vehicle. Be
sure to spread out your load equally
on both sides of the centerline.Overloading your vehicle may
cause damage. Repairs would not
be covered by your warranty. Do
not overload your vehicle.
NOTICE
Overloading
Never exceed the GVWR for
your vehicle, the GAWR for
either the front or rear axle
and vehicle capacity weight.Exceeding these ratings can
affect your vehicle's handling
and braking ability, and causean accident.
Do not overload your vehicle.
Overloading your vehicle can
cause heat buildup in your
vehicle's tires and possible
tire failure, increased stop-ping distances and poor vehi-
cle handling-all of which mayresult in a crash.
WARNING
Page 397 of 558
5-130
Driving your vehicle
We do not recommend using this vehicle for trailer towing.
TTRR AA IILL EE RR TT OO WW IINN GG
If you carry items inside your
vehicle (e.g., suitcases, tools,
packages, or anything else),
they are moving as fast as the
vehicle. If you have to stop or
turn quickly, or if there is a
crash, the items will keep going
and can cause an injury if they
strike the driver or a passenger.
Put items in the cargo area of
your vehicle. Try to spread the
weight evenly.
Do not stack items, like suit-
cases, inside the vehicle
above the tops of the seats.
Do not leave an unsecured
child restraint in your vehicle.
When you carry something
inside the vehicle, secure it.
WARNING
Page 398 of 558

What to do in an emergency
6
Hazard Warning Flasher .......................................6-2
In Case of an Emergency While Driving.............6-2If an accident occurs........................................................6-2
If a fire occurs ...................................................................6-3
Emergency venting of hydrogen gas...........................6-3
If a submersion in water occurs....................................6-3
If the vehicle stalls at a crossroad or crossing .........6-3
If you have a flat tire while driving..............................6-4
If the vehicle stalls while driving...................................6-4
If the Vehicle Will Not Start .................................6-4
If the 12 Volt Battery is Discharged ...................6-5 Before Jump Starting .......................................................6-5
Jump Starting......................................................................6-6
If the Vehicle Overheats .......................................6-9
Tire Pressure Monitoring System (TPMS).......6-11 Check Tire Pressure .......................................................6-11
Tire Pressure Monitoring System ...............................6-12
Low Tire Pressure Telltale ............................................6-13
Low Tire Pressure LCD Display with Position
Indicator.............................................................................6-13 TPMS Malfunction Indicator ........................................6-14
Changing a Tire with TPMS..........................................6-15 If You Have a Flat Tire
(With Tire Mobility Kit) .......................................6-17
Towing ...................................................................6-24
Towing Service .................................................................6-24
Removable Towing Hook ...............................................6-25
Emergency Towing..........................................................6-26
Page 399 of 558
6-2
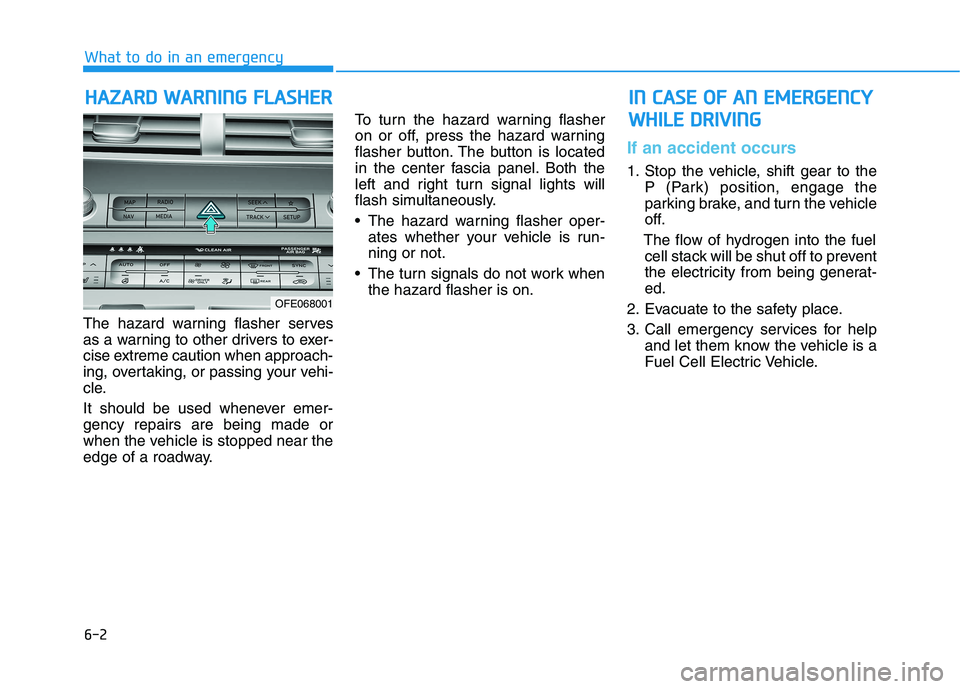
The hazard warning flasher serves
as a warning to other drivers to exer-
cise extreme caution when approach-
ing, overtaking, or passing your vehi-
cle.
It should be used whenever emer- gency repairs are being made or
when the vehicle is stopped near the
edge of a roadway. To turn the hazard warning flasher
on or off, press the hazard warning
flasher button. The button is located
in the center fascia panel. Both the
left and right turn signal lights will
flash simultaneously.
• The hazard warning flasher oper-
ates whether your vehicle is run- ning or not.
The turn signals do not work when the hazard flasher is on.
If an accident occurs
1. Stop the vehicle, shift gear to the P (Park) position, engage the
parking brake, and turn the vehicle
off.
The flow of hydrogen into the fuel cell stack will be shut off to prevent
the electricity from being generat-ed.
2. Evacuate to the safety place.
3. Call emergency services for help and let them know the vehicle is a
Fuel Cell Electric Vehicle.
HHAAZZAA RRDD WW AARRNN IINN GG FF LLAA SSHH EERR
What to do in an emergency
OFE068001
IINN CC AA SSEE OO FF AA NN EE MM EERR GG EENN CCYY
W
W HHIILL EE DD RRIIVV IINN GG
Page 400 of 558
6-3
What to do in an emergency
If a fire occurs
1. Stop the vehicle, shift gear to theP(Park) position, engage the park-
ing brake, and turn the vehicle off.
The flow of hydrogen into the fuel cell stack will be shut off to prevent
the electricity from being generat-ed.
2. If the fire is small, which can be extinguished with fire extinguisher,
use carbon dioxide extinguisher.
You can also extinguish the fire with water when the vehicle power
is turned off. If the fire is too big to be extin-
guished with the fire extinguisher,
evacuate from the vehicle, call the
fire department, and let them know
the vehicle is a Fuel Cell Electric
Vehicle. Do not come close to the
vehicle until the fire is totally extin-guished.
Emergency venting of hydro-
gen gas
If the temperature near the safety
valve located at the rear under vehi-
cle is over 110°C (230°F) caused by
a fire or other reasons, the safety
valve will open to vent hydrogen gas.
Venting the hydrogen gas makes a
loud noise because the venting
speed is very fast. Stay well away
from the vehicle. The discharge of
hydrogen gas from the vehicle is
flammable and could cause a fire.
If a submersion in water
occurs
If your vehicle was flooded and has
soaked carpeting or water on the
flooring, you should not try to start
the vehicle by pressing the POWER
button.
Contact an authorized HYUNDAI
dealer immediately.
If the vehicle stalls at a cross-
road or crossing
If the vehicle stalls at a crossroad or crossing, set the gear in the N
(Neutral) position and then push the
vehicle to a safe place.
6
Do not use water to extinguish a
fire when the vehicle power is
turned on. Serious electric
shock may result.
WARNING
Page 406 of 558
6-9
What to do in an emergency
1. Pull off the road and stop as soonas it is safe to do so.
2. Shift to P (Park) and set the park- ing brake. If the air conditioning is
on, turn it off.
3. If coolant is running out under the vehicle or steam is coming out
from the hood, stop the vehicle.Do not open the hood until the
coolant has stopped running or
the steaming has stopped. If there
is no visible loss of coolant and no
steam, leave the vehicle running
and check to be sure the vehicle
cooling fan is operating. If the fan
is not running, turn the vehicle off. 4. Check for coolant leaking from the
radiator, hoses or under the vehi-
cle. (If the air conditioning had
been in use, it is normal for cold
water to be draining from it when
you stop.)
5. If coolant is leaking out, stop the vehicle immediately and call the
nearest authorized HYUNDAI
dealer for assistance.
IIFF TT HH EE VV EEHH IICC LLEE OO VVEERR HH EEAA TTSS
6
While the vehicle is
running, keep hands,
clothing and tools
away from the mov-
ing parts such as the
cooling fan to prevent
serious injury.
WARNING
Your vehicle is equipped with a pres-
surized coolant
reserve tank. NEVER
remove the coolant
reserve tank cap or the radiatordrain plug while the radiator is
HOT. Hot coolant and steam
may blow out under pressure,
causing serious injury.
Turn the vehicle off and wait
until the vehicle cools down.
Use extreme care when remov-
ing the coolant reserve tank
cap. Wrap a towel or thick rag
around it, and turn it counter-
clockwise slowly to release
some of the pressure from the
system. Step back while thepressure is released.
When you are sure all the pres-
sure has been released, contin-ue turning the cap counter-
clockwise to remove it.
WARNING