2023 HYUNDAI IONIQ 5 ECO mode
[x] Cancel search: ECO modePage 254 of 680

Convenience Features
5-62
Reverse parking aid user settings mode
You may change the angle of the outside
rearview mirror if it is difficult to see
the rear view with the basic downward
mirror angle provided when reversing.
When the vehicle is first delivered, the
set downward angle of the left and right
outside rearview mirror are different to
ensure driver visibility.
1. Make sure the vehicle is stopped.
2. Depress the brake pedal and shift the
gear to R (Reverse). When L (Left) or R
(Right) button is pressed, both outside
rearview mirror angle will move
downward to the basic set position.
3. Press either L or R button to select the outside rearview mirror you would like
to adjust. Then press “ ▼, ▲ , ◄ , ► ”
switch to adjust the outside rearview
mirror to the desired angle.
4. After adjusting the angle to save the
adjusted outside rearview mirror
angle, shift the gear to another
position other than R (Reverse), or
change the L and R buttons to the
neutral position (L and R buttons are
not pressed).
5. Set the other outside rearview mirror following the above procedure 1 to 4.
Resetting reverse parking aid user settings mode
To change the outside rearview mirror
angle back to the basic angle, shift the
gear to R (Reverse), and adjust the mirror angle higher than when the gear is in P
(Park), N (Neutral) and D (Drive).
NOTICE
When changing the angle of both
outside rearview mirrors, it is
recommended to change the angle one
side at a time following the procedure
1 to 4.
Page 261 of 680

05
5-69
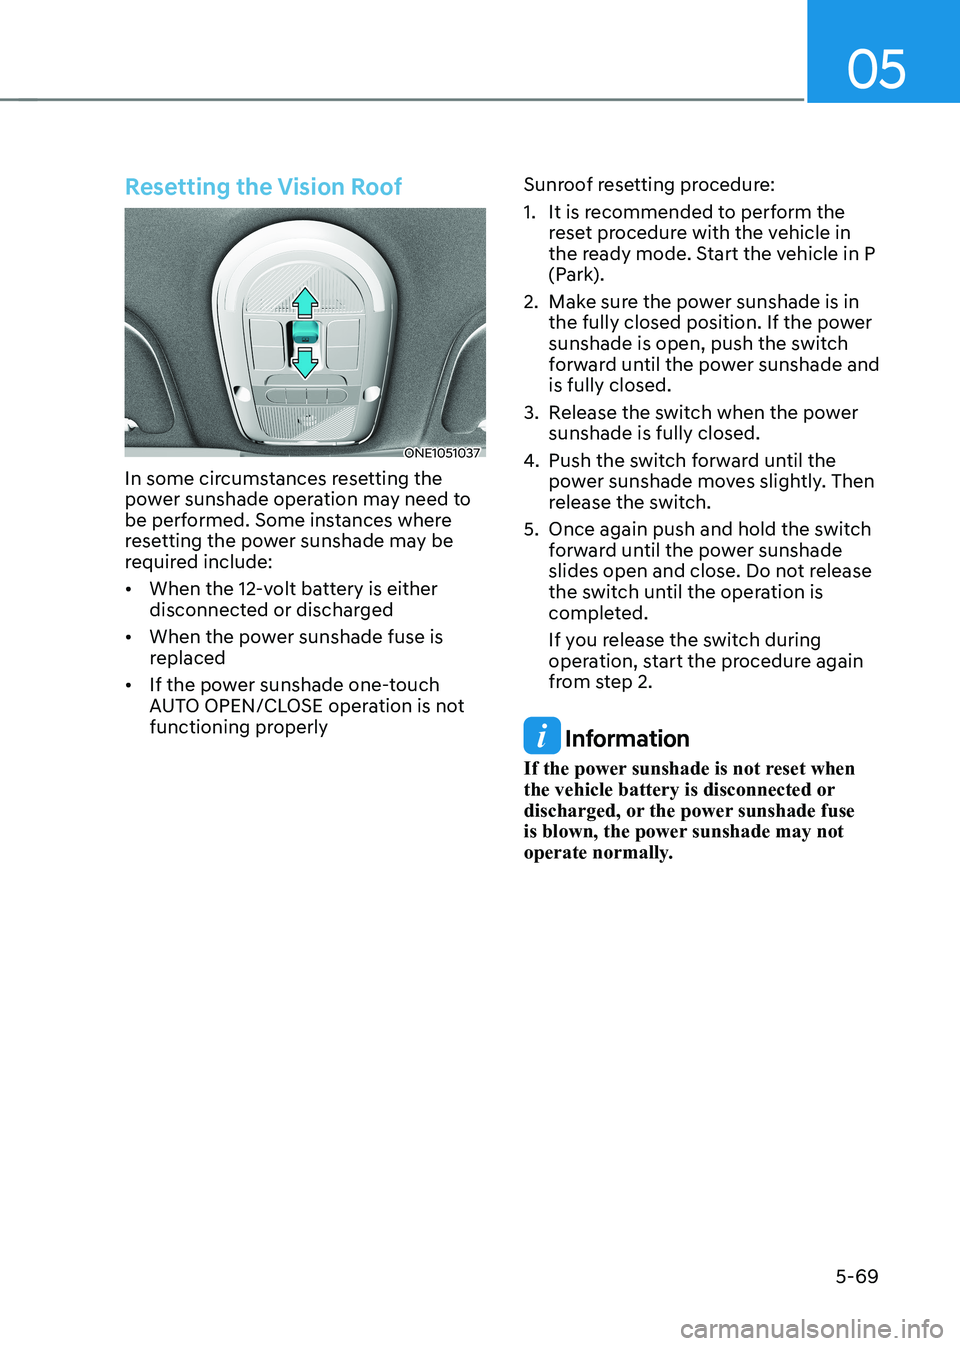
Resetting the Vision Roof
ONE1051037
In some circumstances resetting the
power sunshade operation may need to
be performed. Some instances where
resetting the power sunshade may be
required include: • When the 12-volt battery is either
disconnected or discharged
• When the power sunshade fuse is
replaced
• If the power sunshade one-touch
AUTO OPEN/CLOSE operation is not
functioning properly Sunroof resetting procedure:
1. It is recommended to perform the
reset procedure with the vehicle in
the ready mode. Start the vehicle in P
(Park).
2. Make sure the power sunshade is in the fully closed position. If the power
sunshade is open, push the switch
forward until the power sunshade and is fully closed.
3. Release the switch when the power sunshade is fully closed.
4. Push the switch forward until the
power sunshade moves slightly. Then
release the switch.
5. Once again push and hold the switch forward until the power sunshade
slides open and close. Do not release
the switch until the operation is
completed.
If you release the switch during
operation, start the procedure again
from step 2.
Information
If the power sunshade is not reset when
the vehicle battery is disconnected or
discharged, or the power sunshade fuse
is blown, the power sunshade may not
operate normally.
Page 276 of 680

Convenience Features
5-84
Precautions while Using the
Head-up display
• It may sometimes be difficult to read
information on the Head-Up Display in
the following situations.
- The driver is improperly positioned in the driver’s seat
- The driver wears polarizing-filter sunglasses
- An object is located above the head-up display cover
- The vehicle is driven on a wet road
- Any improper lighting accessory is installed inside the vehicle, or there
is incoming light from outside of the
vehicle
- The driver wears glasses
- The driver wears contact lenses
When it is difficult to read the Head-
up display information, adjust the
image position, brightness level or
AR matching information from the
Settings menu in the infotainment
system screen.
• The AR mode display information may
be difficult to recognize when the
vehicle is driven under severe weather
condition, such as heavy rain, heavy
snow, low visibility, etc.
• Since the information displayed on
the head-up display partially overlaps
with the road ahead, you may feel
fatigue and discomfort while driving.
If you feel tired or uncomfortable,
adjust the image, and if the symptoms
persist, turn off the head-up display
before driving.
• When the direct flash light or
sunlight hits the front windshield, a
warning message will appear. If the
temperature of the front windshield
keep rises, Head-up display will be
deactivated temporarily to protect
Head-up display from the high
temperature. When the temperature
drops, Head-up display will be
reactivated. •
For your safety, make sure to stop the
vehicle before adjusting the settings.
• Do not tint the front windshield glass
or add other types of metallic coating.
Otherwise, the Head-Up Display
image may be invisible.
• Do not place any accessories on the
crash pad or attach any objects on the windshield glass.
• When replacing the front windshield
glass, replace it with a windshield
glass designed for Head-Up Display
operation. Otherwise, duplicated
images may be displayed on the windshield glass.
WARNING
• The warning information of Blind-
Spot Safety on the Head-Up Display
are supplemental. Do not solely
depend on them to change lanes.
Always take a look around before changing lanes.
The driving route guidance display
in the augmented reality mode is an
auxiliary function. Be sure to check
the navigation screen together.
• ALWAYS pay attention on the road
while driving when the Head-Up
Display is on.
Information
Head-Up Display includes GPL, LGPL,
MPL and other open source license
softwares. All license notices including
related source code are provided at http://
www.mobis.co.kr/opensource/list.do.
If the driver requests on-board
software open source code via MOBIS_
[email protected] within 3 years
after buying this product, a CD-ROM or
other storage device will be sent with the minimum cost covering storage device cost and delivery cost.
Page 299 of 680

05
5-107
Information
Operating the system primarily in Fresh
mode is recommended. Use Recirculation mode temporarily only when needed.
Prolonged operation of the heater in
Recirculation mode and without the air conditioning ON can cause fogging of the
windshield. In addition, prolonged use of
the air conditioning ON in Recirculation
mode may result in excessively dry,
dehumidified air in the cabin and may
promote formation of musty vent odor due
to stagnant air.
WARNING
• Continued use of the climate control
system operation in Recirculation
mode for a prolonged period of
time may cause drowsiness to the
occupants in the cabin. This may lead
to loss of vehicle control which may
lead to an accident.
• Continued use of the climate control
system operation in Recirculation
mode with the air conditioning OFF
may allow humidity to increase
inside the cabin. This may cause
condensation to accumulate on the
windshield and obscure visibility.
• Do not sleep in your vehicle or
remain parked in your vehicle with
the windows up and either the
heater or the air conditioning ON for
prolonged periods of time. Doing so
may increase the levels of carbon
dioxide in the cabin which may lead
to serious injury or death.
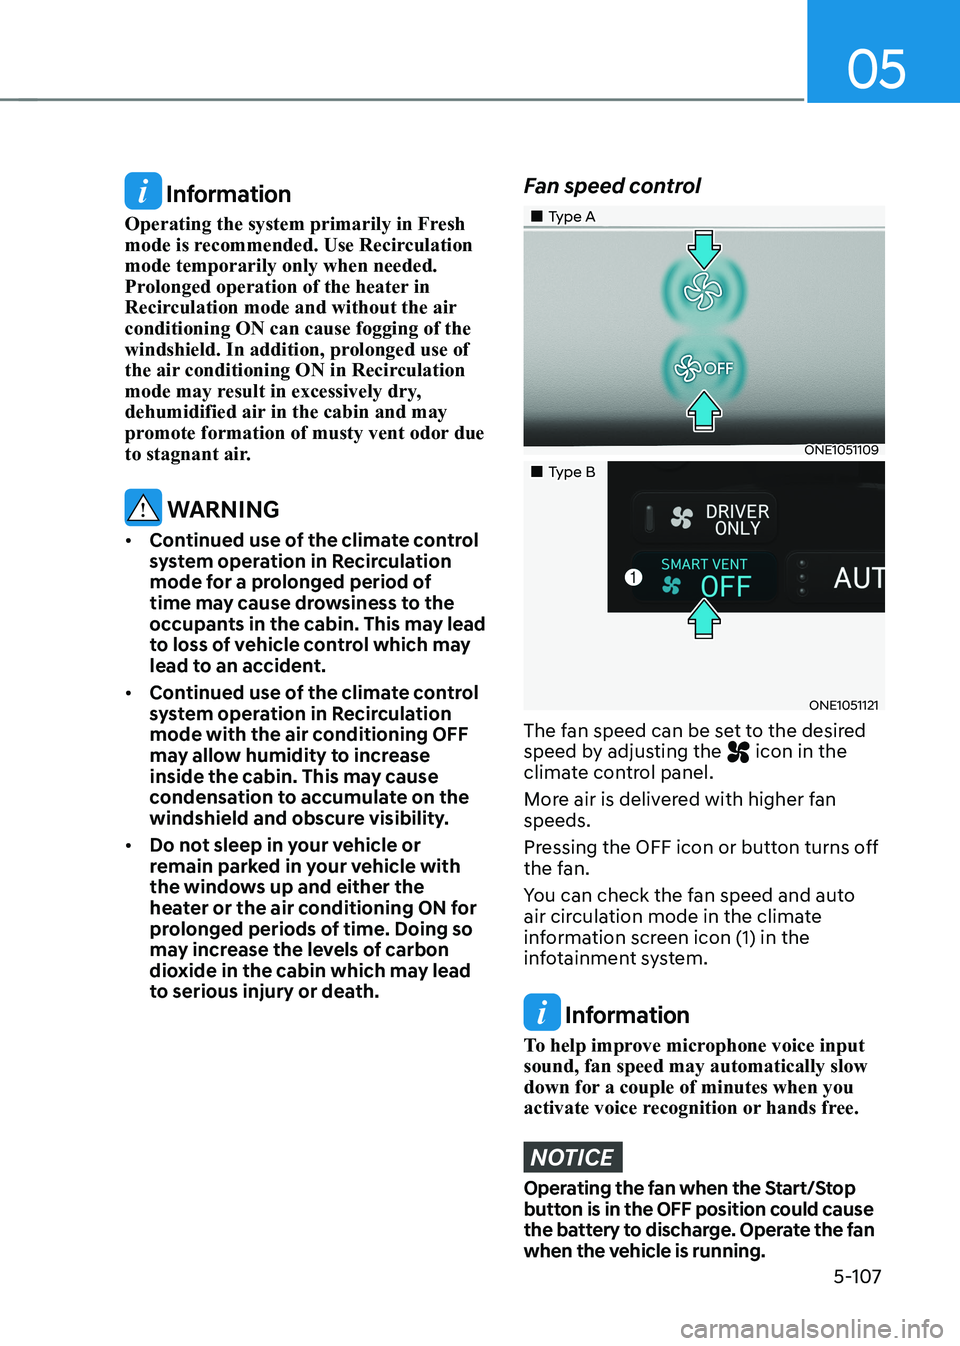
Fan speed control
„„Type A
ONE1051109
„„Type B
ONE1051121
The fan speed can be set to the desired
speed by adjusting the
icon in the
climate control panel.
More air is delivered with higher fan speeds.
Pressing the OFF icon or button turns off
the fan.
You can check the fan speed and auto
air circulation mode in the climate
information screen icon (1) in the
infotainment system.
Information
To help improve microphone voice input sound, fan speed may automatically slow
down for a couple of minutes when you
activate voice recognition or hands free.
NOTICE
Operating the fan when the Start/Stop
button is in the OFF position could cause
the battery to discharge. Operate the fan
when the vehicle is running.
Page 306 of 680

Convenience Features
5-114
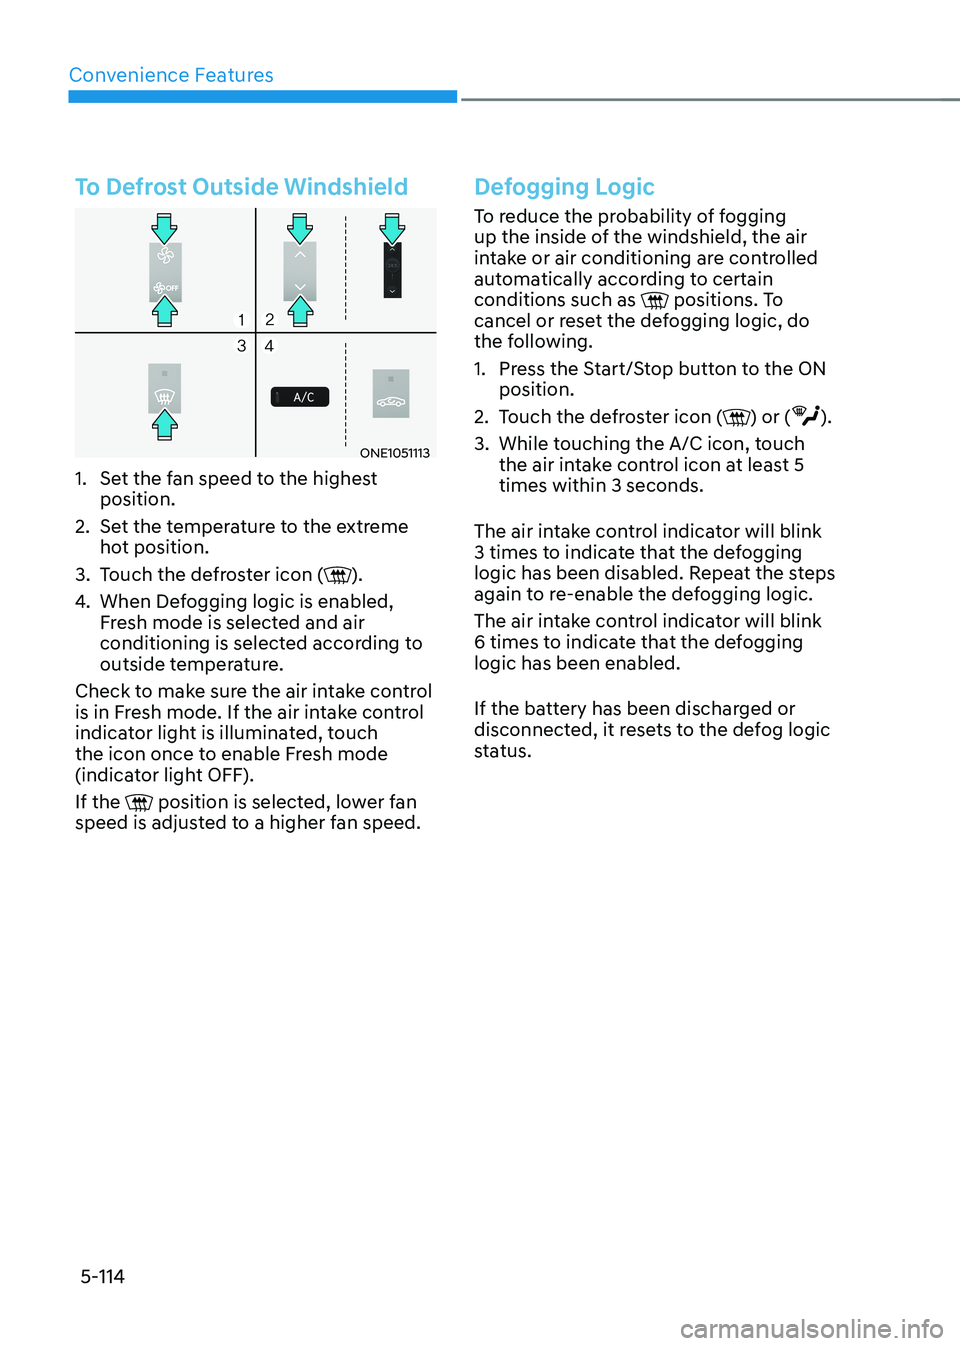
To Defrost Outside Windshield
ONE1051113
1. Set the fan speed to the highest position.
2. Set the temperature to the extreme hot position.
3. Touch the defroster icon (
).
4. When Defogging logic is enabled,
Fresh mode is selected and air
conditioning is selected according to
outside temperature.
Check to make sure the air intake control
is in Fresh mode. If the air intake control
indicator light is illuminated, touch
the icon once to enable Fresh mode
(indicator light OFF). If the
position is selected, lower fan
speed is adjusted to a higher fan speed.
Defogging Logic
To reduce the probability of fogging
up the inside of the windshield, the air
intake or air conditioning are controlled
automatically according to certain conditions such as
positions. To
cancel or reset the defogging logic, do
the following.
1. Press the Start/Stop button to the ON position.
2. Touch the defroster icon (
) or ().
3. While touching the A/C icon, touch the air intake control icon at least 5 times within 3 seconds.
The air intake control indicator will blink
3 times to indicate that the defogging
logic has been disabled. Repeat the steps
again to re-enable the defogging logic.
The air intake control indicator will blink
6 times to indicate that the defogging logic has been enabled.
If the battery has been discharged or
disconnected, it resets to the defog logic
status.
Page 309 of 680

05
5-117
Turning the Auto Defogging System ON or OFF
Climate control system
Touch the front windshield defroster
icon for 3 seconds when the Start/Stop
button is in the ON position. When the
Auto Defogging System is turned off, the
ADS OFF symbol will blink 3 times and
ADS OFF will be displayed on the climate
control information screen.
When the Auto Defogging System is
turned on, the ADS OFF symbol will blink 6 times without a signal.
Infotainment system
Auto Defogging System can be turned
on and off by selecting ‘Setup →
Vehicle Settings → Climate → Defog/
Defrost Options → Auto Defog’ from the
infotainment system screen.
For detailed information, refer to the
separately supplied infotainment
system manual.
Information
• When the air conditioning is turned
on by Auto Defogging System, if you
try to turn off the air conditioning, the
indicator will blink 3 times and the air conditioning will not be turned off.
• To maintain the effectiveness and
efficiency of the Auto Defogging
System, do not select Recirculation mode while the system is operating.
• When Auto Defogging System is operating, fan speed adjustment,
temperature adjustment, and air intake
control selection are all disabled.
NOTICE
Do not remove the sensor cover located
on the upper end of the windshield glass.
Damage to system parts could occur
and may not be covered by your vehicle
warranty.
Auto Dehumidify (if equipped)
To increase cabin air quality and reduce
windshield misting, recirculation mode
switches off automatically after about
5 minutes, depending on the outside
temperature, and the air intake will
change to fresh mode.
Turning Auto Dehumidify ON or OFF
Climate control system
To turn the Auto Dehumidify feature on
or off, select Face level () mode and
touch the air intake control icon at least
five times within three seconds. When
Auto Dehumidify is turned on, the air
intake control button indicator will blink
6 times. When turned off, the indicator will blink 3 times.
Infotainment system
Auto Dehumidify can be turned on and
off by selecting ‘Setup → Vehicle Settings
→ Climate → Automatic Ventilation →
Auto Dehumidify’ from the infotainment
system screen.
Information
If the battery (12V) is discharged or
disconnected, Auto dehumidify settings
will be reset. Readjust the settings to
turning Auto dehumidify option ON or
OFF.
For detailed information, refer to the separately supplied infotainment system manual.
Page 310 of 680

Convenience Features
5-118
Recirculating Air When Washer
Fluid Is Used
Recirculation mode automatically
activates to reduce any objectionable
scent of the washer fluid from entering
the cabin when the windshield washer is used.
Turning Activate upon Washer Fluid
Use ON or OFF
Activate upon Washer Fluid Use can be
turned on and off by selecting ‘Setup →
Vehicle Settings → Climate → Recirculate
Air → Activate upon Washer Fluid Use
(or Interlocking washer fluid)’ from the
infotainment system screen.
For detailed information, refer to the
separately supplied infotainment
system manual.
Auto. Controls That Use Climate
Control Settings (for driver’s
seat)
The temperature of the driver’s seat
warmer, air ventilated seat and heated
steering wheel is automatically
controlled depending on the inside and
outside temperature of the vehicle when
the vehicle is running.
To use these features, it must be
enabled from the Settings menu in the
infotainment system screen. Select: - Setup → Vehicle Settings → Seat →
Heated/Ventilated Features → Heated/
Ventilated Features → Auto. Controls
That Use Climate Control Settings
For more details on Auto Comfort
Control, refer to “Seat Warmers” and
“Air ventilation seats” section in chapter
3 and “Heated Steering Wheel” section
in this chapter.
Smart ventilation
The smart ventilation system maintains
pleasant/fresh air condition inside
the passenger compartment by
automatically detecting/controlling
the temperature and humidity, when
you drive the vehicle with the climate
control system in the OFF position.
When the smart ventilation system
starts to operate, the message “SMART
VENTILATION ON” appears for 5 seconds. • The smart ventilation system stops
operating, when the BLOWER DOWN
OFF button of the climate control
system is selected.
• The smart ventilation system stops
operating, when any button of the
climate control system is selected for
operation.
• The smart ventilation system may not
operate, when the vehicle is driven at
low speed.
Page 325 of 680

05
5-133
VOLUME (VOL + / VOL -) (1) •
Rotate the VOLUME scroll up to
increase volume.
• Rotate the VOLUME scroll down to
decrease volume.
SEEK/PRESET (
/ ) (2)
If the SEEK/PRESET switch is pressed up
or down and held for 0.8 second or more,
it will function in the following modes: •
RADIO mode
It will function as the AUTO SEEK
select button. It will SEEK until you
release the button.
•
MEDIA mode
It will function as the FF/RW button.
If the SEEK/PRESET switch is pressed up
or down, it will function in the following modes: •
RADIO mode
It will function as the PRESET STATION
UP/DOWN button.
•
MEDIA mode
It will function as the TRACK UP/
DOWN button. MODE (3)
Press the MODE button to toggle
through Radio or AUX modes. MUTE (
) (4)
• Press the MUTE(
)button to mute or
activate the sound.
For detailed information, refer to the
separately supplied infotainment
system manual.
Infotainment System
ONE1051091
For detailed information, refer to the
separately supplied infotainment
system manual.