Page 627 of 719
626
uuReplacing Light Bulbs uTaillight and Back-Up Lights
Maintenance
Taillight and Back-Up Lights
Taillights and back-up lights are LED type. Ha ve an authorized Honda dealer inspect
and replace the light assembly.
Rear License Plate Light
Rear license plate light is LED type. Have an authorized Honda dealer inspect and
replace the light assembly.
High-Mount Brake Light
High-mount brake light is LED type. Have an authorized Honda dealer inspect and
replace the light assembly.
Page 630 of 719
629
uuChecking and Maintaining Wiper Blades uChanging the Rear Wiper Blade Rubber
Continued
Maintenance
Changing the Rear Wiper Blade Rubber
1.Raise the wiper arm off.
2. Pivot the bottom end of the wiper blade up
until it comes off from the wiper arm.
3. Slide the blade out of the wiper.
4. Remove the retainers from wiper blade and
mount to a new rubber blade.1Changing the Rear Wiper Blade Rubber
NOTICE
Avoid dropping the wiper arm, as it may damage the
rear window.
Wiper Arm
Blade
Retainer
Page 639 of 719
638
uuChecking and Maintaining Tires uTire Rotation
Maintenance
Tire Rotation
Rotating tires according to the maintena nce messages on the driver information
interface helps to distribute wear more evenly and increase tire life.
■Tires without rotation marks Rotate the tires as shown here.
■Tires with rotation marksRotate the tires as shown here.
1Tire Rotation
Tires with directional trea d patterns should only be
rotated front to back (not fr om one side to the other).
Directional tires should be mounted with the rotation
indication mark facing forward, as shown below.
Whenever tires are rotated, you must calibrate the
TPMS. 2 Tire Pressure Monitoring System (TPMS)
P. 480
Front
Direction Mark
U.S. models
Front
Front
Page 640 of 719

639
uuChecking and Maintaining Tires uWinter Tires
Maintenance
Winter Tires
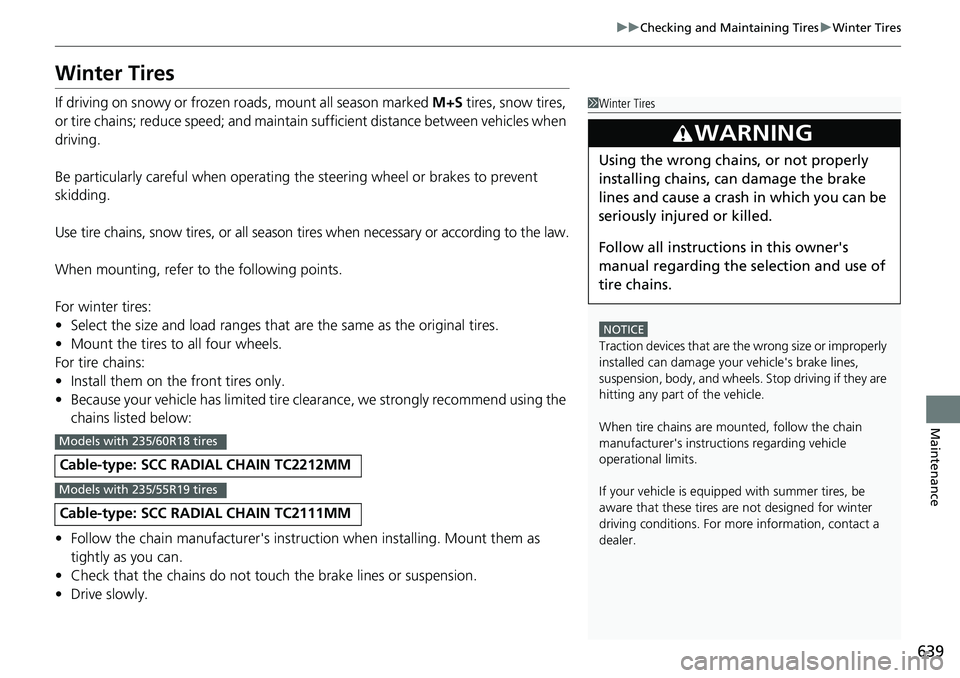
If driving on snowy or frozen roads, mount all season marked M+S tires, snow tires,
or tire chains; reduce speed; and maintain sufficient distance between vehicles when
driving.
Be particularly careful wh en operating the steering wheel or brakes to prevent
skidding.
Use tire chains, snow tires, or all season tires when necessary or according to the law.
When mounting, refer to the following points.
For winter tires:
• Select the size and load ranges that are the same as the original tires.
• Mount the tires to all four wheels.
For tire chains:
• Install them on the front tires only.
• Because your vehicle has limited tire clea rance, we strongly recommend using the
chains listed below:
• Follow the chain manufactur er's instruction when installing. Mount them as
tightly as you can.
• Check that the chains do not touc h the brake lines or suspension.
• Drive slowly.
Cable-type: SCC RADIAL CHAIN TC2212MM
Cable-type: SCC RADIAL CHAIN TC2111MM
1Winter Tires
NOTICE
Traction devices that are the wrong size or improperly
installed can damage your vehicle's brake lines,
suspension, body, and wheels. Stop driving if they are
hitting any part of the vehicle.
When tire chains are mounted, follow the chain
manufacturer's instructi ons regarding vehicle
operational limits.
If your vehicle is equipp ed with summer tires, be
aware that these tires are not designed for winter
driving conditions. For more information, contact a
dealer.
3WARNING
Using the wrong chains, or not properly
installing chains, can damage the brake
lines and cause a crash in which you can be
seriously injured or killed.
Follow all instruction s in this owner's
manual regarding the selection and use of
tire chains.
Models with 235/60R18 tires
Models with 235/55R19 tires
Page 645 of 719

644
Maintenance
Cleaning
Interior Care
Use a damp cloth with a mixture of mild detergent and warm water to remove dirt.
Use a clean cloth to remove detergent residue.
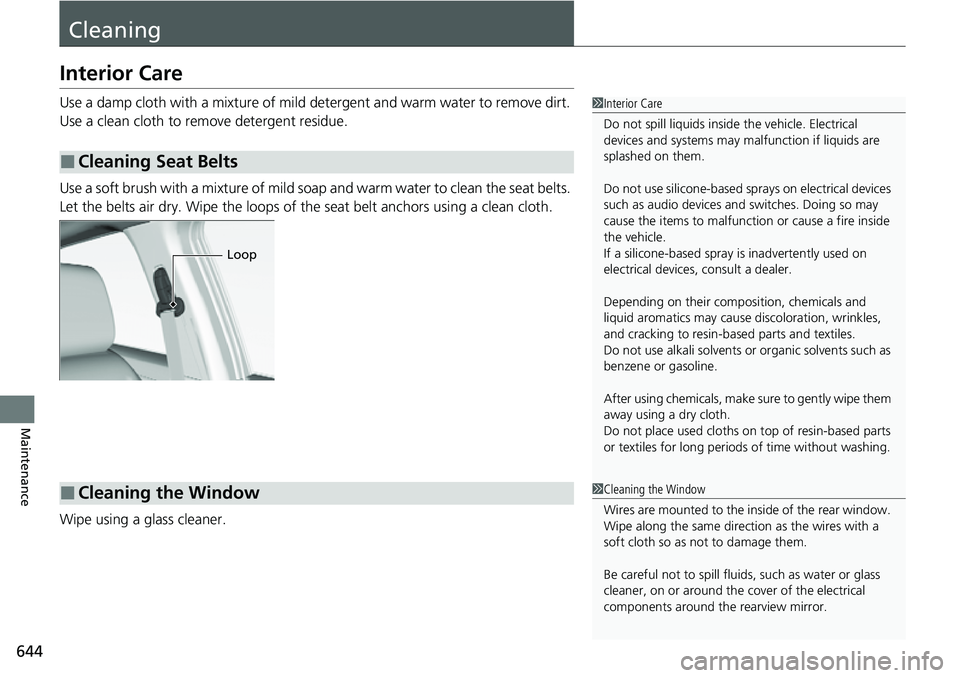
Use a soft brush with a mixture of mild soap and warm water to clean the seat belts.
Let the belts air dry. Wipe the loops of the seat belt anchors using a clean cloth.
Wipe using a glass cleaner.
■Cleaning Seat Belts
1 Interior Care
Do not spill liquids inside the vehicle. Electrical
devices and systems may ma lfunction if liquids are
splashed on them.
Do not use silicone-based sp rays on electrical devices
such as audio devices and switches. Doing so may
cause the items to malfunction or cause a fire inside
the vehicle.
If a silicone-based spray is inadvertently used on
electrical devices, consult a dealer.
Depending on their compos ition, chemicals and
liquid aromatics may cause discoloration, wrinkles,
and cracking to resin-ba sed parts and textiles.
Do not use alkali solvents or organic solvents such as
benzene or gasoline.
After using chemicals, make su re to gently wipe them
away using a dry cloth.
Do not place used cloths on top of resin-based parts
or textiles for long periods of time without washing.
Loop
■Cleaning the Window1Cleaning the Window
Wires are mounted to the in side of the rear window.
Wipe along the same direct ion as the wires with a
soft cloth so as not to damage them.
Be careful not to spill fluids, such as water or glass
cleaner, on or around the cover of the electrical
components around the rearview mirror.
Page 649 of 719

uuCleaning uExterior Care
648
Maintenance
The inside lenses of exterior lights (headli ghts, brake lights, etc.) may fog temporarily
if you have driven in the rain, or after the vehicle has been run through a car wash.
Dew condensation also may build up inside the lenses when there is a significant
enough difference between the ambient and inside lens temperatures (similar to
vehicle windows fogging up in rainy conditions). These conditions are natural
processes, not structural design problems in the exterior lights.
Lens design characteristics may result in mo isture developing on the light lens frame
surfaces. This also is not a malfunction.
However, if you see large amounts of wa ter accumulation, or large water drops
building up inside the lenses, have your vehicle inspected by a dealer.
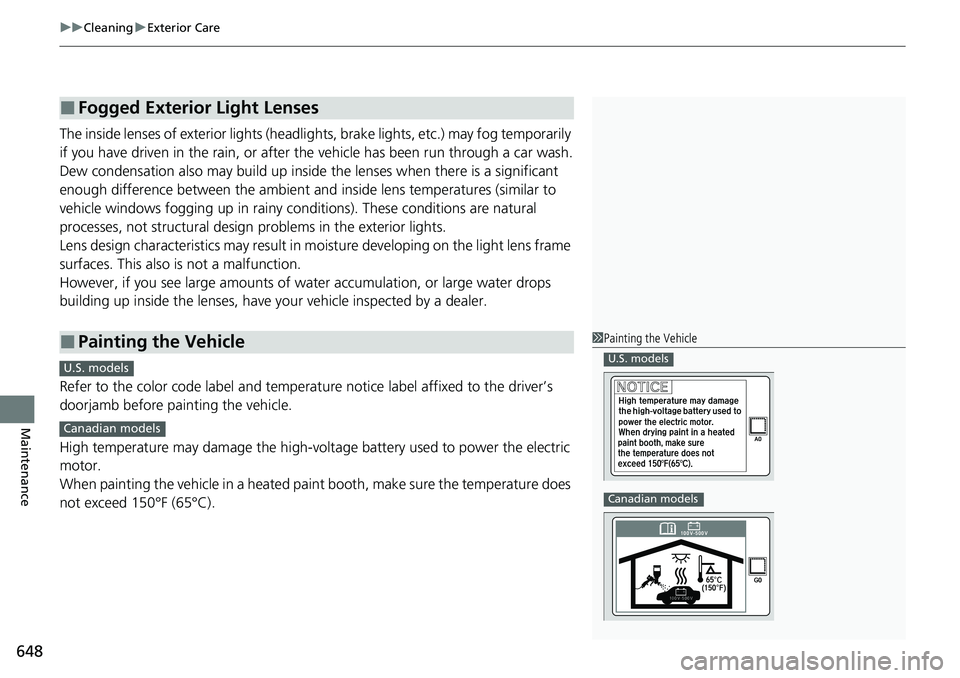
Refer to the color code label and temperat ure notice label affixed to the driver’s
doorjamb before painting the vehicle.
High temperature may damage the high-volt age battery used to power the electric
motor.
When painting the vehicle in a heated paint booth, make sure the temperature does
not exceed 150°F (65°C).
■Fogged Exterior Light Lenses
■Painting the Vehicle1 Painting the Vehicle
U.S. models
Canadian models
C
U.S. models
Canadian models
Page 672 of 719

671Continued
Handling the Unexpected
If the 12-Volt Battery Is Dead
Jump Starting Procedure
Turn off the power to electric devices, such as audio and lights. Turn off the power
system, then open the hood. 1.Open the terminal cover on your vehicle’s
12-volt battery positive + terminal.
2. Connect the first jumper cable to your
vehicle's 12-volt battery + terminal.
3. Connect the other end of the first jumper
cable to the booster battery + terminal.
u Use a 12-volt booster battery only.
u
When using an automotive battery charger
to boost your 12-volt battery, select a
lower charging voltage than 15-volt. Check
the charger manual for the proper setting.
4. Connect the second jumper cable to the
booster battery - terminal.
5. Connect the other end of the second
jumper cable to the engine mounting bolt
as shown. Do not connect this jumper cable
to any other part.
6. If your vehicle is connected to another
vehicle, start the assisting vehicle's engine
and increase its rpm slightly.
7. Attempt to start your ve hicle's engine. If it
turns over slowly, check that the jumper
cables have good metal-to-metal contact.
1 Jump Starting Procedure
Securely attach the jumper cables clips so that they
do not come off when the e ngine vibrates. Be careful
not to tangle the jumper cables or allow the cable
ends to touch each other while attaching or
detaching the jumper cables.
12-volt battery performa nce degrades in cold
conditions and may prevent the engine from starting.
The Vehicle Stability Assist
TM (VSA ®) system, brake
system (Amber), Adaptive Cruise Control (ACC) with
Low Speed Follow, low tire pressure/TPMS
* and
Safety Support indicators may come on along with a
message in the gauge when you set the power mode
to ON after reconnecting the 12-volt battery.
Drive a short distance at more than 12 mph (20 km/h).
Each indicator should go off. If any do not, have your
vehicle checked by a dealer.
3WARNING
A 12-volt battery can explode if you do not
follow the correct procedure, seriously
injuring anyone nearby.
Keep all sparks, open flames, and smoking
materials away from the 12-volt battery.
Booster Battery
* Not available on all models
Page 695 of 719

694
Information
Specifications
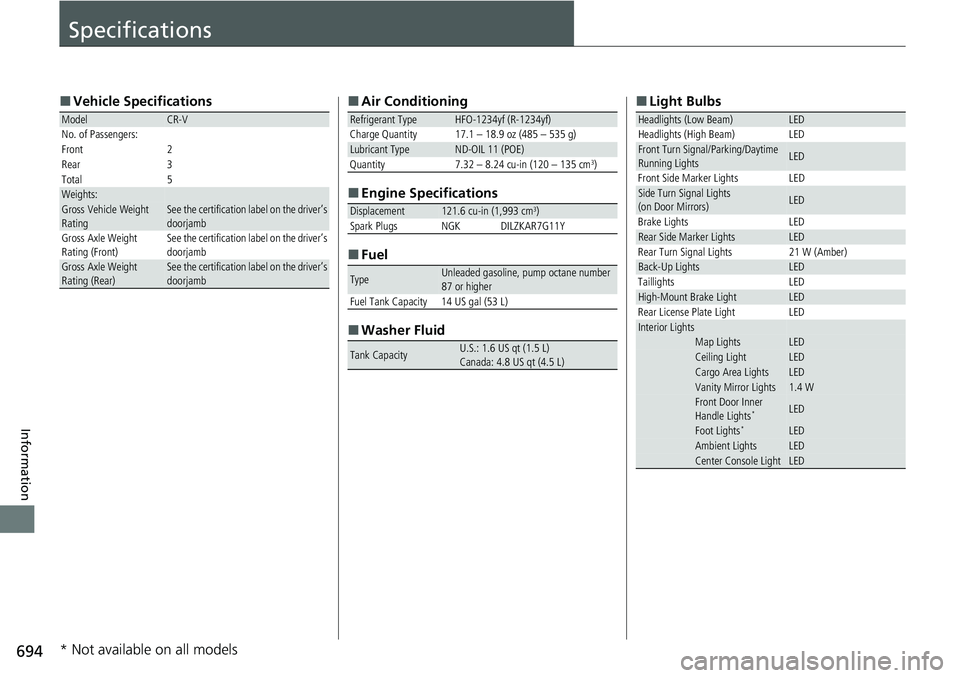
■Vehicle Specifications
ModelCR-V
No. of Passengers:
Front 2
Rear 3
Total 5
Weights:Gross Vehicle Weight
Rating See the certification label on the driver’s
doorjamb
Gross Axle Weight
Rating (Front)See the certification label on the driver’s
doorjamb
Gross Axle Weight
Rating (Rear)See the certification label on the driver’s
doorjamb
■ Air Conditioning
■ Engine Specifications
■ Fuel
■ Washer Fluid
Refrigerant Type HFO-1234yf (R-1234yf)
Charge Quantity 17.1 – 18.9 oz (485 – 535 g)
Lubricant TypeND-OIL 11 (POE)
Quantity 7.32 – 8.24 cu-in (120 – 135 cm3)
Displacement121.6 cu-in (1,993 cm3)Spark PlugsNGKDILZKAR7G11Y
TypeUnleaded gasoline, pump octane number
87 or higher
Fuel Tank Capacity 14 US gal (53 L)
Tank CapacityU.S.: 1.6 US qt (1.5 L)
Canada: 4.8 US qt (4.5 L)
■ Light Bulbs
Headlights (Low Beam)LEDHeadlights (High Beam)LEDFront Turn Signal/Parking/Daytime
Running LightsLED
Front Side Marker Lights LED
Side Turn Signal Lights
(on Door Mirrors)LED
Brake Lights LED
Rear Side Marker LightsLED
Rear Turn Signal Lights 21 W (Amber)
Back-Up LightsLED
Taillights LED
High-Mount Brake LightLED
Rear License Plate Light LED
Interior LightsMap LightsLEDCeiling LightLEDCargo Area LightsLEDVanity Mirror Lights1.4 WFront Door Inner
Handle Lights*LED
Foot Lights*LEDAmbient LightsLEDCenter Console LightLED
* Not available on all models