Page 115 of 719

114
Instrument Panel
Gauges and Driver Information Interface
Gauges
Gauges include the speedometer, fuel gauge, and other related indicators.
They are displayed when the power mode is in ON.
Displays your driving speed in mph or km/h.
Displays the amount of fuel left in the fuel tank.
Shows the total number of miles or kilome ters that your vehicle has accumulated.
Shows the output of the electric motor.
Shows the degree to which the High Voltage battery is being charged.
When the deceleration paddle selector is being used, it shows the strength of
deceleration.
■Speedometer
■Fuel Gauge
■Odometer
■POWER Gauge
■CHARGE/DECEL Gauge
1 Speedometer
You can change the Speed/Distance units.
2 No Content P. 132
2 Settings
* P. 135
2 Customized Features P. 376
1Fuel Gauge
NOTICE
You should refuel when the reading approaches .
Running out of fuel can cause the engine to misfire,
damaging the cata lytic converter.
The actual amount of remain ing fuel may differ from
the fuel gauge reading.E
* Not available on all models
Page 120 of 719

Continued119
uuGauges and Driver Information Interface uDriver Information Interface
Instrument Panel
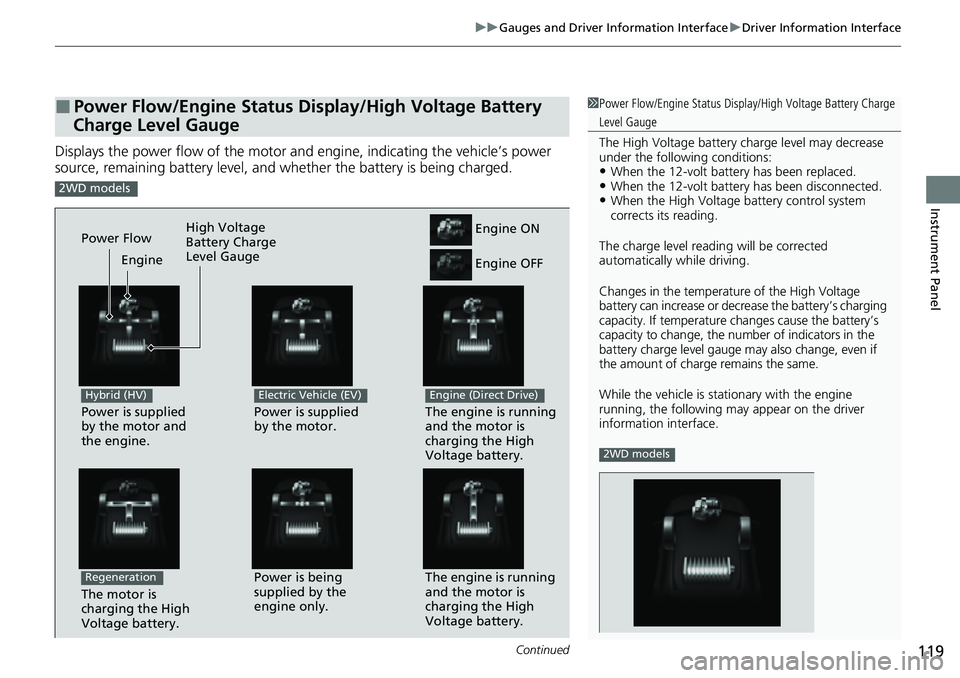
Displays the power flow of the motor an d engine, indicating the vehicle’s power
source, remaining battery level, and whether the battery is being charged.
■Power Flow/Engine Status Display/High Voltage Battery
Charge Level Gauge1 Power Flow/Engine Status Display/High Voltage Battery Charge
Level Gauge
The High Voltage battery ch arge level may decrease
under the following conditions:
•When the 12-volt batter y has been replaced.•When the 12-volt battery has been disconnected.•When the High Voltage battery control system
corrects its reading.
The charge level readin g will be corrected
automatically while driving.
Changes in the temperatur e of the High Voltage
battery can increase or decrease the battery’s charging
capacity. If temperature ch anges cause the battery’s
capacity to change, the num ber of indicators in the
battery charge level gauge may also change, even if
the amount of charge remains the same.
While the vehicle is stat ionary with the engine
running, the following ma y appear on the driver
information interface.
2WD models
2WD models
Power is supplied
by the motor and
the engine.
Hybrid (HV)
The engine is running
and the motor is
charging the High
Voltage battery.Power is being
supplied by the
engine only.
Engine ON
Engine OFF
Power is supplied
by the motor.
Electric Vehicle (EV)
The engine is running
and the motor is
charging the High
Voltage battery.
Engine (Direct Drive)
Power Flow Engine
The motor is
charging the High
Voltage battery.
Regeneration
High Voltage
Battery Charge
Level Gauge
Page 130 of 719
129
uuGauges and Driver Information Interface uDriver Information Interface
Continued
Instrument Panel
The indicators on the display show the
amount of torque being transferred to the
right front, left front, right rear, and left rear
wheels.
2 Real Time AWD with Intelligent Control
SystemTM* P. 479
■AWD Torque Distribution Monitor*
* Not available on all models
Page 194 of 719

193
uuOperating the Switches Around the Steering Wheel uAuto High-Beam
Continued
Controls
Auto High-Beam
The front sensor camera detects the light sources ahead of the vehicle such as the
lights of a preceding or oncoming vehicle, or street lights. When you are driving at
night, the system automatically switches the headlights between low beam and high
beam depending on the situation.
■Activating the system
When all of the following conditions have been met, the auto high-beam indicator
comes on and between the high beam and low beam switches automatically
depending on the situation. •The power mode is in ON.
• The light switch is in AUTO.
• The lever is in the low beam position.
• The headlights have been automatically
activated.
• It is dark outside the vehicle.
If the auto high-beam indica tor does not come on even when all the conditions have
been met, carry out either of the procedures below and the indicator will come on.
• Pull the lever towards you and release it.
• Turn the light switch to th en turn the light switch to AUTO.
■How to Use the Auto High-Beam
1Auto High-Beam
The auto high-beam system does not always operate
in every situation. This syst em is just for assisting the
driver. Always observe your surroundings and switch
the headlights between high beam and low beam
manually if necessary.
If you find the timing of beam changes inconvenient
for driving, change the headlight beams manually.
The range and the distance at which the camera can
recognize varies de pending on conditions
surrounding your vehicle.
Regarding the handling of the camera mounted to
the inside of the windshiel d, refer to the following.
2 Front Sensor Camera P. 568
For the auto high-beam to work properly:
•Do not place an object that reflects light on the
dashboard.
•Keep the windshield around the camera clean.
•When cleaning the windshield, be careful not to
apply the windshield cleans er to the camera lens.
•Do not attach an object, sticker or film to the area
around the camera.
•Do not touch the camera lens.
If the camera receives a st rong impact, or repairing of
the area near the camera is required, consult a dealer.
Light Switch
Auto High-Beam
Indicator
Page 198 of 719

Continued197
uuOperating the Switches Around the Steering Wheel uWipers and Washers
Controls
When you push the lever down to AUTO, the
windshield wipers sweep once, and go into
the automatic mode.
The wipers operate intermittently, at low
speed, or at high speed and stop in
accordance with the amount of rainfall the
rainfall sensor detects.
■AUTO sensitivity adjustment
When the wiper function is set to AUTO, you
can adjust the sensitivity of the rainfall sensor
(using the adjustment ring) so that wipers will
operate in accordance with your preference.
Sensor sensitivity
■Automatic Intermittent Wipers*1 Wipers and Washers
The wiper motor may stop motor operation
temporarily to prevent an overload. Wiper operation
will return to normal within a few minutes.
Adjustment Ring
1 Automatic Intermittent Wipers*
The rainfall sensor is in the location shown below.
NOTICE
AUTO should always be turned OFF before the
following situations in order to prevent severe
damage to the wiper system:
•Cleaning the windshield
•Driving through a car wash
•No rain present
Rainfall Sensor
Low sensitivity
High sensitivity
* Not available on all models
Page 199 of 719

198
uuOperating the Switches Around the Steering Wheel uWipers and Washers
Controls
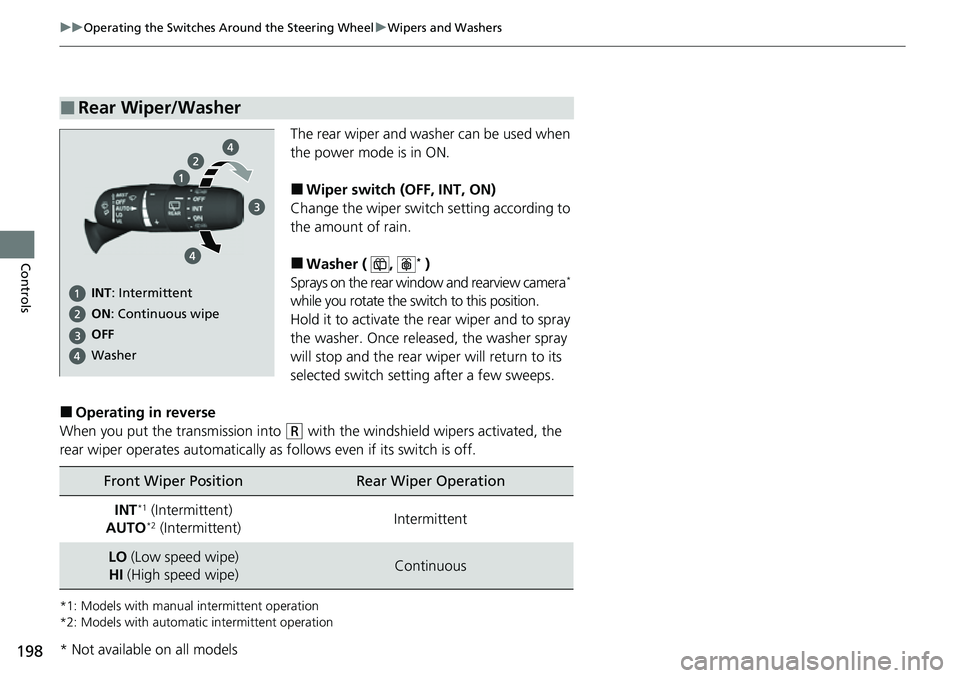
The rear wiper and washer can be used when
the power mode is in ON.
■Wiper switch (OFF, INT, ON)
Change the wiper switch setting according to
the amount of rain.
■Washer ( , * )
Sprays on the rear window and rearview camera*
while you rotate the switch to this position.
Hold it to activate the rear wiper and to spray
the washer. Once released, the washer spray
will stop and the rear wi per will return to its
selected switch setting after a few sweeps.
■Operating in reverse
When you put the transmission into
(R with the windshield wipers activated, the
rear wiper operates automatically as follows even if its switch is off.
*1: Models with manual intermittent operation
*2: Models with automati c intermittent operation
■Rear Wiper/Washer
INT: Intermittent
OFF ON : Continuous wipe
Washer
Front Wiper PositionRear Wiper Operation
INT*1 (Intermittent)
AUTO*2 (Intermittent)Intermittent
LO (Low speed wipe)
HI (High speed wipe)Continuous
* Not available on all models
Page 248 of 719
247
uuAudio System Basic Operation uAdjusting the Sound
Features
Adjusting the Sound
1. Select an audio source.
2. Press the MENU button.
3. Select Sound Settings .
Select an item from the following choices:
• Bass / Treble: Bass, Midrange, Treble
• Balance / Fader: Balance, Fader
• Speed Volume Compensation: Sets the
amount of volume increase.1 Adjusting the Sound
The Speed Volume Compensation (SVC) adjusts the
volume level based on the vehicle speed. As you go
faster, audio volume increa ses. As you slow down,
audio volume decreases.
Page 291 of 719

290
uuAudio System Basic Operation uAdjusting the Sound
Features
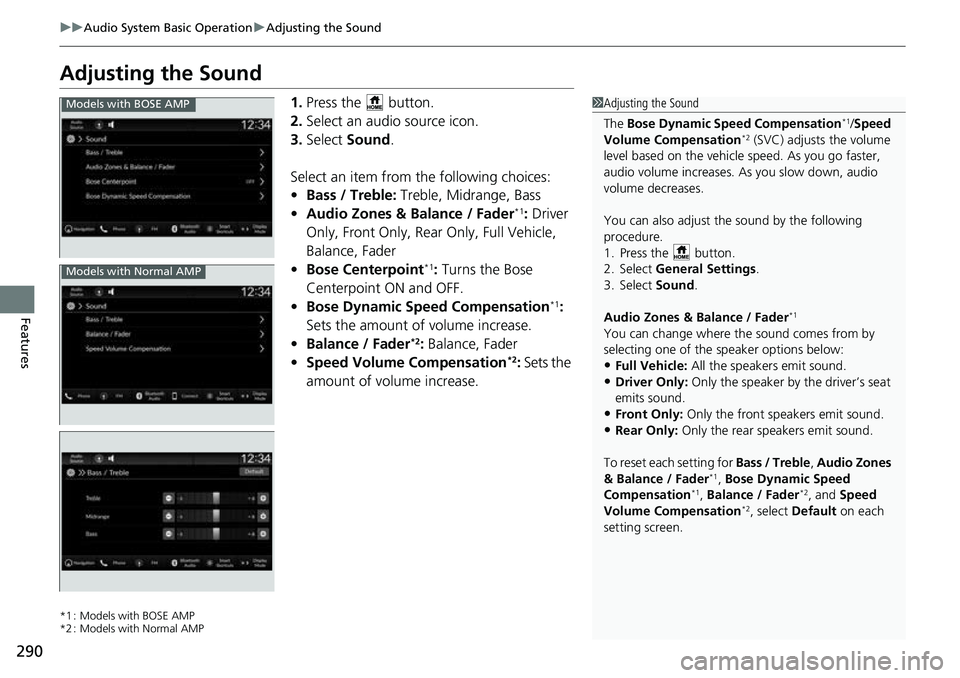
Adjusting the Sound
1. Press the button.
2. Select an audio source icon.
3. Select Sound.
Select an item from the following choices:
• Bass / Treble: Treble, Midrange, Bass
• Audio Zones & Balance / Fader
*1: Driver
Only, Front Only, Rear Only, Full Vehicle,
Balance, Fader
• Bose Centerpoint
*1: Turns the Bose
Centerpoint ON and OFF.
• Bose Dynamic Speed Compensation
*1:
Sets the amount of volume increase.
• Balance / Fader
*2: Balance, Fader
• Speed Volume Compensation*2: Sets the
amount of volume increase.
*1 : Models with BOSE AMP
*2 : Models with Normal AMP
1 Adjusting the Sound
The Bose Dynamic Speed Compensation
*1/Speed
Volume Compensation*2 (SVC) adjusts the volume
level based on the vehicle speed. As you go faster,
audio volume increases. As you slow down, audio
volume decreases.
You can also adjust the sound by the following
procedure.
1. Press the button.
2. Select General Settings .
3. Select Sound .
Audio Zones & Balance / Fader
*1
You can change where the sound comes from by
selecting one of the speaker options below:
•Full Vehicle: All the speakers emit sound.
•Driver Only: Only the speaker by the driver’s seat
emits sound.
•Front Only: Only the front speakers emit sound.
•Rear Only: Only the rear speakers emit sound.
To reset each setting for Bass / Treble , Audio Zones
& Balance / Fader
*1, Bose Dynamic Speed
Compensation*1, Balance / Fader*2, and Speed
Volume Compensation*2, select Default on each
setting screen.
Models with BOSE AMP
Models with BOSE AMPModels with Normal AMP