2023 HONDA CRV oil pressure
[x] Cancel search: oil pressurePage 38 of 719

37
Quick Reference Guide
Maintenance (P599)
Under the Hood (P611)
●Check engine oil, engine coolant, and windshield washer
fluid. Add when necessary.
●Check brake fluid.●Check the 12-volt battery condition monthly.
aPull the hood release handle under the driver's side lower corner
of the dashboard.
bLocate the hood latch lever, push it to the side, and then
raise the hood. Once you have raised the hood slightly, you
can release the lever.
cWhen finished, close the hood and make sure it is firmly
locked in place.
Lights (P623)
●Inspect all lights regularly.
Wiper Blades (P627)
●Replace blades if they leave streaks
across the windshield or become noisy.
Tires (P631)
●Inspect tires and wheels regularly.●Check tire pressures regularly.●Install snow tires for winter
driving.
Page 118 of 719

117
uuGauges and Driver Information Interface uDriver Information Interface
Continued
Instrument Panel
Driver Information Interface
The driver information interface shows information such as the estimated travelable
distance and fuel economy of the vehicle. It also displays messages such as warnings
and other helpful information.
When a warning message displays, please check the message and contact a dealer
to have the vehicle inspected if necessary. Please refer to the pages below if the
Engine oil pressure low, Engine temperature too hot or Limited stopping
power! message is displayed.
2If the Engine oil pressure low Warning Appears P. 676
2 Overheating P. 674
2 If the Limited stopping power Warning Appears P. 677
Press the (home) button, then roll the left selector wheel to scroll to the content
you want to see. Press the left sele ctor wheel to see detailed information.
■Switching the Display1Switching the Display
You can add or delete the meter contents.
2 Gauge Display Settings P. 134
Page 459 of 719

uuWhen Driving uTurning on the Power
458
Driving
If the power system is not turned on, exterior
lights will not flash.
u Go within the rang e, and try again.
The power system is on for up to 10 minutes without you starting the vehicle.
To extend the time for another 10 minute s during the first 10 minutes, press the
button, then press and hold the button.
u Some exterior lights flash six times if a 10-minute extension request was
transmitted successfully.1Remote Engine Start
The power system may not be turned on by the
remote engine start if:
•You have disabled a remo te engine start setting.
2 Settings* P. 135
2 Customized Features P. 376
•The power mode is not in VEHICLE OFF.•The transmission is in a position other than (P.
•The hood is open, or any door or the tailgate is
unlocked.
•You have already used the remote twice to turn the
power system on.
•Another registered keyless remote is in the vehicle.•There is any antenna failure.
•The door is unlocked with the built-in key.
•The engine oil pressure is low.•The engine coolant temper ature is extremely high.
•The telematics unit* malfunctions.
•The security system alarm is not set.•The 12-volt battery charge is too low.
* Not available on all models
Page 460 of 719

Continued459
uuWhen Driving uTurning on the Power
Driving
■To turn the power system off
Press and hold the button for one
second.
If the power system is turned off successfully,
the exterior lights flash once.
When the remote is out of the keyless access
system range, the exteri or lights will not flash.
The power system will not be turned off. u Go within the range, and try again.1Remote Engine Start
The power system may be turned off while it is on if:
•You do not start the vehicl e within 10 minutes of
turning the power system on with the keyless
remote.
•The power system is turned off by using the keyless
remote.
•The security system alarm is not set.•The door is unlocked with the built-in key.
•The hood is open, or any door, or the tailgate is
unlocked.
•You press the shift lever release button.
•The engine coolant temper ature is extremely high.
•The 12-volt battery is low.•The engine oil pressure is low.
•The malfunction indicator la mp comes on if there is
a problem with the emissions control systems.
While the power system is on, the vehicle will
automatically preconditi on inside the vehicle.
When it is warm outside:
•The climate control system is activated in
recirculation mode.
When it is cold outside:
•The defroster is activated at a moderately warm
temperature.
•The rear defogger, heated door mirrors, seat
heaters and heated steering wheel* are activated.
2 Rear Defogger/Heated Door Mirror
Button P. 199
2 Heated Steering Wheel
* P. 229
2 Front Seat Heaters P. 230
* Not available on all models
Page 599 of 719
598
Driving
Fuel Economy and CO2 Emissions
Improving Fuel Economy and Reducing CO2
Emissions
Achieving fuel economy and reducing CO2 emissions is dependent on several
factors, including driving conditions, load weight, idling time, driving habits, and
vehicle condition. Depending on these and other factors, you may not achieve the
rated fuel economy of this vehicle.
You can optimize your fuel economy with proper maintenance of your vehicle.
Always maintain your vehicle in accord ance with the messages displayed on the
driver information interface.
• Use engine oil with the viscosity recommended.
2 Recommended Engine Oil P. 613
•Maintain the specified tire pressure.
• Do not load the vehicl e with excess cargo.
• Keep your vehicle clean. A buildup of snow or mud on your vehicle's underside
adds weight and increases wind resistance.
■Maintenance and Fuel Economy
1Improving Fuel Economy and Reducing CO2 Emissions
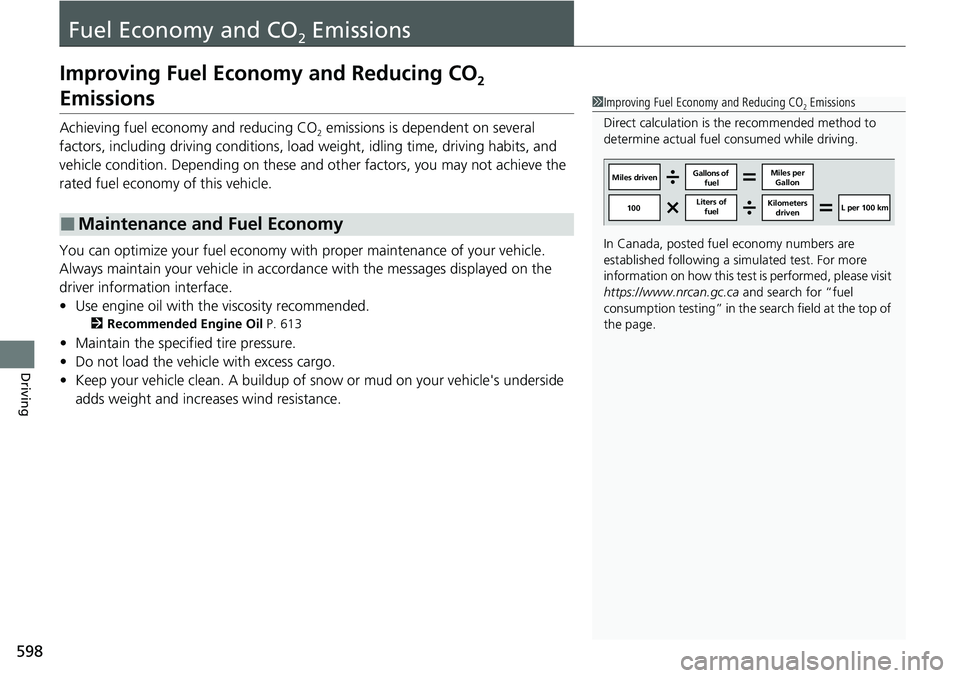
Direct calculation is the recommended method to
determine actual fuel consumed while driving.
In Canada, posted fuel economy numbers are
established following a simulated test. For more
information on how this test is performed, please visit
https://www.nrcan.gc.ca and search for “fuel
consumption testing” in the search field at the top of
the page.
Miles driven Gallons of
fuel Miles per
Gallon
100 Liters of
fuel Kilometers
driven L per 100 km
Page 601 of 719
600
Maintenance
Before Performing Maintenance
Inspection and Maintenance
For your safety, perform all listed inspections and maintenance to keep your vehicle
in good condition. If you become aware of an y abnormality (noise, smell, insufficient
brake fluid, oil residue on the ground, etc.), have your vehicle inspected by a dealer.
(Note, however, that service at a dealer is not mandatory to keep your warranties in
effect.)
■Routine inspections
Perform inspections before long distance tri ps, when washing the vehicle, or when
refueling.
2 Maintenance P. 37
■Periodic inspections
• Check the brake fluid level monthly.
2 Checking the Brake Fluid P. 621
•Check the tire pressure monthly. Examin e the tread for wear and foreign objects.
2Checking and Maintaining Tires P. 631
•Check the operation of the exterior lights monthly.
2 Replacing Light Bulbs P. 623
•Check the condition of the wiper bl ades at least every six months.
2Checking and Maintaining Wiper Blades P. 627
■Types of Inspection and Maintenance
1Inspection and Maintenance
Maintenance, replacement, or repair of
emissions control devices and systems may be
done by any automotive repair establishment or
individuals using parts that are “certified” to
EPA standards.
According to state and fede ral regulations, failure to
perform maintenance on the maintenance main
items marked with # will not void your emissions
warranties. However, all ma intenance services should
be performed in accordan ce with the intervals
indicated by the driver information interface.
2 Maintenance Service Items P. 607
If you want to perform complex maintenance tasks
that require more skills a nd tools, you can purchase a
subscription to the Service Express website at
www.techinfo.honda.com .
2 Authorized Manuals P. 704
If you want to perform ma intenance yourself, make
sure that you have the necessary tools and skills first.
After performing maintenanc e, update the records in
the separate maintenance booklet.
U.S. models
Page 618 of 719

617
uuMaintenance Under the Hood uChanging the Engine Oil and Oil Filter
Maintenance
5. Remove the oil filter and dispose of the
remaining oil.
6. Check that the filter gasket is not stuck to
the engine contact surface.
u If it is stuck, you must detach it.
7. Wipe away dirt and dust adhering to the
contact surface of the engine block, and
install a new oil filter.
u Apply a light coat of new engine oil to
the filter gasket.
8. Put a new washer on the drain bolt, then
reinstall the drain bolt.
u Tightening torque:
30 lbf∙ft (40 N∙m, 4.0 kgf∙m)
9. Pour the recommended engine oil into the
engine.
u Engine oil change capacity (including filter):
4.2 US qt (4.0 L)
10. Reinstall the engine oil fill cap securely and
start the engine.
11. Run the engine for a few minutes, and
then check that there is no leak from the
drain bolt or oil filter.
12. Stop the engine, wait for three minutes,
and then check the oil level on the
dipstick.
u If necessary, add more engine oil.
13. Reinstall the under cover in the same order
it was removed.1Changing the Engine Oil and Oil Filter
You will need a special wrench to replace the oil
filter. You can buy this wrench from a dealer.
When installing the new oil filter, follow the
instructions supplied with the oil filter.
Reinstall the engine oil fill cap. Start the engine. If the
Engine oil pressure low warning appears, turn off
the engine, and check your work.
Oil Filter
Page 652 of 719

651
Handling the Unexpected
This chapter explains how to handle unexpected troubles.
ToolsTypes of Tools .................................. 652
If a Tire Goes Flat
Temporarily Repairi ng a Flat Tire....... 653
Handling of the Jack ......................... 666
Power System Won’t Start Checking the Procedure ................... 667
If the Keyless Remote Battery is Weak ... 668Emergency Power System On ........... 669
Emergency Power System Off........... 670
If the 12-Volt Battery Is Dead .......... 671
Shift Lever Does Not Move .............. 673
Overheating How to Handle Overheating ............. 674 Indicator, Coming On/Blinking
If the Engine oil pressure low Warning Appears ......................................... 676
If the 12-Volt Battery Charging System Indicator Comes On ....................... 677
If the Limited stopping power Warning
Appears ......................................... 677
If the Malfunction Indicator Lamp Comes On or Blinks ................................... 678
If the Brake System Indicator (Red) Comes On or Blinks ................................... 679
If the Brake System Indicator (Red) Comes On
or Blinks at the Same Time When the Brake
System Indicator (Amber) Comes On.... 680
If the Electric Power Steering (EPS) System
Indicator Comes On ....................... 681
If the Low Tire Pressure/TPMS Indicator Comes On or Blinks ....................... 682
Fuses Fuse Locations ................................. 683
Inspecting and Changing Fuses ........ 687
Emergency Towing ........................... 689
If You Cannot Unlock the Fuel Fill Door... 690If You Cannot Open the Tailgate.......... 691Refueling................................................. 692
U.S. models